本文主要是介绍基于RASC的keil电子时钟制作(瑞萨RA)(11)----电容触摸配置,希望对大家解决编程问题提供一定的参考价值,需要的开发者们随着小编来一起学习吧!
基于RASC的keil电子时钟制作11_电容触摸配置
- 概述
- 硬件准备
- 视频教程
- 添加TOUCH驱动
- e2studio配置CapTouch
- e2studio开启调优界面
- e2studio启动 CapTouch 调优
- e2studio判断电容触摸是否按下
- 将QE文件复制到Keil
- 阈值修改
- 触摸电容功能实现
- 主函数
)
概述
这篇文档将创建一个使用 e2 studio 集成 QE 的电容式触摸应用示例移植到keil。
硬件准备
首先需要准备一个开发板,这里我准备的是芯片型号R7FA2E1A72DFL的开发板:
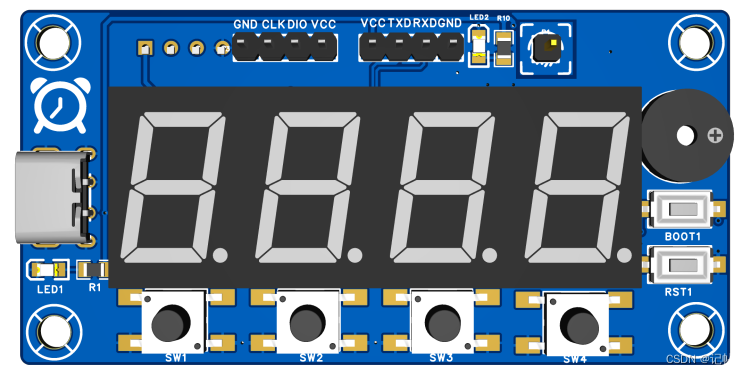
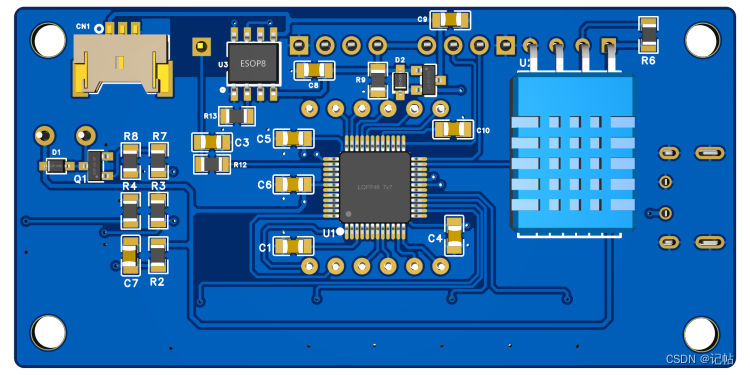
视频教程
https://www.bilibili.com/video/BV1Xu4y117FC/
基于RASC的keil电子时钟制作(瑞萨RA)----(11)电容触摸配置
添加TOUCH驱动
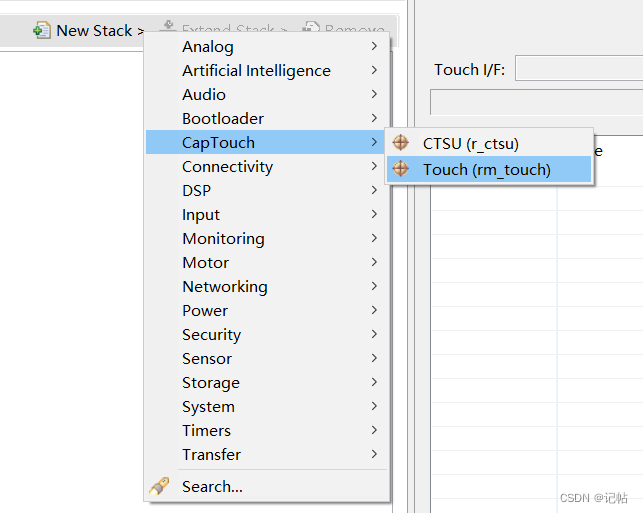
通过点击New Stack->CapTouch->Touch添加触摸组件。
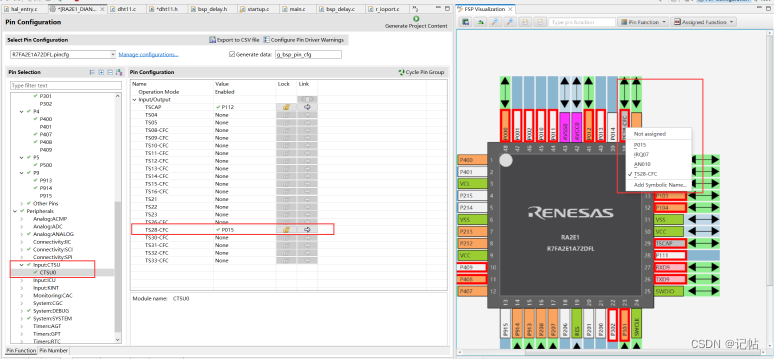
板子上的触摸io为P015。
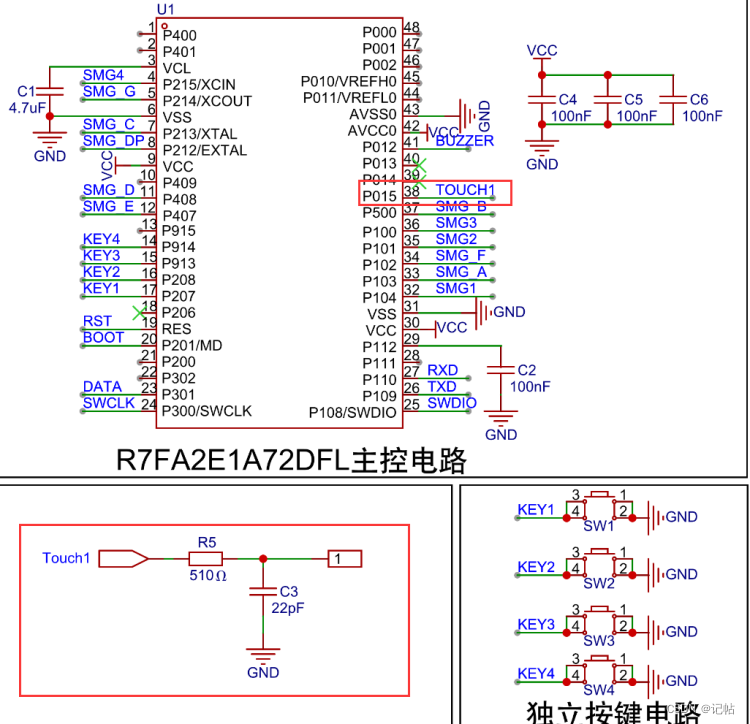
配置GPIO为触摸电容模式。
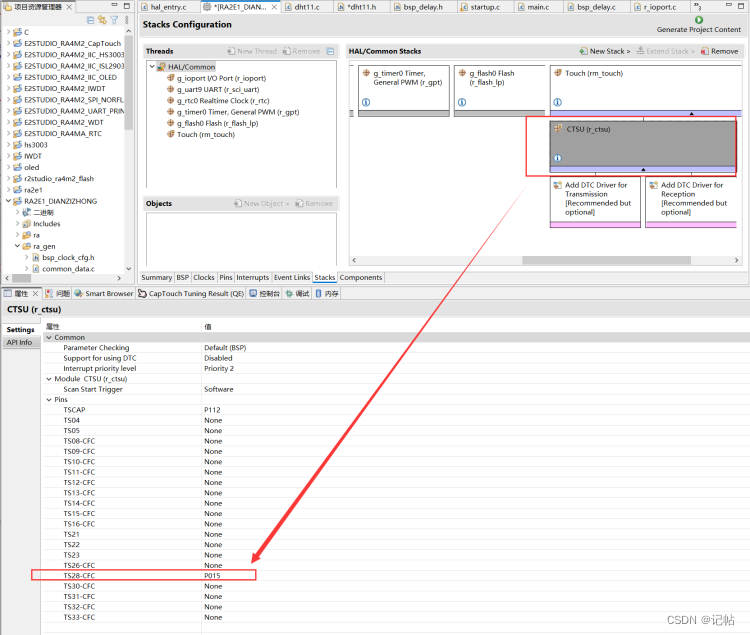
配置完毕之后在TOUCH组件内会同步显示。
e2studio配置CapTouch
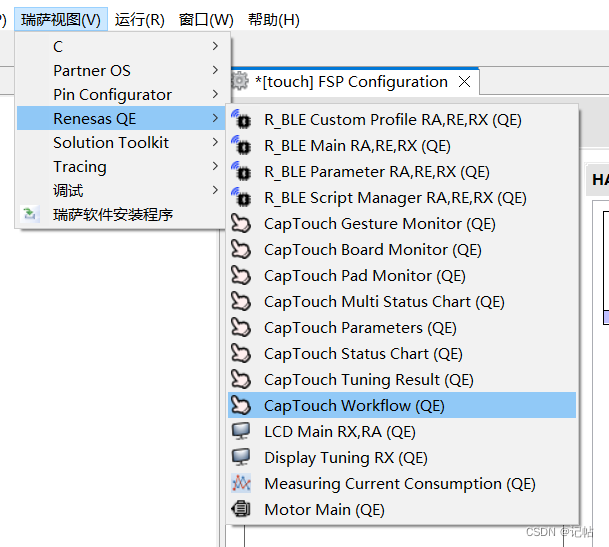
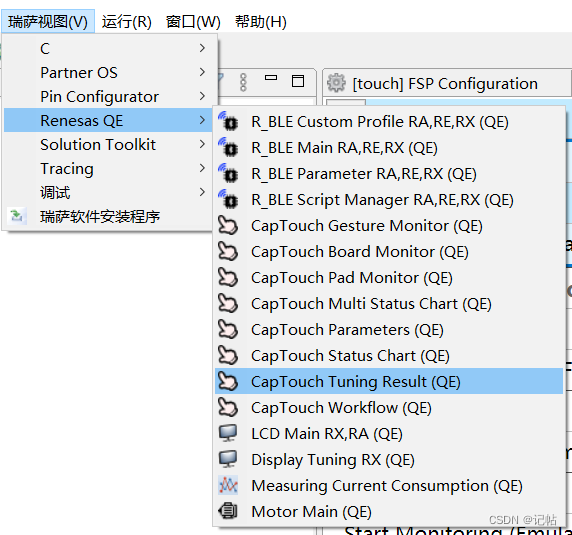
从e2 studio的菜单中,选择瑞萨视图 > Renesas QE > CapTouch Workflow (QE)打开配置电容触摸的主要视角。
打开后可以看到具体的配置流程。
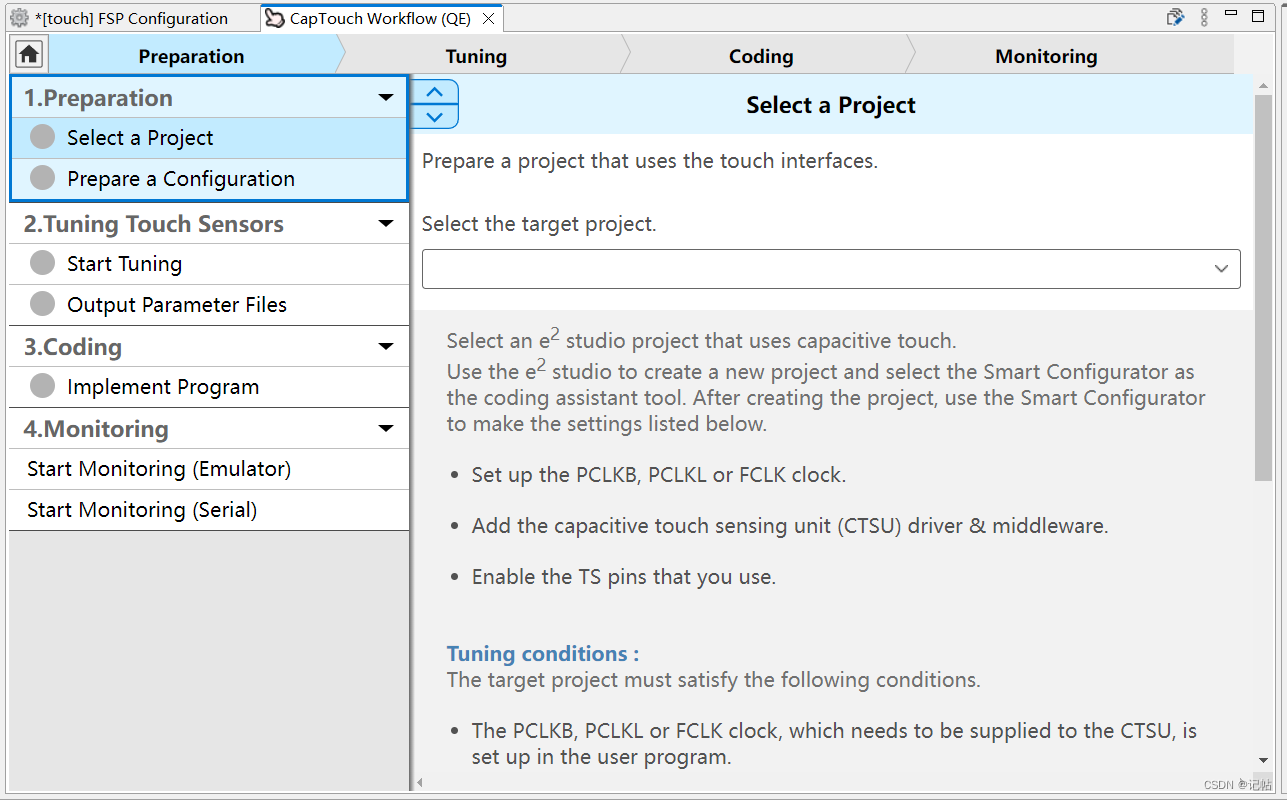
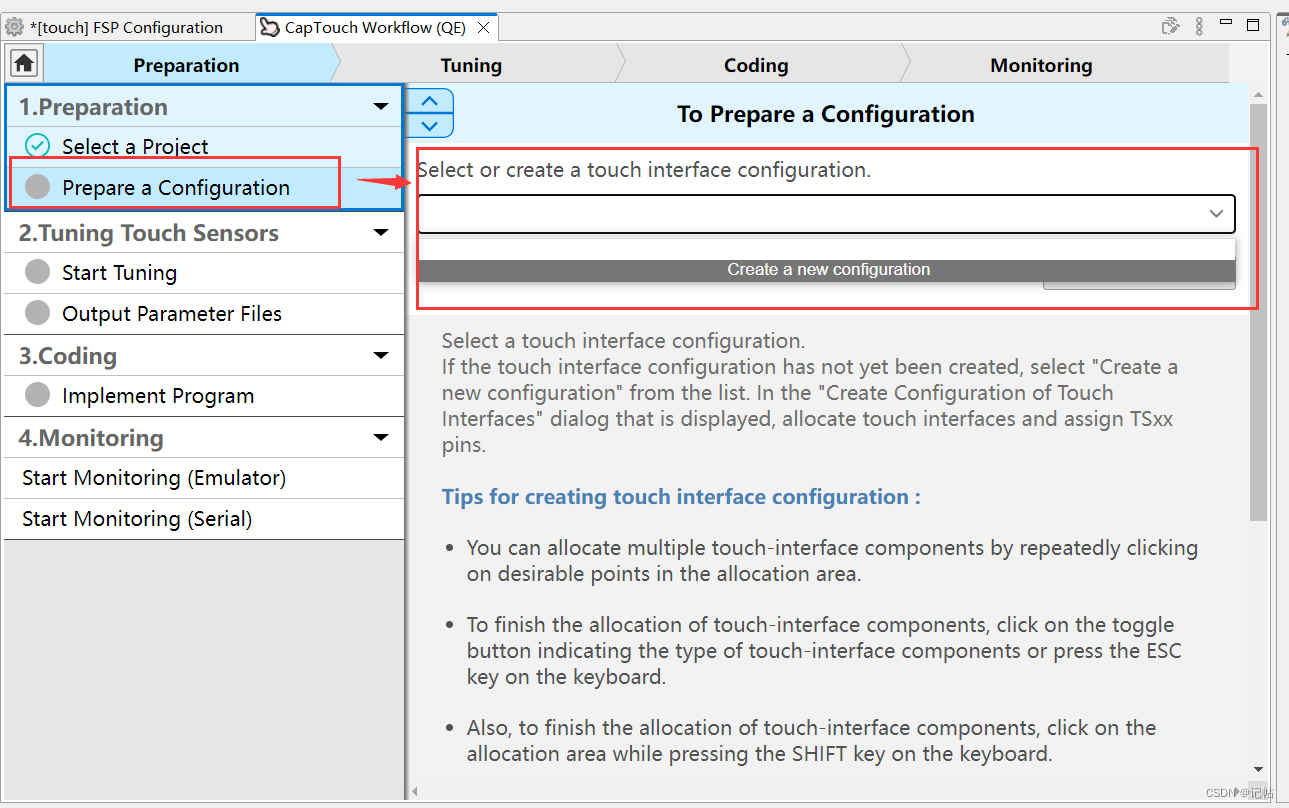
在 CapTouch Workflow (QE)窗格中,首先需要选择需要配置的电容触摸项目,如下所示。


执行“准备配置” , 通过使用下拉菜单并选择Create a newconfiguration创建一个新的Touch配置。
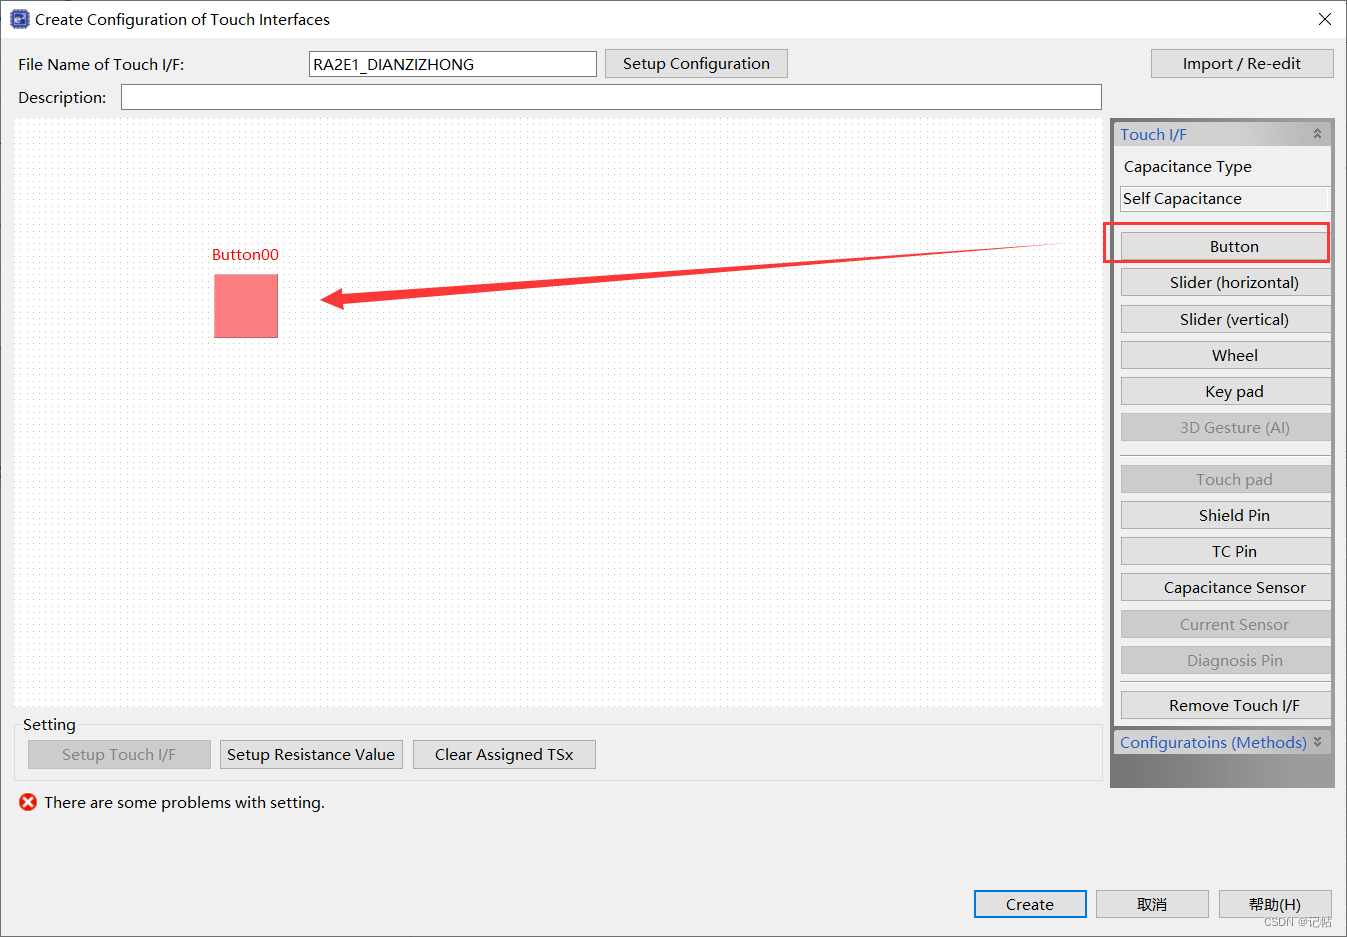
可以通过Button添加电容触摸按钮,具体流程如下所示。
1.从右侧选择Button菜单项并将鼠标移动到画布上。
2.点击鼠标左键来放下按钮图标。开发板上有2个电容触摸按钮,可以添加两个按钮。
3.两个按钮添加完成后,按侧选择Button菜单可以退出放置。
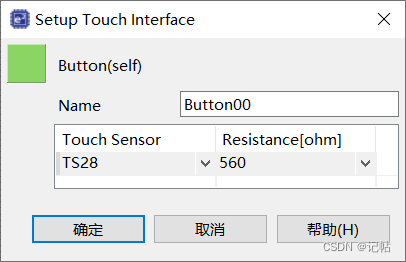
双击按钮,配置具体的电容触摸按键管脚。
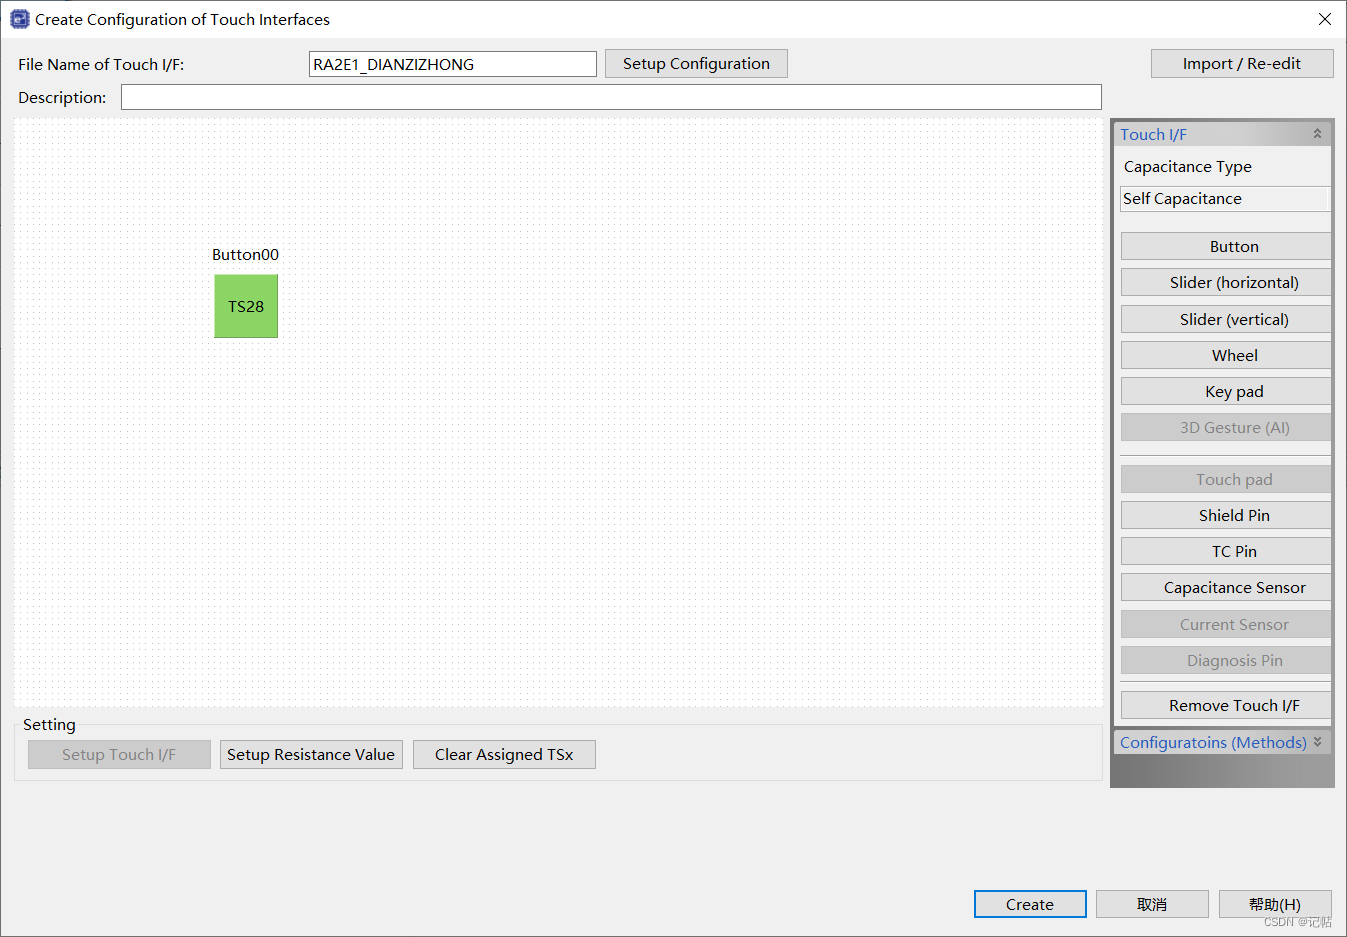
配置完毕之后,可以看到警告已经消失,同时按键变为绿色。
e2studio开启调优界面
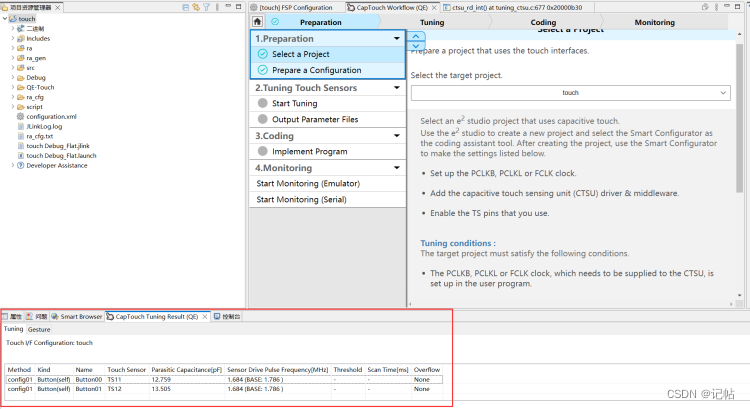
点击瑞萨视图-> Renesas QE-> CapTouch Tuning Result,将在主视图窗格中显示触摸界面的配置。
e2studio启动 CapTouch 调优
要启动自动调优过程,请单击start tuning按钮。
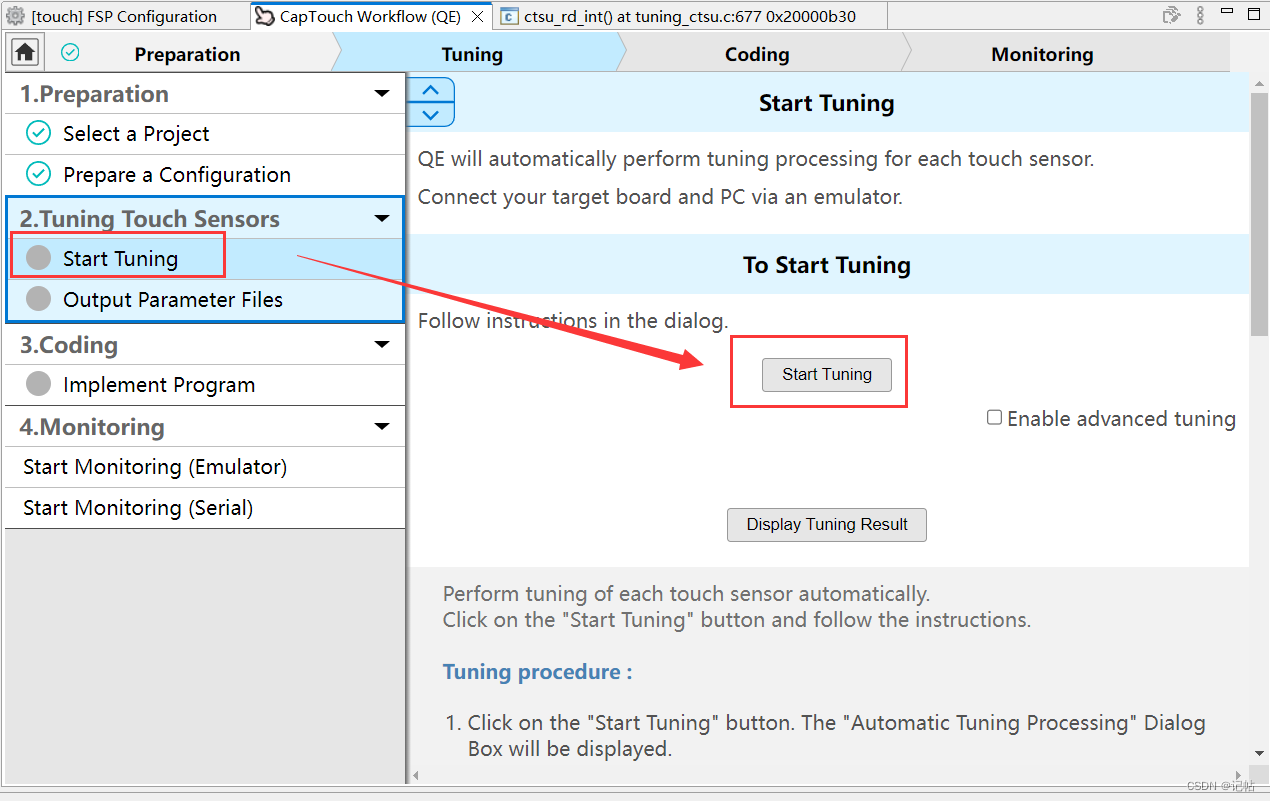
需要注意要链接上开发板。
电容式触控自动匹配的QE现在开始,请仔细阅读调优对话框窗口,因为它们将指导您完成调优过程。下面显示了一个示例屏幕。

经过几个自动步骤后,您将到达对话框,其中包含如下所示的信息。
这是调谐过程的触摸灵敏度测量步骤。在对话框中显示的传感器上按下正常的触摸压力。

当你按下时,条形图将向右增加,触摸计数将以数字形式上升。在保持压力的同时,按下电脑键盘上的任意按键来接受测量值。

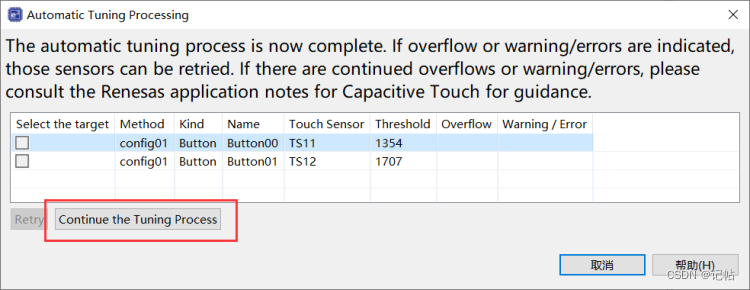
完成后,您将看到如下所示的图片,这是中间件用来确定Touch事件是否发生的检测阈值。
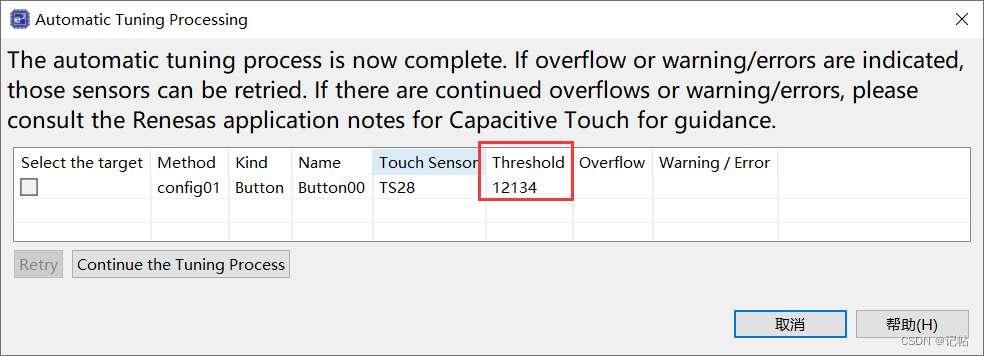
点击对话框中的“Continue the Tuning Process(继续调整过程)”按钮。这将退出调整过程并断开与目标上的调试会话。
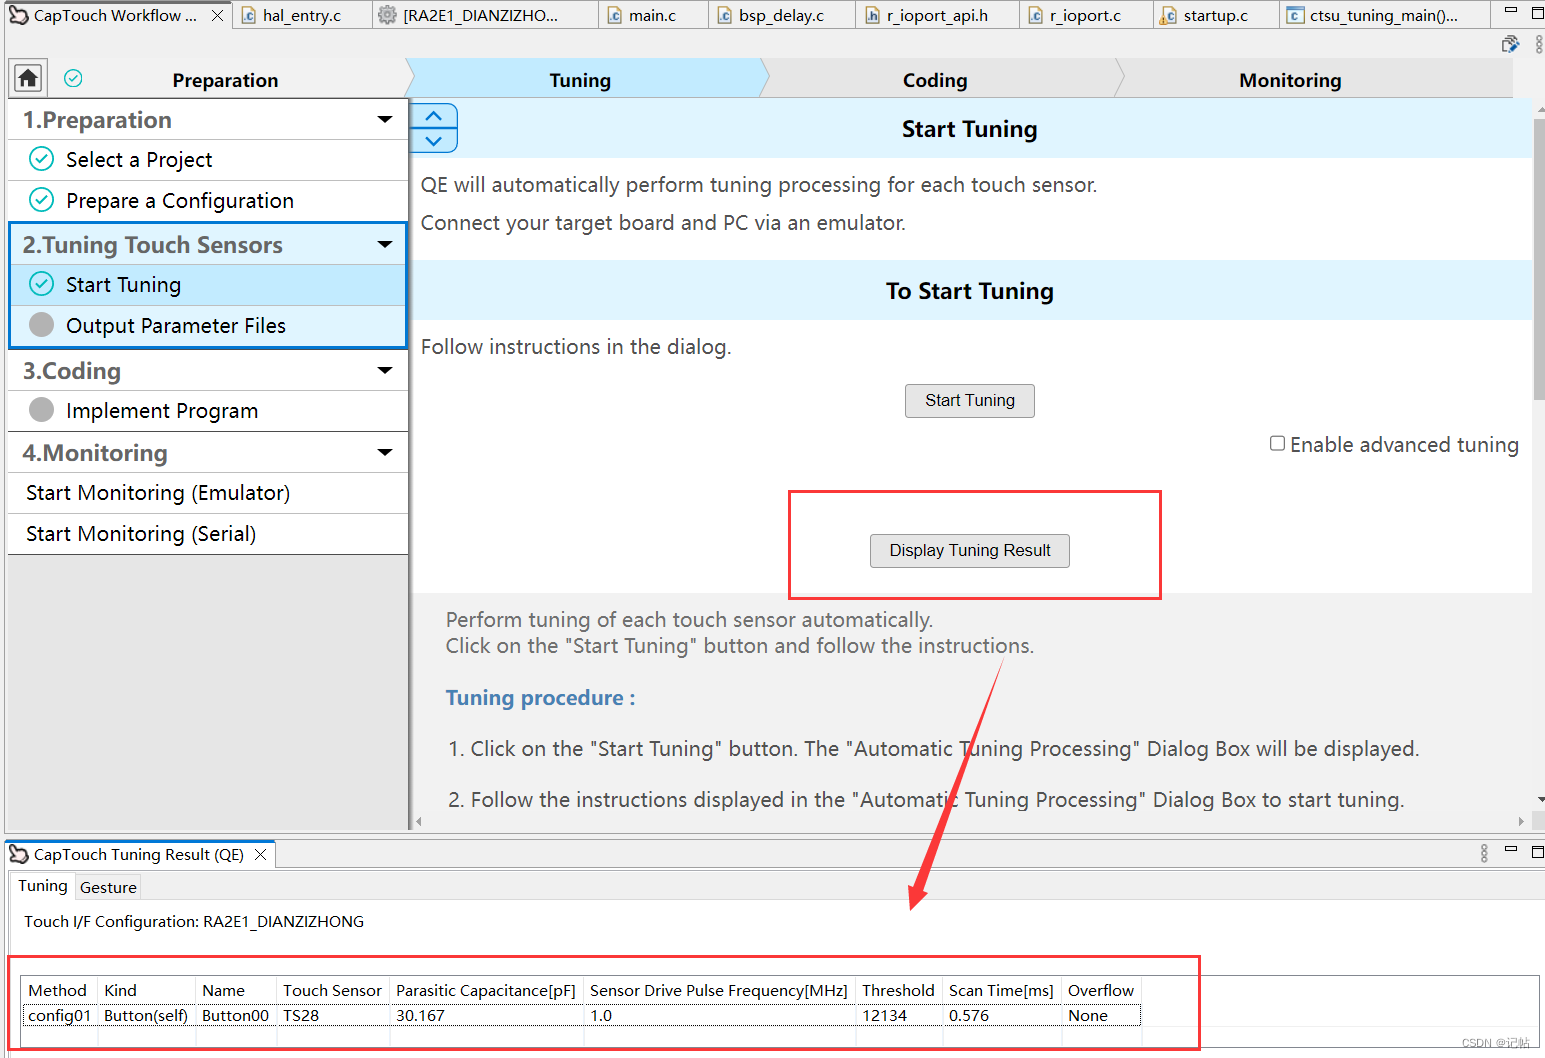
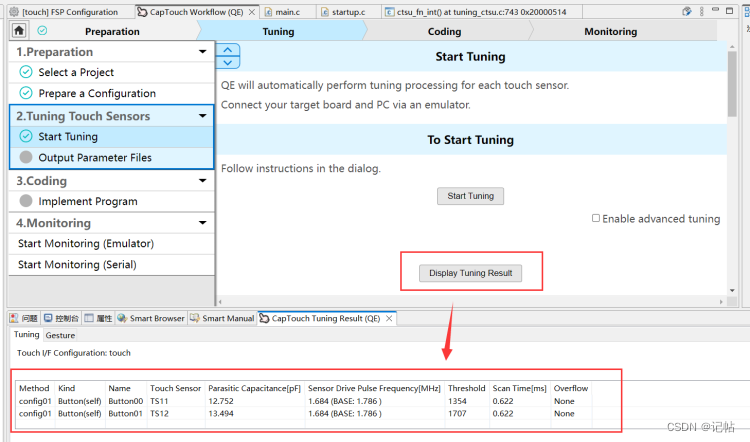
在调整过程完成后,这里呈现的默认视图将是该配置中传感器的调整结果。这使用户可以快速查看调整结果。
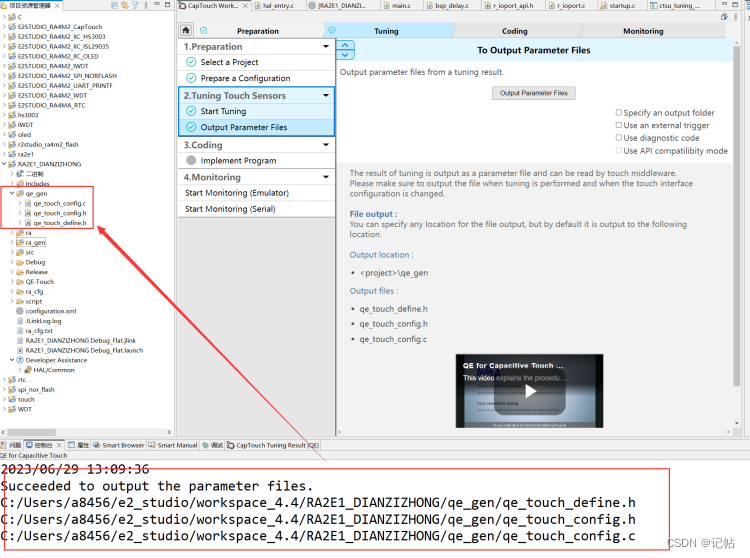
查看“项目资源管理器”窗口,您会看到已添加文件。这些文件包含所需的调整信息,以启用触摸检测。
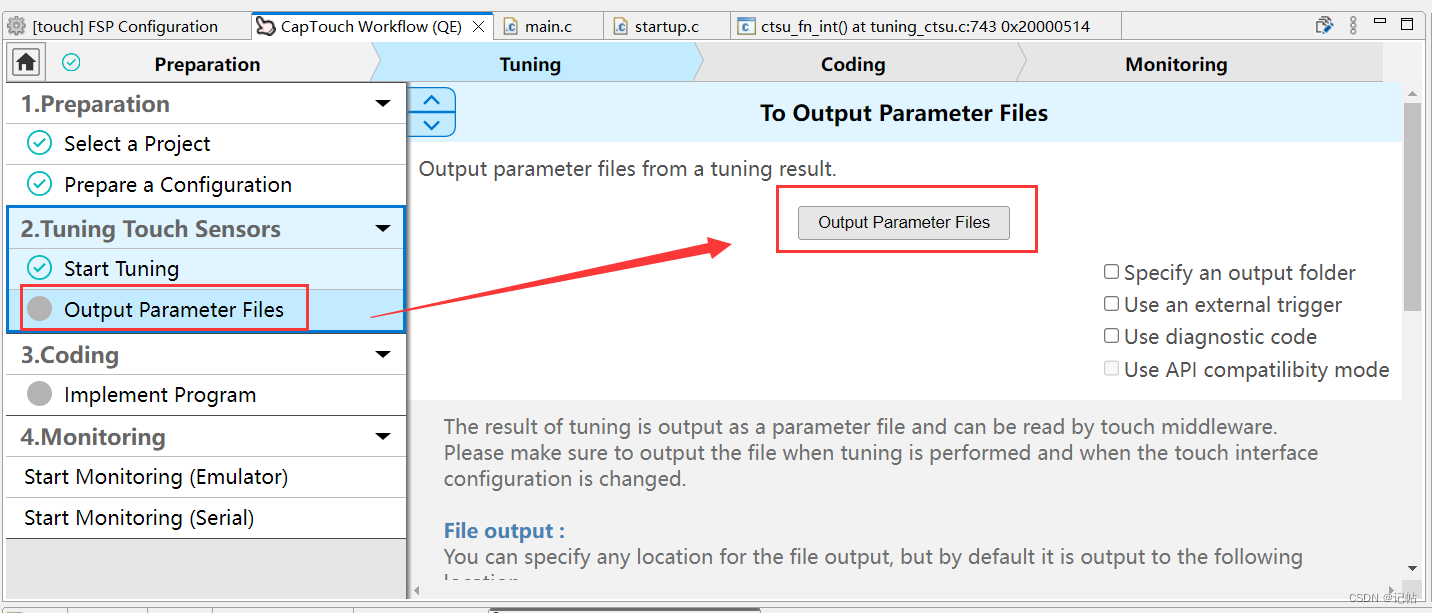
输出调整参数文件。点击“Output Parameter Files(输出参数文件)”按钮。
查看“项目资源管理器”窗口,您会看到已添加文件。这些文件包含所需的调整信息,以启用触摸检测。
e2studio判断电容触摸是否按下
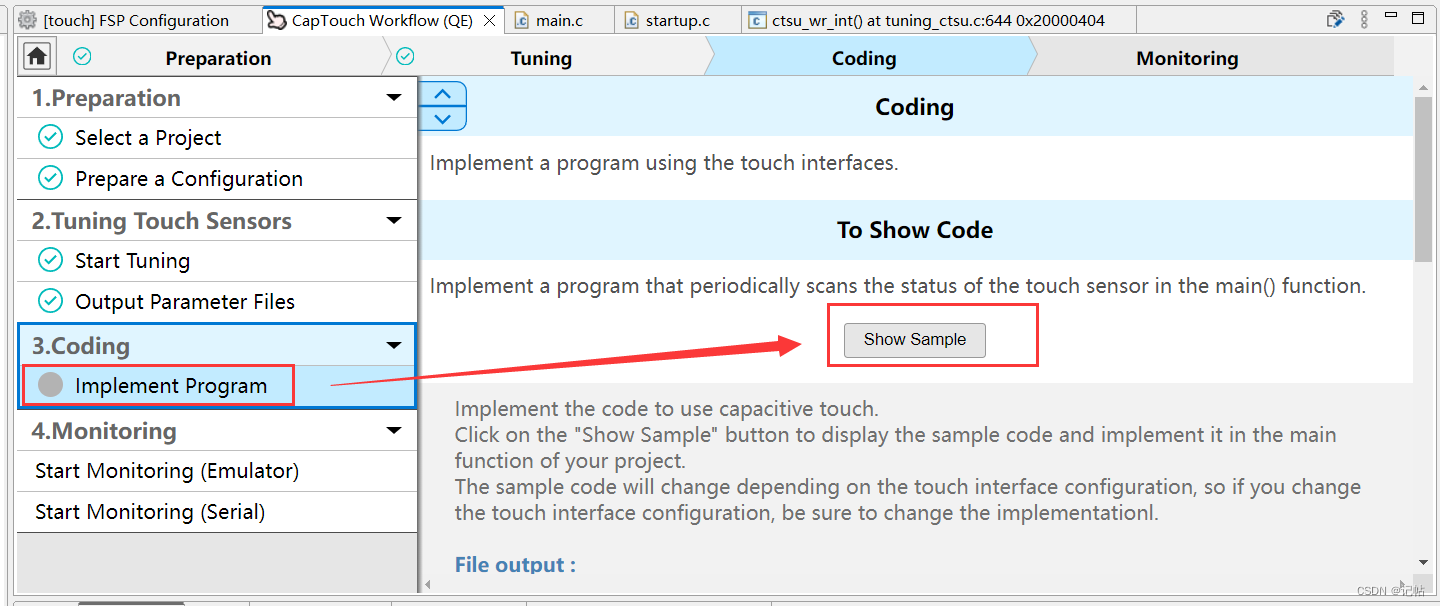
要实现电容触摸状态的应用程序代码,请单击“Show Sample(显示示例)”按钮。
一新的菜单窗口会将打开,显示文本中的示例代码。单击“Output to a File(输出到文件)”按钮。
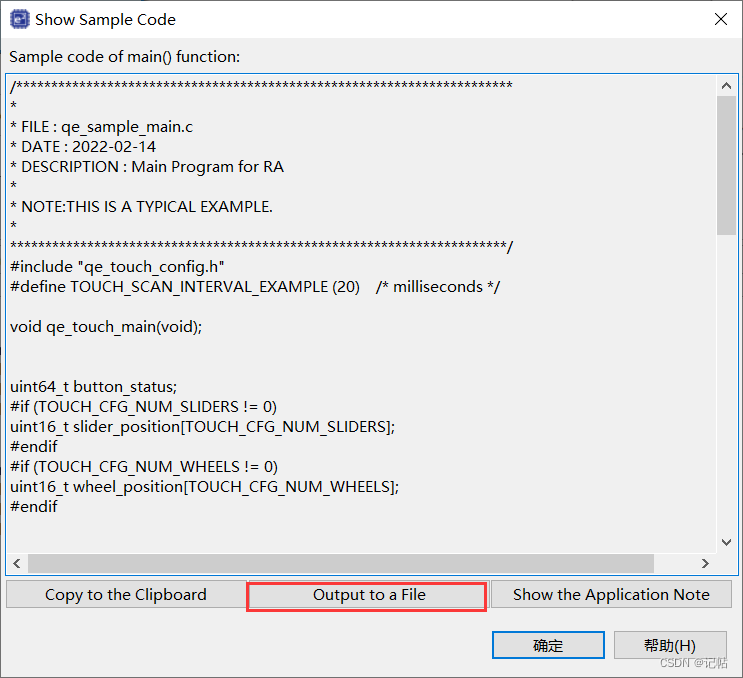
创建了一个描述示例代码的新项目文件。在“项目资源管理器”窗口中,您会看到已添加qe_touch_sample.c文件。

将QE文件复制到Keil

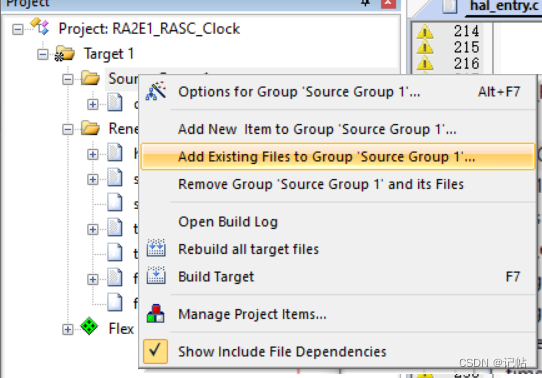
右键文件夹,选择Add Existing Files to Group ,加入刚刚导入的C文件。
阈值修改
触摸阈值可以修改如下值,最大位65535。

触摸电容功能实现
打开qe_touch_sample.c,查看触摸电容实例代码。
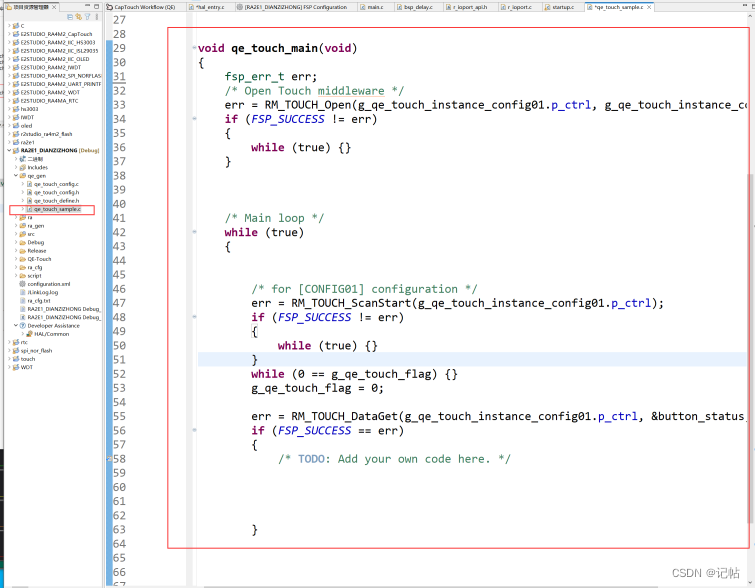
可以看到需要在主程序中初始化打开touch组件。
/* Open Touch middleware */err = RM_TOUCH_Open(g_qe_touch_instance_config01.p_ctrl, g_qe_touch_instance_config01.p_cfg);if (FSP_SUCCESS != err){while (true) {}}
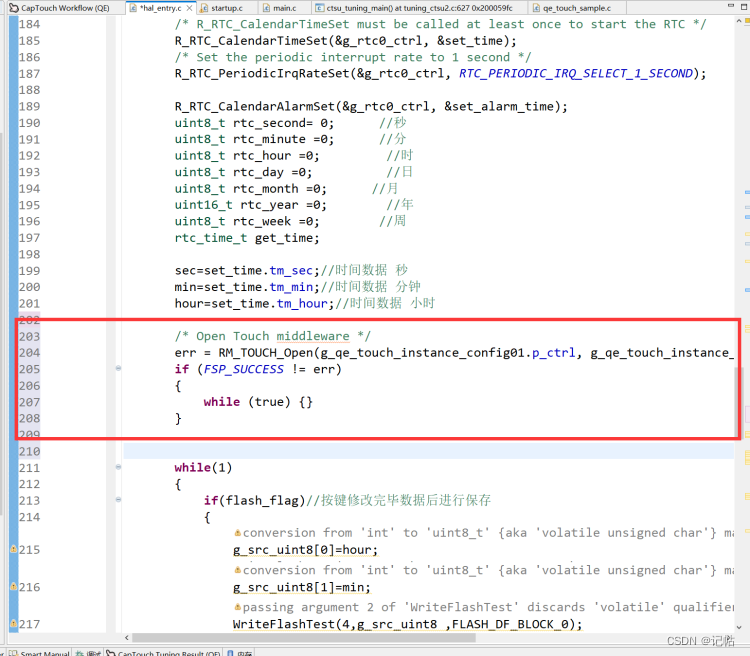
注意带上头文件。
#include "qe_touch_config.h"

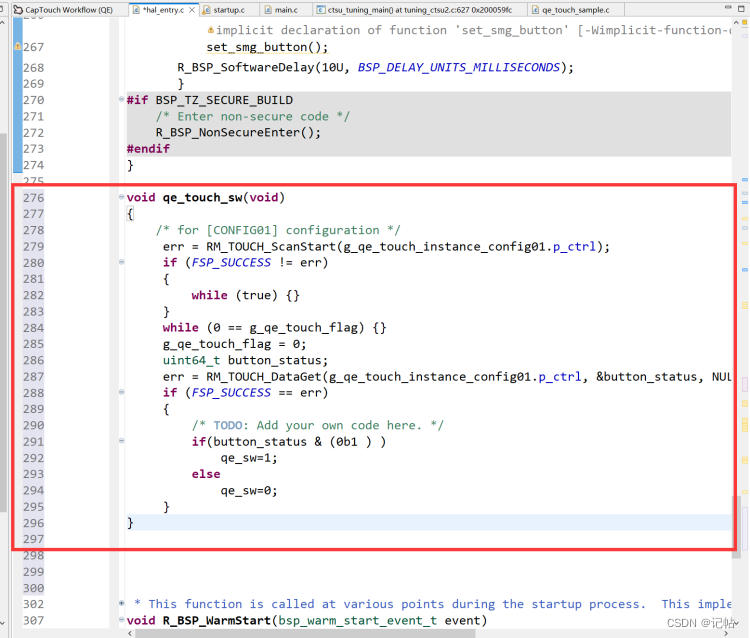
写一个类似的函数进行读取。
void qe_touch_sw(void)
{/* for [CONFIG01] configuration */err = RM_TOUCH_ScanStart(g_qe_touch_instance_config01.p_ctrl);if (FSP_SUCCESS != err){while (true) {}}while (0 == g_qe_touch_flag) {}g_qe_touch_flag = 0;uint64_t button_status;err = RM_TOUCH_DataGet(g_qe_touch_instance_config01.p_ctrl, &button_status, NULL, NULL);if (FSP_SUCCESS == err){/* TODO: Add your own code here. */if(button_status & (0b1 ) )qe_sw=1;elseqe_sw=0;}
}
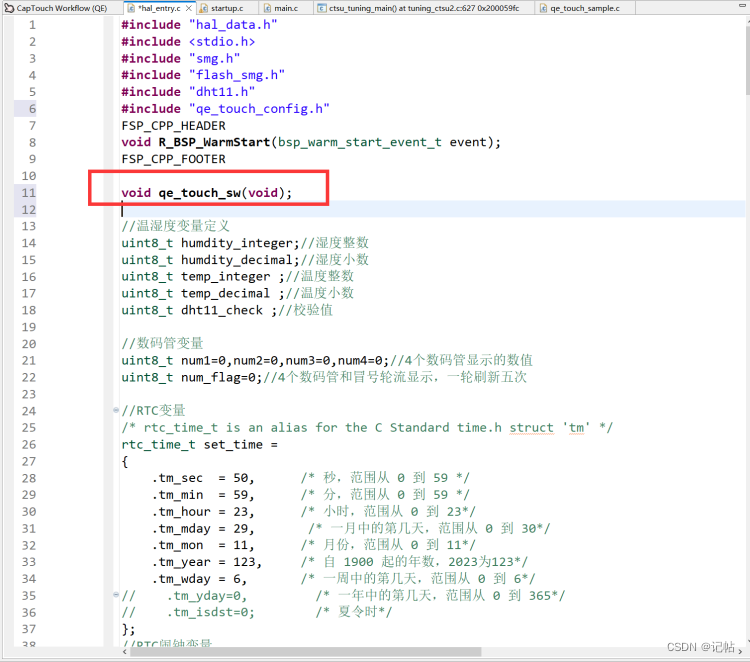
声明一下该函数。
void qe_touch_sw(void);
同时在主程序中添加该函数。

修改按键函数,在timer_smg.c,主要添加触摸按键的定义。
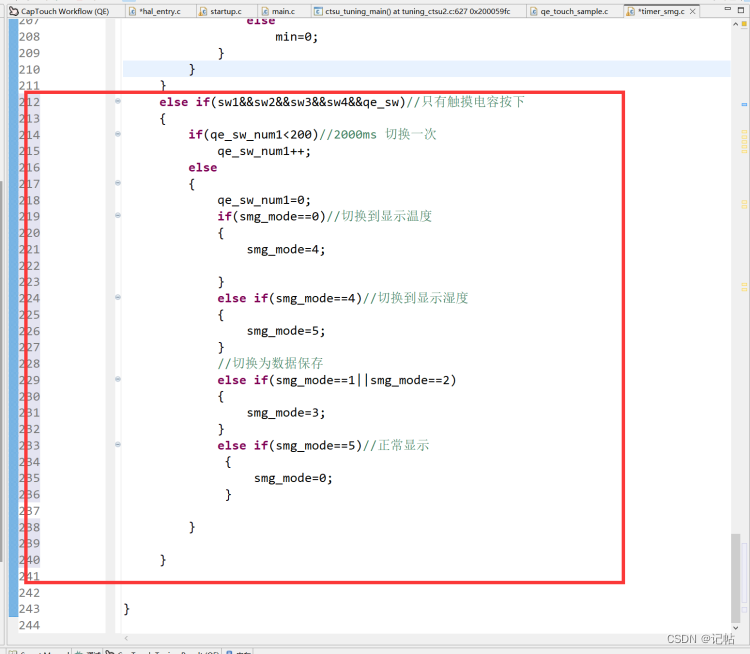
void set_smg_button(void)
{R_IOPORT_PinRead(&g_ioport_ctrl, BSP_IO_PORT_02_PIN_07, &sw1);R_IOPORT_PinRead(&g_ioport_ctrl, BSP_IO_PORT_02_PIN_08, &sw2);R_IOPORT_PinRead(&g_ioport_ctrl, BSP_IO_PORT_09_PIN_13, &sw3);R_IOPORT_PinRead(&g_ioport_ctrl, BSP_IO_PORT_09_PIN_14, &sw4);if(sw1+sw2+sw3+sw4==4&&qe_sw==0)//按键都没按下,清除按键按下计数值{sw1_num1=0;sw2_num1=0;sw3_num1=0;sw4_num1=0;qe_sw_num1=0;}else if(sw1==0&&sw2&&sw3&&sw4&&qe_sw==0)//只有SW1按下{if(sw1_num1<1001)//按下小于10s,1001是防止变量在1000时候一直切换模式sw1_num1++;if(sw1_num1%200==0)//模式切换,按下{buzzer_num=20;//蜂鸣器叫200msif(smg_mode>2)smg_mode=0;elsesmg_mode++;}if(smg_mode==6)smg_mode=0;}else if(sw2==0&&sw1&&sw3&&sw4&&qe_sw==0)//只有SW2按下{if(sw2_num1<30)//300ms 减一次sw2_num1++;else{sw2_num1=0;if(smg_mode==1){if(hour>0)hour--;elsehour=23;}else if(smg_mode==2){if(min>0)min--;elsemin=59;}}}else if(sw3==0&&sw1&&sw2&&sw4&&qe_sw==0)//只有SW3按下{if(sw3_num1<30)//300ms 减一次sw3_num1++;else{sw3_num1=0;if(smg_mode==1){if(hour<23)hour++;elsehour=0;}else if(smg_mode==2){if(min<59)min++;elsemin=0;}}}else if(sw1&&sw2&&sw3&&sw4&&qe_sw)//只有触摸电容按下{if(qe_sw_num1<200)//2000ms 切换一次qe_sw_num1++;else{qe_sw_num1=0;if(smg_mode==0)//切换到显示温度{smg_mode=4;}else if(smg_mode==4)//切换到显示湿度{smg_mode=5;}//切换为数据保存else if(smg_mode==1||smg_mode==2){smg_mode=3;}else if(smg_mode==5)//正常显示{smg_mode=0;}}}}
同时在回调函数中增加温湿度显示,在timer_smg.c,主要添加触摸按键的定义。
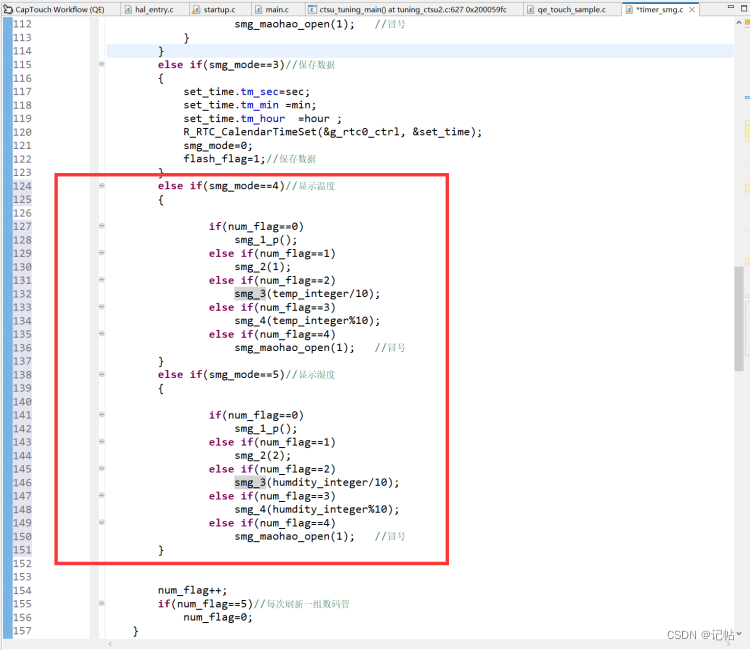
void timer0_callback(timer_callback_args_t *p_args)
{/* TODO: add your own code here */if (TIMER_EVENT_CYCLE_END == p_args->event){time_mode_num++;if(time_mode_num>200)time_mode_num=0;if(smg_mode==0){if(num_flag==0)smg_1(num1);else if(num_flag==1)smg_2(num2);else if(num_flag==2)smg_3(num3);else if(num_flag==3)smg_4(num4);else if(num_flag==4)smg_maohao_open(1);   //冒号}else if(smg_mode==1)//修改时间小时{if(time_mode_num<100){if(num_flag==0)smg_1(hour/10);else if(num_flag==1)smg_2(hour%10);else if(num_flag==2)smg_3(min/10);else if(num_flag==3)smg_4(min%10);else if(num_flag==4)smg_maohao_open(1);   //冒号}else{if(num_flag==0)smg_1_close();else if(num_flag==1)smg_2_close();else if(num_flag==2)smg_3(min/10);else if(num_flag==3)smg_4(min%10);else if(num_flag==4)smg_maohao_open(1);   //冒号}}else if(smg_mode==2)//修改时间分钟{if(time_mode_num<100){if(num_flag==0)smg_1(hour/10);else if(num_flag==1)smg_2(hour%10);else if(num_flag==2)smg_3(min/10);else if(num_flag==3)smg_4(min%10);else if(num_flag==4)smg_maohao_open(1);   //冒号}else{if(num_flag==0)smg_1(hour/10);else if(num_flag==1)smg_2(hour%10);else if(num_flag==2)smg_3_close();else if(num_flag==3)smg_4_close();else if(num_flag==4)smg_maohao_open(1);   //冒号}}else if(smg_mode==3)//保存数据{set_time.tm_sec=sec;set_time.tm_min =min;set_time.tm_hour  =hour ;R_RTC_CalendarTimeSet(&g_rtc0_ctrl, &set_time);smg_mode=0;flash_flag=1;//保存数据}else if(smg_mode==4)//显示温度{if(num_flag==0)smg_1_p();else if(num_flag==1)smg_2(1);else if(num_flag==2)smg_3(temp_integer/10);else if(num_flag==3)smg_4(temp_integer%10);else if(num_flag==4)smg_maohao_open(1);   //冒号}else if(smg_mode==5)//显示湿度{if(num_flag==0)smg_1_p();else if(num_flag==1)smg_2(2);else if(num_flag==2)smg_3(humdity_integer/10);else if(num_flag==3)smg_4(humdity_integer%10);else if(num_flag==4)smg_maohao_open(1);   //冒号}num_flag++;if(num_flag==5)//每次刷新一组数码管num_flag=0;}
}
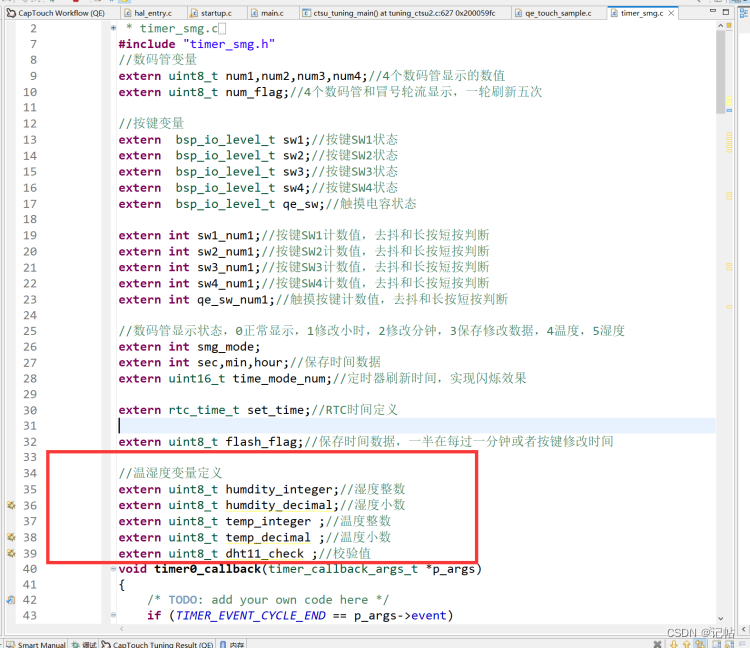
需要增加变量的定义。
//温湿度变量定义
extern uint8_t humdity_integer;//湿度整数
extern uint8_t humdity_decimal;//湿度小数
extern uint8_t temp_integer ;//温度整数
extern uint8_t temp_decimal ;//温度小数
extern uint8_t dht11_check ;//校验值
主函数
#include "hal_data.h"
#include <stdio.h>
#include "smg.h"
#include "timer_smg.h"
#include "flash_smg.h"
#include "dht11.h"
#include "qe_touch_config.h"
FSP_CPP_HEADER
void R_BSP_WarmStart(bsp_warm_start_event_t event);
FSP_CPP_FOOTERvoid qe_touch_sw(void);//温湿度变量定义
uint8_t humdity_integer;//湿度整数
uint8_t humdity_decimal;//湿度小数
uint8_t temp_integer ;//温度整数
uint8_t temp_decimal ;//温度小数
uint8_t dht11_check ;//校验值//数码管变量
uint8_t num1=1,num2=4,num3=6,num4=8;//4个数码管显示的数值
uint8_t num_flag=0;//4个数码管和冒号轮流显示,一轮刷新五次//RTC变量
/* rtc_time_t is an alias for the C Standard time.h struct 'tm' */
rtc_time_t set_time =
{.tm_sec  = 50,      /* 秒,范围从 0 到 59 */.tm_min  = 59,      /* 分,范围从 0 到 59 */.tm_hour = 23,      /* 小时,范围从 0 到 23*/.tm_mday = 29,       /* 一月中的第几天,范围从 0 到 30*/.tm_mon  = 11,      /* 月份,范围从 0 到 11*/.tm_year = 123,     /* 自 1900 起的年数,2023为123*/.tm_wday = 6,       /* 一周中的第几天,范围从 0 到 6*/
//    .tm_yday=0,         /* 一年中的第几天,范围从 0 到 365*/
//    .tm_isdst=0;        /* 夏令时*/
};//RTC闹钟变量
rtc_alarm_time_t set_alarm_time=
{.time.tm_sec  = 58,      /* 秒,范围从 0 到 59 */.time.tm_min  = 59,      /* 分,范围从 0 到 59 */.time.tm_hour = 23,      /* 小时,范围从 0 到 23*/.time.tm_mday = 29,       /* 一月中的第几天,范围从 1 到 31*/.time.tm_mon  = 11,      /* 月份,范围从 0 到 11*/.time.tm_year = 123,     /* 自 1900 起的年数,2023为123*/.time.tm_wday = 6,       /* 一周中的第几天,范围从 0 到 6*/.sec_match        =  1,//每次秒到达设置的进行报警.min_match        =  0,.hour_match       =  0,.mday_match       =  0,.mon_match        =  0,.year_match       =  0,.dayofweek_match  =  0,};bsp_io_level_t sw1;//按键SW1状态
bsp_io_level_t sw2;//按键SW2状态
bsp_io_level_t sw3;//按键SW3状态
bsp_io_level_t sw4;//按键SW4状态
bsp_io_level_t qe_sw;//触摸电容状态int sw1_num1=0;//按键SW1计数值,去抖和长按短按判断
int sw2_num1=0;//按键SW2计数值,去抖和长按短按判断
int sw3_num1=0;//按键SW3计数值,去抖和长按短按判断
int sw4_num1=0;//按键SW4计数值,去抖和长按短按判断
int qe_sw_num1=0;//触摸按键计数值,去抖和长按短按判断
void qe_touch_sw(void);//数码管显示状态,0正常显示,1修改小时,2修改分钟,3保存修改数据,4温度,5湿度
int smg_mode=0;
int sec=0,min=0,hour=0;//保存时间数据
uint16_t time_mode_num=0;//定时器刷新时间,实现闪烁效果volatile uint8_t g_src_uint8[4]={0x00,0x00,0x00,0x00};//时间保存在该数组里面
volatile uint8_t  g_src_uint8_length=4;
uint8_t flash_flag=0;//保存时间数据,一半在每过一分钟或者按键修改时间//RTC回调函数
volatile bool rtc_flag = 0;//RTC延时1s标志位
volatile bool rtc_alarm_flag = 0;//RTC闹钟
/* Callback function */
void rtc_callback(rtc_callback_args_t *p_args)
{/* TODO: add your own code here */if(p_args->event == RTC_EVENT_PERIODIC_IRQ)rtc_flag=1;else if(p_args->event == RTC_EVENT_ALARM_IRQ)rtc_alarm_flag=1;
}fsp_err_t err = FSP_SUCCESS;
volatile bool uart_send_complete_flag = false;
void user_uart_callback (uart_callback_args_t * p_args)
{if(p_args->event == UART_EVENT_TX_COMPLETE){uart_send_complete_flag = true;}
}#ifdef __GNUC__                                 //串口重定向#define PUTCHAR_PROTOTYPE int __io_putchar(int ch)
#else#define PUTCHAR_PROTOTYPE int fputc(int ch, FILE *f)
#endifPUTCHAR_PROTOTYPE
{err = R_SCI_UART_Write(&g_uart9_ctrl, (uint8_t *)&ch, 1);if(FSP_SUCCESS != err) __BKPT();while(uart_send_complete_flag == false){}uart_send_complete_flag = false;return ch;
}int _write(int fd,char *pBuffer,int size)
{for(int i=0;i<size;i++){__io_putchar(*pBuffer++);}return size;
}/*******************************************************************************************************************//*** main() is generated by the RA Configuration editor and is used to generate threads if an RTOS is used.  This function* is called by main() when no RTOS is used.**********************************************************************************************************************/
void hal_entry(void)
{/* TODO: add your own code here *//**********************DHT11初始化***************************************/R_IOPORT_PinWrite(&g_ioport_ctrl, BSP_IO_PORT_03_PIN_01, BSP_IO_LEVEL_HIGH);R_BSP_SoftwareDelay(1000U, BSP_DELAY_UNITS_MILLISECONDS);/* Open the transfer instance with initial configuration. */err = R_SCI_UART_Open(&g_uart9_ctrl, &g_uart9_cfg);assert(FSP_SUCCESS == err);
/**********************数码管测试***************************************/
//              ceshi_smg();
/**********************定时器开启***************************************//* Initializes the module. */err = R_GPT_Open(&g_timer0_ctrl, &g_timer0_cfg);/* Handle any errors. This function should be defined by the user. */assert(FSP_SUCCESS == err);/* Start the timer. */(void) R_GPT_Start(&g_timer0_ctrl);/**********************data flash***************************************/flash_result_t blank_check_result;/* Open the flash lp instance. */err = R_FLASH_LP_Open(&g_flash0_ctrl, &g_flash0_cfg);assert(FSP_SUCCESS == err);//       WriteFlashTest(4,g_src_uint8 ,FLASH_DF_BLOCK_0);PrintFlashTest(FLASH_DF_BLOCK_0);set_time.tm_sec=0;//时间数据 秒set_time.tm_min=min;//时间数据 分钟hour=set_time.tm_hour=hour;//时间数据 小时/**********************RTC开启***************************************//* Initialize the RTC module*/err = R_RTC_Open(&g_rtc0_ctrl, &g_rtc0_cfg);/* Handle any errors. This function should be defined by the user. */assert(FSP_SUCCESS == err);/* Set the RTC clock source. Can be skipped if "Set Source Clock in Open" property is enabled. */R_RTC_ClockSourceSet(&g_rtc0_ctrl);/* R_RTC_CalendarTimeSet must be called at least once to start the RTC */R_RTC_CalendarTimeSet(&g_rtc0_ctrl, &set_time);/* Set the periodic interrupt rate to 1 second */R_RTC_PeriodicIrqRateSet(&g_rtc0_ctrl, RTC_PERIODIC_IRQ_SELECT_1_SECOND);R_RTC_CalendarAlarmSet(&g_rtc0_ctrl, &set_alarm_time);uint8_t rtc_second= 0;      //秒uint8_t rtc_minute =0;      //分uint8_t rtc_hour =0;         //时uint8_t rtc_day =0;          //日uint8_t rtc_month =0;      //月uint16_t rtc_year =0;        //年uint8_t rtc_week =0;        //周rtc_time_t get_time;sec=set_time.tm_sec;//时间数据 秒min=set_time.tm_min;//时间数据 分钟hour=set_time.tm_hour;//时间数据 小时/* Open Touch middleware */err = RM_TOUCH_Open(g_qe_touch_instance_config01.p_ctrl, g_qe_touch_instance_config01.p_cfg);if (FSP_SUCCESS != err){while (true) {}}while(1){if(flash_flag)//按键修改完毕数据后进行保存{g_src_uint8[0]=hour;g_src_uint8[1]=min;WriteFlashTest(4,g_src_uint8 ,FLASH_DF_BLOCK_0);flash_flag=0;}if(rtc_flag){R_RTC_CalendarTimeGet(&g_rtc0_ctrl, &get_time);//获取RTC计数时间rtc_flag=0;rtc_second=get_time.tm_sec;//秒rtc_minute=get_time.tm_min;//分rtc_hour=get_time.tm_hour;//时rtc_day=get_time.tm_mday;//日rtc_month=get_time.tm_mon;//月rtc_year=get_time.tm_year; //年rtc_week=get_time.tm_wday;//周printf(" %d y %d m %d d %d h %d m %d s %d w\n",rtc_year+1900,rtc_month,rtc_day,rtc_hour,rtc_minute,rtc_second,rtc_week);//时间显示num1=rtc_hour/10;num2=rtc_hour%10;num3=rtc_minute/10;num4=rtc_minute%10;if(rtc_second==0&&smg_mode==0)//这个时候刷新变量{sec=rtc_second;//时间数据 秒min=rtc_minute;//时间数据 分钟hour=rtc_hour;//时间数据 小时g_src_uint8[0]=hour;g_src_uint8[1]=min;WriteFlashTest(4,g_src_uint8 ,FLASH_DF_BLOCK_0);}if(rtc_second%5==0)//5S读一次{DHT11_Read();printf("hum=%d temp=%d\n",humdity_integer,temp_integer);}}if(rtc_alarm_flag){rtc_alarm_flag=0;printf("/************************Alarm Clock********************************/\n");}qe_touch_sw();set_smg_button();R_BSP_SoftwareDelay(10U, BSP_DELAY_UNITS_MILLISECONDS);}#if BSP_TZ_SECURE_BUILD/* Enter non-secure code */R_BSP_NonSecureEnter();
#endif
}void qe_touch_sw(void)
{/* for [CONFIG01] configuration */err = RM_TOUCH_ScanStart(g_qe_touch_instance_config01.p_ctrl);if (FSP_SUCCESS != err){while (true) {}}while (0 == g_qe_touch_flag) {}g_qe_touch_flag = 0;uint64_t button_status;err = RM_TOUCH_DataGet(g_qe_touch_instance_config01.p_ctrl, &button_status, NULL, NULL);if (FSP_SUCCESS == err){/* TODO: Add your own code here. */if(button_status & (0b1 ) )qe_sw=1;elseqe_sw=0;}}
这篇关于基于RASC的keil电子时钟制作(瑞萨RA)(11)----电容触摸配置的文章就介绍到这儿,希望我们推荐的文章对编程师们有所帮助!


