本文主要是介绍ubuntu16.04+cuda8.0(GTX1080)+caffe安装,希望对大家解决编程问题提供一定的参考价值,需要的开发者们随着小编来一起学习吧!
1、 ubuntu16.04安装
参考:http://www.tuicool.com/articles/JvUvQjZ
手动添加显卡选项。
具体我的做法是:首先参考 http://blog.sciencenet.cn/blog-655584-877622.html
1)安装时,将箭头移动至”install ubuntu”,按”e”进入编辑模式,进入命令行模式, 然后去掉”—”后,依照不同显卡进行不同显卡驱动选项的添加
(1)Intel 82852/82855 或8系列显示晶片:i915.modeset=1或i915.modeset=0
(2)Nvidia:nomodeset
(3)其它厂牌(如ATI,技嘉):xforcevesa或radeon.modeset=0 xforcevesa [DELL T3400显卡为Nvidia FX580,选择nomodeset]
然后按 F10或ctrl+x安装
2)分区:efi 1G
usr/local 300G
boot 200M
/ 根目录 300G
交换空间 20G (内存16G)
其余都是/home
3)安装结束后,重启时,按住shift不放进入grub画面
按”’e”’ 进入编辑开机指令的模式, 找到”’ro quite splash”’ ,在ro 与 quite 之间写入nomodeset,并将本行后面的字母删掉。
按 ”F10”启动系统.
4)进去系统之后我的桌面一片空白,无法使用终端。所以进入字符界面,编辑”’/etc/default/grub”’ 这个档案(要管理者权限sudo)。
sudo vi /etc/default/grub5)找到这一行:
GRUB_CMDLINE_LINUX_DEFAULT=”quiet splash”
修改为:
GRUB_CMDLINE_LINUX_DEFAULT=”quiet splash nomodeset”
6)更新GRUB: sudo update-grub
7)sudo shutdown -h now (关机)
安装完成,输入登录帐号后,进入桌面一篇空白,wifi可连接窗口闪烁几下之后没反应了。Google之后发现是由于显卡驱动没装,所以又开始挂载移动硬盘,安装驱动。
2、NVIDIA 驱动安装
1) 挂载移动硬盘
(参考:http://www.2cto.com/os/201306/218232.html )
Ctrl+alt+F1进入字符界面,关闭图形界面
sudo /etc/init.d/lightdm stop //必须有,不然会安装失败
sudo fdisk -l
显示信息中最后一行出现:
/dev/sdb1 * 2048 976769023 488383488 7 HPFS/NTFS/exFAT
建立一个文件夹 sudo mkdir /media/disk
把移动硬盘挂载在这个文件夹上 mount -o rw /dev/sdb1 /media/disk
cd /media/disk/ubuntu16.04
cp NVIDIA-Linux-x86_64-367.27.run /home/zhou
2) 安装nvidia driver
sudo chmod 755 NVIDIA-Linux-x86_64-367.27.run  //获取权限
sudo ./NVIDIA-Linux-x86_64-367.27.run  //安装驱动
Accept
Continue installation
安装完成之后
sudo /etc/init.d/lightdm start重启系统。T_T终于正常进入系统了。
3、 更新源,安装了一些软件
参考:http://www.tuicool.com/articles/JvUvQjZ
安装openssh
加入源
sudo apt-get update
sudo apt-get install nvidia-settings nvidia-prime
重启进入桌面。
4、 Cuda8.0安装
1) 安装所必须的库
sudo service lightdm stop
sudo apt-get install freeglut3-dev build-essential libx11-dev libxmu-dev libxi-dev libgl1-mesa-glx libglu1-mesa libglu1-mesa-dev运行指令 sudo sh cuda_8.0.27_linux.run
选择
Do you accept the previously read EULA?
accept/decline/quit: accept
Install NVIDIA Accelerated Graphics Driver for Linux-x86_64 361.62?
(y)es/(n)o/(q)uit: n
Install the CUDA 8.0 Toolkit?
(y)es/(n)o/(q)uit: y
Enter Toolkit Location
[ default is /usr/local/cuda-8.0 ]:
Do you want to install a symbolic link at /usr/local/cuda?
(y)es/(n)o/(q)uit: y
Install the CUDA 8.0 Samples?
(y)es/(n)o/(q)uit: y
Enter CUDA Samples Location
[ default is /home/zhou ]:
Installing the CUDA Toolkit in /usr/local/cuda-8.0 …
Installing the CUDA Samples in /home/zhou …
Copying samples to /home/zhou/NVIDIA_CUDA-8.0_Samples now…
Finished copying samples.
===========
= Summary =
===========
Driver: Not Selected
Toolkit: Installed in /usr/local/cuda-8.0
Samples: Installed in /home/zhou
Please make sure that
- PATH includes /usr/local/cuda-8.0/bin
- LD_LIBRARY_PATH includes /usr/local/cuda-8.0/lib64, or, add /usr/local/cuda-8.0/lib64 to /etc/ld.so.conf and run ldconfig as root
To uninstall the CUDA Toolkit, run the uninstall script in /usr/local/cuda-8.0/bin
Please see CUDA_Installation_Guide_Linux.pdf in /usr/local/cuda-8.0/doc/pdf for detailed information on setting up CUDA.
***WARNING: Incomplete installation! This installation did not install the CUDA Driver. A driver of version at least 361.00 is required for CUDA 8.0 functionality to work.
To install the driver using this installer, run the following command, replacing with the name of this run file:
sudo .run -silent -driver
Logfile is /tmp/cuda_install_8956.log
3)
sudo apt-get install vim安装完成。
4) 设置环境变量
在终端输入这两句:
export PATH=/usr/local/cuda-8.0/bin:$PATH
export LD_LIBRARY_PATH=/usr/local/cuda-8.0/lib64:$LD_LIBRARY_PATH
然后修改文件中环境变量设置
sudo vi /etc/profile输入上面export的两句,保存,退出。
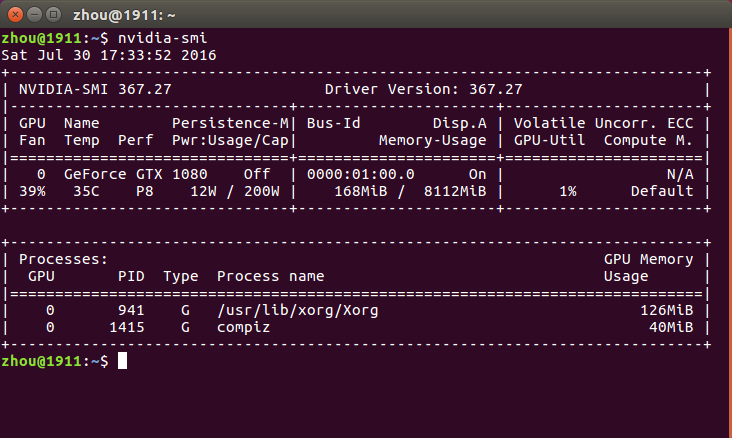
sudo ldconfig //环境变量立即生效5) 验证安装是否完成
nvidia-smi 显示:
nvcc –V显示:
nvcc -V nvcc: NVIDIA (R) Cuda compiler driver Copyright (c) 2005-2016
NVIDIA Corporation Built on Wed_May__4_21:01:56_CDT_2016 Cuda
compilation tools, release 8.0, V8.0.26
6) 测试cuda的samples
cd ‘/home/zhou/NVIDIA_CUDA-8.0_Samples’
make
7) 安装cudnn5.0
安装cuDNN比较简单,解压后把相应的文件拷贝到对应的CUDA目录下即可:
tar -zxvf cudnn-8.0-linux-x64-v5.0-ga.tgz显示以下信息:
*cuda/include/cudnn.h
cuda/lib64/libcudnn.so
cuda/lib64/libcudnn.so.5
cuda/lib64/libcudnn.so.5.0.5
cuda/lib64/libcudnn_static.a*
继续执行以下指令:
sudo cp cuda/include/cudnn.h /usr/local/cuda/include/
sudo cp cuda/lib64/libcudnn* /usr/local/cuda/lib64/
sudo chmod a+r /usr/local/cuda/include/cudnn.h
sudo chmod a+r /usr/local/cuda/lib64/libcudnn*
8) 验证一下,哈哈哈哈哈啊哈哈哈哈哈
cuda的samples 里面有个deviceQuery 运行之后会显示信息,最后一行出行pass说明成功啦~~~~
5、matlab安装
1)先获取root权限
sudo su2)然后按照以前的步骤来,不过这次没有创建快捷方式,因为根本没用过==。
下载完成后将iso文件挂载到Linux
sudo mkdir /media/matlab
mount -o loop [path][filename].iso /media/matlab
cd /media/matlab
sudo ./install
进行安装,安装路径:/usr/local/MATLAB/R2014a
PS:需要注意的是,我下载到的文件里面 readme.txt里没有序列号,所以我就随便填了一个
选项:不使用Internet安装
序列号: 12345-67890-09876-54321
默认路径:/usr/local/MATLAB/R2014a
勾选从默认启动路径创建符号链接(实现在任意位置运行matlab启动程序)
3)激活,选择离线激活模式,选择crack文件夹下的license_405329_R2014a.lic文件进行激活。
4)破解 将crack文件夹下的libmwservices.so 复制到/usr/local/MATLAB/R2014A/bin/glnxa64
sudo cp libmwservices.so /usr/local/MATLAB/R2014a/bin/glnxa64/ 5)完成安装,命令行下使用sudo matlab即可启动使用
6、 caffe 安装
这里是跟着官网教程来的
1) 安装依赖项
sudo apt-get install libprotobuf-dev libleveldb-dev libsnappy-dev libopencv-dev libhdf5-serial-dev protobuf-compilersudo apt-get install --no-install-recommends libboost-all-dev2) BLAS安装
sudo apt-get install libatlas-base-dev3) 安装pycaffe接口所需要的依赖项
sudo apt-get install -y python-numpy python-scipy python-matplotlib python-sklearn python-skimage python-h5py python-protobuf python-leveldb python-networkx python-nose python-pandas python-gflags cython ipython4) 继续安装依赖项
sudo apt-get install libgflags-dev libgoogle-glog-dev liblmdb-dev5) opencv3.0安装
参照http://ouxinyu.github.io/Blogs/20151108001.html
(1)使用他提供的修改版的安装包(即百度云下载,密码:wysa)(下面的安装方式使用该包完成,安装包修改了dependencies.sh文件并增加了OpenCV 3.0.0的安装文件)
(2)切换到文件保存的文件夹(/home/zhou/opencv3.0),然后安装依赖项
sudo sh dependencies.sh
(3)安装OpenCV3.0
sudo sh opencv3_0_0.sh
==。 就应该直接自己下载文件的,我这渣网速。
虽然最后下完了,但是在半路又需要下载文件ippicv_linux_20141027.tgz
因为网络不稳定,所以我在自己的电脑上下载了之后复制到需要的文件夹:
cp ippicv_linux_20141027.tgz /home/zhou/opencv3.0/OpenCV/opencv-3.0.0/3rdparty/ippicv/downloads/linux-8b449a536a2157bcad08a2b9f266828b
重新运行指令:
sudo sh opencv3_0_0.sh
然后开始正常安装,并开始make,但是make到24%出现错误,gcc版本太高,ubuntu16.04自带的gcc版本为5.4,而错误显示高于5.3的都不支持。解决方案请参考官网:https://github.com/BVLC/caffe/wiki/GeForce-GTX-1080,—CUDA-8.0,—Ubuntu-16.04,—Caffe
https://github.com/BVLC/caffe/wiki/Ubuntu-16.04-or-15.10-Installation-Guide
然后在cuda的samples文件夹下 make clean
重新 make
回到opencv3.0文件下
重新运行指令:
sudo sh opencv3_0_0.sh
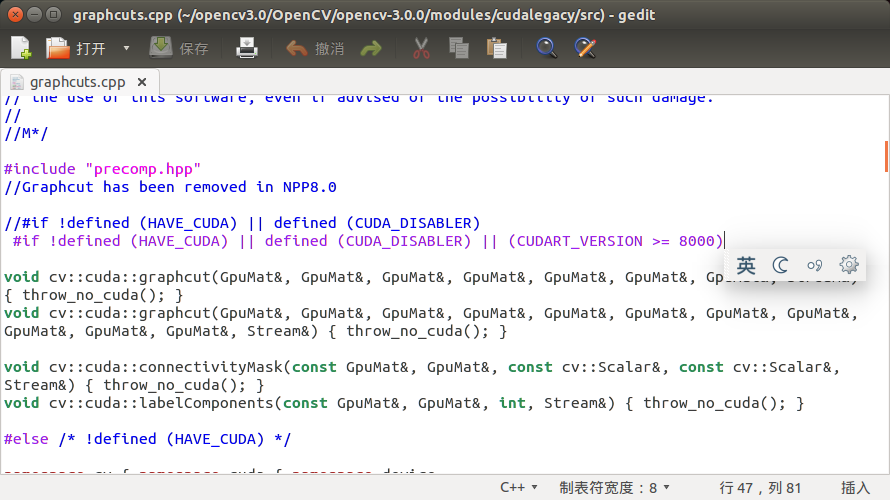
但是make到72%出现错误,graphcuts.cpp文件中许多变量没有声明,google之后发现是因为opencv3.0还不支持cuda8.0,但是有个同学已经对其进行修改。
请参考:https://github.com/opencv/opencv/pull/6510/commits/10896129b39655e19e4e7c529153cb5c2191a1db
cd '/home/zhou/opencv3.0/OpenCV/opencv-3.0.0/modules/cudalegacy/src'sudo vi graphcuts.cpp进行修改
然后保存并退出。
再次运行 sudo sh opencv3_0_0.sh
这次运行正常,至此opencv3.0安装成功(太折腾)!!!
6) caffe编译
下载caffe-master,解压到/home/zhou下,我重新命了个名字,caffe
然后 配置Makefile.config文件,执行指令:
cp Makefile.config.example Makefile.config
我的配置文件如下:
## Refer to http://caffe.berkeleyvision.org/installation.html
# Contributions simplifying and improving our build system are welcome!# cuDNN acceleration switch (uncomment to build with cuDNN).
 USE_CUDNN := 1# CPU-only switch (uncomment to build without GPU support).
# CPU_ONLY := 1# uncomment to disable IO dependencies and corresponding data layers
USE_OPENCV := 0
 USE_LEVELDB := 0
 USE_LMDB := 0# uncomment to allow MDB_NOLOCK when reading LMDB files (only if necessary)
#   You should not set this flag if you will be reading LMDBs with any
#   possibility of simultaneous read and write
# ALLOW_LMDB_NOLOCK := 1# Uncomment if you're using OpenCV 3
OPENCV_VERSION := 3# To customize your choice of compiler, uncomment and set the following.
# N.B. the default for Linux is g++ and the default for OSX is clang++
# CUSTOM_CXX := g++# CUDA directory contains bin/ and lib/ directories that we need.
CUDA_DIR := /usr/local/cuda
# On Ubuntu 14.04, if cuda tools are installed via
# "sudo apt-get install nvidia-cuda-toolkit" then use this instead:
# CUDA_DIR := /usr# CUDA architecture setting: going with all of them.
# For CUDA < 6.0, comment the *_50 lines for compatibility.
CUDA_ARCH := -gencode arch=compute_20,code=sm_20 \-gencode arch=compute_20,code=sm_21 \-gencode arch=compute_30,code=sm_30 \-gencode arch=compute_35,code=sm_35 \-gencode arch=compute_50,code=sm_50 \-gencode arch=compute_50,code=compute_50# BLAS choice:
# atlas for ATLAS (default)
# mkl for MKL
# open for OpenBlas
BLAS := atlas
# Custom (MKL/ATLAS/OpenBLAS) include and lib directories.
# Leave commented to accept the defaults for your choice of BLAS
# (which should work)!
 BLAS_INCLUDE := /usr/include/atlas
 BLAS_LIB := /usr/lib# Homebrew puts openblas in a directory that is not on the standard search path
# BLAS_INCLUDE := $(shell brew --prefix openblas)/include
# BLAS_LIB := $(shell brew --prefix openblas)/lib# This is required only if you will compile the matlab interface.
# MATLAB directory should contain the mex binary in /bin.
 MATLAB_DIR := /usr/local/MATLAB/R2014a
# MATLAB_DIR := /Applications/MATLAB_R2012b.app# NOTE: this is required only if you will compile the python interface.
# We need to be able to find Python.h and numpy/arrayobject.h.
PYTHON_INCLUDE := /usr/include/python2.7 \/usr/lib/python2.7/dist-packages/numpy/core/include
# Anaconda Python distribution is quite popular. Include path:
# Verify anaconda location, sometimes it's in root.
# ANACONDA_HOME := $(HOME)/anaconda
# PYTHON_INCLUDE := $(ANACONDA_HOME)/include \# $(ANACONDA_HOME)/include/python2.7 \# $(ANACONDA_HOME)/lib/python2.7/site-packages/numpy/core/include \# Uncomment to use Python 3 (default is Python 2)
# PYTHON_LIBRARIES := boost_python3 python3.5m
# PYTHON_INCLUDE := /usr/include/python3.5m \
#                 /usr/lib/python3.5/dist-packages/numpy/core/include# We need to be able to find libpythonX.X.so or .dylib.
PYTHON_LIB := /usr/lib
# PYTHON_LIB := $(ANACONDA_HOME)/lib# Homebrew installs numpy in a non standard path (keg only)
# PYTHON_INCLUDE += $(dir $(shell python -c 'import numpy.core; print(numpy.core.__file__)'))/include
# PYTHON_LIB += $(shell brew --prefix numpy)/lib# Uncomment to support layers written in Python (will link against Python libs)
 WITH_PYTHON_LAYER := 1# Whatever else you find you need goes here.
INCLUDE_DIRS := $(PYTHON_INCLUDE) /usr/local/include /usr/include/hdf5/serial
LIBRARY_DIRS := $(PYTHON_LIB) /usr/local/lib /usr/lib /usr/lib/x86_64-linux-gnu /usr/lib/x86_64-linux-gnu/hdf5/serial/lib# If Homebrew is installed at a non standard location (for example your home directory) and you use it for general dependencies
# INCLUDE_DIRS += $(shell brew --prefix)/include
# LIBRARY_DIRS += $(shell brew --prefix)/lib# Uncomment to use `pkg-config` to specify OpenCV library paths.
# (Usually not necessary -- OpenCV libraries are normally installed in one of the above $LIBRARY_DIRS.)
# USE_PKG_CONFIG := 1# N.B. both build and distribute dirs are cleared on `make clean`
BUILD_DIR := build
DISTRIBUTE_DIR := distribute# Uncomment for debugging. Does not work on OSX due to https://github.com/BVLC/caffe/issues/171
# DEBUG := 1# The ID of the GPU that 'make runtest' will use to run unit tests.
TEST_GPUID := 0# enable pretty build (comment to see full commands)
Q ?= @
make all -j16
7)编译时出现的错误:
(1)#error -- unsupported GNU version! gcc versions later than 5.3 are not supported!
解决方法:参考上面给出的官网wiki,注释掉 /usr/local/cuda/include/host_config.h
里出错的这一句就可以了。

(2)出现错误:找不到hdf5文件
解决方法:在Makefile.config 文件里面的INCLUDE_DIRS和LIBRARY_DIRS 修改为如下所示:
INCLUDE_DIRS := $(PYTHON_INCLUDE) /usr/local/include /usr/include/hdf5/serial
LIBRARY_DIRS := $(PYTHON_LIB) /usr/local/lib /usr/lib /usr/lib/x86_64-linux-gnu /usr/lib/x86_64-linux-gnu/hdf5/serial
(3).build_release/lib/libcaffe.so: undefined reference to 'google::protobuf::io::CodedOutputStream::WriteVarint64ToArray(unsigned long long, unsigned char*)'
原因:apt-get install 的安装命令导致安装的protobuf
的gcc编译器版本低,所以需要卸载当前的libprotobuf-dev 和protobuf-compiler,重新安装protobuf-2.5.0.
(一)卸载当前libprotobuf-dev 和protobuf-compiler
sudo apt-get autoremove libprotobuf-dev protobuf-compiler(二)重新让系统恢复默认的gcc-5
cd /usr/bin
sudo rm gcc
sudo ln -s gcc-5 gcc
sudo rm g++
sudo ln -s  g++-5 g++
(三)protobuf-2.5.0安装
下载protobuf-2.5.0,下载地址:http://protobuf.googlecode.com/files/protobuf-2.5.0.tar.gz
安装过程参考:http://blog.csdn.net/hjimce/article/details/51999566
我的有点不同的地方是:路径不同
sudo vim /etc/profile
export PATH=$PATH:/usr/local/bin/
export PKG_CONFIG_PATH=/usr/local/lib/pkgconfig/
source /etc/profile
sudo vim /etc/ld.so.conf
/usr/local/lib
sudo ldconfig
重新回到caffe目录下:
make clean
make all -j16
make test -j16
make runtest -j16
顺利完成!!!!!! 快夸我!!!!
编译Python和Matlab用到的caffe文件
make pycaffe -j16
make matcaffe -j16
到这里就编译完成啦!!!!可以自己用里面的例子去嗨,去浪啦!!!
==。去运行mnist例子
sudo sh examples/mnist/create_mnist.sh就出现了错误:
Creating lmdb...
WARNING: Logging before InitGoogleLogging() is written to STDERR
F1020 17:55:59.447778 32078 convert_mnist_data.cpp:207] This example requires LevelDB and LMDB; compile with USE_LEVELDB and USE_LMDB.
*** Check failure stack trace: ***
Aborted (core dumped)
WARNING: Logging before InitGoogleLogging() is written to STDERR
F1020 17:55:59.532909 32080 convert_mnist_data.cpp:207] This example requires LevelDB and LMDB; compile with USE_LEVELDB and USE_LMDB.
*** Check failure stack trace: ***
Aborted (core dumped)
Done.
解决方法:参考https://github.com/BVLC/caffe/issues/3223
问题的原因我暂时还不清楚==。
这篇关于ubuntu16.04+cuda8.0(GTX1080)+caffe安装的文章就介绍到这儿,希望我们推荐的文章对编程师们有所帮助!


