本文主要是介绍《JVM由浅入深学习【二】 2023-12-20》JVM由简入深学习提升,希望对大家解决编程问题提供一定的参考价值,需要的开发者们随着小编来一起学习吧!
JVM由简入深学习提升第二篇
1. 双亲委派机制源码分析
双亲委派机制的核心源码(代码注释有解释流程)
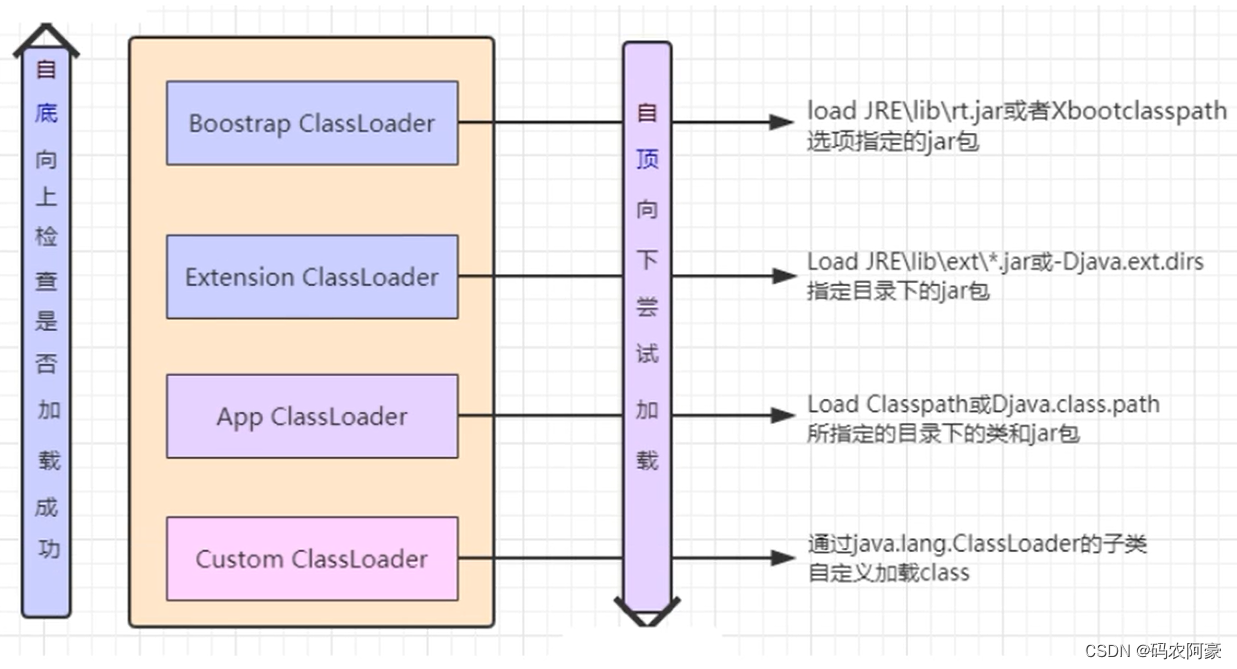
protected Class<?> loadClass(String name, boolean resolve)throws ClassNotFoundException{synchronized (getClassLoadingLock(name)) {// First, check if the class has already been loaded// 首先检查这个类是否已经被加载Class<?> c = findLoadedClass(name);// 如果这个类没加载,进入这里(双亲委派机制核心)if (c == null) {long t0 = System.nanoTime();try {// 第一次判断时当前为AppClassLoader,parent为ExtClassLoader;parent不为空,继续调用此loadClass方法,parent为BootStrapClassLoader,之前说过BootStrapClassLoader是在C++实现的,所以我们这里parent为这null,进入findBootstrapClassOrNullif (parent != null) {c = parent.loadClass(name, false);} else {// 该方法也是调用了native方法,是在C++实现的c = findBootstrapClassOrNull(name);}} catch (ClassNotFoundException e) {// ClassNotFoundException thrown if class not found// from the non-null parent class loader}// 此处c为空,说明BootStrapClassLoader没有加载到该类,调用findClass方法if (c == null) {// If still not found, then invoke findClass in order// to find the class.long t1 = System.nanoTime();// 当前为ExtClassLoader,所以调用他的findClass,他没有,但他的父类URLClassLoader有(代码拿出来了在下面)c = findClass(name);// this is the defining class loader; record the statssun.misc.PerfCounter.getParentDelegationTime().addTime(t1 - t0);sun.misc.PerfCounter.getFindClassTime().addElapsedTimeFrom(t1);sun.misc.PerfCounter.getFindClasses().increment();}}if (resolve) {resolveClass(c);}return c;}}protected Class<?> findClass(final String name)throws ClassNotFoundException{final Class<?> result;try {result = AccessController.doPrivileged(new PrivilegedExceptionAction<Class<?>>() {public Class<?> run() throws ClassNotFoundException {String path = name.replace('.', '/').concat(".class");Resource res = ucp.getResource(path, false);if (res != null) {try {return defineClass(name, res);} catch (IOException e) {throw new ClassNotFoundException(name, e);} catch (ClassFormatError e2) {if (res.getDataError() != null) {e2.addSuppressed(res.getDataError());}throw e2;}} else {return null;}}}, acc);} catch (java.security.PrivilegedActionException pae) {throw (ClassNotFoundException) pae.getException();}if (result == null) {throw new ClassNotFoundException(name);}return result;}
要想打破这个双亲委派机制,可以继承ClassLoader,并重写loadClass方法
如果是重写findClass方法不会打破双亲委派机制,
2. 自定义类加载器
(1)继承CLassLoader
(2)重写loadClass方法 或者 重写findClass方法
public class MyClassLoader extends ClassLoader {@Overridepublic Class<?> findClass(String name) throws ClassNotFoundException {try {// 获取文件名   例如com.zhuyh.studytest.jvmtest.jvm01.Student获取的就是StudentString fileName = name.substring(name.lastIndexOf(".") + 1) + ".class";InputStream is = getClass().getResourceAsStream(fileName);if (is == null) {throw new ClassNotFoundException();}byte[] b = new byte[is.available()];is.read(b);return defineClass(name, b, 0, b.length);} catch (IOException e) {throw new ClassNotFoundException();}}
}class MyTest {public static void main(String[] args) throws Exception{MyClassLoader myClassLoader = new MyClassLoader();Class<?> aClass = myClassLoader.findClass("com.zhuyh.studytest.jvmtest.jvm01.User");System.out.println(aClass.getClassLoader());Object o = aClass.newInstance();System.out.println(o);System.out.println(Student.class.getClassLoader());Class<User> studentClass = User.class;Object user = studentClass.newInstance();System.out.println(user);}
}
结果
// 前部分通过自己的类加载器加载出来的class,显示的加载器就是MyClassLoader
com.zhuyh.studytest.jvmtest.jvm01.MyClassLoader@78308db1
User{no=0, username='null'}
sun.misc.Launcher$AppClassLoader@18b4aac2
User{no=0, username='null'}
3.CLassLoader中的loadClass(),findClass(),defineClass()的区别
(1)loadClass()主要是进行类的加载,双亲委派机制就是在这里实现的。里面调用了findClass();当我们自定义类加载器想破坏双亲委派就覆盖这个方法
(2)findClass()根据名称或者位置加载.class字节码文件,里面调用了defineClass();当我们自定义类加载器不想破坏双亲委派,就覆盖这个方法(建议使用这个方式)
(3)defineClass()把字节码转换为Class,底层调用了native方法(C++写的);我们自定义类加载器最后还是要调用这个方法
private native Class<?> defineClass0(String name, byte[] b, int off, int len,ProtectionDomain pd);private native Class<?> defineClass1(String name, byte[] b, int off, int len,ProtectionDomain pd, String source);private native Class<?> defineClass2(String name, java.nio.ByteBuffer b,int off, int len, ProtectionDomain pd,String source);
加载一个类使用Class.forName()和ClassLoader有什么区别?
先说结论,用Class.forName()加载的话是已经初始化的,而用ClassLoader加载的话是没有初始化的。
看代码,准备一个ChildClass类
public class ChildClass extends ParentClass {// 静态变量private static String p_StaticField = "子类----静态变量";// 变量private String p_Field = "子类----变量";protected int i = 0;protected int j = 0;// 静态初始化块static {System.out.println(p_StaticField);System.out.println("子类----静态初始块");}// 初始快{System.out.println(p_Field);System.out.println("子类----初始块");}// 构造函数public ChildClass() {System.out.print("子类----构造函数");System.out.println("i=" + i + "j=" + j);}public static void main(String[] args) {System.out.println(BufferedReader.class.getClassLoader());System.out.println(ChildClass.class.getClassLoader());}
}
准备测试方法
public class MyTest2 {public static void main(String[] args) throws ClassNotFoundException {Class<?> aClass = Class.forName("com.zhuyh.studytest.jvmtest.jvm02.ChildClass");System.out.println(aClass);System.out.println("--------------------------------");Class<?> aClass1 = MyTest2.class.getClassLoader().loadClass("com.zhuyh.studytest.jvmtest.jvm02.ChildClass");System.out.println(aClass1);}
}
结果:Class.forName初始化了,而ClassLoader().loadClass没有初始化
父类----静态变量
父类----静态初始块
子类----静态变量
子类----静态初始块
class com.zhuyh.studytest.jvmtest.jvm02.ChildClass
--------------------------------
class com.zhuyh.studytest.jvmtest.jvm02.ChildClass
4.Tomcat类加载机制
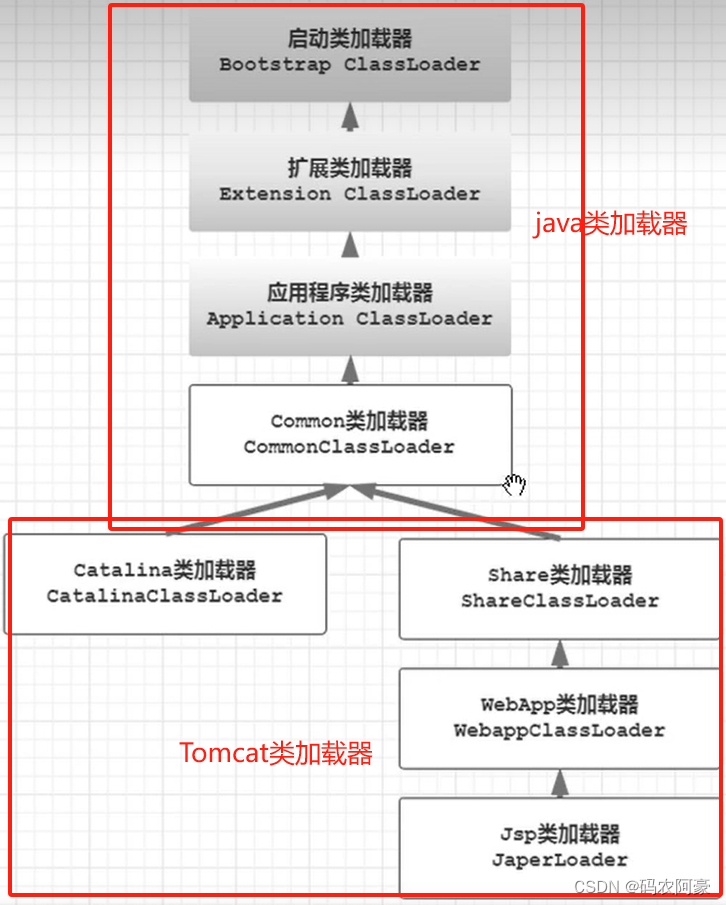
由图可知在之前基础上Tomcat新增了4个类加载器,新版本后Catalina和Share以及common都合并到了lib目录下(tomcat5以后);WebApp类加载器(可以有多个)加载webapps目录下文件,该目录放的是我们要运行的项目;JSP类加载器(也有多个,几个页面就对应几个)加载项目一种JSP文件,转化为java文件,最后转化为Class文件。Common,Catalina,share类加载器是通过工厂模式在URLClassLoader创建的,WebApp类加载器和JSP类加载器都是存在的类,他们打破了双亲委派机制。
5. 为什么Tomcat要破坏双亲委派机制
Tomcat是web服务器,一个web服务器可以部署多个应用服务
(1)部署在同一个tomcat服务器上的两个项目所使用的的java类库要相互隔离
(2)部署在同一个tomcat服务器上的两个项目所使用的的java类库要相互共享
(3)保证Tomcat服务器自身安全不受部署的项目所影响
(4)需要支持JSP的热加载和热部署
6. 热加载和热部署,如何自己实现一个热加载?
(1)热加载指的是在修改代码后不重启服务器也能让代码生效,能提升开发调试效率,但是安全性不高,所以一般不用于生产环境。
(2)热部署指的是在不重启服务器的情况下重新部署项目。比如我们在程序运行时,修改了war包的内容,那么tomcat就会删除之前的war包解压的文件夹,重新解压新的war包,生成文件夹。
总结:热加载就是程序在运行时不断地监测class是否发生改变,改变了就用新的;热部署是运行时重新部署整个项目,比较耗时。
(3)如何实现热加载
1)首先得先实现自定义类加载器
2)自己类加载器中加载需要热加载的类
3)定时任务不断轮训这些class类,如果有更新就重新加载
具体实现案例
public class HotClassLoader extends ClassLoader {private String basePath;public HotClassLoader(String basePath) {this.basePath = basePath;}@Overrideprotected Class<?> findClass(String name) throws ClassNotFoundException {try {byte[] classData = loadClassData(name);return defineClass(name, classData, 0, classData.length);} catch (IOException e) {throw new ClassNotFoundException("Failed to load class data for " + name, e);}}private byte[] loadClassData(String className) throws IOException {String path = basePath + className.replace('.', '/') + ".class";Path classPath = Paths.get(path);return Files.readAllBytes(classPath);}public static void main(String[] args) throws ClassNotFoundException, IllegalAccessException, InstantiationException {String basePath = "path/to/your/classes/";HotClassLoader classLoader = new HotClassLoader(basePath);while (true) {try {// 加载类Class<?> loadedClass = classLoader.loadClass("YourClassName");// 创建实例Object instance = loadedClass.newInstance();// 调用实例方法// 例如:Method method = loadedClass.getMethod("methodName", parameterTypes);//       method.invoke(instance, args);System.out.println("Class reloaded successfully!");} catch (ClassNotFoundException e) {System.out.println("Class not found. Make sure the class name is correct.");} catch (InstantiationException | IllegalAccessException e) {e.printStackTrace();}try {// 模拟定时检测文件变化,实际应用中可使用文件监控库等Thread.sleep(5000);} catch (InterruptedException e) {e.printStackTrace();}}}
}public class HotReloadTester {public static void main(String[] args) {String basePath = "path/to/your/classes/";HotClassLoader classLoader = new HotClassLoader(basePath);// 创建定时任务执行器ScheduledExecutorService executorService = Executors.newScheduledThreadPool(1);// 定时任务,每隔一段时间执行一次executorService.scheduleAtFixedRate(() -> {try {// 加载类Class<?> loadedClass = classLoader.loadClass("YourClassName");// 创建实例Object instance = loadedClass.newInstance();// 调用实例方法// 例如:Method method = loadedClass.getMethod("methodName", parameterTypes);//       method.invoke(instance, args);System.out.println("Class reloaded successfully!");} catch (ClassNotFoundException e) {System.out.println("Class not found. Make sure the class name is correct.");} catch (InstantiationException | IllegalAccessException e) {e.printStackTrace();}}, 0, 5, TimeUnit.SECONDS); // 每隔5秒执行一次// 运行一段时间后停止try {Thread.sleep(60000); // 运行60秒} catch (InterruptedException e) {e.printStackTrace();}// 停止定时任务执行器executorService.shutdown();}
}
这篇关于《JVM由浅入深学习【二】 2023-12-20》JVM由简入深学习提升的文章就介绍到这儿,希望我们推荐的文章对编程师们有所帮助!


