本文主要是介绍facenet 人脸识别构建和开发,希望对大家解决编程问题提供一定的参考价值,需要的开发者们随着小编来一起学习吧!
1. 开发环境
OS: ubuntu16.04
tensorflow版本:1.12.0
python版本: 3.6.7
2. 下载源码到本地
facenet官方github: https://github.com/davidsandberg/facenet.git
git clone https://github.com/davidsandberg/facenet.git
在requirements.txt文件看到要安装相关的依赖库,自己用pip指令安装一下就好了
tensorflow==1.14.0
scipy
scikit-learn
opencv-python
h5py
matplotlib
Pillow
requests
psutil
3. 下载LFW数据集
下载地址:http://vis-www.cs.umass.edu/lfw/
下载步骤:->Menu->Download->All images as gzipped tar file
把下载的压缩包放在 facenet/data/lfw_data 目录下,然后进行解压。
- 对LFW图片预处理
lfw的图片原图尺寸为 250*250,我们要修改图片尺寸,使其大小和预训练模型的图片输入尺寸一致,即160*160,转换后的数据集存储在 facenet/data/lfw_data/lfw_160文件夹内。
- 修改图片尺寸
align_dataset_mtcnn.py 会对dataset的图片进行人脸检测,进一步细化人脸图片,然后再把人脸图片尺寸修改为160×160的尺寸。
进入到facenet/src 目录下,把align_dataset_mtcnn.py 文件拷贝到src目录:
cd facenet/src
cp -i align/align_dataset_mtcnn.py ./
python align_dataset_mtcnn.py ../data/lfw_data/lfw ../data/lfw_data/lfw_160 --image_size 160 --margin 32 --random_order --gpu_memory_fraction 0.25
打印如下表示成功。
[外链图片转存失败(img-RQVgA6oy-1566983772469)(https://pic1.xuehuaimg.com/proxy/csdn/https://img-blog.csdnimg.cn/20190228181338621.png?x-oss-process=image/watermark,type_ZmFuZ3poZW5naGVpdGk,shadow_10,text_aHR0cHM6Ly9ibG9nLmNzZG4ubmV0L3UwMTI1MDU2MTc=,size_16,color_FFFFFF,t_70)]
4. 下载Google预训练的网络模型
下载地址 https://github.com/davidsandberg/facenet ,可以看到有两个基于不同的dataset预训练好的模型。这里我下载的是VGGFace2数据集的模型,并把模型放到facenet/models目录下,然后解压。
[外链图片转存失败(img-0Kf0rcvk-1566983772470)(https://pic1.xuehuaimg.com/proxy/csdn/https://img-blog.csdnimg.cn/20190228182209889.png?x-oss-process=image/watermark,type_ZmFuZ3poZW5naGVpdGk,shadow_10,text_aHR0cHM6Ly9ibG9nLmNzZG4ubmV0L3UwMTI1MDU2MTc=,size_16,color_FFFFFF,t_70)]
5. 预训练模型准确率测试
使用预训练模型进行测试:
python src/validate_on_lfw.py data/lfw_data/lfw_160/ models/20180402-114759/
由于我使用的tf版本的原因,我使用的是 tf1.12版本的, 作者的预训练模型是在tf 1.7版本训练的,所以在导入graph时会出错。出现如下错误:
WARNING:tensorflow:From /usr/local/lib/python3.6/dist-packages/tensorflow/python/training/input.py:734: add_queue_runner (from tensorflow.python.training.queue_runner_impl) is deprecated and will be removed in a future version.
Instructions for updating:
To construct input pipelines, use thetf.datamodule.
Model directory: models/20180402-114759/
Metagraph file: model-20180402-114759.meta
Checkpoint file: model-20180402-114759.ckpt-275
2019-02-28 19:54:02.009422: W tensorflow/core/graph/graph_constructor.cc:1265] Importing a graph with a lower producer version 24 into an existing graph with producer version 27. Shape inference will have run different parts of the graph with different producer versions.
Traceback (most recent call last):
File “src/validate_on_lfw.py”, line 164, in
main(parse_arguments(sys.argv[1:]))
File “src/validate_on_lfw.py”, line 73, in main
facenet.load_model(args.model, input_map=input_map)
File “/home/liguiyuan/study/deep_learning/project/facenet/src/facenet.py”, line 381, in load_model
saver = tf.train.import_meta_graph(os.path.join(model_exp, meta_file), input_map=input_map)
File “/usr/local/lib/python3.6/dist-packages/tensorflow/python/training/saver.py”, line 1674, in import_meta_graph
meta_graph_or_file, clear_devices, import_scope, **kwargs)[0]
…
KeyError: “The name ‘decode_image/cond_jpeg/is_png’ refers to an Operation not in the graph.”
解决方法:
1.把Tensorflow换为1.7版本的;
2.在facenet.py代码中找到create_input_pipeline 再添加一行语句 with tf.name_scope(“tempscope”):就可以完美解决(貌似Tensorflow 1.10及以上版本才修复这个bug)。
[外链图片转存失败(img-AN7KuGeB-1566983772470)(https://pic1.xuehuaimg.com/proxy/csdn/https://img-blog.csdnimg.cn/20190228203353274.png?x-oss-process=image/watermark,type_ZmFuZ3poZW5naGVpdGk,shadow_10,text_aHR0cHM6Ly9ibG9nLmNzZG4ubmV0L3UwMTI1MDU2MTc=,size_16,color_FFFFFF,t_70)]
改好之后, 再重新执行python代码。准确率达到了 0.98500±0.00658,打印如下:
[外链图片转存失败(img-bE7Vd1ZA-1566983772471)(https://pic1.xuehuaimg.com/proxy/csdn/https://img-blog.csdnimg.cn/20190228204156658.png?x-oss-process=image/watermark,type_ZmFuZ3poZW5naGVpdGk,shadow_10,text_aHR0cHM6Ly9ibG9nLmNzZG4ubmV0L3UwMTI1MDU2MTc=,size_16,color_FFFFFF,t_70)]
6. 比较两张图片的距离
执行以下命令:
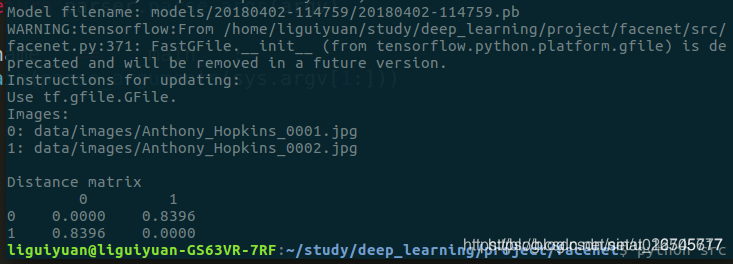
python src/compare.py models/20180402-114759/20180402-114759.pb data/images/Anthony_Hopkins_0001.jpg data/images/Anthony_Hopkins_0002.jpg
又出现了错误:
2019-03-01 15:53:40.632821: I tensorflow/core/common_runtime/gpu/gpu_device.cc:1432] Found device 0 with properties:
name: GeForce GTX 1060 major: 6 minor: 1 memoryClockRate(GHz): 1.6705
pciBusID: 0000:01:00.0
totalMemory: 5.94GiB freeMemory: 5.50GiB
2019-03-01 15:53:40.632855: I tensorflow/core/common_runtime/gpu/gpu_device.cc:1511] Adding visible gpu devices: 0
2019-03-01 15:53:40.838198: I tensorflow/core/common_runtime/gpu/gpu_device.cc:982] Device interconnect StreamExecutor with strength 1 edge matrix:
2019-03-01 15:53:40.838230: I tensorflow/core/common_runtime/gpu/gpu_device.cc:988] 0
2019-03-01 15:53:40.838261: I tensorflow/core/common_runtime/gpu/gpu_device.cc:1001] 0: N
2019-03-01 15:53:40.838410: I tensorflow/core/common_runtime/gpu/gpu_device.cc:1115] Created TensorFlow device (/job:localhost/replica:0/task:0/device:GPU:0 with 6078 MB memory) -> physical GPU (device: 0, name: GeForce GTX 1060, pci bus id: 0000:01:00.0, compute capability: 6.1)
2019-03-01 15:53:40.934468: E tensorflow/stream_executor/cuda/cuda_driver.cc:806] failed to allocate 5.94G (6373572608 bytes) from device: CUDA_ERROR_OUT_OF_MEMORY: out of memory
2019-03-01 15:53:41.996521: E tensorflow/stream_executor/cuda/cuda_dnn.cc:373] Could not create cudnn handle: CUDNN_STATUS_INTERNAL_ERROR
这是申请GPU内存失败了,可以通过设定GPU的配置参数来解决。在compare.py文件中把GPU的使用率从1.0改为0.7:
parser.add_argument('--gpu_memory_fraction', type=float,help='Upper bound on the amount of GPU memory that will be used by the process.', default=1.0)# 该为:parser.add_argument('--gpu_memory_fraction', type=float,help='Upper bound on the amount of GPU memory that will be used by the process.', default=0.7)
这次成功了!得到的值为0.8396,这个值代表的是欧氏距离,用来判别这两张图片是否为同一个人。两张人脸图片越相似,空间距离越小;差别越大,则空间距离越大。

参考教程:
http://www.cnblogs.com/gmhappy/p/9472388.html
这篇关于facenet 人脸识别构建和开发的文章就介绍到这儿,希望我们推荐的文章对编程师们有所帮助!


