本文主要是介绍Linux Podman容器介绍,希望对大家解决编程问题提供一定的参考价值,需要的开发者们随着小编来一起学习吧!
目录
Podman讲解
Container 和 Container Images 的关系
安装Podman
配置root的容器管理
国内镜像源
配置Podman的镜像源
创建容器相关命令
配置rootless的容器管理
配置Podman镜像源
管理容器镜像
管理容器
将容器作为systemd服务运行
配置普通用户来创建systemd管理的容器
Podman讲解
Podman是一个无守护程序、开源的Linux原生工具,指在使用Open Containers Initiative标准轻松查找、运行、构建、共享和部署Container(容器) 和 Container Images(容器镜像)
Podman是一款集合了命令集的工具,设计初衷是为了处理容器化进程的不同任务,可以作为一个模块化框架工作。它的工具集包括:
Podman:Pod和容器镜像管理器
Buildah:容器镜像生成器
Skopeo:容器镜像检查管理器
Runc:容器运行器和特性构建器,并传递给Podman和Buildah
Crun:可选运行时,为Rootless容器提供更大的灵活性、控制和安全性
Podman与Docker的区别
Podman不需要守护进程,Podman控制下的容器既可以由超级用户运行,也可以由非特权用户运行
Docker需要守护进程,并且需要以root权限运行
注意事项
不同用户的Podman操作都是隔离的(用户A有httpd镜像,切换到用户B时就得重新下载httpd镜像)
后续介绍的使用systemd来管理容器也有类似的情况
Container 和 Container Images 的关系
容器镜像是文件,容器是进程
镜像的概念更多偏向于一个环境包,可以移动到任意的操作平台中去运行
容器就是运行环境包的实例,是镜像的一种具体表现形式
可以针对某个环境包运行多个实例(即一个镜像可以启动多个容器)
可以理解为镜像就是系统装载的IOS镜像,容器为镜像启动的操作系统
一个镜像可以装载多个操作系统
安装Podman
安装container-tools模块(包括工具podman和skopeo) RHEL命令
yum module list | grep tools 查找此模块
yum module info container-tools 查看此模块流信息
yum -y module install container-tools 查看安装的版本号
podman -v 查看podman版本号
CentOS命令
yum -y install podman
配置root的容器管理
国内镜像源
常用Docker国内镜像源
网易镜像中心: http://hub-mirror.c.163.com
阿里镜像中心: https://dev.aliyun.com
Docker 官方中国区: https://registry.docker-cn.com
ustc: https://docker.mirrors.ustc.edu.cn
daocloud: https://hub.daocloud.io/
Docker国内免费加速器
daocloud: https://***(自己注册的私有账号).m.daocloud.io
aliyun: https://***(自己注册的私有账号).mirror.aliyuncs.com
配置Podman的镜像源
通过配置podman的配置文件配置镜像源(镜像源有私有镜像源、国内镜像源、国外镜像源)
Podman全局配置文件存放在/etc/containers/registries.conf文件中(安装Podman后自动生成)
Podman用户单独的配置文件存放在~/.config/containers/registries.conf文件中(需要手工创建并编写)
并且~/.config/containers/registries.conf文件的优先级高于/etc/containers/registries.conf
配置docker中国区的源(镜像源-用于存储和检索容器镜像的存储器,从注册表中将容器镜像下载或提取到本地镜像,用于运行容器)
vim /etc/containers/registries.conf#unqualified-search-registries =["registry.fedoraproject.org","registry.access.redhat.com", "registry.centos.org", "docker.io"]  注释掉此行
unqualified-search-registries = ["docker.io"]  指定镜像源域名(前缀),也可以指定指定镜像源[[registry]]prefix = "docker.io"                        定义镜像源的前缀location = " registry.docker-cn.com"        配置镜像加速器(Docker中国官方镜像源)insecure = true                             允许未加密的HTTP以及使用不受信任的证书的TLS连接
- prefix是拉取镜像的时候指定的镜像前缀,location是获取镜像的地址(真正的镜像源)
- 如果不指定prefix,则prefix默认和location一致
- prefix的所对应的值需要在unqualified-search-registries中存在
- 允许通过http协议获取镜像一般用于私有化部署/内网测试环境下
- 通过registry配置镜像源时只可以配置一个镜像源
配置多个中国区的源
vim /etc/containers/registries.conf#unqualified-search-registries =["registry.fedoraproject.org","registry.access.redhat.com", "registry.centos.org", "docker.io"]  注释掉此行
unqualified-search-registries = ["docker.io"][[registry]]
prefix = "docker.io"
location = " registry.docker-cn.com "  配置Docker中国官方镜像源
insecure = true[[registry.mirror]]
location = "hub-mirror.c.163.com"      配置阿里镜像源
insecure = true
[[registry.mirror]
location = " https://dev.aliyun.com "  配置网易镜像源
insecure = true
- 配置多个镜像地址是通过registry.mirror配置多个镜像地址,前提是至少有一个[[registry]]配置
- 拉取镜像时无论选用哪个镜像前缀,都会按照[[registry.mirror]]的上下顺序去拉取镜像,最后才会匹配上[[registry]]里的prefix对应的location位置去拉取镜像
查看padman信息
podman info
创建容器相关命令
podman login registry.docker-cn.com 登录容器镜像源
podman search registry.docker-cn.com/ 搜索整个镜像源有哪些镜像(拉取镜像时先查看镜像)
podman search nginx 搜索镜像源是否有nginx镜像podman pull nginx 拉取nginx镜像
podman pull镜像ID:latest 通过指定镜像源拉取最新镜像
podman images 查看已经下载的镜像
podman inspect 镜像ID 查看镜像的详细信息
podman rmi 镜像ID 删除镜像podman create 基于已经下载的镜像创建容器(并没有启用)
podman start 容器ID 启用容器
podman run 基于已经下载的镜像直接创建并使用容器podman ps -a 查看所有容器
podman exec -it 容器ID /bin/bash 交互式进入到容器中执行命令
podman exec -it 容器ID cat /var/www/html/index.html 直接向容器中执行命令podman stop 容器ID 停止容器
podman rm 容器ID 删除容器
配置rootless的容器管理
rootless的操作和root的操作是一样的,是指编写配置文件时,rootless必须要在家目录下创建相关的文件,并进行编译
配置Podman镜像源
此处我们配置私有的镜像源
通过ssh方式登录到普通用户(编写的内容同root)
mkdir – p ~/.config/containers
vim ~/.config/containers/ registries.conf(可以直接编写,也可以从全局配置文件复制过来进行修改)
unqualified-search-registries = ['registry.domain250.example.com'][[registry]]
location = "registry.domain250.example.com"
insecure = true
blocked = false
管理容器镜像
登录镜像源
podman login registry.lab.example.com
搜索镜像
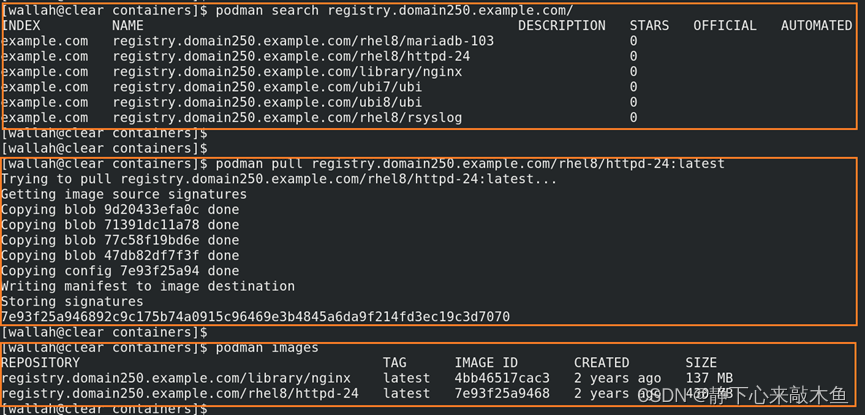
podman search registry.domain250.example.com/
拉取最新镜像
podman pull registry.domain250.example.com/rhel8/httpd-24:latest
查看已经下载的镜像
podman images
查看镜像的详细信息
podman inspect registry.domain250.example.com/rhel8/httpd-24
删除镜像
podman rmi registry.domain250.example.com/rhel8/httpd-24
管理容器
创建容器并启用
podman run -d --name httpd-test -p 8081:8080 registry.domain250.example.com/rhel8/httpd-24
-d 后台运行
--name 容器名称
-p 主机端口:容器端口(将容器的8080端口映射为主机的8081端口)
registry.lab.example.com/rhel8/httpd-24 镜像名称查看容器
podman ps 查看正在运行的容器
-a 查看所有容器查看容器端口
podman port -a停止容器
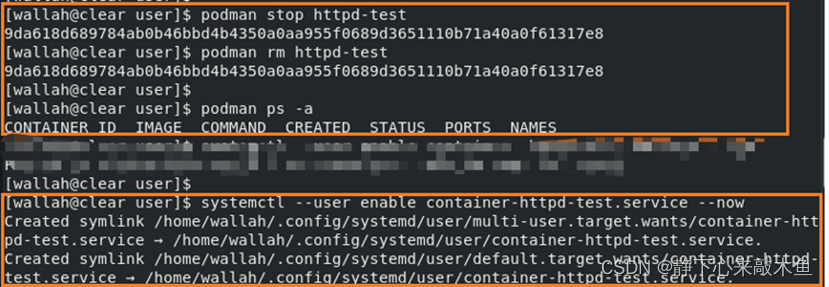
podman stop httpd-test
删除容器
podman rm httpd-test通过交互式进入到容器中执行命令
podman exec -it httpd-test /bin/bash
将容器作为systemd服务运行
并不是通过systemd来管理podman这个程序的start、stop等;而是让systemd管理某个容器的启动、停止等
可以通过systemctl start | status | stop 管理Podman容器,可以实现某个容器在开机时自启动
运行systemctl的两种模式
--system 系统级别(默认的级别)
--user 用户级别
用户级别的systemd目录(通过systemd目录下的unit文件来管理容器)
~/.config/systemd/user/ 优先级高
/usr/lib/systemd/user/ 优先级低
配置普通用户来创建systemd管理的容器
直接通过ssh登录普通用户
创建systemd目录
mkdir -p .config/systemd/user/
cd .config/systemd/user/
在目录下生成unit文件(根据正在运行的容器生成unit文件)
查看容器,并将容器运行
podman ps -a
podman start 容器ID (此处为httpd-test)
然后基于普通用户按照systemctl的服务方式创建unit文件
podman generate systemd --name httpd-test --files --new
podman generate system 将某个容器加入到systemd的管理范围
--name 要加入的应容器名称,并用此名称来命名unit文件
--files 在当前目录生成unit文件(即:container-httpd-test.service文件,服务名就为container-httpd-test.service)
--new 新生成
设置容器通过systemd方式自启动
停止并删除之前安装的容器(保证重启之前container-httpd-test.service 能够自动拉取并启用)
podman stop httpd-test
podman rm httpd-test
设置systemd服务方式的容器自启动
systemctl --user daemon-reload 重新加载systemd管理器配置
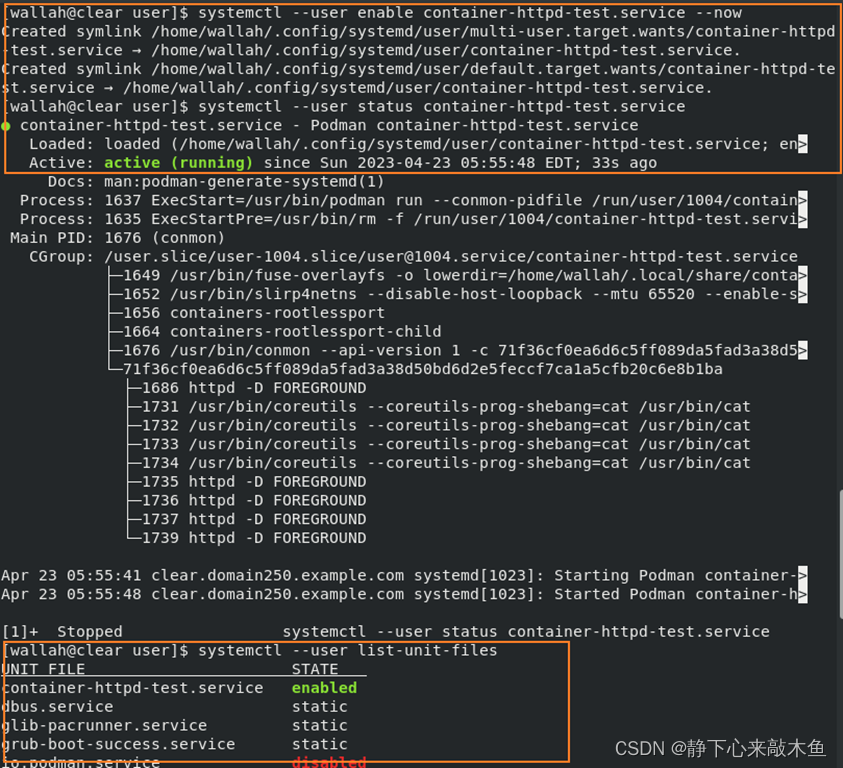
systemctl --user enable container-httpd-test.service –now 给容器设置开机自启动,并且现在也启用
查看systemd服务方式的容器状态
systemctl --user status container-httpd-test.service 查看容器服务状态
systemctl --user list-unit-files 查看systemd启动列表中关于container-httpd-test.service是否enabled状态
强制让普通用户的服务在服务器启动时启动
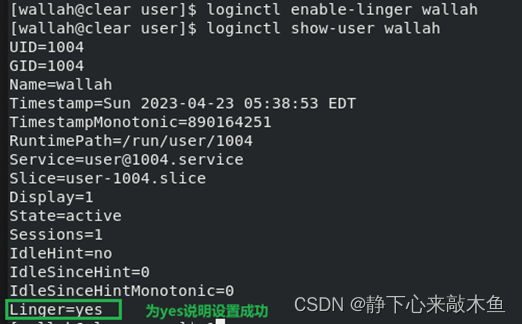
loginctl enable-linger wallah 强制让普通用户的服务在服务器启动时启动
loginctl show-user wallah 查看是否配置成功
这篇关于Linux Podman容器介绍的文章就介绍到这儿,希望我们推荐的文章对编程师们有所帮助!


