本文主要是介绍muduo网络库学习之MutexLock类、MutexLockGuard类、Condition类、CountDownLatch类封装中的知识点,希望对大家解决编程问题提供一定的参考价值,需要的开发者们随着小编来一起学习吧!
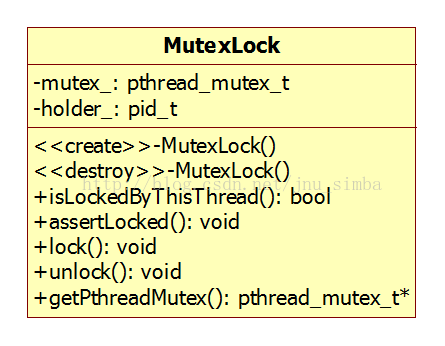
一、MutexLock 类
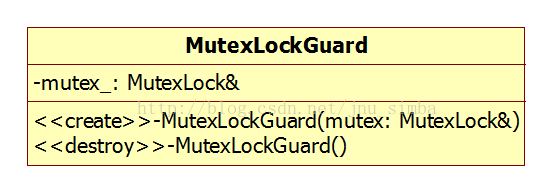
二、MutexLockGuard类
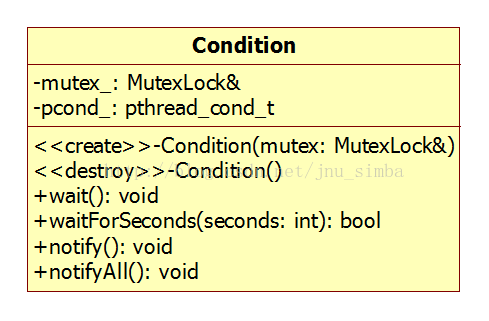
三、Condition类
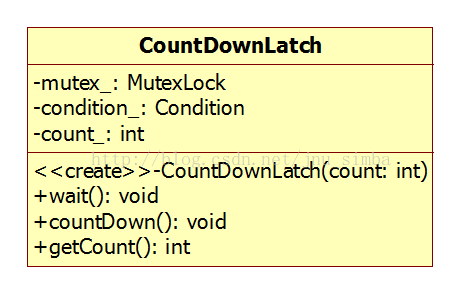
四、CountDownLatch类
也可以用于主线程等待子线程初始化完毕才开始工作
下面写两个程序测试一下CountDownLatch 的作用:
| 1 2 3 4 5 6 7 8 9 10 11 12 13 14 15 16 17 18 19 20 21 22 23 24 25 26 27 28 29 30 31 32 33 34 35 36 37 38 39 40 41 42 43 44 45 46 47 48 49 50 51 52 53 54 55 56 57 58 59 60 61 62 63 64 65 66 67 68 69 70 71 | #include <muduo/base/CountDownLatch.h> #include <muduo/base/Thread.h> #include <boost/bind.hpp> #include <boost/ptr_container/ptr_vector.hpp> #include <string> #include <stdio.h> using namespace muduo; class Test { public: Test( int numThreads) : latch_( 1), threads_(numThreads) { for ( int i = 0; i < numThreads; ++i) { char name[ 32]; snprintf(name, sizeof name, "work thread %d", i); threads_.push_back( new muduo::Thread( boost::bind(&Test::threadFunc, this), muduo::string(name))); } for_each(threads_.begin(), threads_.end(), boost::bind(&Thread::start, _1)); } void run() { latch_.countDown(); } void joinAll() { for_each(threads_.begin(), threads_.end(), boost::bind(&Thread::join, _1)); } private: void threadFunc() { latch_.wait(); printf( "tid=%d, %s started\n", CurrentThread::tid(), CurrentThread::name()); printf( "tid=%d, %s stopped\n", CurrentThread::tid(), CurrentThread::name()); } CountDownLatch latch_; boost::ptr_vector<Thread> threads_; }; int main() { printf( "pid=%d, tid=%d\n", ::getpid(), CurrentThread::tid()); Test t( 3); sleep( 3); printf( "pid=%d, tid=%d %s running ...\n", ::getpid(), CurrentThread::tid(), CurrentThread::name()); t.run(); t.joinAll(); printf( "number of created threads %d\n", Thread::numCreated()); } |
simba@ubuntu:~/Documents/build/debug/bin$ ./countdownlatch_test1
pid=2994, tid=2994
pid=2994, tid=2994 main running ...
tid=2997, work thread 2 started
tid=2997, work thread 2 stopped
tid=2996, work thread 1 started
tid=2996, work thread 1 stopped
tid=2995, work thread 0 started
tid=2995, work thread 0 stopped
number of created threads 3
simba@ubuntu:~/Documents/build/debug/bin$
可以看到其他三个线程一直等到主线程睡眠完执行run(),在里面执行latch_.countDown() 将计数减为0,进而执行notifyall 唤醒后,才开始执行下来。
| 1 2 3 4 5 6 7 8 9 10 11 12 13 14 15 16 17 18 19 20 21 22 23 24 25 26 27 28 29 30 31 32 33 34 35 36 37 38 39 40 41 42 43 44 45 46 47 48 49 50 51 52 53 54 55 56 57 58 59 60 61 62 63 64 65 66 67 68 69 70 71 | #include <muduo/base/CountDownLatch.h> #include <muduo/base/Thread.h> #include <boost/bind.hpp> #include <boost/ptr_container/ptr_vector.hpp> #include <string> #include <stdio.h> using namespace muduo; class Test { public: Test( int numThreads) : latch_(numThreads), threads_(numThreads) { for ( int i = 0; i < numThreads; ++i) { char name[ 32]; snprintf(name, sizeof name, "work thread %d", i); threads_.push_back( new muduo::Thread( boost::bind(&Test::threadFunc, this), muduo::string(name))); } for_each(threads_.begin(), threads_.end(), boost::bind(&muduo::Thread::start, _1)); } void wait() { latch_.wait(); } void joinAll() { for_each(threads_.begin(), threads_.end(), boost::bind(&Thread::join, _1)); } private: void threadFunc() { sleep( 3); printf( "tid=%d, %s started\n" , CurrentThread::tid(), CurrentThread::name()); latch_.countDown(); printf( "tid=%d, %s stopped\n", CurrentThread::tid(), CurrentThread::name()); } CountDownLatch latch_; boost::ptr_vector<Thread> threads_; }; int main() { printf( "pid=%d, tid=%d\n", ::getpid(), CurrentThread::tid()); Test t( 3); t.wait(); printf( "pid=%d, tid=%d %s running ...\n", ::getpid(), CurrentThread::tid(), CurrentThread::name()); t.joinAll(); printf( "number of created threads %d\n", Thread::numCreated()); } |
simba@ubuntu:~/Documents/build/debug/bin$ ./countdownlatch_test2
pid=4488, tid=4488
tid=4491, work thread 2 started
tid=4491, work thread 2 stopped
tid=4490, work thread 1 started
tid=4490, work thread 1 stopped
tid=4489, work thread 0 started
pid=4488, tid=4488 main running ...
tid=4489, work thread 0 stopped
number of created threads 3
可以看出当其他三个线程都启动后,各自执行一次 latch_.countDown(),主线程wait() 返回继续执行下去。
这篇关于muduo网络库学习之MutexLock类、MutexLockGuard类、Condition类、CountDownLatch类封装中的知识点的文章就介绍到这儿,希望我们推荐的文章对编程师们有所帮助!


