本文主要是介绍Spring大略学习(一),希望对大家解决编程问题提供一定的参考价值,需要的开发者们随着小编来一起学习吧!
文章目录
- 1. Spring
- 1.1 简介
- 1.2 优点
- 1.3 组成
- 1.4 拓展
- 2. IOC理论推导
- 传统的各层调用实现
- 存在的问题
- 改进的代码
- 3. HelloSpring
- 例子
- 4. IOC创建对象的方式
- 默认无参构造器+set
- 有参构造器三种
- index下标创建
- 类型识别创建 (不建议使用)
- 通过name创建
- 5. Spring的配置
- 1. 起别名
- 2. Bean的配置
- 3. import
- 6. 依赖注入
- 1. 有参构造器注入
- 2. set 7种类型注入(重点)
- 1. value
- 2. ref
- 3. 数组
- 4. list
- 5. set
- 6. map
- 7. 空指针
- 7. properties
- 3. 其他方式注入
- c命名 通过构造器注入
- p命名 通过属性注入
- 4. Bean的生命周期
- 单例模式
- 原型模式
- Spring大略学习(二)
1. Spring
1.1 简介
spring是一个轻量级 IOC和 AOP的框架技术
spring理念:使现有技术更加容易使用,本身是一个大杂烩,整合了现有框架技术
Spring官网
官方文档
maven导的依赖
<!-- https://mvnrepository.com/artifact/org.springframework/spring-webmvc --><!-- 导入这个依赖,其他的包会自动导入 --><dependency><groupId>org.springframework</groupId><artifactId>spring-webmvc</artifactId><version>5.3.10</version></dependency><!-- spring整合Mybatis 所需要的包 --><dependency><groupId>org.springframework</groupId><artifactId>spring-jdbc</artifactId><version>5.3.10</version></dependency>
1.2 优点
- 开源免费的框架
- 是一个轻量级非入侵式的框架
- 控制反转(IOC),面向切面编程 (AOP)
- 支持事物处理,对框架的整合支持
总结一句话:Spring就是一个轻量级控制反转和面向切面编程的框架
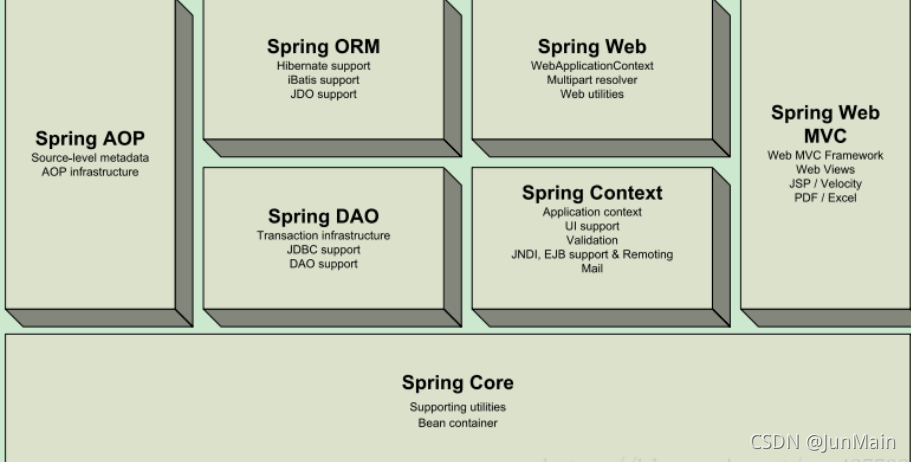
1.3 组成
1.4 拓展
springboot
springcloud
2. IOC理论推导
传统的各层调用实现
-
UserDao接口
package com.lzj.dao;public interface UserDao {public void getUser(); } -
UserDaoImpl实现类
package com.lzj.dao;public class UserDaoImpl implements UserDao{public void getUser() {System.out.println("获取用户");} } -
UserService业务接口
package com.lzj.service;public interface UserService {public void getUser(); } -
UserServiceImpl业务实现类
package com.lzj.service;import com.lzj.dao.UserDao; import com.lzj.dao.UserDaoImpl; import com.lzj.dao.UserDaoMysqlImpl;public class UserServiceImpl implements UserService{private UserDao userDao = new UserDaoImpl();public void getUser() {userDao.getUser();} } -
test测试
@Test/*** 不用IOC正常获取用户都是手动new* 当我们要改需求的时候,dao层一旦改变 service层也要改变*/public void test01(){UserService userService = new UserServiceImpl();userService.getUser();}
存在的问题
当我们一旦需求发生了变化, 例如我想要Mysql查询用户信息,我们先是新写了一个实现类
但是我们发现,一旦我们要在service层面调用的时候还有自己修改代码,再new一个UserDaoMysqlImpl
UserDaoMysqlImpl
package com.lzj.dao;public class UserDaoMysqlImpl implements UserDao{public void getUser() {System.out.println("利用Mysql查询用户");}
}
UserServiceImpl
package com.lzj.service;import com.lzj.dao.UserDao;
import com.lzj.dao.UserDaoImpl;
import com.lzj.dao.UserDaoMysqlImpl;public class UserServiceImpl implements UserService{// private UserDao userDao = new UserDaoImpl();private UserDao userDao = new UserDaoMysqlImpl();public void getUser() {userDao.getUser();}
}
可能这么做一个两个或许不觉得烦,一旦业务量增加成百上千个,我们还要在手动new修改吗?
就是基于这样我们引入了 控制反转,将new实现类对象的权利交给了使用这个代码的人
改进的代码
我们只需要改进这个service层的实现类,并为其加上了一个set方法,这样我们惊奇的发现,new什么实现类对象不再是有我们控制了
而是根据同的需求通过set方法传递,我们只负责调用即可,这样就是实现了new实现类的权利的 控制反转
UserServiceImpl
package com.lzj.service;import com.lzj.dao.UserDao;
import com.lzj.dao.UserDaoImpl;
import com.lzj.dao.UserDaoMysqlImpl;public class UserServiceImpl implements UserService{private UserDao userDao;public void setUserDao(UserDao userDao){this.userDao = userDao;}public void getUser() {userDao.getUser();}
}
Test
@Testpublic void test02(){UserServiceImpl userService = new UserServiceImpl();userService.setUserDao(new UserDaoMysqlImpl());userService.getUser();}
3. HelloSpring
例子
-
先建立applicationContext.xml ——Spring的配置文件
<?xml version="1.0" encoding="UTF-8"?> <beans xmlns="http://www.springframework.org/schema/beans"xmlns:xsi="http://www.w3.org/2001/XMLSchema-instance"xsi:schemaLocation="http://www.springframework.org/schema/beanshttp://www.springframework.org/schema/beans/spring-beans.xsd"><!--bean就是java对象 , 由Spring创建和管理--><!--id是自定义的在getBean("id"); 通过id获取Spring容器创建的对象通过property来注入entity的属性值<property name = "entity的属性名", value/ref = " ">value是基本类型的值ref是引用类型,Spring容器创建过的entity的id--><bean id="hello" class="com.lzj.entity.Hello"><property name="name" value="Spring"/></bean> </beans> -
entity实体类
package com.lzj.entity;import lombok.ToString;public class Hello {private String str;public Hello(){System.out.println("我调用了无参构造器");}public void setStr(String str){System.out.println("调用了setStr方法");this.str = str;}public String getStr(){return this.str;}public String toString(){return "[str = " + str + "]";}} -
获取Spring上下文对象
@Test
public void test01(){//获取ApplicationContext对象, 构造器传入Spring的配置文件ApplicationContext context = new ClassPathXmlApplicationContext("applicationContext.xml");Hello hello = (Hello) context.getBean("applicationContext.xml");System.out.println(hello);
}
我们发现,在Spring容易创建了HelloBean对象的时候调用了set方法, 和无参构造器
@Test
public void test01(){//获取ApplicationContext对象, 构造器传入Spring的配置文件ApplicationContext context = new ClassPathXmlApplicationContext("applicationContext.xml");
}

我们只创建context的一瞬间,Spring容器就通过无参构造器和set方法创建对象
用Spring容器创建UserServiceImpl, UserDaoImpl
<?xml version="1.0" encoding="UTF-8"?>
<beans xmlns="http://www.springframework.org/schema/beans"xmlns:xsi="http://www.w3.org/2001/XMLSchema-instance"xsi:schemaLocation="http://www.springframework.org/schema/beanshttp://www.springframework.org/schema/beans/spring-beans.xsd"><bean id="UserDaoImpl" class="com.lzj.dao.UserDaoImpl"/><bean id="UserDaoMysqlImpl" class="com.lzj.dao.UserDaoMysqlImpl"/><bean id="UserServiceImpl" class="com.lzj.service.UserServiceImpl"><property name="userDao" ref="UserDaoImpl"/></bean></beans>
测试
@Test
public void test(){AppicationContext context = new ClassPathXmlApplicationContext("applicationContext.xml");UserServiceImpl userService = (UserServiceImpl) context.getBean("UserServiceImpl");userService.getUser();
}
4. IOC创建对象的方式
默认无参构造器+set
<beans><bean id="" class=""><property name="" value/ref=""></bean>
</beans>
有参构造器三种
index下标创建
public class Hello{private String str;public void Hello(String str){System.out.printf("调用了有参构造器");this.str = str;}
}
给有参构造器的第一个参数(从0开始)赋值
<beans><bean id="Hello" class="com.lzj.entity.Hello"><constructor-arg index="0" value="Hello"/></bean>
</beans>
类型识别创建 (不建议使用)
当同时出现两个一样的类型是会报错ambiguous
<beans><bean id="Hello" class="com.lzj.entity.Hello"><constructor-arg type="java.lang.String" value="Hello Spring"/></bean>
</beans>
通过name创建
常用
<beans><bean id="Hello" class="com.lzj.entity.Hello"><constructor-arg name="str" value="Hello Spring"/></bean>
</beans>
5. Spring的配置
1. 起别名
alias是给bean的id起别名
  <bean id="Hello" class="com.lzj.entity.Hello">
<!--        <property name="str" value="Hello Spring"/>-->
<!--        <constructor-arg index="0" value="Hello Spring"/>-->
<!--        <constructor-arg type="java.lang.String" value="Hello Spring"/>--><constructor-arg name="str" value="Hello Spring"/></bean><alias name="Hello" alias="hello"/>
2. Bean的配置
name也可以起别名,还不止一个
<beans><bean id="" class="" name="xxx, xxx1, xx3"></bean>
</beans>
3. import
这个标签用于多人合作,当一个项目有多个人再写是,会配置很多个xxx.xml的配置文件,import就是将多个配置文件都最终导入
applicationContext.xml这个配置文件中
applicationContext.xml
<import resource="xxx.xml"/>
<import resource="xxx.xml"/>
6. 依赖注入
1. 有参构造器注入
之前讲过
2. set 7种类型注入(重点)
<bean id="Student" class="com.lzj.entity.Student"><property name="name" value="JunMain"/><property name="address" ref="Address"/><property name="books"><array><value>三国演义</value><value>水浒传</value><value>金瓶梅</value></array></property><property name="hobbies"><list><value>唱</value><value>跳</value><value>rap</value></list></property><property name="map"><map><entry key="JunMain挚爱" value="沙冕"/></map></property><property name="set"><set><value>Abstract</value></set></property><property name="wife"><null/></property><property name="info"><props><prop key="老婆">沙冕</prop><prop key="老爸">留情</prop></props></property>
</bean>
1. value
<property name="name" value="JunMain"/>
2. ref
<property name="address" ref="Address"/>
3. 数组
<property name="books"><array><value>三国演义</value><value>水浒传</value><value>金瓶梅</value></array>
</property>
4. list
<property name="hobbies"><list><value>唱</value><value>跳</value><value>rap</value></list></property>
5. set
<property name="set"><set><value>Abstract</value></set></property>
6. map
<property name="map"><map><entry key="JunMain挚爱" value="沙冕"/></map></property>
7. 空指针
<property name="wife"><null/></property>7. properties
<property name="info"><props><prop key="老婆">沙冕</prop><prop key="老爸">留情</prop></props></property>
3. 其他方式注入
需要添加的约数
People类
package com.lzj.entity;public class People {private String name;public String getName() {return name;}public void setName(String name) {this.name = name;}public People(String name) {this.name = name;}public People() {}@Overridepublic String toString() {return "People{" +"name='" + name + '\'' +'}';}
}
c命名 通过构造器注入
需要添加新的约束
xmlns:c="http://www.springframework.org/schema/c"
<?xml version="1.0" encoding="UTF-8"?>
<beans xmlns="http://www.springframework.org/schema/beans"xmlns:c="http://www.springframework.org/schema/c"xmlns:xsi="http://www.w3.org/2001/XMLSchema-instance"xsi:schemaLocation="http://www.springframework.org/schema/beans http://www.springframework.org/schema/beans/spring-beans.xsd"> <bean id="People" class="com.lzj.entity.People" p:name="先驱"/>
p命名 通过属性注入
需要添加新的约束
<?xml version="1.0" encoding="UTF-8"?>
<beans xmlns="http://www.springframework.org/schema/beans"xmlns:p="http://www.springframework.org/schema/p" xmlns:xsi="http://www.w3.org/2001/XMLSchema-instance"xsi:schemaLocation="http://www.springframework.org/schema/beans http://www.springframework.org/schema/beans/spring-beans.xsd"><!--xmlns:p="http://www.springframework.org/schema/p" --> <bean id="People" class="com.lzj.entity.People" c+:name="先驱"/>
4. Bean的生命周期
单例模式
<bean id="People" class="com.lzj.entity.People" c+:name="先驱" scope="singleton"/>
都是一个对象
默认机制
原型模式
多线程使用
每次从容器get的时候都会产生一个新的对象
Spring大略学习(二)
这篇关于Spring大略学习(一)的文章就介绍到这儿,希望我们推荐的文章对编程师们有所帮助!


