本文主要是介绍spring5.0源码-AOP源码阅读笔记,希望对大家解决编程问题提供一定的参考价值,需要的开发者们随着小编来一起学习吧!
上节 阅读完基础的bean加载之后,关注点转到了,
AOP为Aspect Oriented
Programming的缩写,意为:面向切面编程,通过预编译方式和运行期动态代理实现程序功能的统一维护的一种技术。AOP是OOP的延续,是软件开发中的一个热点,也是Spring框架中的一个重要内容,是函数式编程的一种衍生范型。利用AOP可以对业务逻辑的各个部分进行隔离,从而使得业务逻辑各部分之间的耦合度降低,提高程序的可重用性,同时提高了开发的效率。
AOP是思想,Spring是对于AOP有基于反射模式的一个实现,同时也可以使用CGLIB字节码的方式去实现。
AOP关注的是什么?
是切面,是将业务代码切出来
这里就提起来一个设计模式,代理模式。
代理模式(Proxy Pattern),其定义:
Provide a surrogate or placeholder for another object to control access to it.(为其他对象提供
一种代理以控制对这个对象的访问。)
这是一个类图

如果按照这个类去实现代理模式,如果每次我需要增加新的业务,非常容易造成要修改Proxy的情况,因为将业务强行统一到已经写好固定的模式是很困难的。
这样被称之为静态代理。那么就有与之相对的动态代理
动态代理利用了JDK API(1.5推出了InvocationHandler)/CGLIB,动态地在内存中构建代理对象,从而实现对目标对象的代理功能。
介绍到这里为止,我们现在看demo
<?xml version="1.0" encoding="UTF-8"?>
<beans xmlns="http://www.springframework.org/schema/beans"xmlns:xsi="http://www.w3.org/2001/XMLSchema-instance"xmlns:aop="http://www.springframework.org/schema/aop"xsi:schemaLocation="http://www.springframework.org/schema/beans http://www.springframework.org/schema/beans/spring-beans-3.2.xsd
http://www.springframework.org/schema/aop http://www.springframework.org/schema/aop/spring-aop.xsd"><aop:config>不同的执行方式<!--<aop:aspect id="myAdvice" ref="myAdvice"><aop:pointcut expression="execution(* setAge(..)) and args(age)" id="myPointcut"/><aop:before pointcut-ref="myPointcut"method="loginAdive" arg-names="age"/></aop:aspect>--><aop:pointcut expression="execution(* setAge(..))" id="myPointcut"/><aop:advisor advice-ref="MyAdvisor" pointcut-ref="myPointcut"/></aop:config><bean id="myAdvice" class="com.cn.yc.myAdvice"/><bean id="MyAdvisor" class="com.cn.yc.MyAdvisor"/><bean id="testEntrustBean" class="com.cn.yc.TestEntrustBean"/>
</beans>public class SpringAopTest {@Testpublic void testAop() {ClassPathXmlApplicationContext ctx =new ClassPathXmlApplicationContext(SpringAopTest.class.getName() + "-context.xml", getClass());TestEntrustBean testEntrustBean = (TestEntrustBean) ctx.getBean("testEntrustBean");testEntrustBean.setAge(10);}}public class myAdvice {public void loginAdive(int age){System.out.println("login advice " + age);}}public class TestEntrustBean {public void setAge(int age){System.out.println("real :" +age);}}
执行为
login advice 10
real :10
那么这里有几个问题,我需要知道解答结果
1.aop是如何去抓取xml的
2.aspectj和现有AOP的区别
从demo里面看依旧是初始化context,然后getBean,执行方法。那么这里看,代码执行肯定是在ClassPathXmlApplicationContext 这个类里面的初始化。
这里其实可以直接跑到AbstractXMLApplicationContext的loadBeanDefinitions方法里面
protected void loadBeanDefinitions(DefaultListableBeanFactory beanFactory) throws BeansException, IOException {// Create a new XmlBeanDefinitionReader for the given BeanFactory.// 创建了一个读取xml的一个读取工具XmlBeanDefinitionReader beanDefinitionReader = new XmlBeanDefinitionReader(beanFactory);// Configure the bean definition reader with this context's// resource loading environment.beanDefinitionReader.setEnvironment(this.getEnvironment());beanDefinitionReader.setResourceLoader(this);beanDefinitionReader.setEntityResolver(new ResourceEntityResolver(this));// Allow a subclass to provide custom initialization of the reader,// then proceed with actually loading the bean definitions.initBeanDefinitionReader(beanDefinitionReader);loadBeanDefinitions(beanDefinitionReader);
}
XML有一个
/*** The location to look for the mapping files. Can be present in multiple JAR files.* 这个文件里面是spring的一个解析类的地址*/
public static final String DEFAULT_HANDLER_MAPPINGS_LOCATION = "META-INF/spring.handlers";
/*** Create the default implementation of {@link NamespaceHandlerResolver} used if none is specified.* <p>The default implementation returns an instance of {@link DefaultNamespaceHandlerResolver}.* @see DefaultNamespaceHandlerResolver#DefaultNamespaceHandlerResolver(ClassLoader)*/
protected NamespaceHandlerResolver createDefaultNamespaceHandlerResolver() {ClassLoader cl = (getResourceLoader() != null ? getResourceLoader().getClassLoader() : getBeanClassLoader());return new DefaultNamespaceHandlerResolver(cl);
}
每个jar包里面,都会有spring.handlers,但是我们看AOP包里面的内容
http://www.springframework.org/schema/aop=org.springframework.aop.config.AopNamespaceHandler
也就到了AopNamespaceHandler这个类
public class AopNamespaceHandler extends NamespaceHandlerSupport {/*** Register the {@link BeanDefinitionParser BeanDefinitionParsers} for the* '{@code config}', '{@code spring-configured}', '{@code aspectj-autoproxy}'* and '{@code scoped-proxy}' tags.*/@Overridepublic void init() {// In 2.0 XSD as well as in 2.1 XSD.//AOP自己带的registerBeanDefinitionParser("config", new ConfigBeanDefinitionParser());//扩展的,registerBeanDefinitionParser("aspectj-autoproxy", new AspectJAutoProxyBeanDefinitionParser());registerBeanDefinitionDecorator("scoped-proxy", new ScopedProxyBeanDefinitionDecorator());// Only in 2.0 XSD: moved to context namespace as of 2.1registerBeanDefinitionParser("spring-configured", new SpringConfiguredBeanDefinitionParser());}
}
ConfigBeanDefinitionParser 这个类的parse方法
@Nullable
public BeanDefinition parse(Element element, ParserContext parserContext) {CompositeComponentDefinition compositeDef = new CompositeComponentDefinition(element.getTagName(), parserContext.extractSource(element));parserContext.pushContainingComponent(compositeDef);this.configureAutoProxyCreator(parserContext, element);List<Element> childElts = DomUtils.getChildElements(element);Iterator var5 = childElts.iterator();while(var5.hasNext()) {Element elt = (Element)var5.next();String localName = parserContext.getDelegate().getLocalName(elt);if ("pointcut".equals(localName)) {this.parsePointcut(elt, parserContext);} else if ("advisor".equals(localName)) {this.parseAdvisor(elt, parserContext);} else if ("aspect".equals(localName)) {this.parseAspect(elt, parserContext);}}parserContext.popAndRegisterContainingComponent();return null;
}
然后请这3个if里面的父类都为AbstractBeanDefinition
首先看parsePointcut的使用的类AspectJExpressionPointcut关系图
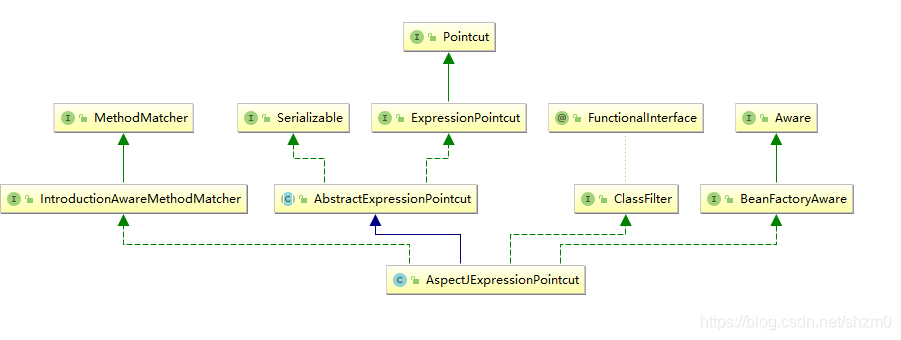
这是具体的解析代码
private AbstractBeanDefinition parsePointcut(Element pointcutElement, ParserContext parserContext) {//获取aop idString id = pointcutElement.getAttribute("id");// 获取正则String expression = pointcutElement.getAttribute("expression");AbstractBeanDefinition pointcutDefinition = null;try {//PointcutEntry是一个hash结构,里面存着一个linkedhashmap的结构this.parseState.push(new PointcutEntry(id));//通过正则创建,一个pointcut的定义pointcutDefinition = this.createPointcutDefinition(expression);pointcutDefinition.setSource(parserContext.extractSource(pointcutElement));String pointcutBeanName = id;if (StringUtils.hasText(id)) {parserContext.getRegistry().registerBeanDefinition(id, pointcutDefinition);} else {pointcutBeanName = parserContext.getReaderContext().registerWithGeneratedName(pointcutDefinition);}parserContext.registerComponent(new PointcutComponentDefinition(pointcutBeanName, pointcutDefinition, expression));} finally {//弹出Linkthis.parseState.pop();}return pointcutDefinition;}
就是吧必要的信息初始化存到BeanDefaintion
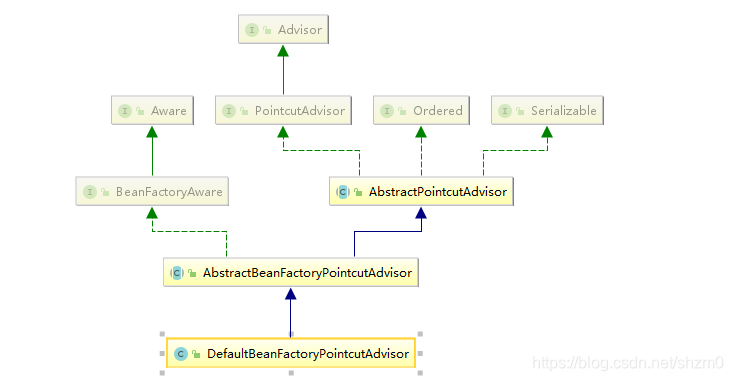
然后是aop:advisor
<aop:advisor advice-ref="MyAdvisor" pointcut-ref="myPointcut"/>
其实也是把信息存起来,但是它会去存point的地方,找一找有没有定义
这里请注意,adviosr必须在pointcut后面,不然后会找不到
这是它所使用的bean定义
aop:aspect是我注释的地方,因为
<aop:aspect id="myAdvice" ref="myAdvice"><aop:pointcut expression="execution(* setAge(..)) and args(age)" id="myPointcut"/><aop:before pointcut-ref="myPointcut"method="loginAdive" arg-names="age"/></aop:aspect>
使用advisor有个很大的缺点就是要去实现接口
他的代码实现其实就综合了一些,要去先找到找aop的before/other,然后找pointcut,然后存起来
private void parseAspect(Element aspectElement, ParserContext parserContext) {
String aspectId = aspectElement.getAttribute(“id”);
String aspectName = aspectElement.getAttribute(“ref”);
try {this.parseState.push(new AspectEntry(aspectId, aspectName));List<BeanDefinition> beanDefinitions = new ArrayList();List<BeanReference> beanReferences = new ArrayList();List<Element> declareParents = DomUtils.getChildElementsByTagName(aspectElement, "declare-parents");for(int i = 0; i < declareParents.size(); ++i) {Element declareParentsElement = (Element)declareParents.get(i);beanDefinitions.add(this.parseDeclareParents(declareParentsElement, parserContext));}NodeList nodeList = aspectElement.getChildNodes();boolean adviceFoundAlready = false;for(int i = 0; i < nodeList.getLength(); ++i) {Node node = nodeList.item(i);//这个方法就是去判断before ,afterif (this.isAdviceNode(node, parserContext)) {if (!adviceFoundAlready) {adviceFoundAlready = true;if (!StringUtils.hasText(aspectName)) {parserContext.getReaderContext().error("<aspect> tag needs aspect bean reference via 'ref' attribute when declaring advices.", aspectElement, this.parseState.snapshot());return;}beanReferences.add(new RuntimeBeanReference(aspectName));}AbstractBeanDefinition advisorDefinition = this.parseAdvice(aspectName, i, aspectElement, (Element)node, parserContext, beanDefinitions, beanReferences);beanDefinitions.add(advisorDefinition);}}AspectComponentDefinition aspectComponentDefinition = this.createAspectComponentDefinition(aspectElement, aspectId, beanDefinitions, beanReferences, parserContext);parserContext.pushContainingComponent(aspectComponentDefinition);List<Element> pointcuts = DomUtils.getChildElementsByTagName(aspectElement, "pointcut");Iterator var21 = pointcuts.iterator();while(var21.hasNext()) {Element pointcutElement = (Element)var21.next();//解析pointcutthis.parsePointcut(pointcutElement, parserContext);}parserContext.popAndRegisterContainingComponent();
} finally {this.parseState.pop();
}
}
现在的关注点是怎么样让他可以去代理
AbstractAutowireCapableBeanFactory 类有createBean方法去执行
Object beanInstance;
try {// 这里是去代理的实现代码beanInstance = this.resolveBeforeInstantiation(beanName, mbdToUse);if (beanInstance != null) {return beanInstance;}
} catch (Throwable var10) {throw new BeanCreationException(mbdToUse.getResourceDescription(), beanName, "BeanPostProcessor before instantiation of bean failed", var10);
}try {//这里是创建beanbeanInstance = this.doCreateBean(beanName, mbdToUse, args);if (this.logger.isDebugEnabled()) {this.logger.debug("Finished creating instance of bean '" + beanName + "'");}return beanInstance;
} catch (ImplicitlyAppearedSingletonException | BeanCreationException var7) {throw var7;
} catch (Throwable var8) {throw new BeanCreationException(mbdToUse.getResourceDescription(), beanName, "Unexpected exception during bean creation", var8);
}
然后是跳到AspectJAwareAdvisorAutoProxyCreator ,类图结构
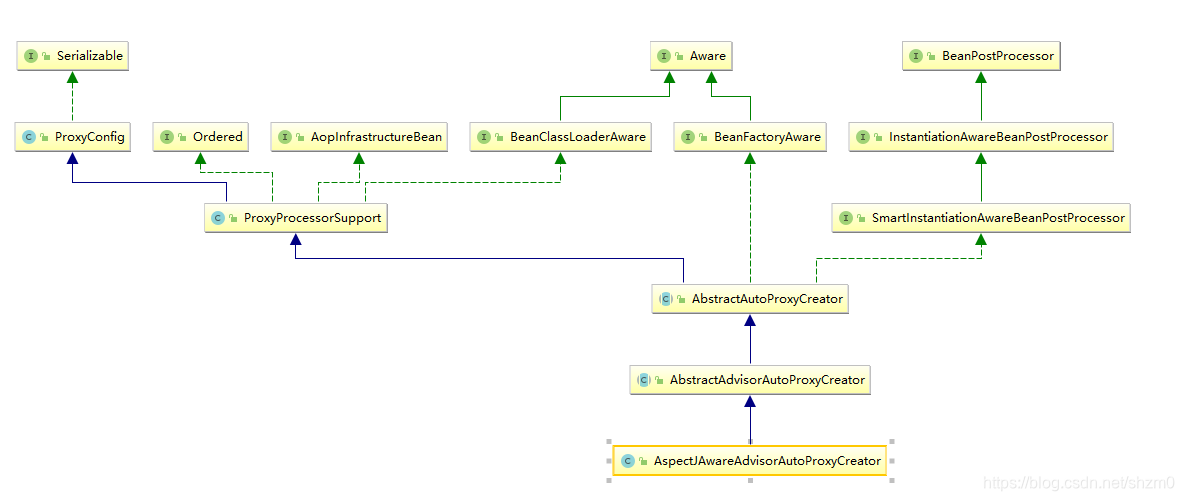
具体实现在AbstractAutoProxyCreator这个类里面方法进行实现postProcessBeforeInstantiation
public Object postProcessBeforeInstantiation(Class<?> beanClass, String beanName) throws BeansException {Object cacheKey = this.getCacheKey(beanClass, beanName);// 这里判断是否将advisor的一些信息put进去if (!StringUtils.hasLength(beanName) || !this.targetSourcedBeans.contains(beanName)) {if (this.advisedBeans.containsKey(cacheKey)) {return null;}if (this.isInfrastructureClass(beanClass) || this.shouldSkip(beanClass, beanName)) {this.advisedBeans.put(cacheKey, Boolean.FALSE);return null;}}//这里是进行代理设置TargetSource targetSource = this.getCustomTargetSource(beanClass, beanName);if (targetSource != null) {if (StringUtils.hasLength(beanName)) {this.targetSourcedBeans.add(beanName);}Object[] specificInterceptors = this.getAdvicesAndAdvisorsForBean(beanClass, beanName, targetSource);Object proxy = this.createProxy(beanClass, beanName, specificInterceptors, targetSource);this.proxyTypes.put(cacheKey, proxy.getClass());return proxy;} else {return null;}}
最后是 这个执行方法里面去判断createProxy
protected Object createProxy(Class<?> beanClass, @Nullable String beanName, @Nullable Object[] specificInterceptors, TargetSource targetSource) {//省略。。。return proxyFactory.getProxy(this.getProxyClassLoader());}
然后到DefaultAopProxyFactory进行jdk还是cglib的代理
public AopProxy createAopProxy(AdvisedSupport config) throws AopConfigException {
if (!config.isOptimize() && !config.isProxyTargetClass() && !this.hasNoUserSuppliedProxyInterfaces(config)) {
return new JdkDynamicAopProxy(config);
} else {
Class<?> targetClass = config.getTargetClass();
if (targetClass == null) {
throw new AopConfigException(“TargetSource cannot determine target class: Either an interface or a target is required for proxy creation.”);
} else {
return (AopProxy)(!targetClass.isInterface() && !Proxy.isProxyClass(targetClass) ? new ObjenesisCglibAopProxy(config) : new JdkDynamicAopProxy(config));
}
}
}
使用JDK,首先不进行策略优化,其次没有直接引用目标代理类,同时有接口
上面的demo是走的cglib加个接口会走aop
aop:aspectj-autoproxy
xml配置是比较坑爹的,使用aspectj,就可以开启aspectj的风格注释支持
直接看
@Nullable
public BeanDefinition parse(Element element, ParserContext parserContext) {
AopNamespaceUtils.registerAspectJAnnotationAutoProxyCreatorIfNecessary(parserContext, element);
this.extendBeanDefinition(element, parserContext);
return null;
}
里面创建的类为AspectJAwareAdvisorAutoProxyCreator,是之前的子类,所以核心基本一致
就是关于一些find重写,来进行解析
这篇关于spring5.0源码-AOP源码阅读笔记的文章就介绍到这儿,希望我们推荐的文章对编程师们有所帮助!


