本文主要是介绍Spring Boot学习随笔- 集成JSP模板(配置视图解析器)、整合Mybatis(@MapperScan注解的使用),希望对大家解决编程问题提供一定的参考价值,需要的开发者们随着小编来一起学习吧!
学习视频:【编程不良人】2021年SpringBoot最新最全教程
第五章、JSP模板集成

5.1 引入JSP依赖
<!--引入jsp解析依赖-->
<!--C标签库-->
<dependency><groupId>jstl</groupId><artifactId>jstl</artifactId><version>1.2</version>
</dependency>
<!--让内嵌tomcat具有解析jsp功能-->
<dependency><groupId>org.apache.tomcat.embed</groupId><artifactId>tomcat-embed-jasper</artifactId>
</dependency>
5.2 配置jsp视图解析器
# 配置jsp视图解析器
spring:mvc:view:prefix: /suffix: .jsp
5.3 指定Jsp访问目录
在main创建webapp,然后创建index.jsp进行测试,在访问之前需要进行一个设置,否则springboot是找不到jsp页面的

-
修改jsp无需重启应用
server:port: 8989servlet:context-path: /springboot02jsp:init-parameters:development: true # 开启jsp页面开发模式 作用:无需重启应用,直接刷新网页
第六章、整合MyBatis框架
数据库访问框架:hibernate、jpa、mybatis【主流】
SpringBoot(微框架) = Spring(工厂) + SpringMVC(控制器)
SpringBoot整合MyBatis的思路基本上是和Spring整合MyBatis是一致的
6.1 引入依赖
<!--引入和MyBatis整合相关的依赖-->
<!--druid-->
<dependency><groupId>com.alibaba</groupId><artifactId>druid</artifactId><version>1.1.19</version>
</dependency>
<!--mysql-->
<dependency><groupId>mysql</groupId><artifactId>mysql-connector-java</artifactId>
</dependency>
<!--mybatis-spring-boot-stater-->
<dependency><groupId>org.mybatis.spring.boot</groupId><artifactId>mybatis-spring-boot-starter</artifactId><version>3.0.0</version>
</dependency>
6.2 @MapperScan注解
作用:用在类上,扫描dao接口所在包,同时将所有dao接口交给工厂创建对象
用法:
@SpringBootApplication
**@MapperScan({"com.baizhi.dao"})**
public class Springboot03Application {public static void main(String[] args) {SpringApplication.run(Springboot03Application.class, args);}}
6.3 整合mybatis相关配置
server:port: 8989servlet:context-path: /springboot03 #指定应用名称**#整合mybatis相关配置**
spring:datasource:type: com.alibaba.druid.pool.DruidDataSource #指定数据源driver-class-name: com.mysql.cj.jdbc.Driver # mysql8以上选择带cj的Driverurl: jdbc:mysql://localhost:3306/ssm?characterEncoding=UTF-8username: rootpassword: 123456mybatis:mapper-locations: classpath:com.baizhi.mapper/*.xml **#指定mapper配置文件位置**type-aliases-package: com.baizhi.entity **#指定实体类的别名** 默认别名:类名(首字母小写)
6.4 实体类、Service、DAO
-
实体类
public class Emp {private Integer id;private String name;@JsonFormat(pattern = "yyyy-MM-dd")private Date birthday;private Double salary; } -
Service实现类
@Service @Transactional public class EmpServiceImpl implements EmpService {@Autowiredprivate EmpDAO empDAO;public EmpServiceImpl(EmpDAO empDAO) {this.empDAO = empDAO;}@Overridepublic List<Emp> findAll() {return empDAO.findAll();}@Overridepublic void save(Emp emp) {empDAO.save(emp);int i = 1/0; // 测试是否回滚} } -
控制器
@RestController public class EmpController {@Autowiredprivate EmpService empService;public EmpController(EmpService empService) {this.empService = empService;}@RequestMapping("findAll")public List<Emp> findAll() {return empService.findAll();}@RequestMapping("save")public void save(Emp emp) {empService.save(emp);} -
Mapper文件
<?xml version="1.0" encoding="UTF-8" ?> <!DOCTYPE mapper PUBLIC "-//mybatis.org//DTD Mapper 3.0//EN" "http://mybatis.org/dtd/mybatis-3-mapper.dtd" > <mapper namespace="com.baizhi.dao.EmpDAO"><insert id="save">insert into emp values(#{id},#{name},#{birthday},#{salary})</insert><select id="findAll" resultType="com.baizhi.entity.Emp">select id,`name`,birthday,salary from emp</select> </mapper> -
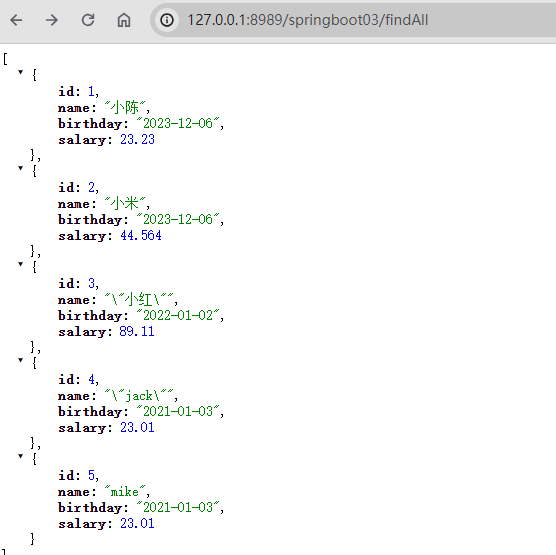
测试结果
http://127.0.0.1:8989/springboot03/save?name=mike&birthday=2021/1/4&salary=23.01可以正常添加
也可以正常查询

6.5 @Mapper 和 @MapperScan
@MapperScan是加在入口类,自动扫描包下面的dao接口一劳永逸【推荐】
@Mapper是直接加在dao接口,每个dao都要添加
下一章:Spring Boot学习随笔- 本地化测试(@SpringBootTest)、热部署(spring-boot-devtools)、日志Logback常用级别使用、指定包级别输出
这篇关于Spring Boot学习随笔- 集成JSP模板(配置视图解析器)、整合Mybatis(@MapperScan注解的使用)的文章就介绍到这儿,希望我们推荐的文章对编程师们有所帮助!


