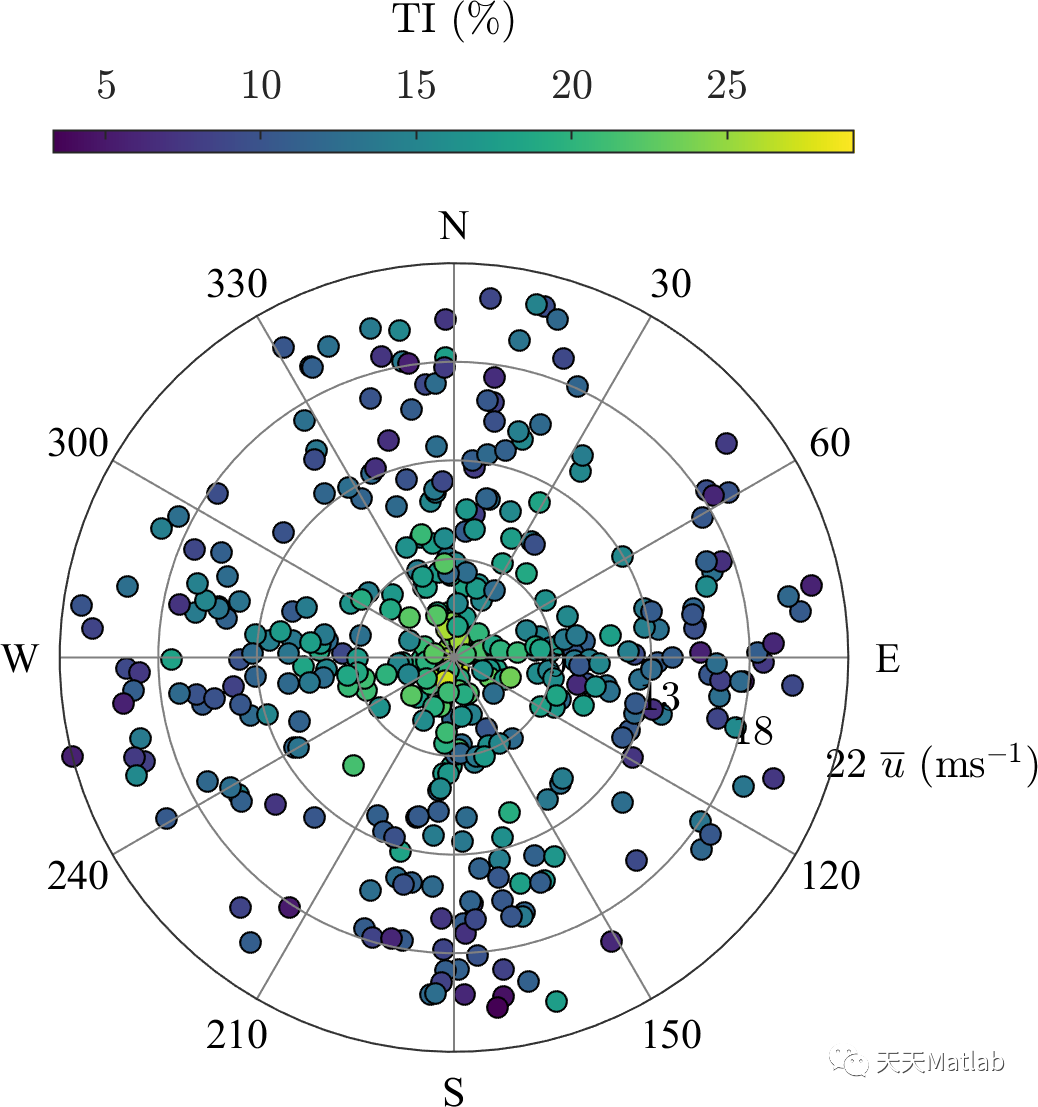
本文主要是介绍【免费】基于Matlab画风玫瑰图,希望对大家解决编程问题提供一定的参考价值,需要的开发者们随着小编来一起学习吧!
✅作者简介:热爱科研的Matlab仿真开发者,修心和技术同步精进,matlab项目合作可私信。
🍎个人主页:Matlab科研工作室
🍊个人信条:格物致知。
更多Matlab完整代码及仿真定制内容点击👇
智能优化算法 神经网络预测 雷达通信 无线传感器 电力系统
信号处理 图像处理 路径规划 元胞自动机 无人机
🔥 内容介绍
风玫瑰图是一种数据可视化工具,用于展示风向和风速的分布情况。它是一种极坐标图,以圆形为基础,将风向表示为角度,风速表示为半径。风玫瑰图通常用于气象学、地理学和环境科学领域,帮助研究人员和决策者更好地理解和分析风的特征和趋势。
风玫瑰图的基本原理是将一定时间内的风向和风速数据转换为可视化的图形。在图表的中心点,通常是一个圆圈或一个点,表示无风或风速非常低的情况。从中心点开始,每个方向的扇形区域代表该方向上的风向,扇形的大小则表示风速的大小。通常情况下,扇形区域的颜色或阴影也可以用来表示风速的强度。
风玫瑰图的优势在于它能够直观地展示风向和风速的分布情况。通过观察图表,我们可以很容易地看出哪个方向上的风速较高,哪个方向上的风速较低。同时,风玫瑰图还能够显示出风向和风速的频率分布,帮助我们了解不同风速区间的占比情况。
在气象学中,风玫瑰图被广泛应用于分析和研究气候变化、风暴活动以及风资源评估等领域。例如,在风能行业中,风玫瑰图可以帮助评估风能资源的分布情况,确定最佳的风能发电场址。此外,风玫瑰图还可以用于研究城市风环境,分析建筑物和城市规划对风速和风向的影响。
除了气象学领域,风玫瑰图还可以应用于其他领域,例如海洋学、航海和航空等。在海洋学中,风玫瑰图可以帮助研究海洋表面风的分布情况,对海洋环境和生态系统的研究具有重要意义。在航海和航空中,风玫瑰图可以用于船舶和飞机的航行计划,帮助确定最佳的航线和飞行高度,以提高安全性和效率。
尽管风玫瑰图在许多领域中都有广泛的应用,但它也存在一些限制。首先,风玫瑰图只能表示风向和风速的分布情况,无法提供其他气象要素的信息。其次,风玫瑰图对数据的质量和采样频率要求较高,如果数据不准确或不完整,可能会导致图表的误导。此外,风玫瑰图在表示大范围或复杂地形的风场时可能存在一定的局限性。
总的来说,风玫瑰图是一种强大的数据可视化工具,可以帮助我们更好地理解和分析风的特征和趋势。它在气象学、地理学和环境科学等领域中的应用广泛,并具有重要的研究和决策价值。然而,我们在使用风玫瑰图时需要注意数据的准确性和采样频率,以确保图表的可靠性和有效性。
📣 代码
Documentation: Wind rose as a scatter plotTable of ContentsExample 1: Individual sensors records on a single wind roseExample 2: Three-variate wind roseExample 1: Individual sensors records on a single wind roseMultiple sensors are consdiered. However, only 2 variables are represented. Here we show the wind direction and the mean wind speed for 4 different wind sensorsclearvars;close all;clc;Nsensors =4; % number of wind sensorsNsamples = 100; % number of samplesCOLOR = {'r','b','k','c','m','g'}; % color choice% generation of recordsDir =[180,270,0,90]'*ones(1,Nsamples)+20.*randn(Nsensors,Nsamples); % #1 Mean wind directionU = abs(1.*randn(Nsensors,Nsamples)+ ones(Nsensors,1)*linspace(5,20,Nsamples)); %#2 Mean wind speedname_U = '$\overline{u}$ (ms$^{-1}$)'; % #4 name of variable U% plot the wind rosejj=1;figurefor ii=1:Nsensors,h{ii} = ScatterWindRose(Dir(ii,:),U(ii,:),'labelY',name_U);set(h{ii},'Marker','o','markerfacecolor',...COLOR{ii},'markeredgecolor','k')hold onleg{jj} = ['sensor ',num2str(jj)];jj=jj+1;endset(gcf,'color','w');legend([h{:}],leg,'location','NorthEastOutside');% put axis and text on topth1 = findobj(gcf,'Type','text');th2 = findobj(gcf,'Type','line');for jj = 1:length(th1),uistack(th1(jj),'top');endfor jj = 1:length(th2),uistack(th2(jj),'top');end% Adjust font size and nameset(findall(gcf,'-property','FontSize'),'FontSize',10,'fontName','Times')Example 2: Three-variate wind roseThree variables are used hereafter:The mean wind speed (Based on the 4 wind sensors from Example 1)The turbulence intensity (TI)The wind direction (Based on the 4 wind sensors from Example 1)% TI is defined as:TI =abs(0.05+abs(1./U)+0.03.*randn(size(U))); % #3 TI% force column vectors:% we are not longer interested in identifying the sensorsDir = Dir(:);U=U(:);TI = TI(:)*100;% We only want to look at TI lower than 30 %indTI = find(TI>30);U(indTI)=NaN;% set limits and labelslimU = [min(U),max(U)]; % #3 limites for the wind speedname_U = '$\overline{u}$ (ms$^{-1}$)'; % #4 name of variable Uname_IU = 'TI (\%)'; % #4 name of variable IU% plot the datafigure[h,c] = ScatterWindRose(Dir,U,'Ylim',limU,'labelY',name_U,'labelZ',name_IU,'Z',TI);% c is the colorbr handle% h is the scatter handle% put axis and text on topth1 = findobj(gcf,'Type','text');th2 = findobj(gcf,'Type','line');for jj = 1:length(th1)uistack(th1(jj),'top');endfor jj = 1:length(th2)uistack(th2(jj),'top');end% Adjust the width of the colorbarx1=get(gca,'position');x=get(c,'Position');x(4)= c.Position(4)/3; % three times thinner than initiallyset(c,'Position',x)set(gca,'position',x1)% Adjust font size and nameset(findall(gcf,'-property','FontSize'),'FontSize',10,'fontName','Times')
function [varargout] =ScatterWindRose(X,Y,varargin)%%% [varargout] =ScatterWindRose(X,Y,varargin) creates a scatter polar plot% with 2 to 3 variables as input%%% Input:%varargin:1 to 6 inputs :% #1 Direction ; type: float ; size: [1 x N] in DEGREES% #2 variable associated to direction (ex: speed); type: float; size: [1 x N]% #3 limits associated to #2; type: float ; size [1x2] -> if empty variable '[]' is written, the [min(#2),max(#2)] is used% #4 name of variable #2; type: string;% #5 variable associated to #2 and #1; type: float; size: [1 x N]% #6 name of variable #5; type: string;%%% Syntax :% [hpol] =ScatterWindRose(Dir,U)% [hpol,c] =ScatterWindRose(Dir,U)%% OUTPUT%optionals:% varargout{1}: scatter handle% varargout{2}: colorbar handle%%% Author info%Author: E. Cheynet, UiB, Norway% Last modified: 2020-06-25%% Input parser% Number of outputs must be >=3and <=4.nargoutchk(0,2)% force columns vectorsX = X(:); Y=Y(:);X(X<0)=X(X<0)+360;[cax,~,~] = axescheck(X);% options: default valuesp = inputParser();p.CaseSensitive = false;p.addOptional('Z',[]);p.addOptional('Ylim',[min(Y),max(Y)]);p.addOptional('labelZ','');p.addOptional('labelY','');p.addOptional('myMarker','+');p.addOptional('myColor','k');% p.addOptional('plotType','scatter');p.parse(varargin{:});% shorthen the variables namelabelZ = p.Results.labelZ;labelY = p.Results.labelY;Z = p.Results.Z(:);myMarker = p.Results.myMarker;myColor = p.Results.myColor;Ylim = p.Results.Ylim;% plotType = p.Results.plotType;%% Check errorsif Ylim(1)>Ylim(2),warning('you have specified Ylim(1)>Ylim(2); The two limits are flipped so that Ylim(1)<Ylim(2).');elseif Ylim(1)==Ylim(2),error('you have specified Ylim(1)=Ylim(2). You need to choose Ylim(1)~=Ylim(2).');endif isnumeric(labelZ), error('labelZ must be a string');endif isnumeric(labelY), error('labelY must be a string');endif ischar(X) || ischar(Y)error('MATLAB:polar:InvalidInputType', 'Input arguments must be numeric.');endif ~isequal(size(X),size(Y))error('MATLAB:polar:InvalidInput', 'X and Y must be the same size.');end%% Initialisation of figure% get hold statecax = newplot(cax);if ~ishold(cax);% make a radial gridhold(cax,'on');% Get limitsYmax = Ylim(2);Ymin = Ylim(1);% limits from Ymin to YmaxX = X(Y>= Ymin & Y<=Ymax);% limit from Zmin to Zmax, if variable Z is includedif ~isempty(Z),Z = Z(Y>= Ymin & Y<=Ymax);endY = Y(Y>= Ymin & Y<=Ymax);%% Create circles and radius% define a circleNcirc = 4;createCircles(Ncirc,Ymax,Ymin,labelY)% create radiuscreateRadius(Ymax,Ymin)% set view to 2-Dview(cax,2);% set axis limitsaxis(cax,(Ymax-Ymin)*[-1 1 -1.15 1.15]);setappdata( cax, 'rMin', Ymin );else%Try to find the inner radius of the current axis.if (isappdata ( cax, 'rMin' ) )Ymin = getappdata(cax, 'rMin' );elseYmin = 0;endend%% --------------------------% PLOT the data% --------------------------% transform data to Cartesian coordinates.xx = (Y - Ymin).*cosd(90-X);yy = (Y - Ymin).*sind(90-X);% plot data on top of gridif ~isempty(Z),h = scatter(xx,yy,25,Z,'filled');set(h,'MarkerEdgeColor','k')c =colorbar;set(c,'location','NorthOutside','TickLabelInterpreter','latex');title(c,labelZ,'interpreter','latex')elseh = plot(xx,yy,[myMarker,myColor]);endif nargout == 1varargout{1} = h;elseif nargout == 2varargout{1} = h;varargout{2} = c;endset(cax,'dataaspectratio',[1 1 1]), axis(cax,'off');set(get(cax,'xlabel'),'visible','on')set(get(cax,'ylabel'),'visible','on')set(gcf,'color','w');uistack(h, 'bottom')%%%%%%%%%%%%%%%%%%%%%%%%%%%%%%%%%%%%%%%%%%%%%%%%%%%%%%%%%%%%%%%%%%%%%%%%%%%% Nested functions%%%%%%%%%%%%%%%%%%%%%%%%%%%%%%%%%%%%%%%%%%%%%%%%%%%%%%%%%%%%%%%%%%%%%%%%%%%function createCircles(Ncirc,Ymax,Ymin,labelY)theta = linspace(0,360,100);xunit = cosd(theta);yunit = sind(theta);cos_scale = cosd(-20);sin_scale = sind(-20);% draw radial circlesfor ii = 1:Ncircif ii<NcircCOLOR = [0.5,0.5,0.5];elseCOLOR = [0.2 0.2 0.2];endline(xunit*ii.*(Ymax-Ymin)./Ncirc,...yunit*ii.*(Ymax-Ymin)./Ncirc,'color',COLOR,...'linestyle','-');if ii >= Ncirc,text(ii.*(Ymax-Ymin)./Ncirc.*cos_scale,...ii.*(Ymax-Ymin)./Ncirc.*sin_scale, ...[' ',num2str((Ymin+ii.*(Ymax-Ymin)./Ncirc),2),' ',...' ',...labelY],'verticalalignment','bottom','interpreter','latex');elsetext(ii.*(Ymax-Ymin)./Ncirc.*cos_scale,...ii.*(Ymax-Ymin)./Ncirc.*sin_scale, ...[' ',num2str((Ymin+ii.*(Ymax-Ymin)./Ncirc),2)],...'verticalalignment','bottom','interpreter','latex');endendendfunction createRadius(Ymax,Ymin)% origin aligned with the NORTHthetaLabel = [[90,60,30],[360:-30:120]];theta = 0:30:360;cs = [-cosd(theta); cosd(theta)];sn = [-sind(theta); sind(theta)];line((Ymax-Ymin)*cs,(Ymax-Ymin)*sn,'color',[0.5,0.5,0.5],...'linestyle','-')% annotate spokes in degreesrt = 1.1*(Ymax-Ymin);for iAngle = 1:numel(thetaLabel),if theta(iAngle) ==0,text(rt*cosd(theta(iAngle)),rt*sind(theta(iAngle)),'E',...'horizontalalignment','center');elseif theta(iAngle) == 90,text(rt*cosd(theta(iAngle)),rt*sind(theta(iAngle)),'N',...'horizontalalignment','center');elseif theta(iAngle) == 180,text(rt*cosd(theta(iAngle)),rt*sind(theta(iAngle)),'W',...'horizontalalignment','center');elseif theta(iAngle) == 270,text(rt*cosd(theta(iAngle)),rt*sind(theta(iAngle)),'S',...'horizontalalignment','center');elsetext(rt*cosd(theta(iAngle)),rt*sind(theta(iAngle)),int2str(abs(thetaLabel(iAngle))),...'horizontalalignment','center');endendendend
⛳️ 运行结果

🔗 参考文献
🎈 部分理论引用网络文献,若有侵权联系博主删除
🎁 关注我领取海量matlab电子书和数学建模资料
👇 私信完整代码和数据获取及论文数模仿真定制
1 各类智能优化算法改进及应用
生产调度、经济调度、装配线调度、充电优化、车间调度、发车优化、水库调度、三维装箱、物流选址、货位优化、公交排班优化、充电桩布局优化、车间布局优化、集装箱船配载优化、水泵组合优化、解医疗资源分配优化、设施布局优化、可视域基站和无人机选址优化
2 机器学习和深度学习方面
卷积神经网络(CNN)、LSTM、支持向量机(SVM)、最小二乘支持向量机(LSSVM)、极限学习机(ELM)、核极限学习机(KELM)、BP、RBF、宽度学习、DBN、RF、RBF、DELM、XGBOOST、TCN实现风电预测、光伏预测、电池寿命预测、辐射源识别、交通流预测、负荷预测、股价预测、PM2.5浓度预测、电池健康状态预测、水体光学参数反演、NLOS信号识别、地铁停车精准预测、变压器故障诊断
2.图像处理方面
图像识别、图像分割、图像检测、图像隐藏、图像配准、图像拼接、图像融合、图像增强、图像压缩感知
3 路径规划方面
旅行商问题(TSP)、车辆路径问题(VRP、MVRP、CVRP、VRPTW等)、无人机三维路径规划、无人机协同、无人机编队、机器人路径规划、栅格地图路径规划、多式联运运输问题、车辆协同无人机路径规划、天线线性阵列分布优化、车间布局优化
4 无人机应用方面
无人机路径规划、无人机控制、无人机编队、无人机协同、无人机任务分配、无人机安全通信轨迹在线优化
5 无线传感器定位及布局方面
传感器部署优化、通信协议优化、路由优化、目标定位优化、Dv-Hop定位优化、Leach协议优化、WSN覆盖优化、组播优化、RSSI定位优化
6 信号处理方面
信号识别、信号加密、信号去噪、信号增强、雷达信号处理、信号水印嵌入提取、肌电信号、脑电信号、信号配时优化
7 电力系统方面
微电网优化、无功优化、配电网重构、储能配置
8 元胞自动机方面
交通流 人群疏散 病毒扩散 晶体生长
9 雷达方面
卡尔曼滤波跟踪、航迹关联、航迹融合
这篇关于【免费】基于Matlab画风玫瑰图的文章就介绍到这儿,希望我们推荐的文章对编程师们有所帮助!


![C# double[] 和Matlab数组MWArray[]转换](/front/images/it_default.jpg)

