本文主要是介绍mmc频率配置,希望对大家解决编程问题提供一定的参考价值,需要的开发者们随着小编来一起学习吧!
代码路径及功能
以zync的 sd mmc来解读
涉及到的设备驱动文件:
| 文件 | 说明 |
| \drivers\mmc\host\dw_mmc-pltfm.c | 作为mmc的驱动的入口 |
| \drivers\mmc\host\dw_mmc.c | dw mmc的通用驱动。虽然各个芯片厂家都有自己的外设接口,但是这些接口通常用的同一个IP,例如此处的dw即为Synopsys DesignWare 的mmc ip |
| drivers\mmc\core\host.c | mmc控制器通用接口 |
| \drivers\mmc\core\core.c | 控制器与mmc设备的结合处。mmc扫描设备的入口 |
| \drivers\mmc\core\mmc.c |
DTS配置
配置
mmc0: dwmmc@e0043000 {compatible = "fmsh,psoc-dw-mshc";reg = <0xe0043000 0x1000>;interrupts = <GIC_SPI 20 IRQ_TYPE_LEVEL_HIGH>;clocks = <&clkc NCLK_AHB_SDIO0>, <&clkc NCLK_SDIO0>;clock-names = "biu", "ciu";#address-cells = <1>;#size-cells = <0>;data-addr = <0x100>;max-frequency = <50000000>;解析
在 host.c中的函数实现对DTS中 host控制器(SD SDIO EMMC等)的配置解析。这里可以看到
host->caps 包含了DTS的属性。此处解析出的最大频率max-frequency放到了host->f_max
int mmc_of_parse(struct mmc_host *host)
{struct device *dev = host->parent;u32 bus_width;int ret;bool cd_cap_invert, cd_gpio_invert = false;bool ro_cap_invert, ro_gpio_invert = false;if (!dev || !dev_fwnode(dev))return 0;/* "bus-width" is translated to MMC_CAP_*_BIT_DATA flags */if (device_property_read_u32(dev, "bus-width", &bus_width) < 0) {dev_dbg(host->parent,"\"bus-width\" property is missing, assuming 1 bit.\n");bus_width = 1;}switch (bus_width) {case 8:host->caps |= MMC_CAP_8_BIT_DATA;/* Hosts capable of 8-bit transfers can also do 4 bits */case 4:host->caps |= MMC_CAP_4_BIT_DATA;break;case 1:break;default:dev_err(host->parent,"Invalid \"bus-width\" value %u!\n", bus_width);return -EINVAL;}//此处解析设备树中的最大的频率/* f_max is obtained from the optional "max-frequency" property */device_property_read_u32(dev, "max-frequency", &host->f_max);
mmc控制器初始化
针对dw mmc控制器,此控制器的初始化函数中针对每个通道调用接口 dw_mci_init_slot完成初始化,主要包括如下三个部分:
host分配
这里我们主要关注一个个delay work,即mmc rescan
mmc_alloc_hostINIT_DELAYED_WORK(&host->detect, mmc_rescan);INIT_DELAYED_WORK(&host->sdio_irq_work, sdio_irq_work);setup_timer(&host->retune_timer, mmc_retune_timer, (unsigned long)host);解析dts
参考1.2 节
host添加
将 mmc host控制器添加到系统中
mmc_add_host
void mmc_start_host(struct mmc_host *host)
{host->f_init = max(freqs[0], host->f_min);host->rescan_disable = 0;host->ios.power_mode = MMC_POWER_UNDEFINED;if (!(host->caps2 & MMC_CAP2_NO_PRESCAN_POWERUP)) {mmc_claim_host(host);mmc_power_up(host, host->ocr_avail);mmc_release_host(host);}mmc_gpiod_request_cd_irq(host);_mmc_detect_change(host, 0, false);
}
//此处开始mmc设备的探测,也就是说将host控制器添加到系统后,再探测host下挂的mmc
static void _mmc_detect_change(struct mmc_host *host, unsigned long delay,bool cd_irq)
{/** If the device is configured as wakeup, we prevent a new sleep for* 5 s to give provision for user space to consume the event.*/if (cd_irq && !(host->caps & MMC_CAP_NEEDS_POLL) &&device_can_wakeup(mmc_dev(host)))pm_wakeup_event(mmc_dev(host), 5000);host->detect_change = 1;mmc_schedule_delayed_work(&host->detect, delay);
}
powerup(第一次配置速率)
此处第一次配置mmc的速率。此处 配置的速率为f_init
/** Apply power to the MMC stack.  This is a two-stage process.* First, we enable power to the card without the clock running.* We then wait a bit for the power to stabilise.  Finally,* enable the bus drivers and clock to the card.** We must _NOT_ enable the clock prior to power stablising.** If a host does all the power sequencing itself, ignore the* initial MMC_POWER_UP stage.*/
void mmc_power_up(struct mmc_host *host, u32 ocr)
{if (host->ios.power_mode == MMC_POWER_ON)return;host->ios.clock = host->f_init;host->ios.power_mode = MMC_POWER_ON;mmc_set_ios(host);/** This delay must be at least 74 clock sizes, or 1 ms, or the* time required to reach a stable voltage.*/mmc_delay(10);
}
上电打印
可以看到第一行 控制器请求的速率为400K,这个为默认初始化的值。
  2.521074] mmc_host mmc0: Bus speed (slot 0) = 99999999Hz (slot req 400000Hz, actual 399999HZ div = 125)
[    2.530608] CPU: 3 PID: 1 Comm: swapper/0 Not tainted 4.14.55-fmsh20220223 #27ware name: FMSH PSOC Platform
[    2.542168] [<8010e648>] (unwind_backtrace) from [<8010a970>] (show_stack+0x10/0x14)
[    2.549890] [<8010a970>] (show_stack) from [<806483c4>] (dump_stack+0x7c/0x9c)
[    2.557094] [<806483c4>] (dump_stack) from [<8051f840>] (dw_mci_setup_bus+0x18c/0x1c4)
[    2.564987] [<8051f840>] (dw_mci_setup_bus) from [<8051f9a0>] (dw_mci_set_ios+0x128/0x164)
[    2.573227] [<8051f9a0>] (dw_mci_set_ios) from [<80509158>] (mmc_power_up+0xa4/0xb0)
[    2.580947] [<80509158>] (mmc_power_up) from [<80509cf4>] (mmc_start_host+0x48/0x74)
[    2.588665] [<80509cf4>] (mmc_start_host) from [<8050acb4>] (mmc_add_host+0x3c/0x4c)
[    2.596384] [<8050acb4>] (mmc_add_host) from [<8051f378>] (dw_mci_probe+0x924/0xb88)
[    2.604105] [<8051f378>] (dw_mci_probe) from [<804179fc>] (platform_drv_probe+0x50/0x9c)
[    2.612169] [<804179fc>] (platform_drv_probe) from [<8041654c>] (driver_probe_device+0x1dc/0x298)
[    2.621009] [<8041654c>] (driver_probe_device) from [<80416684>] (__driver_attach+0x7c/0xa8)
[    2.629417] [<80416684>] (__driver_attach) from [<80414dac>] (bus_for_each_dev+0x7c/0x8c)
[    2.637566] [<80414dac>] (bus_for_each_dev) from [<80415bd4>] (bus_add_driver+0x16c/0x1d4)
[    2.645801] [<80415bd4>] (bus_add_driver) from [<80416e08>] (driver_register+0xa0/0xe0)
[    2.653778] [<80416e08>] (driver_register) from [<801019ac>] (do_one_initcall+0xf8/0x118)
[    2.661929] [<801019ac>] (do_one_initcall) from [<80900da8>] (kernel_init_freeable+0x188/0x1c8)
[    2.670601] [<80900da8>] (kernel_init_freeable) from [<806583e4>] (kernel_init+0x8/0x10c)
[    2.678753] [<806583e4>] (kernel_init) from [<80106f88>] (ret_from_fork+0x14/0x2c)
[    2.711293] sdhci-pltfm: SDHCI platform and OF driver helper
sys 系统设备信息
mmc设备初始化
mmc设备的扫描
书接上回,在host初始化完毕开始时,启动了delay work 开始扫描mmc设备,以下的接口
mmc_rescanstatic const unsigned freqs[] = { 400000, 300000, 200000, 100000 };
//400k -100k中的最大值for (i = 0; i < ARRAY_SIZE(freqs); i++) {if (!mmc_rescan_try_freq(host, max(freqs[i], host->f_min)))break;if (freqs[i] <= host->f_min)break;}
mmc的初始化
这里根据设备猜测支持的速率。
mmc_attach_sd/** Handle the detection and initialisation of a card.** In the case of a resume, "oldcard" will contain the card* we're trying to reinitialise.*/
static int mmc_sd_init_card(struct mmc_host *host, u32 ocr,struct mmc_card *oldcard)
{struct mmc_card *card;int err;u32 cid[4];u32 rocr = 0;WARN_ON(!host->claimed);//以下部分代码是初始化时钟相关参数/* Initialization sequence for UHS-I cards */if (rocr & SD_ROCR_S18A) {err = mmc_sd_init_uhs_card(card);if (err)goto free_card;} else {/** Attempt to change to high-speed (if supported)*/err = mmc_sd_switch_hs(card);if (err > 0)mmc_set_timing(card->host, MMC_TIMING_SD_HS);else if (err)goto free_card;/** Set bus speed.*/mmc_set_clock(host, mmc_sd_get_max_clock(card));/** Switch to wider bus (if supported).*/if ((host->caps & MMC_CAP_4_BIT_DATA) &&(card->scr.bus_widths & SD_SCR_BUS_WIDTH_4)) {err = mmc_app_set_bus_width(card, MMC_BUS_WIDTH_4);if (err)goto free_card;mmc_set_bus_width(host, MMC_BUS_WIDTH_4);}}host->card = card;return 0;free_card:if (!oldcard)mmc_remove_card(card);return err;
}
SD_ROCR_S18A
high-speed mode(第二次速率设定)
mmc工作模式
mmc_set_timing(card->host, MMC_TIMING_SD_HS);host->ios.timing = timing;mmc_set_ios(host);bus speed
根据mmc的信息,确定最大的bus speed
unsigned mmc_sd_get_max_clock(struct mmc_card *card)
{unsigned max_dtr = (unsigned int)-1;if (mmc_card_hs(card)) {if (max_dtr > card->sw_caps.hs_max_dtr)max_dtr = card->sw_caps.hs_max_dtr;} else if (max_dtr > card->csd.max_dtr) {max_dtr = card->csd.max_dtr;}return max_dtr;
}
void mmc_set_clock(struct mmc_host *host, unsigned int hz)
{WARN_ON(hz && hz < host->f_min);if (hz > host->f_max)hz = host->f_max;host->ios.clock = hz;mmc_set_ios(host);
}上电打印
此时,速率已经变为52MHZ,而打印出的栈正如我们分析的一样,在扫描具体的mmc存储设备后,再次更新控制器的速率配置。
[    2.846320] mmc_host mmc0: Bus speed (slot 0) = 99999999Hz (slot req 52000000Hz, actual 49999999HZ div = 1)
[    2.856119] CPU: 3 PID: 32 Comm: kworker/3:1 Not tainted 4.14.55-fmsh20220223 #27
[    2.863586] Hardware name: FMSH PSOC Platform
[    2.867959] Workqueue: events_freezable mmc_rescan
[    2.872808] [<8010e648>] (unwind_backtrace) from [<8010a970>] (show_stack+0x10/0x14)
[    2.880568] [<8010a970>] (show_stack) from [<806483c4>] (dump_stack+0x7c/0x9c)
[    2.887807] [<806483c4>] (dump_stack) from [<8051f840>] (dw_mci_setup_bus+0x18c/0x1c4)
[    2.895732] [<8051f840>] (dw_mci_setup_bus) from [<8051f9a0>] (dw_mci_set_ios+0x128/0x164)
[    2.904006] [<8051f9a0>] (dw_mci_set_ios) from [<8050bf8c>] (mmc_init_card+0x578/0x1774)
[    2.912102] [<8050bf8c>] (mmc_init_card) from [<8050d524>] (mmc_attach_mmc+0xbc/0x11c)
Starting logging: [    2.920002] [<8050d524>] (mmc_attach_mmc) from [<80509c9c>] (mmc_rescan+0x300/0x310)
[    2.929302] [<80509c9c>] (mmc_rescan) from [<8012dc14>] (process_one_work+0x13c/0x240)
[    2.937220] [<8012dc14>] (process_one_work) from [<8012ec8c>] (worker_thread+0x1b0/0x2b4)
[    2.945378] [<8012ec8c>] (worker_thread) from [<80132e7c>] (kthread+0x130/0x148)
OK[    2.952758] [<80132e7c>] (kthread) from [<80106f88>] (ret_from_fork+0x14/0x2c)[    2.961578] mmc0: new high speed MMC card at address 0001
如果没有设置dts中的参数,那么频率是根据什么来的?
mmc控制器的频率设定
经过控制器的初始化,mmc的扫描,得知了mmc支持的最大频率,进而调用host的控制接口设置host的频率。如下代码回调了host的接口set_ios.
static inline void mmc_set_ios(struct mmc_host *host)
{struct mmc_ios *ios = &host->ios;pr_debug("%s: clock %uHz busmode %u powermode %u cs %u Vdd %u ""width %u timing %u\n",mmc_hostname(host), ios->clock, ios->bus_mode,ios->power_mode, ios->chip_select, ios->vdd,1 << ios->bus_width, ios->timing);host->ops->set_ios(host, ios);
}
如下代码中slot->clock 即为上述mmc初始时得到的clock值。
static void dw_mci_set_ios(struct mmc_host *mmc, struct mmc_ios *ios)
{struct dw_mci_slot *slot = mmc_priv(mmc);const struct dw_mci_drv_data *drv_data = slot->host->drv_data;u32 regs;int ret;switch (ios->bus_width) {case MMC_BUS_WIDTH_4:slot->ctype = SDMMC_CTYPE_4BIT;break;case MMC_BUS_WIDTH_8:slot->ctype = SDMMC_CTYPE_8BIT;break;default:/* set default 1 bit mode */slot->ctype = SDMMC_CTYPE_1BIT;}regs = mci_readl(slot->host, UHS_REG);/* DDR mode set */if (ios->timing == MMC_TIMING_MMC_DDR52 ||ios->timing == MMC_TIMING_UHS_DDR50 ||ios->timing == MMC_TIMING_MMC_HS400)regs |= ((0x1 << slot->id) << 16);elseregs &= ~((0x1 << slot->id) << 16);mci_writel(slot->host, UHS_REG, regs);slot->host->timing = ios->timing;/** Use mirror of ios->clock to prevent race with mmc* core ios update when finding the minimum.*/slot->clock = ios->clock;if (drv_data && drv_data->set_ios)drv_data->set_ios(slot->host, ios);switch (ios->power_mode) {case MMC_POWER_UP:if (!IS_ERR(mmc->supply.vmmc)) {ret = mmc_regulator_set_ocr(mmc, mmc->supply.vmmc,ios->vdd);if (ret) {dev_err(slot->host->dev,"failed to enable vmmc regulator\n");/*return, if failed turn on vmmc*/return;}}set_bit(DW_MMC_CARD_NEED_INIT, &slot->flags);regs = mci_readl(slot->host, PWREN);regs |= (1 << slot->id);mci_writel(slot->host, PWREN, regs);break;case MMC_POWER_ON:if (!slot->host->vqmmc_enabled) {if (!IS_ERR(mmc->supply.vqmmc)) {ret = regulator_enable(mmc->supply.vqmmc);if (ret < 0)dev_err(slot->host->dev,"failed to enable vqmmc\n");elseslot->host->vqmmc_enabled = true;} else {/* Keep track so we don't reset again */slot->host->vqmmc_enabled = true;}/* Reset our state machine after powering on */dw_mci_ctrl_reset(slot->host,SDMMC_CTRL_ALL_RESET_FLAGS);}/* Adjust clock / bus width after power is up */dw_mci_setup_bus(slot, false);break;case MMC_POWER_OFF:/* Turn clock off before power goes down */dw_mci_setup_bus(slot, false);if (!IS_ERR(mmc->supply.vmmc))mmc_regulator_set_ocr(mmc, mmc->supply.vmmc, 0);if (!IS_ERR(mmc->supply.vqmmc) && slot->host->vqmmc_enabled)regulator_disable(mmc->supply.vqmmc);slot->host->vqmmc_enabled = false;regs = mci_readl(slot->host, PWREN);regs &= ~(1 << slot->id);mci_writel(slot->host, PWREN, regs);break;default:break;}if (slot->host->state == STATE_WAITING_CMD11_DONE && ios->clock != 0)slot->host->state = STATE_IDLE;
}
设备与控制器速率支持
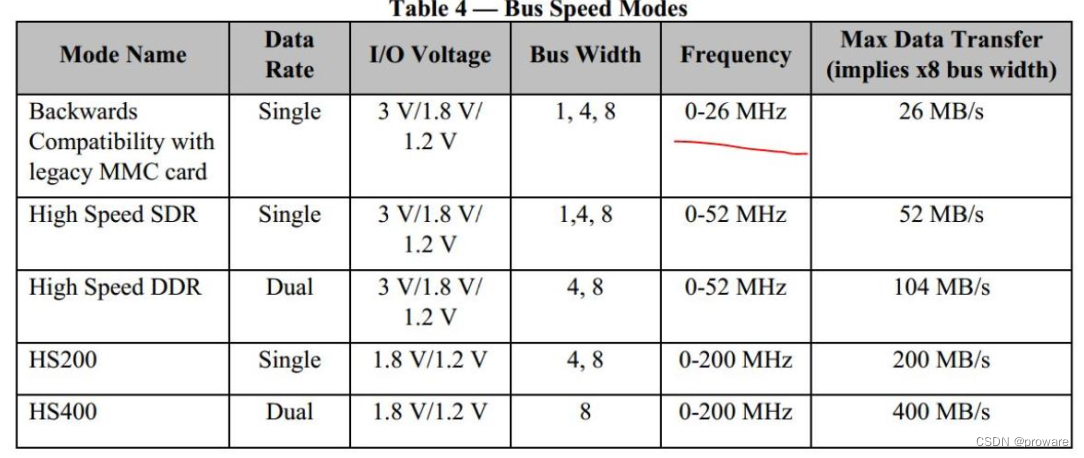
设备的速率为上表,而控制器只支持前两种速率,同时,对于EMIO扩展的,频率仅仅支持25M,这就需要在DTS中限制,而不能仅仅依赖于MMC设备支持的速率。
dw_mci_setup_bus
dw ip设置 频率的代码接口
static void dw_mci_setup_bus(struct dw_mci_slot *slot, bool force_clkinit)
{struct dw_mci *host = slot->host;unsigned int clock = slot->clock;u32 div;u32 clk_en_a;u32 sdmmc_cmd_bits = SDMMC_CMD_UPD_CLK | SDMMC_CMD_PRV_DAT_WAIT;/* We must continue to set bit 28 in CMD until the change is complete */if (host->state == STATE_WAITING_CMD11_DONE)sdmmc_cmd_bits |= SDMMC_CMD_VOLT_SWITCH;if (!clock) {mci_writel(host, CLKENA, 0);mci_send_cmd(slot, sdmmc_cmd_bits, 0);} else if (clock != host->current_speed || force_clkinit) {div = host->bus_hz / clock;if (host->bus_hz % clock && host->bus_hz > clock)/** move the + 1 after the divide to prevent* over-clocking the card.*/div += 1;div = (host->bus_hz != clock) ? DIV_ROUND_UP(div, 2) : 0;if ((clock != slot->__clk_old &&!test_bit(DW_MMC_CARD_NEEDS_POLL, &slot->flags)) ||force_clkinit) {/* Silent the verbose log if calling from PM context */if (!force_clkinit)dev_info(&slot->mmc->class_dev,"Bus speed (slot %d) = %dHz (slot req %dHz, actual %dHZ div = %d)\n",slot->id, host->bus_hz, clock,div ? ((host->bus_hz / div) >> 1) :host->bus_hz, div);/** If card is polling, display the message only* one time at boot time.*/if (slot->mmc->caps & MMC_CAP_NEEDS_POLL &&slot->mmc->f_min == clock)set_bit(DW_MMC_CARD_NEEDS_POLL, &slot->flags);}/* disable clock */mci_writel(host, CLKENA, 0);mci_writel(host, CLKSRC, 0);/* inform CIU */mci_send_cmd(slot, sdmmc_cmd_bits, 0);/* set clock to desired speed */mci_writel(host, CLKDIV, div);/* inform CIU */mci_send_cmd(slot, sdmmc_cmd_bits, 0);/* enable clock; only low power if no SDIO */clk_en_a = SDMMC_CLKEN_ENABLE << slot->id;if (!test_bit(DW_MMC_CARD_NO_LOW_PWR, &slot->flags))clk_en_a |= SDMMC_CLKEN_LOW_PWR << slot->id;mci_writel(host, CLKENA, clk_en_a);/* inform CIU */mci_send_cmd(slot, sdmmc_cmd_bits, 0);/* keep the last clock value that was requested from core */slot->__clk_old = clock;}host->current_speed = clock;/* Set the current slot bus width */mci_writel(host, CTYPE, (slot->ctype << slot->id));
}
总结
速率的配置,首先采用默认值。
而后根据具体的mmc存储设备进行调整。但是本身控制器的实现也会对速率有要求,导致在配置时要多方考虑才能得出一个较好的速率值。
进一步的走读: 对mmc设备的识别。
这篇关于mmc频率配置的文章就介绍到这儿,希望我们推荐的文章对编程师们有所帮助!


