本文主要是介绍Mybatis 操作续集(结合上文),希望对大家解决编程问题提供一定的参考价值,需要的开发者们随着小编来一起学习吧!
当我们增加一个数据之后,如果我们想要获取它的 Id 进行别的操作,我们该如何获取 Id 呢?
用那个@Options
package com.example.mybatisdemo.mapper;import com.example.mybatisdemo.model.UserInfo;
import org.apache.ibatis.annotations.*;import java.util.List;@Mapper
public interface UserInfoMapper {@Options(useGeneratedKeys = true,keyProperty = "id")@Insert(" insert into userinfo(username,password,age,gender,phone) " +"value(#{username},#{password},#{age},#{gender},#{phone})")Integer insert(UserInfo userInfo);}
然后log.info 里面加上userinfo.getId
package com.example.mybatisdemo.mapper;import com.example.mybatisdemo.model.UserInfo;
import lombok.extern.slf4j.Slf4j;
import org.junit.jupiter.api.AfterEach;
import org.junit.jupiter.api.BeforeEach;
import org.junit.jupiter.api.Test;
import org.springframework.beans.factory.annotation.Autowired;
import org.springframework.boot.test.context.SpringBootTest;import java.util.List;import static org.junit.jupiter.api.Assertions.*;@Slf4j
@SpringBootTest
class UserInfoMapperTest {@Autowiredprivate UserInfoMapper userInfoMapper;@Testvoid insert() {UserInfo userInfo = new UserInfo();userInfo.setUsername("zhaoliu");userInfo.setPassword("123");userInfo.setAge(45);userInfo.setGender(0);userInfo.setPhone("1775423");Integer result = userInfoMapper.insert(userInfo);log.info("insert 方法,执行结果:{},自增ID:{}",result,userInfo.getId());}
}
这样就能在日志中拿到这个Id了
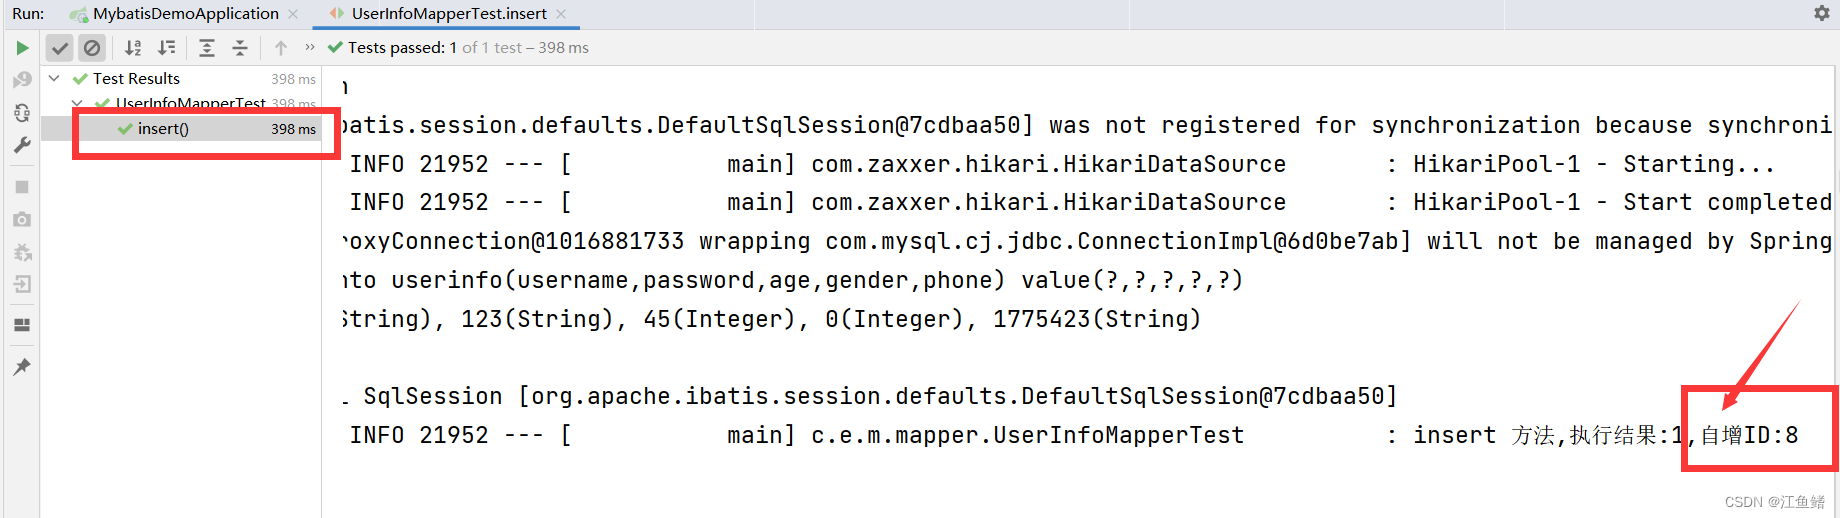
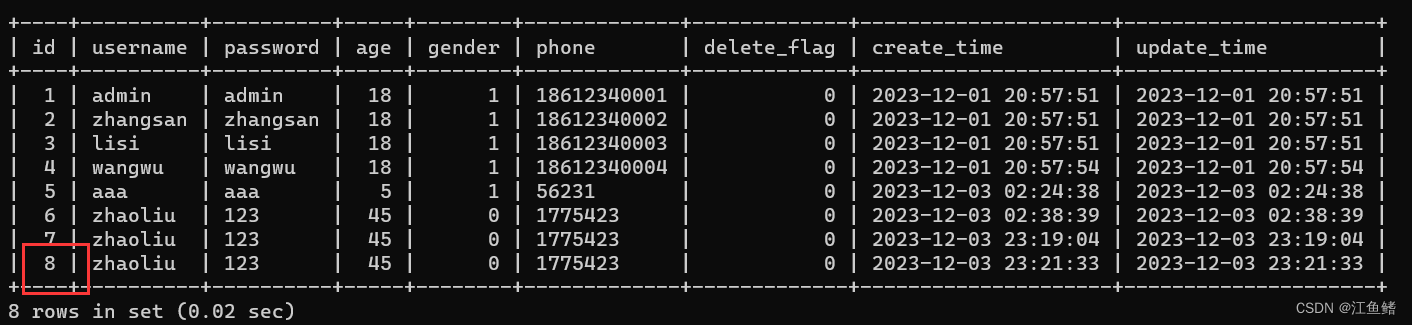
我们在 Mysql 中看到确实是8
接下来,对 insert 的参数如何进行重命名呢?
(就是username和password这些属性前面都加上重命名之后的名字,比如重命名为userinfo,就写为userinfo.username,还有@Param()括号里面写下要改的名字)
package com.example.mybatisdemo.mapper;import com.example.mybatisdemo.model.UserInfo;
import org.apache.ibatis.annotations.*;import java.util.List;@Mapper
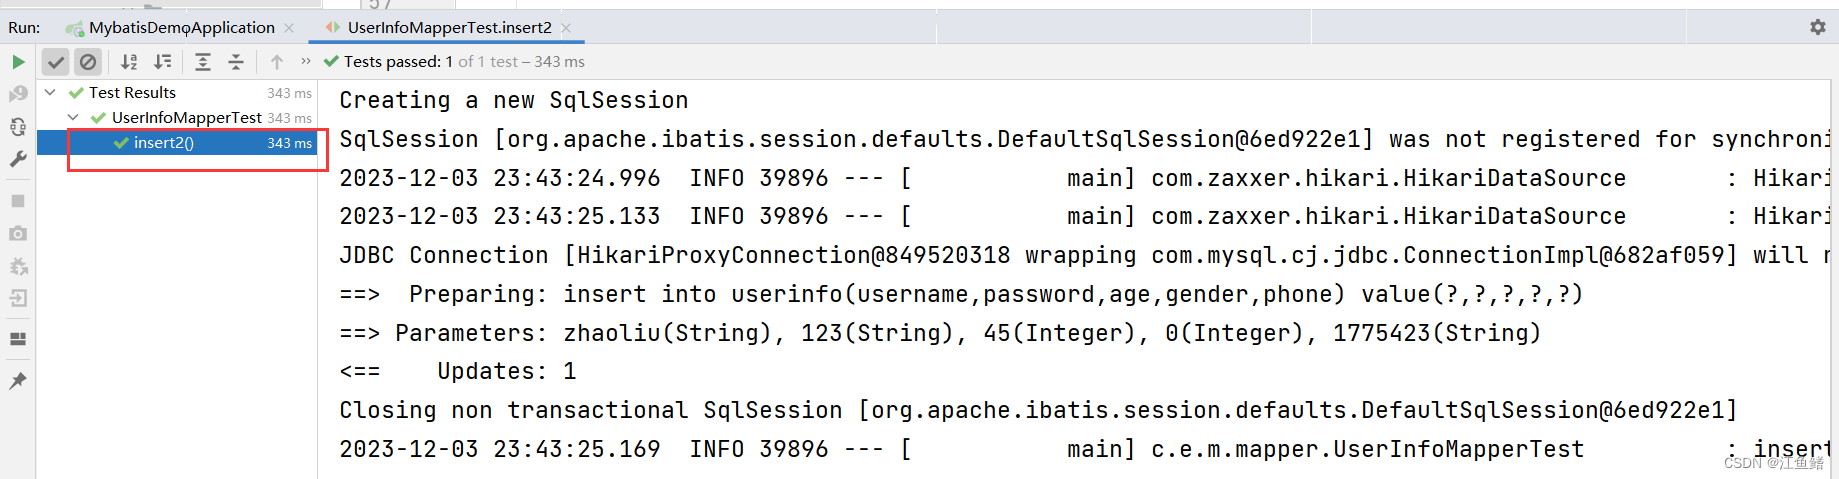
public interface UserInfoMapper {@Options(useGeneratedKeys = true,keyProperty = "id")@Insert(" insert into userinfo(username,password,age,gender,phone) " +"value(#{username},#{password},#{age},#{gender},#{phone})")Integer insert(UserInfo userInfo);@Options(useGeneratedKeys = true,keyProperty = "id")@Insert(" insert into userinfo(username,password,age,gender,phone) " +"value(#{userinfo.username},#{userinfo.password},#{userinfo.age},#{userinfo.gender},#{userinfo.phone})")Integer insert2(@Param("userinfo") UserInfo userInfo);}然后依旧右键generate,test,勾选,ok
package com.example.mybatisdemo.mapper;import com.example.mybatisdemo.model.UserInfo;
import lombok.extern.slf4j.Slf4j;
import org.junit.jupiter.api.AfterEach;
import org.junit.jupiter.api.BeforeEach;
import org.junit.jupiter.api.Test;
import org.springframework.beans.factory.annotation.Autowired;
import org.springframework.boot.test.context.SpringBootTest;import java.util.List;import static org.junit.jupiter.api.Assertions.*;@Slf4j
@SpringBootTest
class UserInfoMapperTest {@Autowiredprivate UserInfoMapper userInfoMapper;@Testvoid insert2() {UserInfo userInfo = new UserInfo();userInfo.setUsername("zhaoliu");userInfo.setPassword("123");userInfo.setAge(45);userInfo.setGender(0);userInfo.setPhone("1775423");Integer result = userInfoMapper.insert(userInfo);log.info("insert 方法,执行结果:{},自增ID:{}",result,userInfo.getId());}
}
这样就能成功了
接下来是删除操作
package com.example.mybatisdemo.mapper;import com.example.mybatisdemo.model.UserInfo;
import org.apache.ibatis.annotations.*;import java.util.List;@Mapper
public interface UserInfoMapper {@Delete("delete from userinfo where id=#{id}")Integer delete(Integer id);//想根据什么条件删除,括号就传什么条件}
右键,generate,test,勾选,ok
package com.example.mybatisdemo.mapper;import com.example.mybatisdemo.model.UserInfo;
import lombok.extern.slf4j.Slf4j;
import org.junit.jupiter.api.AfterEach;
import org.junit.jupiter.api.BeforeEach;
import org.junit.jupiter.api.Test;
import org.springframework.beans.factory.annotation.Autowired;
import org.springframework.boot.test.context.SpringBootTest;import java.util.List;import static org.junit.jupiter.api.Assertions.*;@Slf4j
@SpringBootTest
class UserInfoMapperTest {@Autowiredprivate UserInfoMapper userInfoMapper;@Testvoid delete() {userInfoMapper.delete(9);}
}
这样就运行成功了

我们就会发现Id为 9 的数据被删除了
上面的 select 是 delete之前查找的,下面的是 delete 之后查找的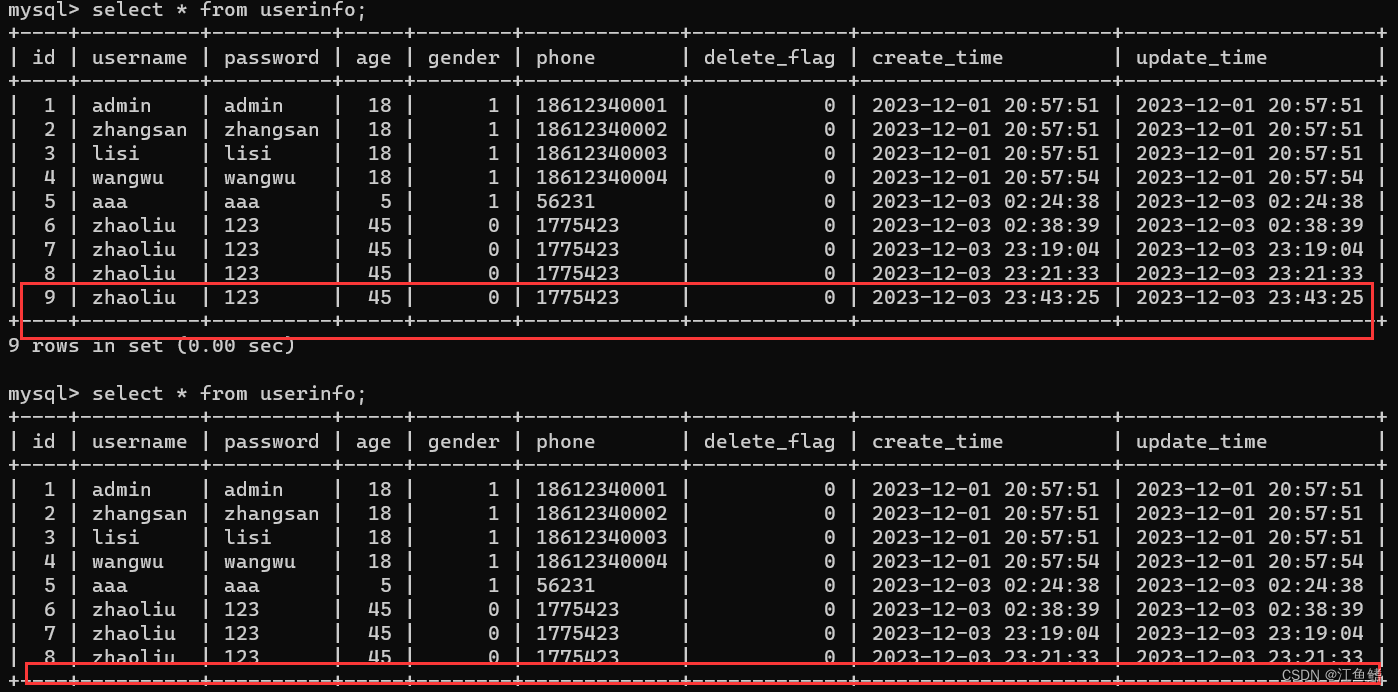
接下来是"改"操作
package com.example.mybatisdemo.mapper;import com.example.mybatisdemo.model.UserInfo;
import org.apache.ibatis.annotations.*;import java.util.List;@Mapper
public interface UserInfoMapper {@Update("update userinfo set age=#{age} where id=#{id}")Integer update(UserInfo userInfo);}
右键,generate,test,勾选,OK
package com.example.mybatisdemo.mapper;import com.example.mybatisdemo.model.UserInfo;
import lombok.extern.slf4j.Slf4j;
import org.junit.jupiter.api.AfterEach;
import org.junit.jupiter.api.BeforeEach;
import org.junit.jupiter.api.Test;
import org.springframework.beans.factory.annotation.Autowired;
import org.springframework.boot.test.context.SpringBootTest;import java.util.List;import static org.junit.jupiter.api.Assertions.*;@Slf4j
@SpringBootTest
class UserInfoMapperTest {@Autowiredprivate UserInfoMapper userInfoMapper;@Testvoid update() {UserInfo userInfo = new UserInfo();userInfo.setAge(78);userInfo.setId(7);Integer result=userInfoMapper.update(userInfo);//受影响的行数,也就是一般Mysql执行一段语句之后的最后一行if (result>0){//如果受影响的行数大于0,说明执行成功了log.info("数据修改成功");}}
} 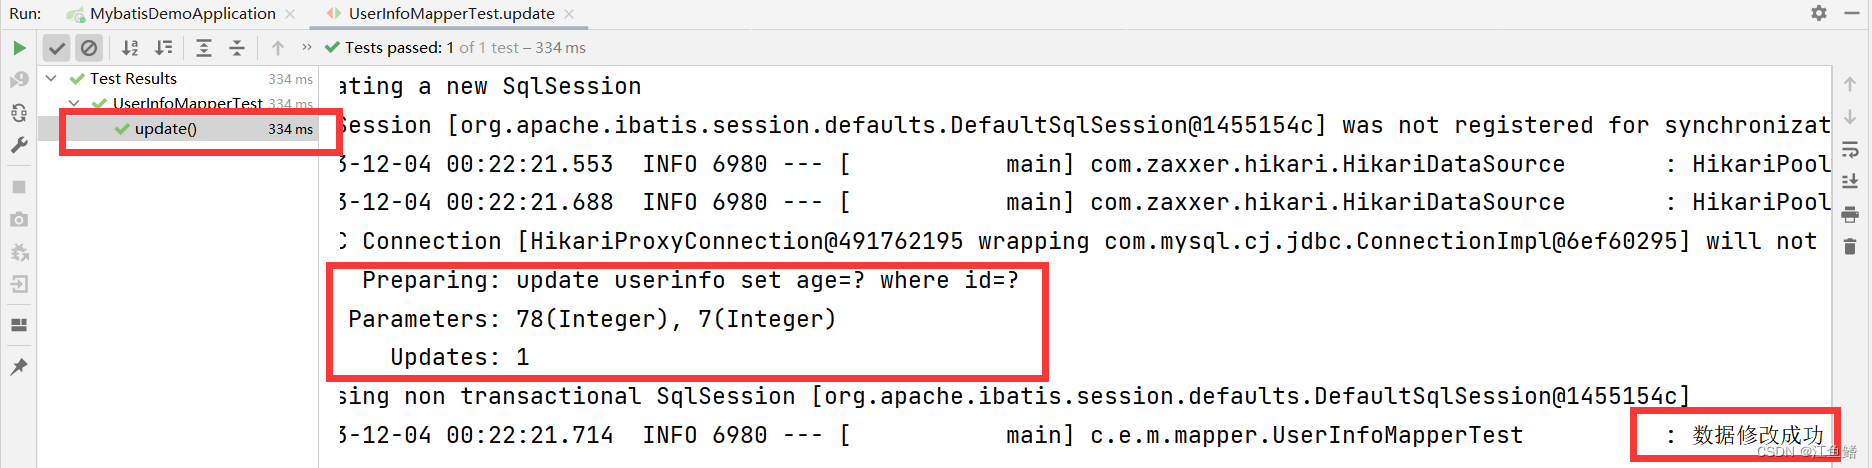
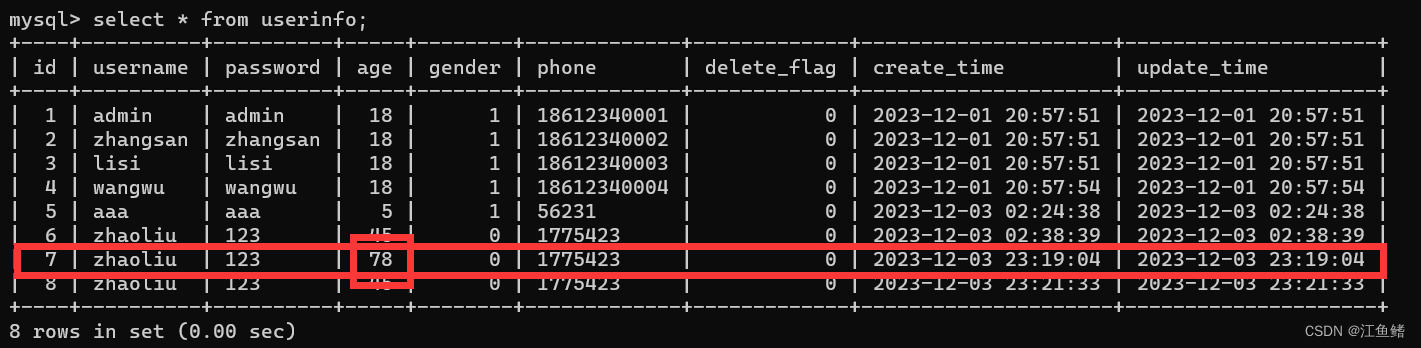
Id 为 7 的年龄改为 78
这篇关于Mybatis 操作续集(结合上文)的文章就介绍到这儿,希望我们推荐的文章对编程师们有所帮助!


