本文主要是介绍狂神说-SMBMS项目,希望对大家解决编程问题提供一定的参考价值,需要的开发者们随着小编来一起学习吧!

- 数据库

- 项目如何搭建
考虑使用不使用 Maven?依赖,jar
一、项目搭建准备工作
- 1.搭建一个maven web 项目
- 2.配置Tomcat
- 3.测试项目是否能够跑起来
- 4.导入项目中需要的jar包:jsp,Servlet,mysql驱动,jstl,standard…
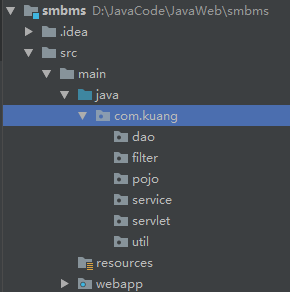
- 5.创建项目包结构
- 6.编写实体类
ROM映射:表-类映射 - 7.编写基础公共类
- 7.1.数据库配置文件
driver=com.mysql.jdbc.Driver
url=jdbc:mysql://127.0.0.1:3306/smbms?useSSL=false&useUnicode=true&characterEncoding=utf-8
username=root
password=123456
- 7.2.编写数据库的公共类
package com.kuang.dao;import java.io.IOException;
import java.io.InputStream;
import java.sql.*;
import java.util.Properties;//操作数据库的公共类
public class BaseDao {private static String driver;private static String url;private static String username;private static String password;//静态代码块,类加载的时候就初始化了static {Properties properties = new Properties();//通过类加载器,读取对应的资源InputStream is = BaseDao.class.getClassLoader().getResourceAsStream("db.properties");try {properties.load(is);} catch (IOException e) {e.printStackTrace();}driver = properties.getProperty("driver");url = properties.getProperty("url");username = properties.getProperty("username");password = properties.getProperty("password");}//获取数据库的连接public static Connection getConnection(){Connection connection = null;try {Class.forName(driver);connection = DriverManager.getConnection(url, username, password);} catch (Exception e) {e.printStackTrace();}return connection;}//编写查询公共类public static ResultSet execute(Connection connection, String sql, Object[] params, ResultSet resultSet, PreparedStatement preparedStatement) throws SQLException {//预编译的sql,在后面直接执行就可以了preparedStatement = connection.prepareStatement(sql);for (int i = 1; i < params.length; i++) {//setObject,占位符从1开始,但是我们的数组是从0开始的preparedStatement.setObject(i+1, params[i]);}resultSet = preparedStatement.executeQuery();return resultSet;}//编写增删改公共方法public static int execute(Connection connection, String sql, Object[] params, PreparedStatement preparedStatement) throws SQLException {preparedStatement = connection.prepareStatement(sql);for (int i = 1; i < params.length; i++) {//setObject,占位符从1开始,但是我们的数组是从0开始的preparedStatement.setObject(i+1, params[i]);}int updateRows = preparedStatement.executeUpdate();return updateRows;}//释放资源public static boolean closeResource(Connection connection, PreparedStatement preparedStatement, ResultSet resultSet){boolean flag = true;if (resultSet != null){try {resultSet.close();//GC回收resultSet = null;} catch (SQLException e) {e.printStackTrace();flag = false;}}if (preparedStatement != null){try {preparedStatement.close();//GC回收preparedStatement = null;} catch (SQLException e) {e.printStackTrace();flag = false;}}if (connection != null){try {connection.close();//GC回收connection = null;} catch (SQLException e) {e.printStackTrace();flag = false;}}return flag;}}- 7.3.编写字符编码过滤器
package com.kuang.filter;import javax.servlet.*;
import java.io.IOException;public class CharacterEncodingFilter implements Filter {public void init(FilterConfig filterConfig) throws ServletException {}public void doFilter(ServletRequest servletRequest, ServletResponse servletResponse, FilterChain filterChain) throws IOException, ServletException {servletRequest.setCharacterEncoding("utf-8");servletResponse.setCharacterEncoding("utf-8");filterChain.doFilter(servletRequest, servletResponse);}public void destroy() {}
}- 8.导入静态资源
二、登录功能实现

- 1.编写前端页面
- 2.设置首页
<!--设置欢迎页面--><welcome-file-list><welcome-file>login.jsp</welcome-file></welcome-file-list>
- 3.编写dao层登录用户登录的接口
public User getLoginUser(Connection connection, String userCode) throws Exception;
- 4.编写dao层接口的实现类
package com.kuang.dao.user;import com.kuang.dao.BaseDao;
import com.kuang.pojo.User;import java.sql.Connection;
import java.sql.PreparedStatement;
import java.sql.ResultSet;
import java.sql.SQLException;public class UserDaoImpl implements UserDao {public User getLoginUser(Connection connection, String userCode) throws SQLException{PreparedStatement pstm = null;ResultSet rs = null;User user = null;if (connection != null){String sql = "select * from smbms_user where userCode=?";Object[] params = {userCode};rs = BaseDao.execute(connection, pstm, rs, sql, params);if(rs.next()){user = new User();user.setId(rs.getInt("id"));user.setUserCode(rs.getString("userCode"));user.setUserName(rs.getString("userName"));user.setUserPassword(rs.getString("userPassword"));user.setGender(rs.getInt("gender"));user.setBirthday(rs.getDate("birthday"));user.setPhone(rs.getString("phone"));user.setAddress(rs.getString("address"));user.setUserRole(rs.getInt("userRole"));user.setCreatedBy(rs.getInt("createdBy"));user.setCreationDate(rs.getTimestamp("creationDate"));user.setModifyBy(rs.getInt("modifyBy"));user.setModifyDate(rs.getTimestamp("modifyDate"));}BaseDao.closeResource(null, pstm, rs);}return user;}
}- 5.业务层接口
//用户登录
public User login(String userCode, String userPassword);
- 6.业务层实现类
如果出现报错java.sql.SQLException: No value specified for parameter 1
可以参考https://blog.csdn.net/shenxinde/article/details/123639137
package com.kuang.service.user;import com.kuang.dao.BaseDao;
import com.kuang.dao.user.UserDao;
import com.kuang.dao.user.UserDaoImpl;
import com.kuang.pojo.User;
import org.junit.Test;import java.sql.Connection;
import java.sql.SQLException;public class UserServiceImpl implements UserService {//业务层都会调用dao层,所以我们要引入dao层private UserDao userDao;public UserServiceImpl(){userDao = new UserDaoImpl();}public User login(String userCode, String password) {Connection connection = null;User user = null;try {connection = BaseDao.getConnection();//通过业务层调用对应的具体的数据库操作user = userDao.getLoginUser(connection, userCode);} catch (SQLException e) {e.printStackTrace();} finally {BaseDao.closeResource(connection, null, null);}return user;}@Testpublic void test(){UserServiceImpl userService = new UserServiceImpl();User admin = userService.login("admin", "123");System.out.println(admin.getUserPassword());}}- 7.编写Servlet
package com.kuang.servlet.user;import com.kuang.pojo.User;
import com.kuang.service.user.UserServiceImpl;
import com.kuang.util.Constants;import javax.servlet.ServletException;
import javax.servlet.http.HttpServlet;
import javax.servlet.http.HttpServletRequest;
import javax.servlet.http.HttpServletResponse;
import java.io.IOException;public class LoginServlet extends HttpServlet {//Servlet:控制层,调用业务层代码@Overrideprotected void doGet(HttpServletRequest req, HttpServletResponse resp) throws ServletException, IOException {System.out.println("LoginServlet--start...");//获取用户名和密码String userCode = req.getParameter("userCode");String userPassword = req.getParameter("userPassword");//和数据库中的密码进行对比,调用业务层UserServiceImpl userService = new UserServiceImpl();User user = userService.login(userCode, userPassword);  //这里已经把登录的人查出来了//        user.getUserPassword().equals(userPassword)if (user!=null){    //查有此人,可以登录//将用户的信息放到Session中req.getSession().setAttribute(Constants.USER_SESSION, user);//登录成功后,跳转到主页resp.sendRedirect("jsp/frame.jsp");} else {    //查无此人,无法登录//转发回登录页面,顺带提示他,用户名或者密码错误req.setAttribute("error", "用户名或者密码错误");req.getRequestDispatcher("login.jsp").forward(req, resp);}}@Overrideprotected void doPost(HttpServletRequest req, HttpServletResponse resp) throws ServletException, IOException {doGet(req, resp);}
}- 9.测试访问,保证以上功能可以成功
三、登录功能优化
注销功能
- 思路:移除session,返回登录页面
package com.kuang.servlet.user;import com.kuang.util.Constants;import javax.servlet.ServletException;
import javax.servlet.http.HttpServlet;
import javax.servlet.http.HttpServletRequest;
import javax.servlet.http.HttpServletResponse;
import java.io.IOException;public class LogoutServlet extends HttpServlet {@Overrideprotected void doGet(HttpServletRequest req, HttpServletResponse resp) throws ServletException, IOException {//移除用户的Constants.USER_SESSIONreq.getSession().removeAttribute(Constants.USER_SESSION);resp.sendRedirect("/login.jsp");    //返回登录页面}@Overrideprotected void doPost(HttpServletRequest req, HttpServletResponse resp) throws ServletException, IOException {doGet(req, resp);}
}- 注册xml
<servlet><servlet-name>LogoutServlet</servlet-name><servlet-class>com.kuang.servlet.user.LogoutServlet</servlet-class>
</servlet>
<servlet-mapping><servlet-name>LogoutServlet</servlet-name><url-pattern>/jsp/logout.do</url-pattern>
</servlet-mapping>
登录拦截优化
- 编写一个过滤器,并注册
package com.kuang.filter;import com.kuang.pojo.User;
import com.kuang.util.Constants;import javax.servlet.*;
import javax.servlet.http.HttpServlet;
import javax.servlet.http.HttpServletRequest;
import javax.servlet.http.HttpServletResponse;
import java.io.IOException;public class SysFilter implements Filter {public void init(FilterConfig filterConfig) throws ServletException {}public void doFilter(ServletRequest req, ServletResponse resp, FilterChain chain) throws IOException, ServletException {HttpServletRequest request = (HttpServletRequest) req;HttpServletResponse response = (HttpServletResponse) resp;//过滤器:从Session中获取用户User user = (User) request.getSession().getAttribute(Constants.USER_SESSION);if (user==null){ //已经被移除或者注销了,或者未登录response.sendRedirect("/smbms/error.jsp");} else {chain.doFilter(req, resp);}}public void destroy() {}
}- 注册
<!--用户登录过滤器--><filter><filter-name>SysFilter</filter-name><filter-class>com.kuang.filter.SysFilter</filter-class></filter><filter-mapping><filter-name>SysFilter</filter-name><url-pattern>/jsp/*</url-pattern></filter-mapping>
四、密码修改
- 1.导入前端素材
<li><a href="${pageContext.request.contextPath }/jsp/pwdmodify.jsp">密码修改</a></li>
- 2.写项目,建议从底层向上写

- 3.UserDao接口
//修改当前用户密码
public int updatePwd(Connection connection, int id, int password) throws SQLException;
- 4.UserDao接口实现类
//修改当前用户密码
public int updatePwd(Connection connection, int id, int password) throws SQLException {PreparedStatement pstm = null;int execute = 0;if (connection!=null){String sql = "update smbms_user set UserPassword = ? where id = ?";Object params[] = {password, id};execute = BaseDao.execute(connection, pstm, sql, params);BaseDao.closeResource(null, pstm, null);}return execute;
}
- 5.UserService层
//根据用户ID修改密码
public boolean updatePwd(int id, int pwd);
- 6.UserService实现类
public boolean updatePwd(int id, int pwd) {Connection connection = null;boolean flag = false;//修改密码try {connection = BaseDao.getConnection();if (userDao.updatePwd(connection, id, pwd) > 0){flag = true;}} catch (SQLException e) {e.printStackTrace();} finally {BaseDao.closeResource(connection, null, null);}return flag;}
- 7.servlet记得实现复用,要提取出方法!
package com.kuang.servlet.user;import com.kuang.pojo.User;
import com.kuang.service.user.UserService;
import com.kuang.service.user.UserServiceImpl;
import com.kuang.util.Constants;
import com.mysql.jdbc.StringUtils;import javax.servlet.ServletException;
import javax.servlet.http.HttpServlet;
import javax.servlet.http.HttpServletRequest;
import javax.servlet.http.HttpServletResponse;
import java.io.IOException;//实现Servlet复用
public class UserServlet extends HttpServlet {@Overrideprotected void doGet(HttpServletRequest req, HttpServletResponse resp) throws ServletException, IOException {String method = req.getParameter("method");if (method.equals("savepwd") && method!=null){this.updatePwd(req, resp);}}@Overrideprotected void doPost(HttpServletRequest req, HttpServletResponse resp) throws ServletException, IOException {doGet(req, resp);}public void updatePwd(HttpServletRequest req, HttpServletResponse resp){//从Session里面拿IDObject o = req.getSession().getAttribute(Constants.USER_SESSION);String newpassword = req.getParameter("newpassword");System.out.println("UserServlet:" + newpassword);boolean flag = false;if (o!=null && newpassword!=null && newpassword.length()!=0){UserService userService = new UserServiceImpl();flag = userService.updatePwd(((User) o).getId(), newpassword);if (flag){req.setAttribute("message", "修改密码成功,请退出,使用新密码登录");//密码修改成功,移除当前Sessionreq.getSession().removeAttribute(Constants.USER_SESSION);} else {req.setAttribute("message", "修改密码失败");//密码修改失败}} else {req.setAttribute("message", "新密码有问题");}try {req.getRequestDispatcher("pwdmodify.jsp").forward(req, resp);} catch (ServletException e) {e.printStackTrace();} catch (IOException e) {e.printStackTrace();}}
}
优化密码修改使用Ajax
- 1.阿里巴巴的 fastjson
<!-- https://mvnrepository.com/artifact/com.alibaba/fastjson -->
<dependency><groupId>com.alibaba</groupId><artifactId>fastjson</artifactId><version>1.2.75</version>
</dependency>
- 2.后台代码修改
package com.kuang.servlet.user;import com.alibaba.fastjson.JSONArray;
import com.kuang.pojo.User;
import com.kuang.service.user.UserService;
import com.kuang.service.user.UserServiceImpl;
import com.kuang.util.Constants;
import com.mysql.jdbc.StringUtils;import javax.servlet.ServletException;
import javax.servlet.http.HttpServlet;
import javax.servlet.http.HttpServletRequest;
import javax.servlet.http.HttpServletResponse;
import java.io.IOException;
import java.io.PrintWriter;
import java.util.HashMap;//实现Servlet复用
public class UserServlet extends HttpServlet {@Overrideprotected void doGet(HttpServletRequest req, HttpServletResponse resp) throws ServletException, IOException {String method = req.getParameter("method");if (method.equals("savepwd") && method!=null){this.updatePwd(req, resp);} else if (method.equals("pwdmodify") && method!=null){this.pwdmodify(req, resp);}}@Overrideprotected void doPost(HttpServletRequest req, HttpServletResponse resp) throws ServletException, IOException {doGet(req, resp);}//修改密码public void updatePwd(HttpServletRequest req, HttpServletResponse resp){//从Session里面拿IDObject o = req.getSession().getAttribute(Constants.USER_SESSION);String newpassword = req.getParameter("newpassword");System.out.println("UserServlet:" + newpassword);boolean flag = false;if (o!=null && newpassword!=null && newpassword.length()!=0){UserService userService = new UserServiceImpl();flag = userService.updatePwd(((User) o).getId(), newpassword);if (flag){req.setAttribute("message", "修改密码成功,请退出,使用新密码登录");//密码修改成功,移除当前Sessionreq.getSession().removeAttribute(Constants.USER_SESSION);} else {req.setAttribute("message", "修改密码失败");//密码修改失败}} else {req.setAttribute("message", "新密码有问题");}try {req.getRequestDispatcher("pwdmodify.jsp").forward(req, resp);} catch (ServletException e) {e.printStackTrace();} catch (IOException e) {e.printStackTrace();}}//验证旧密码,session中有用户的旧密码public void pwdmodify(HttpServletRequest req, HttpServletResponse resp){//从Session里面拿IDObject o = req.getSession().getAttribute(Constants.USER_SESSION);String oldpassword = req.getParameter("oldpassword");//万能的Map:结果集HashMap<String, String> resultMap = new HashMap<String, String>();if (o==null) { //Session失效了,session过期了resultMap.put("result", "sessionerror");} else if (StringUtils.isNullOrEmpty(oldpassword)){ //输入的密码为空resultMap.put("result", "error");} else {String userPassword = ((User) o).getUserPassword(); //Session中用户的密码if (oldpassword.equals(userPassword)){resultMap.put("result", "true");} else {resultMap.put("result", "false");}}try {resp.setContentType("application/json");PrintWriter writer = resp.getWriter();//JSONArray 阿里巴巴的JSON工具类,转换格式/*resultMap = ["result","sessionerror","result",error]josn格式={key:value}*/writer.write(JSONArray.toJSONString(resultMap));writer.flush();writer.close();} catch (IOException e) {e.printStackTrace();}}
}- 3.测试


五、用户管理实现

- 1.导入分页的工具类-PageSupport
- 2.用户列表页面导入-userlist.jsp 以及 -rollpage.jsp
1、获取用户数量
- 1.UserDao
//根据用户名或者角色查询用户总数
public int getUserCount(Connection connection, String username, int userRode) throws SQLException;
- 2.UserDaoImpl
//根据用户名或者角色查询用户总数public int getUserCount(Connection connection, String username, int userRole) throws SQLException {PreparedStatement pstm = null;ResultSet rs = null;int count = 0;if(connection!=null){StringBuffer sql = new StringBuffer();sql.append("select count(1) as count from smbms_user u, smbms_role r where u.userRole = r.id");ArrayList<Object> list = new ArrayList<Object>(); //存放我们的参数if (!StringUtils.isNullOrEmpty(username)){sql.append(" and u.userName like ?");list.add("%" + username + "%"); //index:0}if (userRole > 0){sql.append(" and u.userRole = ?");list.add(userRole); //index:0}//怎么把list转换为数组Object[] params = list.toArray();System.out.println("UserDaoImpl->getUserCount:" + sql.toString()); //输出最后完整的SQL语句rs = BaseDao.execute(connection, pstm, rs, sql.toString(), params);if (rs.next()){count = rs.getInt("count");//从结果集中获取最终的数量}BaseDao.closeResource(null, pstm, rs);}return count;}
- 3.UserService
public int getUserCount(String username, int userRole);
- 4.UserServiceImpl
//查询记录数public int getUserCount(String username, int userRole) {Connection connection = null;int count = 0;try {connection = BaseDao.getConnection();count = userDao.getUserCount(connection, username, userRole);} catch (SQLException e) {e.printStackTrace();} finally {BaseDao.closeResource(connection, null, null);}return count;}
- 5.测试
@Testpublic void test(){UserServiceImpl userService = new UserServiceImpl();int userCount = userService.getUserCount(null, 1);System.out.println(userCount);}

2、获取用户列表
- 1.userdao
//通过条件查询-userList
public List<User> getUserList(Connection connection, String userName, int userRole, int currentPageNo, int pageSize) throws Exception;
- 2.userdaoImpl
//通过条件查询-userListpublic List<User> getUserList(Connection connection, String userName, int userRole, int currentPageNo, int pageSize) throws Exception {PreparedStatement pstm = null;ResultSet rs = null;List<User> userList = new ArrayList<User>();if (connection != null){StringBuffer sql = new StringBuffer();sql.append("select u.*, r.roleName as userRoleName from smbms_user u, smbms_role r where u.userRole = r.id");List<Object> list = new ArrayList<Object>();if (!StringUtils.isNullOrEmpty(userName)){sql.append(" and u.userName like ?");list.add("%" + userName + "%");}if (userRole > 0){sql.append(" and u.userRole = ?");list.add(userRole);}//在数据库中,分页显示 limit startIndex,pageSize;总数//当前页 (当前页-1)*页面大小//0,5 1,0 01234//5,5 5,0 56789//10,5 10,0 10~sql.append(" order by creationDate DESC limit ?,?");currentPageNo = (currentPageNo-1) * pageSize;list.add(currentPageNo);list.add(pageSize);Object[] params = list.toArray();System.out.println("sql ---> " + sql.toString());rs = BaseDao.execute(connection, pstm, rs, sql.toString(), params);while (rs.next()){User _user = new User();_user.setId(rs.getInt("id"));_user.setUserCode(rs.getString("userCode"));_user.setUserName(rs.getString("userName"));_user.setGender(rs.getInt("gender"));_user.setBirthday(rs.getDate("birthday"));_user.setPhone(rs.getString("phone"));_user.setUserRole(rs.getInt("userRole"));_user.setUserRoleName(rs.getString("userRoleName"));userList.add(_user);}BaseDao.closeResource(null, pstm, rs);}return userList;}
- 3.userService
//根据条件查询用户列表
public List<User> getUserList(String queryUserName, int queryUserRole, int currentPageNo, int pageSize);
- 4.userServiceImpl
//根据条件查询用户列表public List<User> getUserList(String queryUserName, int queryUserRole, int currentPageNo, int pageSize) {Connection connection = null;List<User> userList = null;System.out.println("queryUserName ---- > " + queryUserName);System.out.println("queryUserRole ---- > " + queryUserRole);System.out.println("currentPageNo ---- > " + currentPageNo);System.out.println("pageSize ---- > " + pageSize);try {connection = BaseDao.getConnection();userList = userDao.getUserList(connection, queryUserName, queryUserRole, currentPageNo, pageSize);} catch (Exception e) {e.printStackTrace();} finally {BaseDao.closeResource(connection, null, null);}return userList;}
3、获取角色列表
- 为了我们职责统一,可以把角色的操作单独放在一个包中,和 POJO 类对应
- 1.roledao
//获取角色列表public List<Role> getRoleList(Connection connection) throws SQLException;
- 2.roledaoImpl
public List<Role> getRoleList(Connection connection) throws SQLException {PreparedStatement pstm = null;ResultSet rs = null;List<Role> roleList = new ArrayList<Role>();if (connection != null){String sql = "select * from smbm_role";Object[] params = {};rs = BaseDao.execute(connection, pstm, rs, sql, params);while (rs.next()){Role _role = new Role();_role.setId(rs.getInt("id"));_role.setRoleCode(rs.getString("roleCode"));_role.setRoleName(rs.getString("roleName"));roleList.add(_role);}BaseDao.closeResource(null, pstm, rs);}return roleList;}
- 3.roleService
//角色列表查询public List<Role> getRoleList();
- 4.roleServiceImpl
public class RoleServiceImpl implements RoleService {//引入Daoprivate RoleDao roleDao;public RoleServiceImpl(){roleDao = new RoleDaoImpl();}public List<Role> getRoleList() {Connection connection = null;List<Role> roleList = null;try {connection = BaseDao.getConnection();roleList = roleDao.getRoleList(connection);} catch (SQLException e) {e.printStackTrace();} finally {BaseDao.closeResource(connection, null, null);}return roleList;}
}
- 5.测试
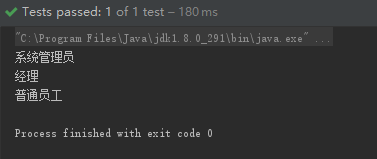
@Testpublic void test(){RoleServiceImpl roleService = new RoleServiceImpl();List<Role> roleList = roleService.getRoleList();for (Role role : roleList) {System.out.println(role.getRoleName());}}
4、用户显示的 Servlet
- 1.获取用户前端的数据(查询)
- 2.判断请求是否需要执行,看参数的值判断
- 3.为了实现分页,需要计算出当前页面和总页面,页面大小…
- 4.用户列表展示
- 5.返回前端
//重点,难点public void query(HttpServletRequest req, HttpServletResponse resp){//查询用户列表//从前端获取数据String queryUserName = req.getParameter("queryname");String temp = req.getParameter("queryUserRole");String pageIndex = req.getParameter("pageIndex");int queryUserRole = 0;//获取用户列表UserServiceImpl userService = new UserServiceImpl();List<User> userList = null;//第一次走这个请求,一定是第一页,页面大小是固定的int pageSize = 5; //可以把这个写到配置文件中,方便后期修改int currentPageNo = 1; //当前页码if (queryUserName == null){queryUserName = "";}if (temp != null && !temp.equals("")){queryUserRole = Integer.parseInt(temp); //给查询赋值!0,1,2,3}if (pageIndex != null){currentPageNo = Integer.parseInt(pageIndex);}//获取用户的总数(分页:上一页,下一页的情况)int totalCount = userService.getUserCount(queryUserName, queryUserRole);//总页数支持PageSupport pageSupport = new PageSupport();pageSupport.setCurrentPageNo(currentPageNo);pageSupport.setPageSize(pageSize);pageSupport.setTotalCount(totalCount);int totalPageCount = pageSupport.getTotalPageCount(); //总共有几页//控制首页和尾页//如果页数要小于1,就显示第一页的内容if (currentPageNo < 1){currentPageNo = 1;}else if (currentPageNo > totalPageCount){ //当前页数大于最后一页,就显示最后一页的内容currentPageNo = totalPageCount;}//获取用户列表展示userList = userService.getUserList(queryUserName, queryUserRole, currentPageNo, pageSize);req.setAttribute("userList", userList);RoleServiceImpl roleService = new RoleServiceImpl();List<Role> roleList = roleService.getRoleList();req.setAttribute("roleList", roleList);req.setAttribute("totalCount", totalCount);req.setAttribute("currentPageNo",currentPageNo);req.setAttribute("totalPageCount", totalPageCount);req.setAttribute("queryUserName",queryUserName);req.setAttribute("queryUserRole",queryUserRole);//返回前端try {req.getRequestDispatcher("userlist.jsp").forward(req,resp);} catch (ServletException e) {e.printStackTrace();} catch (IOException e) {e.printStackTrace();}}
完结撒花!
这篇关于狂神说-SMBMS项目的文章就介绍到这儿,希望我们推荐的文章对编程师们有所帮助!


