本文主要是介绍通过互联网代理部署Docker+Kubernetes 1.28.1,希望对大家解决编程问题提供一定的参考价值,需要的开发者们随着小编来一起学习吧!
一、背景
在公司环境中,我们往往都是无法直接连接外网的,之前写过一篇文章,是通过外网自建的中转机器下载需要的离线包,并在内网搭建一个harbor,通过harbor的方式搭建了一个kubernetes,但是这种方式还是有点费事。本次,在公司的环境中,我们搭建了一个互联网代理服务器,通过互联网代理直接让机器下载镜像、进行配置,快速的搭建一个kubernetes集群。虽然,通过互联网代理,虽然在获取资源时候方便了很多,但是在整个搭建过程中还是遇到了一些坑,这里也是mark一下。
二、环境
互联网代理(nginx):
| 机器 | 用途 | ip |
|---|---|---|
| InternetProxy | 可通过正向代理配置将互联网映射到内网,避免内网直连互联网,带来安全隐患 | 192.168.220.5 |
| yum | ftp服务器,主要用来下载本操作系统镜像源 | 192.168.130.220 |
内网机器:
| Cluster | Members | 节点名称 | IP |
|---|---|---|---|
| kubernetes | 1 master 3 worker | k8s-master1 k8-salve1, k8s-slave2, k8s-slave3 | 192.168.131.201 192.168.131.203 192.168.131.204 192.168.131.205 |
三、部署架构及思路
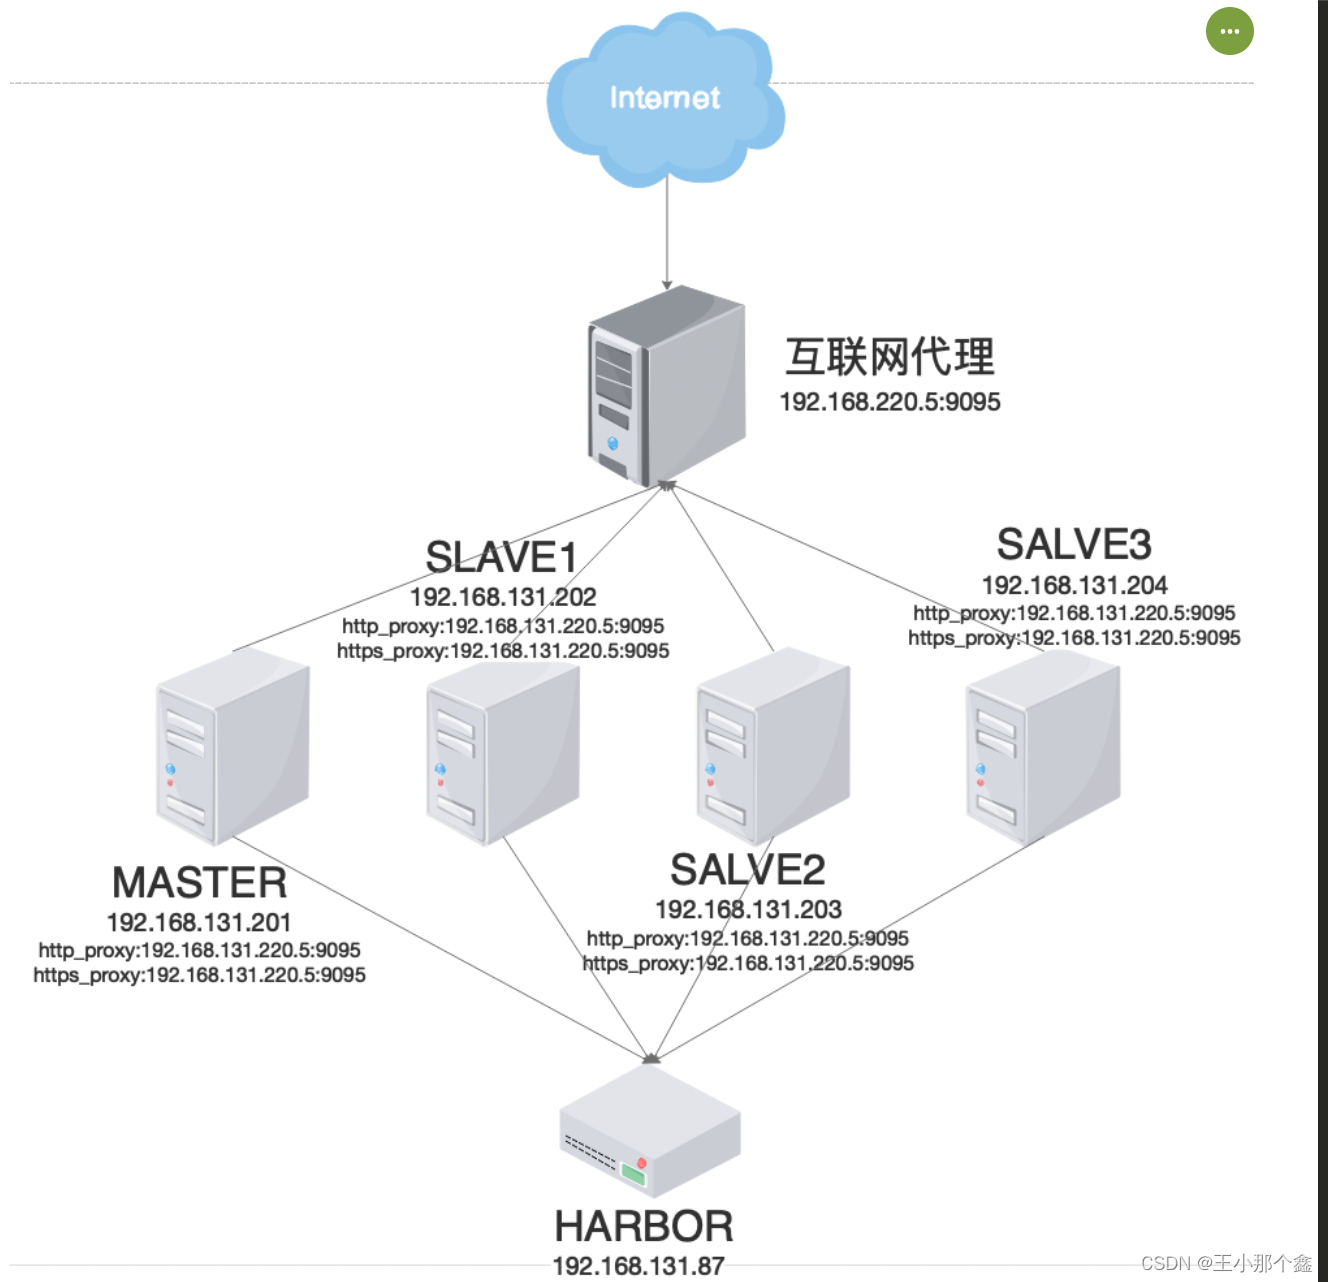
四、部署步骤
1.互联网代理正向代理配置:
在nginx的http模块中加入以下配置(该配置需要nginx新增ngx_http_proxy_connect_module模块):
server{resolver 61.139.2.69;listen 9095;resolver_timeout 180s;proxy_connect;proxy_connect_allow 443 80;proxy_connect_connect_timeout 20s;proxy_connect_read_timeout 20s;proxy_connect_send_timeout 20s;location /{proxy_pass $scheme://$http_host$request_uri;}
}
重新加载互联网代理配置文件:
./nginx -t
./nginx -s reload
2.内网机器初始化配置:
1) 修改主机名(需要注意主机名不能有下划线,否则后面初始化k8s集群时报错)
hostnamectl set-hostname k8s-master1
hostnamectl set-hostname k8s-slave1
hostnamectl set-hostname k8s-slave2
hostnamectl set-hostname k8s-slave3
2) 写入hosts文件:
echo '
192.168.131.201 k8s-master1
192.168.131.203 k8s-slave1
192.168.131.204 k8s-slave2
192.168.131.205 k8s-slave3
' >> /etc/hosts
3) 配置互联网代理
echo '
export http_proxy=http://192.168.220.5:9095
export https_proxy=http://192.168.220.5:9095
export no_proxy=127.0.0.1,localhost
' >> /etc/profile && source /etc/profile
4) 配置互信
sh sshUserSetup.sh -user root -hosts "k8s-master1 k8s-slave1 k8s-slave2 k8s-slave3"
5) 配置参数
cp /etc/sysctl.conf /etc/sysctl.conf.bak_`date +%Y%m%d`
echo "fs.file-max = 6815744
kernel.sem = 10000  10240000 10000 1024
kernel.shmmni = 4096
kernel.shmall = 1073741824
kernel.shmmax = 751619276800
net.ipv4.ip_local_port_range = 9000 65500
net.core.rmem_default = 16777216
net.core.rmem_max = 16777216
net.core.wmem_max = 16777216
net.core.wmem_default = 16777216
fs.aio-max-nr = 6194304
vm.dirty_ratio=20
vm.dirty_background_ratio=3
vm.dirty_writeback_centisecs=100
vm.dirty_expire_centisecs=500
vm.min_free_kbytes=524288
net.core.netdev_max_backlog = 30000
net.core.netdev_budget = 600
#vm.nr_hugepages =
net.ipv4.conf.all.rp_filter = 2
net.ipv4.conf.default.rp_filter = 2
net.ipv4.ipfrag_time = 60
net.ipv4.ipfrag_low_thresh = 6291456
net.ipv4.ipfrag_high_thresh = 8388608
net.ipv4.ip_forward = 1
net.bridge.bridge-nf-call-ip6tables = 1
net.bridge.bridge-nf-call-iptables = 1
vm.swappiness=0">> /etc/sysctl.conf && sysctl -p
其中,以下参数为必须设置:
net.ipv4.ip_forward = 1
net.bridge.bridge-nf-call-ip6tables = 1
net.bridge.bridge-nf-call-iptables = 1
vm.swappiness=0
其中前三个主要是用于转发网络流量,使网络流量可以在节点之间进行传输,达到不同节点之间的pod网络流量可以转发互通;
最后一个是在内存很小的时候的优化参数;
6) 配置用户资源限制
cp /etc/security/limits.conf /etc/security/limits_`date +"%Y%m%d_%H%M%S"`.conf
echo "
* soft    nproc   655350
* hard    nproc   655350
* soft    nofile  655360
* hard    nofile  655360* soft    stack  102400
* hard    stack  327680
* soft    stack  102400
* hard    stack  327680
* soft memlock -1
* hard memlock -1" >>/etc/security/limits.conf
7) 停止防火墙(为了方便,也可以打开防火墙,但要放出6443端口)
systemctl stop firewalld
systemctl disable firewalld
8) 关闭selinux
setenforce 0
sed -i "s/^SELINUX=enforcing/SELINUX=disabled/g" /etc/selinux/config
9) 关闭swap
swapoff -a
sed -i 's/.*swap.*/#&/' /etc/fstab
10) 加载相关模块
modprobe overlay
modprobe br_netfilter
两个模块分别是overlay文件系统支持模块和网络流量转发模块
11) 配置相关源
ftp源:
touch /etc/yum.repos.d/ftp.repo && cat > /etc/yum.repos.d/ftp.repo << EOF
[ftp]
name=ftp
baseurl=ftp://192.168.130.220/rhel7.9/
enabled=1
gpgcheck=0
EOF
centos源:
wget -O /etc/yum.repos.d/CentOS-Base.repo https://mirrors.aliyun.com/repo/Centos-7.repo
这里需要将镜像中的"$releaserver"替换成"7"
vi /etc/yum.repos.d/CentOS-Base.repo
:%s/$releasever/7/g
docker源:
yum-config-manager --add-repo https://mirrors.aliyun.com/docker-ce/linux/centos/docker-ce.repo
这里需要将下载镜像源改为阿里云或者其他的,否则国内无法获取docker-ce软件
sed -i ‘s+download.docker.com+mirrors.aliyun.com/docker-ce+’ /etc/yum.repos.d/docker-ce.repo
yum makecache fast
12) 时间同步(有条件可以配置统一的时钟服务器或者时钟源):
在master节点安装ntp服务,并在ntpd.conf中进行配置,作为同步源:
yum install ntpdvi /etc/ntpd.conf
server 127.127.1.0
fudge 127.127.1.0 stratum 10systemctl start ntpd在worker节点:yum install -y chrony修改配置文件vi /etc/chrony.conf
server 192.168.131.201 iburst prefer启动服务:
systemctl enable chronyd --now查看同步情况:
chronyc source -v
13) 安装ipvsadm,并设置ipvs模块自启:
yum install ipvsadm -yipvsadm --save > /etc/sysconfig/ipvsadm
cat > /etc/sysconfig/modules/ipvs.modules << EOF
/sbin/modinfo -F filename ip_vs > /dev/null 2>&1
if [ $? -eq 0 ];then/sbin/modprobe ip_vs
fi
EOFsystemctl daemon-reload
systemctl enable ipvsadm
systemctl restart ipvsadm
3.安装docker:
安装基础组件:
yum install -y yum-utils device-mapper-persistent-data lvm2
列出docker-ce的版本:
yum list docker-ce.x86_64 --showduplicates | sort -r
(也可以单独做container容器作为cri,yum list containerd.io.x86_64 --showduplicates | sort -r)
指定版本安装:
yum -y install docker-ce-24.0.7
启动docker服务,验证是否安装成功:
systemctl start dockerdocker version
优化docker配置,修改docker的daemon.json文件并配置docker的服务可进行外网访问,否则后续则无法下载镜像
touch /etc/docker/daemon.jsonsudo tee /etc/docker/daemon.json <<-'EOF'
{"data-root":"/app/docker_data","registry-mirrors": ["https://bgx0ltz2.mirror.aliyuncs.com"],"insecure-registries": ["172.16.131.87:1088"],"exec-opts": ["native.cgroupdriver=systemd"]
}
EOFvi /usr/lib/systemd/system/docker.service在“[Service]”模块中添加正向代理配置:
Environment="HTTP_PROXY=http://192.168.220.5:9095/"
Environment="HTTPS_PROXY=http://192.168.220.5:9095/"
Environment="NO_PROXY=localhost,127.0.0.1"重新加载配置并启动docker:sudo systemctl daemon-reload
sudo systemctl restart docker
4.安装cri-docker:
由于docker作为cri时,kubernetes在1.20之后不再支持,因此如果使用docker,则需要安装cri-docker作为cri接口。
1) GITHUB下载cri-docker
tar -xvzf cri-dockerd-0.3.1.amd64.tgz -C /app/soft
cd cri-dockerd
cp cri-dockerd /usr/bin/
chmod +x /usr/bin/cri-dockerd
2) 生成服务启动文件:
cat <<"EOF" > /usr/lib/systemd/system/cri-docker.service
[Unit]
Description=CRI Interface for Docker Application Container Engine
Documentation=https://docs.mirantis.com
After=network-online.target firewalld.service docker.service
Wants=network-online.target
Requires=cri-docker.socket[Service]
Type=notify#原来配置了私有仓库,这里可以注释掉
#ExecStart=/usr/bin/cri-dockerd --network-plugin=cni --pod-infra-container-image=192.168.131.87:1088/kubernetes-deploy/pause:3.7#从阿里云上下载pause:3.9版本
ExecStart=/usr/bin/cri-dockerd --network-plugin=cni --pod-infra-container-image=registry.aliyuncs.com/google_containers/pause:3.9ExecReload=/bin/kill -s HUP $MAINPID
TimeoutSec=0
RestartSec=2
Restart=alwaysStartLimitBurst=3StartLimitInterval=60sLimitNOFILE=infinity
LimitNPROC=infinity
LimitCORE=infinityTasksMax=infinity
Delegate=yes
KillMode=process[Install]
WantedBy=multi-user.targetEOF
3) 生成socket文件:
cat <<"EOF" > /usr/lib/systemd/system/cri-docker.socket
[Unit]
Description=CRI Docker Socket for the API
PartOf=cri-docker.service[Socket]
ListenStream=%t/cri-dockerd.sock
SocketMode=0660
SocketUser=root
SocketGroup=docker[Install]
WantedBy=sockets.targetEOF
4) 启用cri-docker
systemctl daemon-reload
systemctl start cri-docker
systemctl enable cri-docker
systemctl status cri-docker
5.初始化集群:
1) 安装kube-tools:kubeadm、kubelet、kubectl
配置kubernetes工具的yum源:
cat > /etc/yum.repos.d/kubernetes.repo << EOF
[kubernetes]
name=Kubernetes
baseurl=https://mirrors.aliyun.com/kubernetes/yum/repos/kubernetes-el7-x86_64/
enabled=1
gpgcheck=1
repo_gpgcheck=1
gpgkey=https://mirrors.aliyun.com/kubernetes/yum/doc/yum-key.gpg https://mirrors.aliyun.com/kubernetes/yum/doc/rpm-package-key.gpg
EOF
查看工具版本
yum list  kubelet --showduplicates | sort -r
yum list  kubeadm --showduplicates | sort -r
yum list  kubectl --showduplicates | sort -r
下载对应工具(也可以直接yum install直接安装),这里我们需要安装对应kubernetes版本的工具,我们安装的1.28.1的kubernetes:
mkdir -p /app/soft/kubernetes/kubelet
mkdir -p /app/soft/kubernetes/kubeadm
mkdir -p /app/soft/kubernetes/kubectl
yumdownloader kubelet-1.28.1 --resolve --destdir=/app/soft/kubernetes/kubelet
yumdownloader kubeadm-1.28.1 --resolve --destdir=/app/soft/kubernetes/kubeadm
yumdownloader kubectl-1.28.1 --resolve --destdir=/app/soft/kubernetes/kubectl
安装工具:
yum install -y iproute*
yum install kubectl-1.28.1 kubelet-1.28.1 kubeadm-1.28.1 -y
2) 修改kubelet配置,保证kubelet的cgroup的driver和docker一致:
vi /usr/lib/systemd/system/kubelet.service.d/10-kubeadm.conf
在最后一行的最后增加:--cgroup-driver=systemd
设置kubelet开机启动:
$ systemctl enable kubelet
$ systemctl daemon-reload
$ systemctl restart kubelet
3) 生成并配置集群参数文件
通过kubeadmin生成初始化配置文件(我们也可以直接通过kubeadm init+参数的命令进行初始化,通过文本则更灵活好控制参数):
kubeadm config print init-defaults > kubeadm.yml
4) 修改集群初始化配置:
vi kubeadm.yaml
#修改IP
advertiseAddress: 192.168.131.201
#修改运行时到cri-docker
criSocket: unix:///run/cri-dockerd.sock
#修改主机名(主机名不能为_)
name: k8s-master1
etcd:local:
#修改etcd地址(留一个空间比较大、容易扩容的目录)dataDir: /app/etcd_data
# 镜像服务地址
imageRepository: registry.aliyuncs.com/google_containers
#修改版本
kubernetesVersion: 1.28.1
serviceSubnet: 10.96.0.0/16
5) 初始化集群:
列出需要下载的镜像
kubeadm config images list --config /app/webapp/kubeadm.yml
拉取镜像,提前拉取镜像到本地,可以加快初始化速度
kubeadm config images pull --config /app/webapp/kubeadm.yml
取消主机的代理配置,由于为了方便在线拉取centos、docker-ce、Kubernetes等镜像源配置文件,因此最初在主机层配置了代理,但这里需要取消,否则会导致集群初始化失败:
export http_proxy=''
export https_proxy=''
export no_proxy=''
初始化集群:
kubeadm init --config=/app/webapp/kubeadm.yml --upload-certs --v=6
当输出类似以下内容后,则说明集群master初始化成功:
[init] Using Kubernetes version: v1.28.1
[preflight] Running pre-flight checks
[preflight] Pulling images required for setting up a Kubernetes cluster
[preflight] This might take a minute or two, depending on the speed of your internet connection
[preflight] You can also perform this action in beforehand using 'kubeadm config images pull'
[certs] Using certificateDir folder "/etc/kubernetes/pki"
[certs] Using existing ca certificate authority
[certs] Using existing apiserver certificate and key on disk
[certs] Using existing apiserver-kubelet-client certificate and key on disk
[certs] Using existing front-proxy-ca certificate authority
[certs] Using existing front-proxy-client certificate and key on disk
[certs] Using existing etcd/ca certificate authority
[certs] Generating "etcd/server" certificate and key
[certs] etcd/server serving cert is signed for DNS names [k8s-master1 localhost] and IPs [172.16.131.201 127.0.0.1 ::1]
[certs] Generating "etcd/peer" certificate and key
[certs] etcd/peer serving cert is signed for DNS names [k8s-master1 localhost] and IPs [172.16.131.201 127.0.0.1 ::1]
[certs] Generating "etcd/healthcheck-client" certificate and key
[certs] Generating "apiserver-etcd-client" certificate and key
[certs] Generating "sa" key and public key
[kubeconfig] Using kubeconfig folder "/etc/kubernetes"
[kubeconfig] Writing "admin.conf" kubeconfig file
[kubeconfig] Writing "kubelet.conf" kubeconfig file
[kubeconfig] Writing "controller-manager.conf" kubeconfig file
[kubeconfig] Writing "scheduler.conf" kubeconfig file
[etcd] Creating static Pod manifest for local etcd in "/etc/kubernetes/manifests"
[control-plane] Using manifest folder "/etc/kubernetes/manifests"
[control-plane] Creating static Pod manifest for "kube-apiserver"
[control-plane] Creating static Pod manifest for "kube-controller-manager"
[control-plane] Creating static Pod manifest for "kube-scheduler"
[kubelet-start] Writing kubelet environment file with flags to file "/var/lib/kubelet/kubeadm-flags.env"
[kubelet-start] Writing kubelet configuration to file "/var/lib/kubelet/config.yaml"
[kubelet-start] Starting the kubelet
[wait-control-plane] Waiting for the kubelet to boot up the control plane as static Pods from directory "/etc/kubernetes/manifests". This can take up to 4m0s
[apiclient] All control plane components are healthy after 6.503390 seconds
[upload-config] Storing the configuration used in ConfigMap "kubeadm-config" in the "kube-system" Namespace
[kubelet] Creating a ConfigMap "kubelet-config" in namespace kube-system with the configuration for the kubelets in the cluster
[upload-certs] Skipping phase. Please see --upload-certs
[mark-control-plane] Marking the node k8s-master1 as control-plane by adding the labels: [node-role.kubernetes.io/control-plane node.kubernetes.io/exclude-from-external-load-balancers]
[mark-control-plane] Marking the node k8s-master1 as control-plane by adding the taints [node-role.kubernetes.io/control-plane:NoSchedule]
[bootstrap-token] Using token: abcdef.0123456789abcdef
[bootstrap-token] Configuring bootstrap tokens, cluster-info ConfigMap, RBAC Roles
[bootstrap-token] Configured RBAC rules to allow Node Bootstrap tokens to get nodes
[bootstrap-token] Configured RBAC rules to allow Node Bootstrap tokens to post CSRs in order for nodes to get long term certificate credentials
[bootstrap-token] Configured RBAC rules to allow the csrapprover controller automatically approve CSRs from a Node Bootstrap Token
[bootstrap-token] Configured RBAC rules to allow certificate rotation for all node client certificates in the cluster
[bootstrap-token] Creating the "cluster-info" ConfigMap in the "kube-public" namespace
[kubelet-finalize] Updating "/etc/kubernetes/kubelet.conf" to point to a rotatable kubelet client certificate and key
[addons] Applied essential addon: CoreDNS
[addons] Applied essential addon: kube-proxyYour Kubernetes control-plane has initialized successfully!To start using your cluster, you need to run the following as a regular user:mkdir -p $HOME/.kubesudo cp -i /etc/kubernetes/admin.conf $HOME/.kube/configsudo chown $(id -u):$(id -g) $HOME/.kube/configAlternatively, if you are the root user, you can run:export KUBECONFIG=/etc/kubernetes/admin.confYou should now deploy a pod network to the cluster.
Run "kubectl apply -f [podnetwork].yaml" with one of the options listed at:https://kubernetes.io/docs/concepts/cluster-administration/addons/Then you can join any number of worker nodes by running the following on each as root:kubeadm join 172.16.131.201:6443 --token abcdef.0123456789abcdef \--discovery-token-ca-cert-hash sha256:57be6c62a473650fdfcad0112ce04147cc9a40d811b3d000d661c35379636e60
6) 根据初始化结果的输出,进行后续操作:
在环境变量里配置kubeconfig文件,后续通过kubectl识别正确的集群配置,连接操作:
mkdir -p $HOME/.kube
sudo cp -i /etc/kubernetes/admin.conf $HOME/.kube/config
sudo chown $(id -u):$(id -g) $HOME/.kube/config
echo "export KUBECONFIG=/etc/kubernetes/admin.conf" >> $HOME/.bash_profile
7) 安装网络插件:
在安装网络插件前,我们查看kubelet的日志,会一直提示网络插件cni未准备好,且主节点也一直处于NotReady状态:
Nov 21 22:25:40 k8s-slave1 kubelet[80136]: E1121 22:25:40.578592 80136 kubelet.go:2855] "Container runtime network not ready" networkReady="NetworkReady=false reason:NetworkPluginNotReady message:docker: network plugin is not ready: cni config uninitialized"
这里网络插件,我们选用calico:
从github上找到calico项目,从其mainfest文件夹中找到的对应yml文件,下载或拷贝到master主机上,并从文件中找到所有的"image:"对应的镜像。由于国内网络的原因的问题,我们可以通过其他方式提前下载镜像并打包,注册到环境中(也可以使用国内的镜像站提前下载):
docker pull docker.io/calico/kube-controllers:v3.26.1
docker pull docker.io/calico/cni:v3.26.1
docker pull docker.io/calico/node:v3.26.1
将镜像打包:
docker save docker.io/calico/kube-controllers:v3.26.1 -o kube-controllers_v3.26.1.tar.gz
docker save docker.io/calico/cni:v3.26.1 -o cni_v3.26.1.tar.gz
docker save docker.io/calico/node:v3.26.1 -o node_v3.26.1.tar.gz
将打包好的镜像注册到集群docker中,这一步我们需要在master和worker中均执行,否则worker中无法正确拉取网络cni插件,导致worker节点是NotReady状态:
docker load -i node_v3.26.1.tar.gz
docker load -i cni_v3.26.1.tar.gz
docker load -i kube-controllers_v3.26.1.tar.gz
执行以下命令,部署calico:
kubectl apply -f /app/soft/calico/calico.yaml
7) 将worker加入集群:
在work节点上取消主机代理配置,不取消则会报错,无法加入:
export http_proxy=''
export https_proxy=''
export no_proxy=''
在worker节点上执行以下命令,加入集群:
kubeadm join 172.16.131.201:6443 --token abcdef.0123456789abcdef --discovery-token-ca-cert-hash sha256:57be6c62a473650fdfcad0112ce04147cc9a40d811b3d000d661c35379636e60 --cri-socket=unix:///run/cri-dockerd.sock
8) 等待各节点就绪,完成pod下载,网络插件安装,pod启动后,查看各个节点状态,验证集群可用性:
root@k8s-master1:/app/soft/calico]$kubectl get nodes
NAME          STATUS   ROLES           AGE   VERSION
k8s-master1   Ready    control-plane   32m   v1.28.2
k8s-slave1    Ready    <none>          18m   v1.28.2
k8s-slave2    Ready    <none>          17m   v1.28.2
k8s-slave3    Ready    <none>          17m   v1.28.2
五、部署中遇到的那些问题
问题一:错误的daemon.json格式
正确格式:
{"data-root":"/app/docker_data","registry-mirrors": ["https://bgx0ltz2.mirror.aliyuncs.com"],"insecure-registries": ["172.16.131.87:1088"],"exec-opts": ["native.cgroupdriver=systemd"]
}
每一项配置后面都需要有逗号分割,我配置的时候,少写了逗号,导致后续的docker启动失败。
问题二:集群初始化文件配置问题
1) 主机名问题
主机名不能使用"_“,否则会报错,节点不符合命名规则,但可以使用”-"
2) criSocket问题
这里一定记得修改为cri-docker的sock文件,否则,运行时无法正常运行
问题三:主机互联网代理配置
在进行初始化、worker加入节点的时候,一定要把http_proxy、https_proxy的互联网配置取消,否则,集群将会通过互联网代理到公网访问https://192.168.131.201获取集群状态,但是我们根本无法通过外网访问到这个地址和端口。所以在最后初始化集群会一直不断循环的提示大概为如下的错误:
访问http://192.168.220.5:6443/heazlth?timeout ....
而针对代理访问的问题,只是一个warning,所以很容易忽视该错误,导致集群初始化失败
root@k8s-master1:/app/webapp]$kubeadm init --config kubeadm.yml
[init] Using Kubernetes version: v1.28.1
[preflight] Running pre-flight checks[WARNING HTTPProxy]: Connection to "https://192.168.131.201" uses proxy "http://192.168.220.5:9095". If that is not intended, adjust your proxy settings[WARNING HTTPProxyCIDR]: connection to "10.96.0.0/16" uses proxy "http://192.168.220.5:9095". This may lead to malfunctional cluster setup. Make sure that Pod and Services IP ranges specified correctly as exceptions in proxy configuration
[preflight] Pulling images required for setting up a Kubernetes cluster
[preflight] This might take a minute or two, depending on the speed of your internet connection
[preflight] You can also perform this action in beforehand using 'kubeadm config images pull'
[certs] Using certificateDir folder "/etc/kubernetes/pki"
[certs] Generating "ca" certificate and key
[certs] Generating "apiserver" certificate and key
[certs] apiserver serving cert is signed for DNS names [k8s-master1 kubernetes kubernetes.default kubernetes.default.svc kubernetes.default.svc.cluster.local] and IPs [10.96.0.1 172.16.131.201]
[certs] Generating "apiserver-kubelet-client" certificate and key
[certs] Generating "front-proxy-ca" certificate and key
[certs] Generating "front-proxy-client" certificate and key
[certs] Generating "etcd/ca" certificate and key
所以我们一定要在初始化或者worker加入集群前做如下操作:
export http_proxy=''
export https_proxy=''
export no_proxy=''
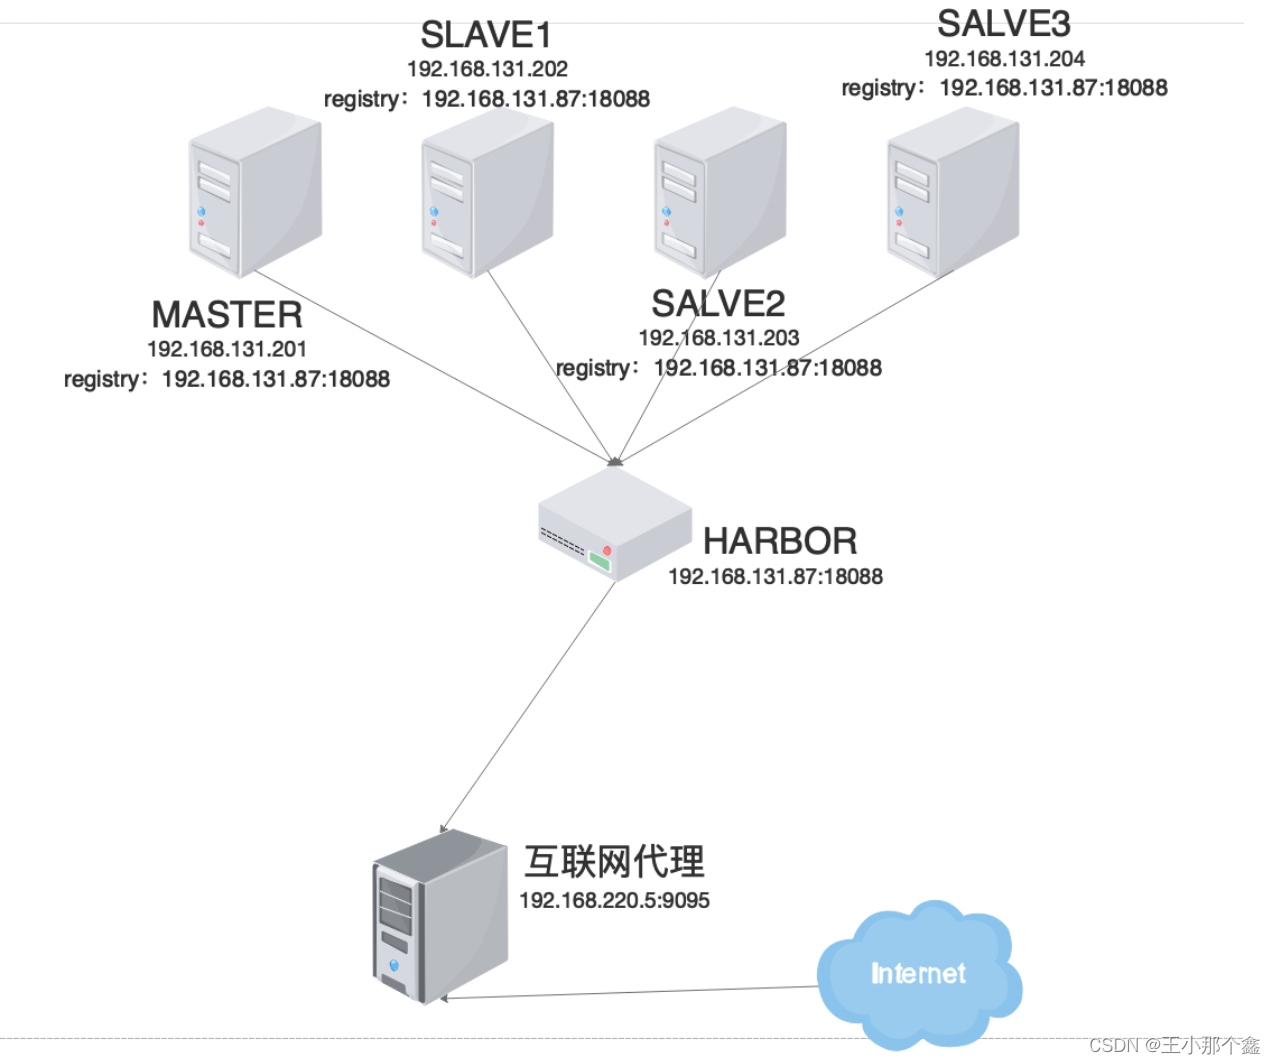
六、基于后续内网架构的考虑
一般在生产中搭建kubernetes集群或者使用的时候,出于安全考虑,一般都不会让集群节点直接连接网络。因此,我们只能通过离线或私有仓库(harbor等)方式进行部署。那么我们则可以对内网的kubernetes使用架构有如下的考虑和设计:
附录:
sshUserSetup.sh脚本内容:
#!/bin/sh
# Nitin Jerath - Aug 2005
#Usage sshUserSetup.sh  -user <user name> [ -hosts \"<space separated hostlist>\" | -hostfile <absolute path of cluster configuration file> ] [ -advanced ]  [ -verify] [ -exverify ] [ -logfile <desired absolute path of logfile> ] [-confirm] [-shared] [-help] [-usePassphrase] [-noPromptPassphrase]
#eg. sshUserSetup.sh -hosts "host1 host2" -user njerath -advanced
#This script is used to setup SSH connectivity from the host on which it is
# run to the specified remote hosts. After this script is run, the user can use # SSH to run commands on the remote hosts or copy files between the local host
# and the remote hosts without being prompted for passwords or confirmations.
# The list of remote hosts and the user name on the remote host is specified as
# a command line parameter to the script. Note that in case the user on the
# remote host has its home directory NFS mounted or shared across the remote
# hosts, this script should be used with -shared option.
#Specifying the -advanced option on the command line would result in SSH
# connectivity being setup among the remote hosts which means that SSH can be
# used to run commands on one remote host from the other remote host or copy
# files between the remote hosts without being prompted for passwords or
# confirmations.
#Please note that the script would remove write permissions on the remote hosts
#for the user home directory and ~/.ssh directory for "group" and "others". This
# is an SSH requirement. The user would be explicitly informed about this by teh script and prompted to continue. In case the user presses no, the script would exit. In case the user does not want to be prompted, he can use -confirm option.
# As a part of the setup, the script would use SSH to create files within ~/.ssh
# directory of the remote node and to setup the requisite permissions. The
#script also uses SCP to copy the local host public key to the remote hosts so
# that the remote hosts trust the local host for SSH. At the time, the script
#performs these steps, SSH connectivity has not been completely setup  hence
# the script would prompt the user for the remote host password.
#For each remote host, for remote users with non-shared homes this would be
# done once for SSH and  once for SCP. If the number of remote hosts are x, the
# user would be prompted  2x times for passwords. For remote users with shared
# homes, the user would be prompted only twice, once each for SCP and SSH.
#For security reasons, the script does not save passwords and reuse it. Also,
# for security reasons, the script does not accept passwords redirected from a
#file. The user has to key in the confirmations and passwords at the prompts.
#The -verify option means that the user just wants to verify whether SSH has
#been set up. In this case, the script would not setup SSH but would only check
# whether SSH connectivity has been setup from the local host to the remote
# hosts. The script would run the date command on each remote host using SSH. In
# case the user is prompted for a password or sees a warning message for a
#particular host, it means SSH connectivity has not been setup correctly for
# that host.
#In case the -verify option is not specified, the script would setup SSH and
#then do the verification as well.
#In case the user speciies the -exverify option, an exhaustive verification would be done. In that case, the following would be checked:
# 1. SSH connectivity from local host to all remote hosts.
# 2. SSH connectivity from each remote host to itself and other remote hosts.#echo Parsing command line arguments
numargs=$#ADVANCED=false
HOSTNAME=`hostname`
CONFIRM=no
SHARED=false
i=1
USR=$USERif  test -z "$TEMP"
thenTEMP=/tmp
fiIDENTITY=id_rsa
LOGFILE=$TEMP/sshUserSetup_`date +%F-%H-%M-%S`.log
VERIFY=false
EXHAUSTIVE_VERIFY=false
HELP=false
PASSPHRASE=no
RERUN_SSHKEYGEN=no
NO_PROMPT_PASSPHRASE=nowhile [ $i -le $numargs ]
doj=$1 if [ $j = "-hosts" ] thenHOSTS=$2shift 1i=`expr $i + 1`fiif [ $j = "-user" ] thenUSR=$2shift 1i=`expr $i + 1`fiif [ $j = "-logfile" ] thenLOGFILE=$2shift 1i=`expr $i + 1`fiif [ $j = "-confirm" ] thenCONFIRM=yesfiif [ $j = "-hostfile" ] thenCLUSTER_CONFIGURATION_FILE=$2shift 1i=`expr $i + 1`fiif [ $j = "-usePassphrase" ] thenPASSPHRASE=yesfiif [ $j = "-noPromptPassphrase" ] thenNO_PROMPT_PASSPHRASE=yesfiif [ $j = "-shared" ] thenSHARED=truefiif [ $j = "-exverify" ] thenEXHAUSTIVE_VERIFY=truefiif [ $j = "-verify" ] thenVERIFY=truefiif [ $j = "-advanced" ] thenADVANCED=truefiif [ $j = "-help" ] thenHELP=truefii=`expr $i + 1`shift 1
doneif [ $HELP = "true" ]
thenecho "Usage $0 -user <user name> [ -hosts \"<space separated hostlist>\" | -hostfile <absolute path of cluster configuration file> ] [ -advanced ]  [ -verify] [ -exverify ] [ -logfile <desired absolute path of logfile> ] [-confirm] [-shared] [-help] [-usePassphrase] [-noPromptPassphrase]"
echo "This script is used to setup SSH connectivity from the host on which it is run to the specified remote hosts. After this script is run, the user can use  SSH to run commands on the remote hosts or copy files between the local host and the remote hosts without being prompted for passwords or confirmations.  The list of remote hosts and the user name on the remote host is specified as a command line parameter to the script. "
echo "-user : User on remote hosts. "
echo "-hosts : Space separated remote hosts list. "
echo "-hostfile : The user can specify the host names either through the -hosts option or by specifying the absolute path of a cluster configuration file. A sample host file contents are below: "
echo
echo  "   stacg30 stacg30int 10.1.0.0 stacg30v  -"
echo  "   stacg34 stacg34int 10.1.0.1 stacg34v  -"
echo
echo " The first column in each row of the host file will be used as the host name."
echo
echo "-usePassphrase : The user wants to set up passphrase to encrypt the private key on the local host. "
echo "-noPromptPassphrase : The user does not want to be prompted for passphrase related questions. This is for users who want the default behavior to be followed."
echo "-shared : In case the user on the remote host has its home directory NFS mounted or shared across the remote hosts, this script should be used with -shared option. "
echo "  It is possible for the user to determine whether a user's home directory is shared or non-shared. Let us say we want to determine that user user1's home directory is shared across hosts A, B and C."
echo " Follow the following steps:"
echo "    1. On host A, touch ~user1/checkSharedHome.tmp"
echo "    2. On hosts B and C, ls -al ~user1/checkSharedHome.tmp"
echo "    3. If the file is present on hosts B and C in ~user1 directory and"
echo "       is identical on all hosts A, B, C, it means that the user's home "
echo "       directory is shared."
echo "    4. On host A, rm -f ~user1/checkSharedHome.tmp"
echo " In case the user accidentally passes -shared option for non-shared homes or viceversa,SSH connectivity would only be set up for a subset of the hosts. The user would have to re-run the setyp script with the correct option to rectify this problem."
echo "-advanced :  Specifying the -advanced option on the command line would result in SSH  connectivity being setup among the remote hosts which means that SSH can be used to run commands on one remote host from the other remote host or copy files between the remote hosts without being prompted for passwords or confirmations."
echo "-confirm: The script would remove write permissions on the remote hosts for the user home directory and ~/.ssh directory for "group" and "others". This is an SSH requirement. The user would be explicitly informed about this by the script and prompted to continue. In case the user presses no, the script would exit. In case the user does not want to be prompted, he can use -confirm option."
echo  "As a part of the setup, the script would use SSH to create files within ~/.ssh directory of the remote node and to setup the requisite permissions. The script also uses SCP to copy the local host public key to the remote hosts so that the remote hosts trust the local host for SSH. At the time, the script performs these steps, SSH connectivity has not been completely setup  hence the script would prompt the user for the remote host password.  "
echo "For each remote host, for remote users with non-shared homes this would be done once for SSH and  once for SCP. If the number of remote hosts are x, the user would be prompted  2x times for passwords. For remote users with shared homes, the user would be prompted only twice, once each for SCP and SSH.  For security reasons, the script does not save passwords and reuse it. Also, for security reasons, the script does not accept passwords redirected from a file. The user has to key in the confirmations and passwords at the prompts. "
echo "-verify : -verify option means that the user just wants to verify whether SSH has been set up. In this case, the script would not setup SSH but would only check whether SSH connectivity has been setup from the local host to the remote hosts. The script would run the date command on each remote host using SSH. In case the user is prompted for a password or sees a warning message for a particular host, it means SSH connectivity has not been setup correctly for that host.  In case the -verify option is not specified, the script would setup SSH and then do the verification as well. "
echo "-exverify : In case the user speciies the -exverify option, an exhaustive verification for all hosts would be done. In that case, the following would be checked: "
echo "   1. SSH connectivity from local host to all remote hosts. "
echo "   2. SSH connectivity from each remote host to itself and other remote hosts.  "
echo The -exverify option can be used in conjunction with the -verify option as well to do an exhaustive verification once the setup has been done.
echo "Taking some examples: Let us say local host is Z, remote hosts are A,B and C. Local user is njerath. Remote users are racqa(non-shared), aime(shared)."
echo "$0 -user racqa -hosts "A B C" -advanced -exverify -confirm"
echo "Script would set up connectivity from Z -> A, Z -> B, Z -> C, A -> A, A -> B, A -> C, B -> A, B -> B, B -> C, C -> A, C -> B, C -> C."
echo "Since user has given -exverify option, all these scenario would be verified too."
echo
echo "Now the user runs : $0 -user racqa -hosts "A B C" -verify"
echo "Since -verify option is given, no SSH setup would be done, only verification of existing setup. Also, since -exverify or -advanced options are not given, script would only verify connectivity from Z -> A, Z -> B, Z -> C"echo "Now the user runs : $0 -user racqa -hosts "A B C" -verify -advanced"
echo "Since -verify option is given, no SSH setup would be done, only verification of existing setup. Also, since  -advanced options is given, script would verify connectivity from Z -> A, Z -> B, Z -> C, A-> A, A->B, A->C, A->D"echo "Now the user runs:"
echo "$0 -user aime -hosts "A B C" -confirm -shared"
echo "Script would set up connectivity between  Z->A, Z->B, Z->C only since advanced option is not given."
echo "All these scenarios would be verified too."exit
fiif test -z "$HOSTS"
thenif test -n "$CLUSTER_CONFIGURATION_FILE" && test -f "$CLUSTER_CONFIGURATION_FILE"thenHOSTS=`awk '$1 !~ /^#/ { str = str " " $1 } END { print str }' $CLUSTER_CONFIGURATION_FILE` elif ! test -f "$CLUSTER_CONFIGURATION_FILE"thenecho "Please specify a valid and existing cluster configuration file."fi
fiif  test -z "$HOSTS" || test -z $USR
then
echo "Either user name or host information is missing"
echo "Usage $0 -user <user name> [ -hosts \"<space separated hostlist>\" | -hostfile <absolute path of cluster configuration file> ] [ -advanced ]  [ -verify] [ -exverify ] [ -logfile <desired absolute path of logfile> ] [-confirm] [-shared] [-help] [-usePassphrase] [-noPromptPassphrase]"
exit 1
fiif [ -d $LOGFILE ]; thenecho $LOGFILE is a directory, setting logfile to $LOGFILE/ssh.logLOGFILE=$LOGFILE/ssh.log
fiecho The output of this script is also logged into $LOGFILE | tee -a $LOGFILEif [ `echo $?` != 0 ]; thenecho Error writing to the logfile $LOGFILE, Exitingexit 1
fiecho Hosts are $HOSTS | tee -a $LOGFILE
echo user is  $USR | tee -a $LOGFILE
SSH="/usr/bin/ssh"
SCP="/usr/bin/scp"
SSH_KEYGEN="/usr/bin/ssh-keygen"
calculateOS()
{platform=`uname -s`case "$platform"in"SunOS")  os=solaris;;"Linux")  os=linux;;"HP-UX")  os=hpunix;;"AIX")  os=aix;;*)  echo "Sorry, $platform is not currently supported." | tee -a $LOGFILEexit 1;;esacecho "Platform:- $platform " | tee -a $LOGFILE
}
calculateOS
BITS=1024
ENCR="rsa"deadhosts=""
alivehosts=""
if [ $platform = "Linux" ]
thenPING="/bin/ping"
elsePING="/usr/sbin/ping"
fi
#bug 9044791
if [ -n "$SSH_PATH" ]; thenSSH=$SSH_PATH
fi
if [ -n "$SCP_PATH" ]; thenSCP=$SCP_PATH
fi
if [ -n "$SSH_KEYGEN_PATH" ]; thenSSH_KEYGEN=$SSH_KEYGEN_PATH
fi
if [ -n "$PING_PATH" ]; thenPING=$PING_PATH
fi
PATH_ERROR=0
if test ! -x $SSH ; thenecho "ssh not found at $SSH. Please set the variable SSH_PATH to the correct location of ssh and retry."PATH_ERROR=1
fi
if test ! -x $SCP ; thenecho "scp not found at $SCP. Please set the variable SCP_PATH to the correct location of scp and retry."PATH_ERROR=1
fi
if test ! -x $SSH_KEYGEN ; thenecho "ssh-keygen not found at $SSH_KEYGEN. Please set the variable SSH_KEYGEN_PATH to the correct location of ssh-keygen and retry."PATH_ERROR=1
fi
if test ! -x $PING ; thenecho "ping not found at $PING. Please set the variable PING_PATH to the correct location of ping and retry."PATH_ERROR=1
fi
if [ $PATH_ERROR = 1 ]; thenecho "ERROR: one or more of the required binaries not found, exiting"exit 1
fi
#9044791 end
echo Checking if the remote hosts are reachable | tee -a $LOGFILE
for host in $HOSTS
doif [ $platform = "SunOS" ]; then$PING -s $host 5 5elif [ $platform = "HP-UX" ]; then$PING $host -n 5 -m 5else$PING -c 5 -w 5 $hostfiexitcode=`echo $?`if [ $exitcode = 0 ]thenalivehosts="$alivehosts $host"elsedeadhosts="$deadhosts $host"fi
doneif test -z "$deadhosts"
thenecho Remote host reachability check succeeded.  | tee -a $LOGFILEecho The following hosts are reachable: $alivehosts.  | tee -a $LOGFILEecho The following hosts are not reachable: $deadhosts.  | tee -a $LOGFILEecho All hosts are reachable. Proceeding further...  | tee -a $LOGFILE
elseecho Remote host reachability check failed.  | tee -a $LOGFILEecho The following hosts are reachable: $alivehosts.  | tee -a $LOGFILEecho The following hosts are not reachable: $deadhosts.  | tee -a $LOGFILEecho Please ensure that all the hosts are up and re-run the script.  | tee -a $LOGFILEecho Exiting now...  | tee -a $LOGFILEexit 1
fifirsthost=`echo $HOSTS | awk '{print $1}; END { }'`
echo firsthost $firsthost
numhosts=`echo $HOSTS | awk '{ }; END {print NF}'`
echo numhosts $numhostsif [ $VERIFY = "true" ]
thenecho Since user has specified -verify option, SSH setup would not be done. Only, existing SSH setup would be verified. | tee -a $LOGFILEcontinue
else
echo The script will setup SSH connectivity from the host ''`hostname`'' to all  | tee -a $LOGFILE
echo the remote hosts. After the script is executed, the user can use SSH to run  | tee -a $LOGFILE
echo commands on the remote hosts or copy files between this host ''`hostname`'' | tee -a $LOGFILE
echo and the remote hosts without being prompted for passwords or confirmations. | tee -a $LOGFILE
echo  | tee -a $LOGFILE
echo NOTE 1: | tee -a $LOGFILE
echo As part of the setup procedure, this script will use 'ssh' and 'scp' to copy | tee -a $LOGFILE
echo files between the local host and the remote hosts. Since the script does not  | tee -a $LOGFILE
echo store passwords, you may be prompted for the passwords during the execution of  | tee -a $LOGFILE
echo the script whenever 'ssh' or 'scp' is invoked. | tee -a $LOGFILE
echo  | tee -a $LOGFILE
echo NOTE 2: | tee -a $LOGFILE
echo "AS PER SSH REQUIREMENTS, THIS SCRIPT WILL SECURE THE USER HOME DIRECTORY" | tee -a $LOGFILE
echo AND THE .ssh DIRECTORY BY REVOKING GROUP AND WORLD WRITE PRIVILEGES TO THESE  | tee -a $LOGFILE
echo "directories." | tee -a $LOGFILE
echo  | tee -a $LOGFILE
echo "Do you want to continue and let the script make the above mentioned changes (yes/no)?" | tee -a $LOGFILE if [ "$CONFIRM" = "no" ]
then read CONFIRM
elseecho "Confirmation provided on the command line" | tee -a $LOGFILE
fi echo  | tee -a $LOGFILE
echo The user chose ''$CONFIRM'' | tee -a $LOGFILE if [ -z "$CONFIRM" -o "$CONFIRM" != "yes" -a "$CONFIRM" != "no" ]
thenecho "You haven't specified proper input. Please enter 'yes' or 'no'. Exiting...."exit 0
fi
if [ "$CONFIRM" = "no" ]
then echo "SSH setup is not done." | tee -a $LOGFILE exit 1
else if [ $NO_PROMPT_PASSPHRASE = "yes" ]thenecho "User chose to skip passphrase related questions."  | tee -a $LOGFILEelseif [ $SHARED = "true" ]thenhostcount=`expr ${numhosts} + 1`PASSPHRASE_PROMPT=`expr 2 \* $hostcount`elsePASSPHRASE_PROMPT=`expr 2 \* ${numhosts}`fiecho "Please specify if you want to specify a passphrase for the private key this script will create for the local host. Passphrase is used to encrypt the private key and makes SSH much more secure. Type 'yes' or 'no' and then press enter. In case you press 'yes', you would need to enter the passphrase whenever the script executes ssh or scp. $PASSPHRASE " | tee -a $LOGFILEecho "The estimated number of times the user would be prompted for a passphrase is $PASSPHRASE_PROMPT. In addition, if the private-public files are also newly created, the user would have to specify the passphrase on one additional occasion. " | tee -a $LOGFILEecho "Enter 'yes' or 'no'." | tee -a $LOGFILEif [ "$PASSPHRASE" = "no" ]thenread PASSPHRASEelseecho "Confirmation provided on the command line" | tee -a $LOGFILEfi echo  | tee -a $LOGFILE echo The user chose ''$PASSPHRASE'' | tee -a $LOGFILE if [ -z "$PASSPHRASE"  -o "$PASSPHRASE" != "yes" -a "$PASSPHRASE" != "no" ]thenecho "You haven't specified whether to use Passphrase or not. Please specify 'yes' or 'no'. Exiting..."exit 0fiif [ "$PASSPHRASE" = "yes" ] then RERUN_SSHKEYGEN="yes"
#Checking for existence of ${IDENTITY} fileif test -f  $HOME/.ssh/${IDENTITY}.pub && test -f  $HOME/.ssh/${IDENTITY} thenecho "The files containing the client public and private keys already exist on the local host. The current private key may or may not have a passphrase associated with it. In case you remember the passphrase and do not want to re-run ssh-keygen, press 'no' and enter. If you press 'no', the script will not attempt to create any new public/private key pairs. If you press 'yes', the script will remove the old private/public key files existing and create new ones prompting the user to enter the passphrase. If you enter 'yes', any previous SSH user setups would be reset. If you press 'change', the script will associate a new passphrase with the old keys." | tee -a $LOGFILEecho "Press 'yes', 'no' or 'change'" | tee -a $LOGFILEread RERUN_SSHKEYGEN echo The user chose ''$RERUN_SSHKEYGEN'' | tee -a $LOGFILE if [ -z "$RERUN_SSHKEYGEN" -o "$RERUN_SSHKEYGEN" != "yes" -a "$RERUN_SSHKEYGEN" != "no" -a "$RERUN_SSHKEYGEN" != "change" ]thenecho "You haven't specified whether to re-run 'ssh-keygen' or not. Please enter 'yes' , 'no' or 'change'. Exiting..."exit 0;fifi elseif test -f  $HOME/.ssh/${IDENTITY}.pub && test -f  $HOME/.ssh/${IDENTITY} thenecho "The files containing the client public and private keys already exist on the local host. The current private key may have a passphrase associated with it. In case you find using passphrase inconvenient(although it is more secure), you can change to it empty through this script. Press 'change' if you want the script to change the passphrase for you. Press 'no' if you want to use your old passphrase, if you had one."read RERUN_SSHKEYGEN echo The user chose ''$RERUN_SSHKEYGEN'' | tee -a $LOGFILE if [ -z "$RERUN_SSHKEYGEN" -o "$RERUN_SSHKEYGEN" != "yes" -a "$RERUN_SSHKEYGEN" != "no" -a "$RERUN_SSHKEYGEN" != "change" ]thenecho "You haven't specified whether to re-run 'ssh-keygen' or not. Please enter 'yes' , 'no' or 'change'. Exiting..."exit 0fifififiecho Creating .ssh directory on local host, if not present already | tee -a $LOGFILEmkdir -p $HOME/.ssh | tee -a $LOGFILE
echo Creating authorized_keys file on local host  | tee -a $LOGFILE
touch $HOME/.ssh/authorized_keys  | tee -a $LOGFILE
echo Changing permissions on authorized_keys to 644 on local host  | tee -a $LOGFILE
chmod 644 $HOME/.ssh/authorized_keys  | tee -a $LOGFILE
mv -f $HOME/.ssh/authorized_keys  $HOME/.ssh/authorized_keys.tmp | tee -a $LOGFILE
echo Creating known_hosts file on local host  | tee -a $LOGFILE
touch $HOME/.ssh/known_hosts  | tee -a $LOGFILE
echo Changing permissions on known_hosts to 644 on local host  | tee -a $LOGFILE
chmod 644 $HOME/.ssh/known_hosts  | tee -a $LOGFILE
mv -f $HOME/.ssh/known_hosts $HOME/.ssh/known_hosts.tmp | tee -a $LOGFILEecho Creating config file on local host | tee -a $LOGFILE
echo If a config file exists already at $HOME/.ssh/config, it would be backed up to $HOME/.ssh/config.backup.
echo "Host *" > $HOME/.ssh/config.tmp | tee -a $LOGFILE
echo "ForwardX11 no" >> $HOME/.ssh/config.tmp | tee -a $LOGFILEif test -f $HOME/.ssh/config
thencp -f $HOME/.ssh/config $HOME/.ssh/config.backup
fimv -f $HOME/.ssh/config.tmp $HOME/.ssh/config  | tee -a $LOGFILE
chmod 644 $HOME/.ssh/configif [ "$RERUN_SSHKEYGEN" = "yes" ]
thenecho Removing old private/public keys on local host | tee -a $LOGFILErm -f $HOME/.ssh/${IDENTITY} | tee -a $LOGFILErm -f $HOME/.ssh/${IDENTITY}.pub | tee -a $LOGFILEecho Running SSH keygen on local host | tee -a $LOGFILE$SSH_KEYGEN -t $ENCR -b $BITS -f $HOME/.ssh/${IDENTITY}   | tee -a $LOGFILEelif [ "$RERUN_SSHKEYGEN" = "change" ]
thenecho Running SSH Keygen on local host to change the passphrase associated with the existing private key | tee -a $LOGFILE$SSH_KEYGEN -p -t $ENCR -b $BITS -f $HOME/.ssh/${IDENTITY} | tee -a $LOGFILE
elif test -f  $HOME/.ssh/${IDENTITY}.pub && test -f  $HOME/.ssh/${IDENTITY}
thencontinue
elseecho Removing old private/public keys on local host | tee -a $LOGFILErm -f $HOME/.ssh/${IDENTITY} | tee -a $LOGFILErm -f $HOME/.ssh/${IDENTITY}.pub | tee -a $LOGFILEecho Running SSH keygen on local host with empty passphrase | tee -a $LOGFILE$SSH_KEYGEN -t $ENCR -b $BITS -f $HOME/.ssh/${IDENTITY} -N ''  | tee -a $LOGFILE
fiif [ $SHARED = "true" ]
thenif [ $USER = $USR ]then
#No remote operations requiredecho Remote user is same as local user | tee -a $LOGFILEREMOTEHOSTS=""chmod og-w $HOME $HOME/.ssh | tee -a $LOGFILEelse    REMOTEHOSTS="${firsthost}"fi
elseREMOTEHOSTS="$HOSTS"
fifor host in $REMOTEHOSTS
doecho Creating .ssh directory and setting permissions on remote host $host | tee -a $LOGFILEecho "THE SCRIPT WOULD ALSO BE REVOKING WRITE PERMISSIONS FOR "group" AND "others" ON THE HOME DIRECTORY FOR $USR. THIS IS AN SSH REQUIREMENT." | tee -a $LOGFILEecho The script would create ~$USR/.ssh/config file on remote host $host. If a config file exists already at ~$USR/.ssh/config, it would be backed up to ~$USR/.ssh/config.backup. | tee -a $LOGFILEecho The user may be prompted for a password here since the script would be running SSH on host $host. | tee -a $LOGFILE$SSH -o StrictHostKeyChecking=no -x -l $USR $host "/bin/sh -c \"  mkdir -p .ssh ; chmod og-w . .ssh;   touch .ssh/authorized_keys .ssh/known_hosts;  chmod 644 .ssh/authorized_keys  .ssh/known_hosts; cp  .ssh/authorized_keys .ssh/authorized_keys.tmp ;  cp .ssh/known_hosts .ssh/known_hosts.tmp; echo \\"Host *\\" > .ssh/config.tmp; echo \\"ForwardX11 no\\" >> .ssh/config.tmp; if test -f  .ssh/config ; then cp -f .ssh/config .ssh/config.backup; fi ; mv -f .ssh/config.tmp .ssh/config\""  | tee -a $LOGFILEecho Done with creating .ssh directory and setting permissions on remote host $host. | tee -a $LOGFILE
donefor host in $REMOTEHOSTS
doecho Copying local host public key to the remote host $host | tee -a $LOGFILEecho The user may be prompted for a password or passphrase here since the script would be using SCP for host $host. | tee -a $LOGFILE$SCP $HOME/.ssh/${IDENTITY}.pub  $USR@$host:.ssh/authorized_keys | tee -a $LOGFILEecho Done copying local host public key to the remote host $host | tee -a $LOGFILE
donecat $HOME/.ssh/${IDENTITY}.pub >> $HOME/.ssh/authorized_keys | tee -a $LOGFILEfor host in $HOSTS
doif [ "$ADVANCED" = "true" ] thenecho Creating keys on remote host $host if they do not exist already. This is required to setup SSH on host $host. | tee -a $LOGFILEif [ "$SHARED" = "true" ]thenIDENTITY_FILE_NAME=${IDENTITY}_$hostCOALESCE_IDENTITY_FILES_COMMAND="cat .ssh/${IDENTITY_FILE_NAME}.pub >> .ssh/authorized_keys"elseIDENTITY_FILE_NAME=${IDENTITY}fi$SSH  -o StrictHostKeyChecking=no -x -l $USR $host " /bin/sh -c \"if test -f  .ssh/${IDENTITY_FILE_NAME}.pub && test -f  .ssh/${IDENTITY_FILE_NAME}; then echo; else rm -f .ssh/${IDENTITY_FILE_NAME} ;  rm -f .ssh/${IDENTITY_FILE_NAME}.pub ;  $SSH_KEYGEN -t $ENCR -b $BITS -f .ssh/${IDENTITY_FILE_NAME} -N '' ; fi; ${COALESCE_IDENTITY_FILES_COMMAND} \"" | tee -a $LOGFILEelse
#At least get the host keys from all hosts for shared case - advanced option not setif test  $SHARED = "true" && test $ADVANCED = "false"thenif [ "$PASSPHRASE" = "yes" ]thenecho "The script will fetch the host keys from all hosts. The user may be prompted for a passphrase here in case the private key has been encrypted with a passphrase." | tee -a $LOGFILEfi$SSH  -o StrictHostKeyChecking=no -x -l $USR $host "/bin/sh -c true"fifi
donefor host in $REMOTEHOSTS
doif test $ADVANCED = "true" && test $SHARED = "false"  then$SCP $USR@$host:.ssh/${IDENTITY}.pub $HOME/.ssh/${IDENTITY}.pub.$host | tee -a $LOGFILEcat $HOME/.ssh/${IDENTITY}.pub.$host >> $HOME/.ssh/authorized_keys | tee -a $LOGFILErm -f $HOME/.ssh/${IDENTITY}.pub.$host | tee -a $LOGFILEfi
donefor host in $REMOTEHOSTS
doif [ "$ADVANCED" = "true" ]thenif [ "$SHARED" != "true" ]thenecho Updating authorized_keys file on remote host $host | tee -a $LOGFILE$SCP $HOME/.ssh/authorized_keys  $USR@$host:.ssh/authorized_keys | tee -a $LOGFILEfi echo Updating known_hosts file on remote host $host | tee -a $LOGFILE$SCP $HOME/.ssh/known_hosts $USR@$host:.ssh/known_hosts | tee -a $LOGFILEfiif [ "$PASSPHRASE" = "yes" ]thenecho "The script will run SSH on the remote machine $host. The user may be prompted for a passphrase here in case the private key has been encrypted with a passphrase." | tee -a $LOGFILEfi$SSH -x -l $USR $host "/bin/sh -c \"cat .ssh/authorized_keys.tmp >> .ssh/authorized_keys; cat .ssh/known_hosts.tmp >> .ssh/known_hosts; rm -f  .ssh/known_hosts.tmp  .ssh/authorized_keys.tmp\"" | tee -a $LOGFILE
donecat  $HOME/.ssh/known_hosts.tmp >> $HOME/.ssh/known_hosts | tee -a $LOGFILE
cat  $HOME/.ssh/authorized_keys.tmp >> $HOME/.ssh/authorized_keys | tee -a $LOGFILE
#Added chmod to fix BUG NO 5238814
chmod 644 $HOME/.ssh/authorized_keys
#Fix for BUG NO 5157782
chmod 644 $HOME/.ssh/config
rm -f  $HOME/.ssh/known_hosts.tmp $HOME/.ssh/authorized_keys.tmp | tee -a $LOGFILE
echo SSH setup is complete. | tee -a $LOGFILE
fi
fiecho                                                                          | tee -a $LOGFILE
echo ------------------------------------------------------------------------ | tee -a $LOGFILE
echo Verifying SSH setup | tee -a $LOGFILE
echo =================== | tee -a $LOGFILE
echo The script will now run the 'date' command on the remote nodes using ssh | tee -a $LOGFILE
echo to verify if ssh is setup correctly. IF THE SETUP IS CORRECTLY SETUP,  | tee -a $LOGFILE
echo THERE SHOULD BE NO OUTPUT OTHER THAN THE DATE AND SSH SHOULD NOT ASK FOR | tee -a $LOGFILE
echo PASSWORDS. If you see any output other than date or are prompted for the | tee -a $LOGFILE
echo password, ssh is not setup correctly and you will need to resolve the  | tee -a $LOGFILE
echo issue and set up ssh again. | tee -a $LOGFILE
echo The possible causes for failure could be:  | tee -a $LOGFILE
echo   1. The server settings in /etc/ssh/sshd_config file do not allow ssh | tee -a $LOGFILE
echo      for user $USR. | tee -a $LOGFILE
echo   2. The server may have disabled public key based authentication.
echo   3. The client public key on the server may be outdated.
echo   4. ~$USR or  ~$USR/.ssh on the remote host may not be owned by $USR.  | tee -a $LOGFILE
echo   5. User may not have passed -shared option for shared remote users or | tee -a $LOGFILE
echo     may be passing the -shared option for non-shared remote users.  | tee -a $LOGFILE
echo   6. If there is output in addition to the date, but no password is asked, | tee -a $LOGFILE
echo   it may be a security alert shown as part of company policy. Append the | tee -a $LOGFILE
echo   "additional text to the <OMS HOME>/sysman/prov/resources/ignoreMessages.txt file." | tee -a $LOGFILE
echo ------------------------------------------------------------------------ | tee -a $LOGFILE
#read -t 30 dummyfor host in $HOSTSdoecho --$host:-- | tee -a $LOGFILEecho Running $SSH -x -l $USR $host date to verify SSH connectivity has been setup from local host to $host.  | tee -a $LOGFILEecho "IF YOU SEE ANY OTHER OUTPUT BESIDES THE OUTPUT OF THE DATE COMMAND OR IF YOU ARE PROMPTED FOR A PASSWORD HERE, IT MEANS SSH SETUP HAS NOT BEEN SUCCESSFUL. Please note that being prompted for a passphrase may be OK but being prompted for a password is ERROR." | tee -a $LOGFILEif [ "$PASSPHRASE" = "yes" ]thenecho "The script will run SSH on the remote machine $host. The user may be prompted for a passphrase here in case the private key has been encrypted with a passphrase." | tee -a $LOGFILEfi$SSH -l $USR $host "/bin/sh -c date"  | tee -a $LOGFILE
echo ------------------------------------------------------------------------ | tee -a $LOGFILEdoneif [ "$EXHAUSTIVE_VERIFY" = "true" ]
thenfor clienthost in $HOSTSdoif [ "$SHARED" = "true" ]thenREMOTESSH="$SSH -i .ssh/${IDENTITY}_${clienthost}"elseREMOTESSH=$SSHfifor serverhost in  $HOSTSdoecho ------------------------------------------------------------------------ | tee -a $LOGFILEecho Verifying SSH connectivity has been setup from $clienthost to $serverhost  | tee -a $LOGFILEecho ------------------------------------------------------------------------ | tee -a $LOGFILEecho "IF YOU SEE ANY OTHER OUTPUT BESIDES THE OUTPUT OF THE DATE COMMAND OR IF YOU ARE PROMPTED FOR A PASSWORD HERE, IT MEANS SSH SETUP HAS NOT BEEN SUCCESSFUL."  | tee -a $LOGFILE$SSH -l $USR $clienthost "$REMOTESSH $serverhost \"/bin/sh -c date\""  | tee -a $LOGFILEecho ------------------------------------------------------------------------ | tee -a $LOGFILEdone  echo -Verification from $clienthost complete- | tee -a $LOGFILEdone
elseif [ "$ADVANCED" = "true" ]thenif [ "$SHARED" = "true" ]thenREMOTESSH="$SSH -i .ssh/${IDENTITY}_${firsthost}"elseREMOTESSH=$SSHfifor host in $HOSTSdoecho ------------------------------------------------------------------------ | tee -a $LOGFILEecho Verifying SSH connectivity has been setup from $firsthost to $host  | tee -a $LOGFILEecho "IF YOU SEE ANY OTHER OUTPUT BESIDES THE OUTPUT OF THE DATE COMMAND OR IF YOU ARE PROMPTED FOR A PASSWORD HERE, IT MEANS SSH SETUP HAS NOT BEEN SUCCESSFUL." | tee -a $LOGFILE$SSH -l $USR $firsthost "$REMOTESSH $host \"/bin/sh -c date\"" | tee -a $LOGFILEecho ------------------------------------------------------------------------ | tee -a $LOGFILEdoneecho -Verification from $clienthost complete- | tee -a $LOGFILEfi
fi
echo "SSH verification complete." | tee -a $LOGFILE
这篇关于通过互联网代理部署Docker+Kubernetes 1.28.1的文章就介绍到这儿,希望我们推荐的文章对编程师们有所帮助!


![[Centos7] 部署Zabbix5.0](https://img-blog.csdnimg.cn/direct/3f47280a92474c4ba9f2a1bc683d6579.png)