本文主要是介绍Android开源框架--Dagger2详解,希望对大家解决编程问题提供一定的参考价值,需要的开发者们随着小编来一起学习吧!
功名只向马上取,真是英雄一丈夫
一,定义
我们知道在一个类中,通常会定义其他类型的变量,这个变量就是我们所说的“依赖“。
对一个类的变量进行初始化,有两种方式。第一种,这个类自己进行初始化;第二种,其他外部的类帮你进行初始化。
其中第二种方式,由外部类进行初始化的方式就是我们所说的”依赖注入“。由于他是由外部来控制,因此又叫做”控制反转“。依赖注入和非依赖注入的区别就是,变量初始化工作是由谁来做的。前面我们提到过的创建型设计模式,工厂模式、builder模式,带参数的构造函数等,都是依赖注入。
因此,实际上我们一直都在使用“依赖注入“,对它其实并不陌生。而Dagger2的定位就是提供了用注解的方式来配置依赖的方法。因此Dagger2并不是提供依赖注入的能力,而是为依赖注入提供一种更简单的方法。
谷歌新推出的hilt相比于dagger2来说,使用起来要方便易懂的多,那么我们为什么还要去学习dagger2呢?因为dagger2与hilt的关系,就相当于okhttp3与retrofit2的关系。hilt只是对于dagger2的二次封装。而且现在许多大型的互联网项目使用的依然是dagger2,所以我们非常有必要去了解dagger2。
二,角色介绍
1,object:需要被创建的对象
2,module: 主要用来提供对象
3,component:用于组织module并进行注入
三,基本使用
1,在app的build.gradle下面添加依赖:
implementation 'com.google.dagger:dagger:2.4'
annotationProcessor 'com.google.dagger:dagger-compiler:2.4'
如果报错:Unable to load class 'javax.annotation.Generated'.
再添加依赖:
implementation'javax.annotation:javax.annotation-api:1.3.2'annotationProcessor("javax.annotation:javax.annotation-api:1.3.2")2,创建一个用于注入的对象:
public class YuanZhen {
}
3,创建一个module,用来提供YuanZhen
@Module
public class YuanZhenModule {@Providespublic YuanZhen providerYuanZhen(){//后面所有需要YuanZhen对象的地方,都在这里提供return new YuanZhen();}
}
4,创建component,用于组织module并进行注入
@Component(modules = {YuanZhenModule.class})
public interface MyComponent {void injectMainActivity(MainActivity mainActivity);
}
5,注入到activity
public class MainActivity extends AppCompatActivity {@InjectYuanZhen yuanZhen;@Overrideprotected void onCreate(Bundle savedInstanceState) {super.onCreate(savedInstanceState);setContentView(R.layout.activity_main);}
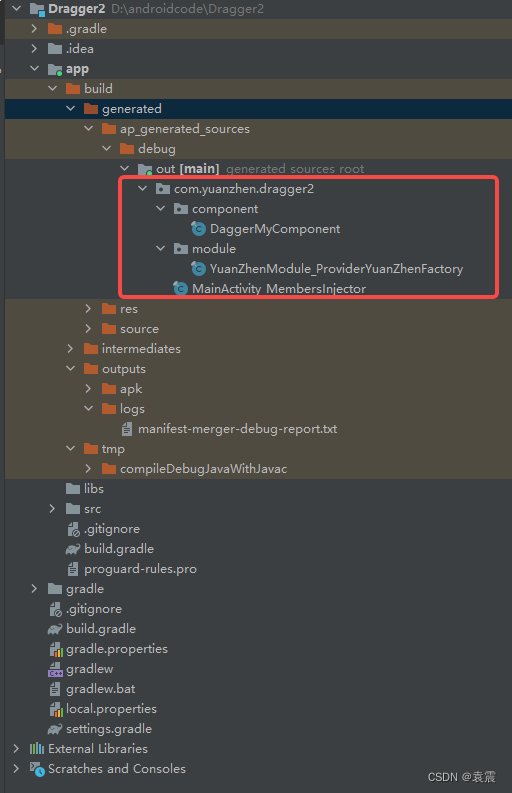
}6,编译项目,让APT生成需要的文件
关于APT不了解的,可以参考文章android注解之APT和javapoet_android javapoet-CSDN博客
7,使用:
public class MainActivity extends AppCompatActivity {@InjectYuanZhen yuanZhen;@Overrideprotected void onCreate(Bundle savedInstanceState) {super.onCreate(savedInstanceState);setContentView(R.layout.activity_main);// DaggerMyComponent.create().injectMainActivity(this);DaggerMyComponent.builder().yuanZhenModule(new YuanZhenModule()).build().injectMainActivity(this);System.out.println("yz----"+yuanZhen.hashCode());}}最后输出:![]()
上面就是APT的基本使用,两种方式都可以
四,源码分析
对于源码的分析,主要是分析APT生成的三个文件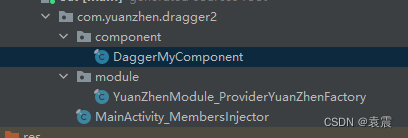
从 DaggerMyComponent.builder().yuanZhenModule(new YuanZhenModule()).build().injectMainActivity(this);
我们可以看出,一定是采用了Buidler建造者模式,不清楚的可以参考文章Android设计模式--Builder建造者模式-CSDN博客
首先分析DaggerMyComponent.builder()
public static Builder builder() {return new Builder();
}
可以看到是new了一个Buidler,我们再来看下Builder
public static final class Builder {private YuanZhenModule yuanZhenModule;private Builder() {}public MyComponent build() {if (yuanZhenModule == null) {this.yuanZhenModule = new YuanZhenModule();}return new DaggerMyComponent(this);}public Builder yuanZhenModule(YuanZhenModule yuanZhenModule) {this.yuanZhenModule = Preconditions.checkNotNull(yuanZhenModule);return this;}可以看到DaggerMyComponent.builder().yuanZhenModule(new YuanZhenModule())是将我们新创建的YuanZhenModule传入到了Builder里面。
然后 DaggerMyComponent.builder().yuanZhenModule(new YuanZhenModule()).build()则是创建了一个DaggerMyComponent对象。
private DaggerMyComponent(Builder builder) {assert builder != null;initialize(builder);
}
在DaggerMyComponent的构造函数中,调用了initialize方法。
private void initialize(final Builder builder) {this.providerYuanZhenProvider =YuanZhenModule_ProviderYuanZhenFactory.create(builder.yuanZhenModule);this.mainActivityMembersInjector =MainActivity_MembersInjector.create(providerYuanZhenProvider);
}
在initialize方法中,调用了YuanZhenModule_ProviderYuanZhenFactory的create方法,这是一个工厂模式,不清楚的请参考Android设计模式--工厂模式-CSDN博客
再来看看YuanZhenModule_ProviderYuanZhenFactory的create方法
public static Factory<YuanZhen> create(YuanZhenModule module) {return new YuanZhenModule_ProviderYuanZhenFactory(module);
}
创建了一个YuanZhenModule_ProviderYuanZhenFactory对象,接下来继续看YuanZhenModule_ProviderYuanZhenFactory的构造方法:
public YuanZhenModule_ProviderYuanZhenFactory(YuanZhenModule module) {assert module != null;this.module = module;
}
也就是将yuanZhenModule这个对象传递给了YuanZhenModule_ProviderYuanZhenFactory
然后我们继续回到initialize方法,看看 this.mainActivityMembersInjector =
MainActivity_MembersInjector.create(providerYuanZhenProvider)的实现
public static MembersInjector<MainActivity> create(Provider<YuanZhen> yuanZhenProvider) {return new MainActivity_MembersInjector(yuanZhenProvider);
}
创建了一个MainActivity_MembersInjector对象,看看其构造方法:
public MainActivity_MembersInjector(Provider<YuanZhen> yuanZhenProvider) {assert yuanZhenProvider != null;this.yuanZhenProvider = yuanZhenProvider;
}
将刚才创建的YuanZhenModule_ProviderYuanZhenFactory对象传递给了MainActivity_MembersInjector;
最后 我们来看下
DaggerMyComponent.builder().yuanZhenModule(new YuanZhenModule()).build().injectMainActivity(this);
@Override
public void injectMainActivity(MainActivity mainActivity) {mainActivityMembersInjector.injectMembers(mainActivity);
}
调用了MainActivity_MembersInjector的injectMembers方法
@Override
public void injectMembers(MainActivity instance) {if (instance == null) {throw new NullPointerException("Cannot inject members into a null reference");}instance.yuanZhen = yuanZhenProvider.get();
}
然后又调用了YuanZhenModule_ProviderYuanZhenFactory的get方法
@Override
public YuanZhen get() {return Preconditions.checkNotNull(module.providerYuanZhen(), "Cannot return null from a non-@Nullable @Provides method");
}
在get方法中,最终调用了我们自己写的module的providerYuanZhen方法:
@Module
public class YuanZhenModule {@Providespublic YuanZhen providerYuanZhen(){//后面所有需要YuanZhen对象的地方,都在这里提供return new YuanZhen();}
}
这样就通过APT生成的代码,自动帮我们创建了对象。
五,单例使用
1,创建一个注解:
@Scope
@Documented
@Retention(RUNTIME)
public @interface AppScope {}
2,在component和Module中使用注解
@AppScope
@Component(modules = {YuanZhenModule.class})
public interface MyComponent {void injectMainActivity(MainActivity mainActivity);
}
@AppScope
@Module
public class YuanZhenModule {@AppScope@Providespublic YuanZhen providerYuanZhen(){//后面所有需要YuanZhen对象的地方,都在这里提供return new YuanZhen();}
}3,在application中创建component 保证component是唯一的
public class MyApplication extends Application {private MyComponent myComponent;@Overridepublic void onCreate() {super.onCreate();myComponent= DaggerMyComponent.builder().yuanZhenModule(new YuanZhenModule()).build();}public MyComponent getMyComonent(){return myComponent;}
}
4,验证:
public class MainActivity extends AppCompatActivity {@InjectYuanZhen yuanZhen;@InjectYuanZhen yuanZhen2;@Overrideprotected void onCreate(Bundle savedInstanceState) {super.onCreate(savedInstanceState);setContentView(R.layout.activity_main);((MyApplication)getApplication()).getMyComonent().injectMainActivity(this);System.out.println("yz------"+yuanZhen.hashCode());System.out.println("yz------"+yuanZhen2.hashCode());}}输出:

六,多个component组合依赖
如果我们一个类有好几个对象需要依赖的话,dagger2是不能使用多个Component同时注入同一个类中的,这种情况需要进行Component的组合
新建一个object对象:
public class YuanZhen2 {
}
创建新的注解:
@Scope
@Documented
@Retention(RUNTIME)
public @interface AppScope2 {
}
创建module:
@AppScope2
@Module
public class YuanZhen2Module {@AppScope2@Providespublic CuiJing provideYuanZhen2(){return new YuanZhen2();}
}
创建component:
@AppScope2
@Component(modules = {YuanZhen2Module.class})
public interface YuanZhen2Component {YuanZhen2 providerYuanZhen2();
}
进行依赖:
@AppScope
@Component(modules = {YuanZhenModule.class},dependencies = {YuanZhen2Component.class})
public interface MyComponent {void injectMainActivity(MainActivity mainActivity);
}
使用:
public class MainActivity extends AppCompatActivity {@InjectYuanZhen yuanZhen;@InjectYuanZhen2 yuanZhen2;@Overrideprotected void onCreate(Bundle savedInstanceState) {super.onCreate(savedInstanceState);setContentView(R.layout.activity_main);// DaggerMyComponent.create().injectMainActivity(this);DaggerMyComponent.builder().yuanZhenModule(new YuanZhenModule()).yuanZhen2Component(DaggerYuanZhen2Component.create()).build().injectMainActivity(this);System.out.println("yz----"+yuanZhen.hashCode());System.out.println("yz----"+yuanZhen2.hashCode());}}输出:

注意:
1.多个component上面的scope不能相同
2.没有scope的组件不能去依赖有scope的组件
七,总结
dagger2源码使用到的主要是APT框架,工厂模式和builder模式,dagger2的使用较为复杂,但是现在很多主流app都在使用,所以掌握还是很有必要的。
这篇关于Android开源框架--Dagger2详解的文章就介绍到这儿,希望我们推荐的文章对编程师们有所帮助!


