本文主要是介绍Android Service与IntentService,下载/断点续传,希望对大家解决编程问题提供一定的参考价值,需要的开发者们随着小编来一起学习吧!
Android的Service组件可以处理的场景有:网络请求(心跳、长连接),文件的I/O操作,ContentProvider数据的CRUD,及所有可运行在后台的动作等。Service:适合并发请求,代码较多,较复杂,更灵活。
Service的各个生命周期函数是运行在主线程,因此它本身并不是一个异步处理技术。为了能够在Service中实现在子线程中处理耗时任务,Android引入了一个Service的子类:IntentService。IntentService具有Service一样的生命周期,同时也提供了在后台线程中处理异步任务的机制。
- Android O 后台startService限制简析- https://www.jianshu.com/p/f2db0f58d47f
Service既然不能再后台偷偷启动,那只能显示启动,Google提供的方案是:startForegroundService()。并且在系统创建Service后,需要在一定时间内调用startForeground()让Service为用户可见通知,否则则系统将停止此Service,抛出ANR,如果不像让用户可见可以参考JobScheduler。
在AMS端startForegroundService跟普通startService区别, ServiceRecord的fgRequired被设置为true,然后走后续流程bringUpServiceLocked->realStartServiceLocked-> sendServiceArgsLocked,在sendServiceArgsLocked的时候,Service其实已经创建并启动(可以看Service启动流程).
-- service
startService抛异常不是看调用的APP处于何种状态,而是看Servic所在APP处于何种状态,因为看的是UID的状态,所以这里重要的是APP而不仅仅是进程状态
不要通过Handler延迟太久再startService,否则可能会有问题
应用进入后台,60s之后就会变成idle状态,无法start其中的Service,但是可以通过startForegroundService来启动
Application里面不要startService,否则恢复的时候可能有问题
startForGround 要及时配合startForegroundService,否则会有各种异常。
Android服务发现库- https://github.com/FamliarMan/AndroidServiceProvider
> Service注册,Service运行在主线程中,与IntentService
Service需要在manifest中注册,如<service android:name=".Service"></service>
android中Service与IntentService的使用比较- http://www.cnblogs.com/shaweng/p/4024766.html
Service与IntentService的使用比较- http://blog.csdn.NET/matrix_xu/article/details/7974393
Android开发之Service与IntentService的区别与使用场景(源代码剖析):http://www.tuicool.com/articles/6RfMBz
Service和IntentService中显示Toast的区别:Service运行在主线程中,因此Toast是正常的。IntentService运行在独立的线程中,因此Toast不正常。
在Service中弹出Toast和Dialog- http://blog.csdn.NET/nmzkchina/article/details/15506373
Toast必须在UI主线程上才能正常显示,而在Service中是无法获得Acivity的Context的,在service中想显示出Toast只需将show的消息发送给主线程Looper就可以了。
Handler handler = new Handler(Looper.getMainLooper());
handler.post(new Runnable() {
public void run() {
Toast.makeText(getApplicationContext(), "存Service is runing!",
Toast.LENGTH_SHORT).show();
}
});
Service中如果有耗时的操作,要开启一个Thread来做。IntentService是在独立的线程中,所以可以进行一些耗时操作。
如果是全后台的工作,使用Service,结果的提示可以使用Notification。如果是异步工作,工作结束后需要更新UI,那么最好使用Thread或者AsyncTask。
> Service的启动和销毁方式:
-- 关于Android Service真正的完全详解,你需要知道的一切- http://blog.csdn.net/javazejian/article/details/52709857
a.调用startService然后点击stopService;
b.调用bindService然后点击unbindService;
c.调用startService开启服务后再bindService绑定服务就不能通过stopService来停止服务.需要先调用unbindService再调用stopService来停止服务;
d.通过bindService启动服务的,之后只能靠unbindService来停止服务,并且只能调用一次,否则会挂掉,还有就是因为是绑定的,所以Activity退出的时候也会销毁这个服务;
e.只要调用了startService,退出Activity就不会杀死服务,在没有绑定或者成功解除绑定后再去解除绑定就会发生异常,程序挂掉!而多次调用stopService没有问题。

-- 两种启动方式:
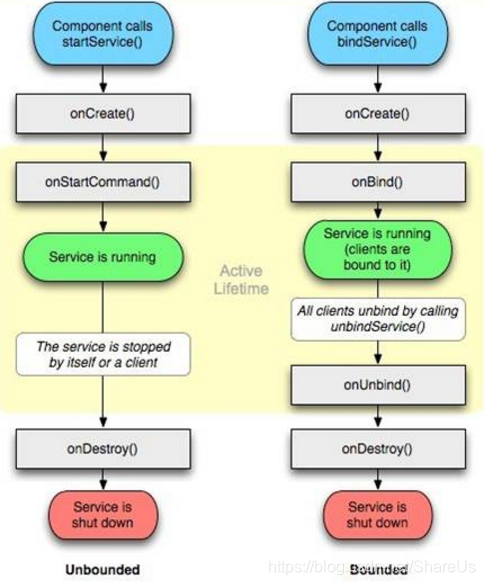
1.采用start的方式开启服务:onCreate()--->onStartCommand()(onStart()方法已过时) ---> onDestory()
2.采用bind的方式开启服务:onCreate() --->onBind()--->onunbind()--->onDestory()
context.startService() ->onCreate()- >onStartCommand()->Service running--调用context.stopService() ->onDestroy();
context.bindService()->onCreate()->onBind()->Service running--调用>onUnbind() -> onDestroy()。
1.Context.startService()方式启动
context.startService() ->onCreate()- >onStartCommand()->Service running--调用context.stopService() ->onDestroy();
①Context.startService()方式的生命周期: 启动时,startService –> onCreate() –> onStart()停止时,stopService –> onDestroy()如果调用者直接退出而没有停止Service,则Service 会一直在后台运行 Context.startService()方法启动服务,在服务未被创建时,系统会先调用服务的onCreate()方法,接着调用onStart()方法。如果调用startService()方法前服务已经被创建,多次调用startService()方法并不会导致多次创建服务,但会导致多次调用onStart()方法。采用startService()方法启动的服务,只能调用Context.stopService()方法结束服务,服务结束时会调用onDestroy()方法附代码。
每当Service被创建时回调onCreate方法,每次Service被启动时都会回调onStartCommand方法,多次启动一个已有的Service组件将不会再回调onCreate方法,但每次启动时都会回调onStartCommand方法。
Service从创建到销毁分别经历了 onCreate---->onStartCommand---->onDestroy;
使用startService方法启动服务,当程序被强制退出时,并且没有调用stopService来停止服务,Service会保持在后台一直运行,直到Android系统关闭或调用stopService方法后才会停止。
使用startService()方法启动的服务,在服务的外部,必须使用stopService()方法停止,在服务的内部可以调用stopSelf()方法停止当前服务。如果使用startService()或者stopSelf()方法请求停止服务,系统会就会尽快销毁这个服务。值得注意的是对于启动服务,一旦启动将与访问它的组件无任何关联,即使访问它的组件被销毁了,这个服务也一直运行下去,直到手动调用停止服务才被销毁.
2.Context.bindService()方式启动:
context.bindService()->onCreate()->onBind()->Service running--调用>onUnbind() -> onDestroy()。
通过bindService开启服务,再通过unbindService停止服务的过程是 onCreate------>onBind------->onServiceConnected------->onUnbind------>onDestory。
①Context.bindService()方式的生命周期:绑定时,bindService -> onCreate() –> onBind()调用者退出了,即解绑定时,Srevice就会unbindService –>onUnbind() –> onDestory()。Context.bindService()方式启动 Service的方法:绑定Service需要三个参数:bindService(intent, conn, Service.BIND_AUTO_CREATE);第一个,Intent对象;第二个,ServiceConnection对象,创建该对象要实现它的onServiceConnected()和 onServiceDisconnected()来判断连接成功或者是断开连接;第三个,如何创建Service,一般指定绑定的时候自动创建附代码。
如果我们想保持和 Service 的通信,又不想让 Service 随着 Activity 退出而退出呢?你可以先 startService() 然后再 bindService() 。当你不需要绑定的时候就执行 unbindService() 方法,执行这个方法只会触发 Service 的 onUnbind() 而不会把这个 Service 销毁。这样就可以既保持和 Service 的通信,也不会随着 Activity 销毁而销毁了。
如果一个 Service 已经被启动,其他代码再试图调用 startService() 方法,是不会执行 onCreate() 的,但会重新执行一次 onStart()。 在 sdk 2.0 及其以后的版本中,对应的 onStart 已经被否决变为了 onStartCommand,不过之前的 onStart 任然有效。这意味着,如果你开发的应用程序用的 sdk 为 2.0 及其以后的版本,那么你应当使用 onStartCommand 而不是 onStart。
-- Android之startService()和bindService()区别
至于startservice和bindservice的使用场景,有网友这么说:
1.通过startservice开启的服务.一旦服务开启, 这个服务和开启他的调用者之间就没有任何的关系了.
调用者不可以访问 service里面的方法. 调用者如果被系统回收了或者调用了ondestroy方法, service还会继续存在
2.通过bindService开启的服务,服务开启之后,调用者和服务之间 还存在着联系 , 一旦调用者挂掉了.service也会跟着挂掉 .
-- 多次调用startService和bindService会出现什么,及 startService和bindService的不同:
a demo of using startservice and bindservice- https://github.com/KingPaul/ServiceDemo
开启服务时,调用一次startService,生命周期执行的方法依次是:
onCreate() ==> onStartCommand();调用多次startService,onCreate只有第一次会被执行,而onStartCommand会执行多次。
结束服务时,调用stopService,生命周期执行onDestroy方法,并且多次调用stopService时,onDestroy只有第一次会被执行。
startService和bindService开启服务时,他们与activity之间的关系。
1、startService开启服务以后,与activity就没有关联,不受影响,独立运行。
2、bindService开启服务以后,与activity存在关联,退出activity时必须调用unbindService方法,否则会报ServiceConnection泄漏的错误。
(1)针对startService和bindService:
a.先startService,则调用onCreate,onStartCommand;当bindService时,再调用onBind(不会再调用onCreate)
b.先bindServcie,则调用onCreate,onBind;当startService时,再调用onStartCommand
(2)针对stopService和unbindService:
a.先stopService,则不会调用任何方法,然后当unbindService时,依次调用onUnbind和onDestroy方法
b.先unbindService,则会调用onUnbind,然后当stopService时,会调用onDestroy
- 生命周期上的区别:
执行startService时,Service会经历onCreate->onStartCommand。当执行stopService时,直接调用onDestroy方法。调用者如果没有stopService,Service会一直在后台运行,下次调用者再起来仍然可以stopService。
执行bindService时,Service会经历onCreate->onBind。这个时候调用者和Service绑定在一起。调用者调用unbindService方法或者调用者Context不存在了(如Activity被finish了),Service就会调用onUnbind->onDestroy。这里所谓的绑定在一起就是说两者共存亡了。
多次调用startService,该Service只能被创建一次,即该Service的onCreate方法只会被调用一次。但是每次调用startService,onStartCommand方法都会被调用。Service的onStart方法在API 5时被废弃,替代它的是onStartCommand方法。
第一次执行bindService时,onCreate和onBind方法会被调用,但是多次执行bindService时,onCreate和onBind方法并不会被多次调用,即并不会多次创建服务和绑定服务。
多次调用bindService(),为什么onBind()只执行一次。
-- startservice和bindservice的使用场景:
1.通过startservice开启的服务.一旦服务开启, 这个服务和开启他的调用者之间就没有任何的关系了. 调用者不可以访问 service里面的方法. 调用者如果被系统回收了或者调用了ondestroy方法, service还会继续存在
2.通过bindService开启的服务,服务开启之后,调用者和服务之间 还存在着联系 , 一旦调用者挂掉了.service也会跟着挂掉 .
需要手动调用stopService或者执行完任务后调用stopSelf ,即使Service销毁了,其中的线程如果没有执行完会继续执行,如果不掉用的话即使启动该Service的activity销毁了,该Service仍然存在,系统内存不够时会销毁后台的service,service存在时间越长,被销毁的可能性越大。
When the operation is done, the service should stop itself.A service is "started" when an application component (such as an activity) starts it by calling startService(). A service is "bound" when an application component binds to it by calling bindService(). A bound service offers a client-server interface that allows components to interact with the service, send requests, get results, and even do so across processes with interprocess communication (IPC). A bound service runs only as long as another application component is bound to it.If you implement this, it is your responsibility to stop the service when its work is done, by callingstopSelf() or stopService(). (If you only want to provide binding, you don't need to implement this method.)
--- A started service
The service is created when another component calls startService(). The service then runs indefinitely and must stop itself by calling stopSelf(). Another component can also stop the service by calling stopService(). When the service is stopped, the system destroys it..
--- A bound service
The service is created when another component (a client) calls bindService(). The client then communicates with the service through an IBinder interface. The client can close the connection by calling unbindService(). Multiple clients can bind to the same service and when all of them unbind, the system destroys the service. (The service does not need to stop itself.)
-- service处理一些逻辑后,发送广播,然后关闭自己(stopSelf)?
AIDL与service的双向通信,Local Service与Remote Service?
startService(intent)与 stopService(intent);
Service stopSelf(int startId)与stopSelf()的区别- http://blog.csdn.net/mingli198611/article/details/8782772
stopSelf() is used to always stop the current service.
stopSelf(int startId) is also used to stop the current service, but only if startId was the ID specified the last time the service was started.
stopService(Intent service) is used to stop services, but from outside the service to be stopped.
> Service与通知
startForeground、stopForeground ; stopForeground(true);startForeground(this);
写app的时候经常希望某个service可以常驻内存,但是在系统内存低的时候还是不可避免的被杀掉,为了降低被杀掉的概率,一般的解决方式是通过startForeground()将service设置成前台运行。但是从android 5.0开始,前台运行的service必须在通知栏有一个常驻通知,点都点不掉,试想一下如果每个app都在通知栏有一个常驻通知的恐怖场景。
Android 2.0(SDK level 5),Service.startForeground()和Service.stopForeground()
Android的startForeground前台Service如何去掉通知显示- http://blog.csdn.net/wxx614817/article/details/50669420
> IntentService(onHandleIntent有点类似匿名内部类)
IntentService具有以下特点:
1. IntentService自带一个工作线程,当我们的Service需要做一些可能会阻塞主线程的工作的时候可以考虑使用IntentService。
2. 我们需要将要做的实际工作放入到IntentService的onHandleIntent回到方法中,当我们通过startService(intent)启动了IntentService之后,最终Android Framework会回调其onHandleIntent方法,并将intent传入该方法,这样我们就可以根据intent去做实际工作,并且onHandleIntent运行在IntentService所持有的工作线程中,而非主线程。
3. 当我们通过startService多次启动了IntentService,这会产生多个job,由于IntentService只持有一个工作线程,所以每次onHandleIntent只能处理一个job。面多多个job,IntentService会如何处理?处理方式是one-by-one,也就是一个一个按照先后顺序处理,先将intent1传入onHandleIntent,让其完成job1,然后将intent2传入onHandleIntent,让其完成job2…这样直至所有job完成,所以我们IntentService不能并行的执行多个job,只能一个一个的按照先后顺序完成,当所有job完成的时候IntentService就销毁了,会执行onDestroy回调方法。
IntentService 实际上是Looper,Handler,Service 的集合体,他不仅有服务的功能,还有处理和循环消息的功能.
这是一个基于消息的服务,每次启动该服务并不是马上处理你的工作,而是首先会创建对应的Looper,Handler并且在MessageQueue中添加的附带客户Intent的Message对象,当Looper发现有Message的时候接着得到Intent对象通过在onHandleIntent((Intent)msg.obj)中调用你的处理程序.处理完后即会停止自己的服务.意思是Intent的生命周期跟你的处理的任务是一致的.所以这个类用下载任务中非常好,下载任务结束后服务自身就会结束退出.
IntentService:适合同一时间只处理一个任务,代码少,使用简单 ,
是Service类的子类,默认会开启一个工作线程,你需要覆盖onHandleIntent方法,用来处理startService传过来的Intent,在一个生命周期内,如果多次调用startService只会进一次onCreate(),但是会进对应次数的onHandleIntent,在同一时间只能处理一个Intent,也就是说不管调用多少次startService只有一个工作线程在工作,其余的排队等待,一旦所有的Intent处理完成,自动调用onDestroy方法,无须手动调用stopService或者stopSelf.
IntentService官方的解释是:
IntentService is a base class for Services that handle asynchronous requests (expressed as Intents) on demand. Clients send requests through android.content.Context.startService(Intent) calls; the service is started as needed, handles each Intent in turn using a worker thread, and stops itself when it runs out of work.
This "work queue processor" pattern is commonly used to offload tasks from an application's main thread. The IntentService class exists to simplify this pattern and take care of the mechanics. To use it, extend IntentService and implement onHandleIntent(Intent). IntentService will receive the Intents, launch a worker thread, and stop the service as appropriate.
All requests are handled on a single worker thread -- they may take as long as necessary (and will not block the application's main loop), but only one request will be processed at a time.
-- 声明IntentServiceSub继承IntentService
IntentService需要在manifest中注册,如<service android:name=".IntentServiceSub"></service>
public class IntentServiceSub extends IntentService {
private static final String TAG = "IntentServiceSub";
public IntentServiceSub() {
super("IntentServiceSub");
Log.i(TAG, "=>IntentServiceSub");
}
/* (non-Javadoc)
* @see android.app.IntentService#onCreate()
*/
@Override
public void onCreate() {
Log.i(TAG, "=>onCreate");
super.onCreate();
}
/* (non-Javadoc)
* @see android.app.IntentService#onDestroy()
*/
@Override
public void onDestroy() {
Log.i(TAG, "=>onDestroy");
super.onDestroy();
}
@Override
protected void onHandleIntent(Intent arg0) {
Log.i(TAG, "IntentService 线程:"+Thread.currentThread.getId());
Thread.sleep(2000);
//Intent是从Activity发过来的,携带识别参数,根据参数不同执行不同的任务
String action = intent.getExtras().getString("paramType");
if (action.equals("musicScan")) {//扫描音乐
LogUtil.e("ScanSDIIntentService", "onHandleIntent,扫描音乐");
int currentPage = intent.getExtras().getInt("currentPage", 0);
int numOfOnePage = intent.getExtras().getInt("numOfOnePage", 0);
List<MusicInfoBean> list = ScanMusicSDUtils.musicInfos(getApplicationContext(), currentPage, numOfOnePage);
String json = GsonUtils.list2Json(list);
LogUtil.v("onHandleIntent", "json="+json);
//musicIntent要新建,不能复用intent
Intent musicIntent = new Intent();
musicIntent.putExtra("musicListJson", json);
musicIntent.setAction("com.desaco.desacoplayer.music");
sendBroadcast(musicIntent);
LogUtil.e("ScanSDIIntentService", "扫描音乐完成,发送广播");
}else if (action.equals("videoScan")) {//扫描视频
//TODO
intent.setAction("com.desaco.desacoplayer.video");
}
}
> 下载与更新,断点续传下载
Android判断当前Service是否是重启的Servcie- http://blog.csdn.net/luyi325xyz/article/details/42342899
android中Service+Notification断点续传下载- http://blog.csdn.net/linglongxin24/article/details/53874148
Android应用自动更新功能的代码实现(应用内自动更新)-- http://www.cnblogs.com/coolszy/archive/2012/04/27/2474279.html
Android原生实现多线程断点下载- https://github.com/Shanlovana/AndroidStudy
这篇关于Android Service与IntentService,下载/断点续传的文章就介绍到这儿,希望我们推荐的文章对编程师们有所帮助!


