本文主要是介绍构建meteor应用程序_构建swiftui动物穿越应用程序第1部分,希望对大家解决编程问题提供一定的参考价值,需要的开发者们随着小编来一起学习吧!
构建meteor应用程序
In this new series of articles, I’ll guide you through the making of my latest open-source project.
在这一系列新文章中,我将指导您完成最新的开源项目 。
It is once again a fully open-source, fully SwiftUI application.
它再次是一个完全开源的完全SwiftUI应用程序。
And this time, it’s even available on the App Store! This goes to prove my point that you can have SwiftUI code in production.
这次,它甚至可以在App Store上使用! 这证明了我的观点,即可以在生产中使用SwiftUI代码。
But unlike MovieSwiftUI, it doesn’t use the Redux architecture but just the very core of the SwiftUI built-in data flow that I’ve already covered in the past. If you need an introduction or refresher, you should read this article.
但是与MovieSwiftUI不同,它不使用Redux架构,而只是我以前已经介绍过的SwiftUI内置数据流的核心。 如果您需要简介或复习知识,则应该阅读本文 。
I’m using a combination of view, view models, and some environment objects. By following this series of articles, you’ll be able to fully grasp a very simple yet effective SwiftUI application architecture.
我正在使用视图,视图模型和一些环境对象的组合。 通过阅读本系列文章,您将能够完全掌握一个非常简单而有效的SwiftUI应用程序体系结构。
Let’s begin with the services and models layer because for the application to be fun, we’ll first need to gather, compute, and fetch some data to put in our data sources. We’ll use Combine, a new (WWDC 19) framework from Apple that allows users to beautifully process data in a reactive way.
让我们从服务和模型层开始,因为要使应用程序变得有趣,我们首先需要收集,计算和获取一些数据以放入我们的数据源中。 我们将使用苹果公司的新(WWDC 19)框架Combine,该框架允许用户以React方式精美地处理数据。
For people not familiar with Animal Crossing, the game is all about playing a bit daily. The game uses the real-time clock to progress. And it’s all about collecting items, furniture to decorate your house and island, and also catching critters, fish, bugs, and fossils. That depends on the time of day and the date.
对于不熟悉《 动物穿越》的人 ,游戏就是每天玩一点。 游戏使用实时时钟进行进度。 收集物品,家具来装饰房屋和岛屿,还捕获生物,鱼,虫子和化石。 这取决于一天中的时间和日期。
This is all to say that Animal Crossing is the perfect game to make an app for because it has a ton of data (more than 5,000 items to catalog, display, and play with) in the form of information, images, and such. It’s a good candidate for which to make a pretty and playful application that is a bit more than a glorified REST client.
综上所述, Animal Crossing是一款完美的应用程序游戏,因为它具有大量信息(图像,信息等)形式的数据(用于分类,显示和玩耍的5,000多个项目)。 它是一个不错的选择,可以使它成为一个漂亮而有趣的应用程序,而不仅仅是一个赞美的REST客户端。
结合部分 (The Combine Part)
So let’s start with the data. The community did an incredible job, and to this date, it’s still dumping, organizing, and editing the master spreadsheet. It’s an incredible work that contains all of the game’s data. A spreadsheet is not that convenient for working with an app, so the owner of Nook Plaza made an awesome pipeline to convert the spreadsheet into a very simple JSON API.
因此,让我们从数据开始。 社区的工作非常出色,到目前为止,它仍在倾销,组织和编辑主电子表格 。 包含游戏所有数据的这项不可思议的工作。 电子表格不适用于处理应用程序,因此Nook Plaza的所有者制作了很棒的管道,可以将电子表格转换为非常简单的JSON API。
I then dumped this API and put the JSON directly in the Xcode project. It’ll allow us to work with Swift’s Codable protocol to directly instantiate the JSON into native Swift objects.
然后,我转储了此API,并将JSON直接放入Xcode项目中。 它使我们可以使用Swift的Codable协议直接将JSON实例化为本地Swift对象。
So let’s first make our service that will read the JSON and decode it into objects:
因此,首先让我们的服务读取JSON并将其解码为对象:
The function returns a publisher that you can subscribe to in order to get the decoded result. The final type of the object is inferred by the user of this function. It’s generic to work with any type you need from within the JSON. We just need to know that the generic type conforms to Codable. We could even specify Decodable, as we don’t need to encode it back (for now).
该函数返回一个发布者,您可以订阅该发布者以获得解码结果。 该函数的用户可以推断出对象的最终类型。 可以在JSON中使用所需的任何类型都是通用的。 我们只需要知道泛型类型符合Codable 。 我们甚至可以指定Decodable,因为我们现在不需要对其进行编码。
If we read the Combine chain, it would look like so:
如果我们阅读Combine链,它将看起来像这样:
- First, we try to get the JSON URL from the bundle resources. 首先,我们尝试从包资源中获取JSON URL。
Then we try to read it into
Data.然后,我们尝试将其读入
Data。Then we decode the object to the type using our static
JSONDecoder.然后,我们使用静态
JSONDecoder将对象解码为该类型。If we get any error in the above, we publish the error into a known
APIErrortype with the message.如果上面出现任何错误,我们
APIError错误与消息一起发布到已知的APIError类型中。- And finally, we want all that to happen in a specific background queue once a subscriber starts the work. 最后,我们希望所有操作都在订阅者开始工作后在特定的后台队列中进行。
I think this looks much cleaner than how we could have done it without Combine. Even if using Combine is not entirely justified in this case, it was more an exercise to get familiar with it than to use it to its full potential.
我认为这比没有Combine的情况要干净得多。 即使在这种情况下使用Combine并不是完全合理的做法,与其说是充分利用它,不如说是熟悉它的一种练习。
Let’s now look at the consumer classes, the front end that will use this service, and how we’ll use it. We’ll still use Combine, and this will be our first EnvironmentObject — the one that stores all the items (all the decoded objects) in those JSON files:
现在,让我们看一下消费者类,将使用此服务的前端以及我们将如何使用它。 我们仍将使用Combine,这将是我们的第一个EnvironmentObject将所有项目(所有已解码的对象)存储在这些JSON文件中的对象:
The data is split into various categories, so we’ll reference it in an enum. In the app, this enum has a lot of functions (e.g. to return the correct label and icon for the UI).
数据分为多个类别,因此我们将在枚举中对其进行引用。 在应用程序中,此枚举具有很多功能(例如,为UI返回正确的标签和图标)。
Here is also an extract of our Codable object that represents what is stored in our JSON files:
这也是我们Codable对象的一部分,该对象表示存储在JSON文件中的内容:
And finally the Items class:
最后是Items类:
This is our Items class that will store all the items by category. It’s an ObservableObject with one Published property. SwiftUI views will able to subscribe to this object and reload their body whenever it gets updated.
这是我们的Items类,它将按类别存储所有项目。 这是一个带有一个Published属性的ObservableObject 。 SwiftUI视图将能够订阅该对象并在其更新时重新加载其主体。
In this class, we consume our API service and call the fetch function for each category. We don’t want to handle the error for now, so we replace it with an empty ItemResponse. We then extract only the results (the array of Item objects). We specify that we want to receive the final data in the main queue. It’s important because we’ll update our published property and thus most probably update the UI. And you can’t do that on a background thread. Remember, we specified that our service should do all its job into a background queue.
在此类中,我们使用我们的API服务,并为每个类别调用fetch函数。 我们暂时不想处理该错误,因此我们将其替换为空的ItemResponse 。 然后,我们仅提取结果(Item对象的数组)。 我们指定我们要在主队列中接收最终数据。 这很重要,因为我们将更新已发布的属性,因此很可能会更新UI。 而且您不能在后台线程上执行此操作。 记住,我们指定我们的服务应将其所有工作放入后台队列。
Finally, we use sink, which allows us to get a closure on the subscriber when it receives the final transformed value. We then store the decoded list of items into the corresponding category.
最后,我们使用接收sink ,它使我们能够在订阅者收到最终的转换值时对其进行关闭。 然后,我们将已解码的项目列表存储到相应的类别中。
SwiftUI部分 (The SwiftUI Part)
Now that we have our Items ready to be used in the app, let’s make them available to the UI. As we’ll reuse those Items in various views, as we want them to be available everywhere. So we’ll use EnvironmentObject, a SwiftUI property wrapper that allows us to recover an object from the environment.
现在我们已经准备好要在应用程序中使用项目,现在让它们可用于UI。 因为我们希望它们可以在各种视图中重复使用,所以我们希望它们在任何地方都可用。 因此,我们将使用EnvironmentObject ,这是一个SwiftUI属性包装器,它允许我们从环境中恢复对象。
And to add our Items to our application environment, we need to attach it to the root view of our view hierarchy. The best place to do that is in the SceneDelegate:
并将项目添加到我们的应用程序环境中,我们需要将其附加到视图层次结构的根视图中。 最好的方法是在SceneDelegate :
On line 7, when we create our TabbarView, we add an instance of Items to the environment. This instance will be kept around as long as our application process is alive. And then we use our TabbarView as the root view of our application (line 11).
在第7行,当我们创建TabbarView ,我们向环境添加了Items的实例。 只要我们的申请程序还活着,这个实例将一直存在。 然后,我们使用TabbarView作为应用程序的根视图(第11行)。
Let’s now build a list of those categories of items and a list of items from this EnvironmentObject.
现在,让我们构建这些项目类别的列表以及此EnvironmentObject中的项目清单。
Let’s first look at our root view, the TabbarView:
让我们首先看一下我们的根视图TabbarView :
It’s good practice to have an enum for your Tab. Since TabView from SwiftUI needs a binding, you’ll need a @State property wrapper to store your currently selected tab. It’ll change as you touch the tab of your Tabbar. It’s a two-way street, so maybe later you’ll want to have a sort of UIState that has the selected tab as a @Published property and then store it in an EnvironmentObject. It’ll allow you to swap tabs programmatically from anywhere in the app.
最好为Tab枚举一个枚举。 由于TabView的TabView需要绑定,因此需要一个@State属性包装器来存储当前选择的标签。 当您触摸“标签栏”的标签时,它将更改。 这是一条双向的街道,所以也许以后您将需要一种UIState,该UIState会将选定的选项卡作为@Published属性,然后将其存储在EnvironmentObject 。 它允许您从应用程序中的任何位置以编程方式交换选项卡。
This is what I actually do in the full project, but I wanted to simplify it for this article.
这是我在整个项目中实际上要做的,但是我想在本文中简化它。
Finally, our TabedView has one tab for now. This is the HomeView:
最后,我们的TabedView现在有一个选项卡。 这是HomeView :
As we saw previously, we read our Items environment object using the @EnvironmentObject property wrapper.
如前所述,我们使用@EnvironmentObject属性包装器读取了Items环境对象。
Then I made a convenience dynamic property on the view (categories), which returned a tuple ((Category, Items)). This will be much easier to use with SwiftUI’s ForEach.
然后,我在视图(类别)上创建了一个便利动态属性,该属性返回一个元组( (Category, Items) )。 使用SwiftUI的ForEach会更容易。
If you take a look at the body of our HomeView, we have a List, and for every category, we’ll make a section that will have a Scrolling HStack of ten items.
如果您看一下HomeView的正文,我们有一个List ,对于每个类别,我们都将创建一个包含十个项目的Scrolling HStack部分。
And voilà!
和瞧!
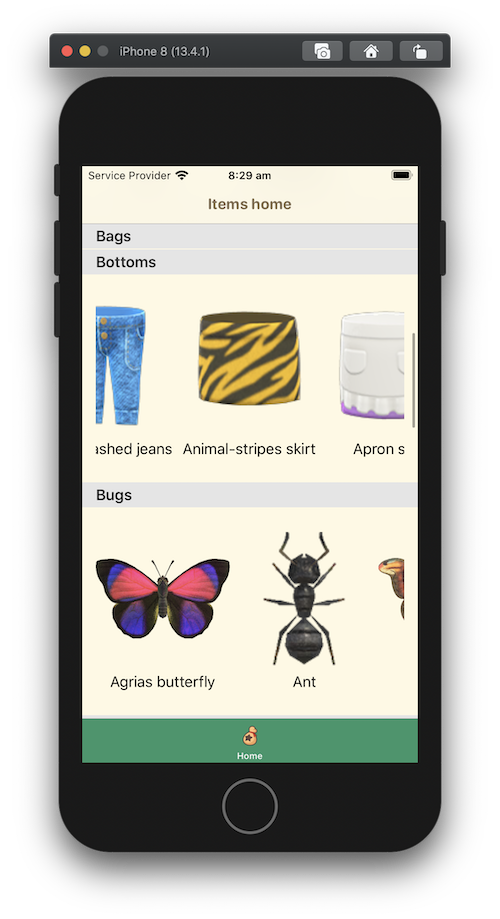
This is not pretty, but we have our prototype of a SwiftUI app. And it’s fully functional. It uses various SwiftUI dataflow property wrappers to read and publish live back-end data into your app.
这并不漂亮,但是我们有一个SwiftUI应用程序的原型。 而且它功能齐全。 它使用各种SwiftUI数据流属性包装器来读取实时后端数据并将其发布到您的应用程序中。
This is now what the application looks like for categories and items:
现在,应用程序的类别和项目如下所示:
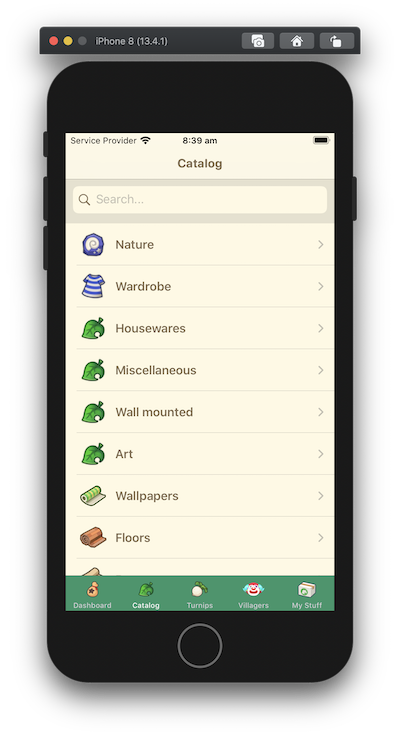

I’ve made it much simpler for the article, of course. It would have been too much code to embed if I wanted to show you the full application. But you can take a look at the full repository here and build it yourself:
当然,我使本文变得更加简单。 如果我想向您展示完整的应用程序,可能会嵌入太多代码。 但是您可以在这里查看完整的存储库并自己构建:
There is one more thing I wanted to talk about: the view model. A view model is an important building block for a basic SwiftUI application. It’s the layer between your back-end services and raw models and your view. It allows you to put all the business logic that should not be in your views and expose only what your views need. You don’t want heavy calculation or anything of the sort directly in the body of your SwiftUI view.
我还想谈谈另一件事:视图模型。 视图模型是基本SwiftUI应用程序的重要构建块。 它是您的后端服务,原始模型和视图之间的层。 它允许您将所有不应该包含在视图中的业务逻辑放入视图中,并仅公开视图所需的内容。 您不希望直接在SwiftUI视图的主体中进行繁重的计算或任何其他类型的操作。
Here is a look at the ItemsViewModel, the view model that handles a list of items (as you can see in the screenshoot above):
来看一下ItemsViewModel ,它是处理项目列表的视图模型(如上图所示):
Just as the screen has various functions, this view model does too. It’ll hold a list of items but also the search text we directly bind in the TextField that we use as our search bar (the searched items, etc.).
正如屏幕具有各种功能一样,此视图模型也具有此功能。 它不仅包含项目列表,还包含我们直接绑定在用作搜索栏的TextField中的搜索文本(搜索到的项目等)。
And here is how we use it in our current flow:
这是我们在当前流程中如何使用它:
The categories list will open an ItemsListView with an ItemsViewModel scoped on the selected category. And there you have it!
类别列表将打开一个ItemsListView ,其中ItemsViewModel范围取决于所选类别。 在那里,您拥有了!
This is a bit more complex, but it’ll allow you to get the gist of what you could do in a real-world application.
这有点复杂,但是它使您可以了解在实际应用程序中可以做的事情。
Let me know what you think of this first article in the new series. I try to keep it simple and embed all the code so you can get something working yourself without looking at the repository too much. For the rest of the series, do you want something more in-depth or more code to make it work on your own?
让我知道您对新系列的第一篇文章有何看法。 我尝试使其简单并嵌入所有代码,以便您可以自己完成一些工作,而不必过多地查看存储库。 对于本系列的其余部分,您是否需要更深入的内容或更多的代码来使其独立工作?
If you wish to contribute, you’re more than welcome. We already have a few contributors and it’s really a great project if you want to try out SwiftUI. So clone it and open your first PR. We won’t bite!
如果您想做出贡献,那就非常欢迎。 我们已经有一些贡献者了,如果您想试用SwiftUI,那真的是一个很棒的项目。 因此,克隆它并打开您的第一个PR。 我们不会咬人!
结论 (Conclusion)
Thank you for reading this article!
感谢您阅读本文!
I hope you enjoyed this first part and I’ll see you in part 2, where we’ll dig deeper into view models and views. We’ll try to build more complex views, some animations, and explore internal state management.
希望您喜欢第一部分,并在第二部分中看到您,在这里我们将更深入地研究视图模型和视图。 我们将尝试构建更复杂的视图,一些动画,并探索内部状态管理。
翻译自: https://medium.com/better-programming/build-a-swiftui-animal-crossing-application-part-1-aaf3528c1df
构建meteor应用程序
相关文章:
这篇关于构建meteor应用程序_构建swiftui动物穿越应用程序第1部分的文章就介绍到这儿,希望我们推荐的文章对编程师们有所帮助!


