本文主要是介绍自定义FlowLayout,android flowLayout实现,希望对大家解决编程问题提供一定的参考价值,需要的开发者们随着小编来一起学习吧!
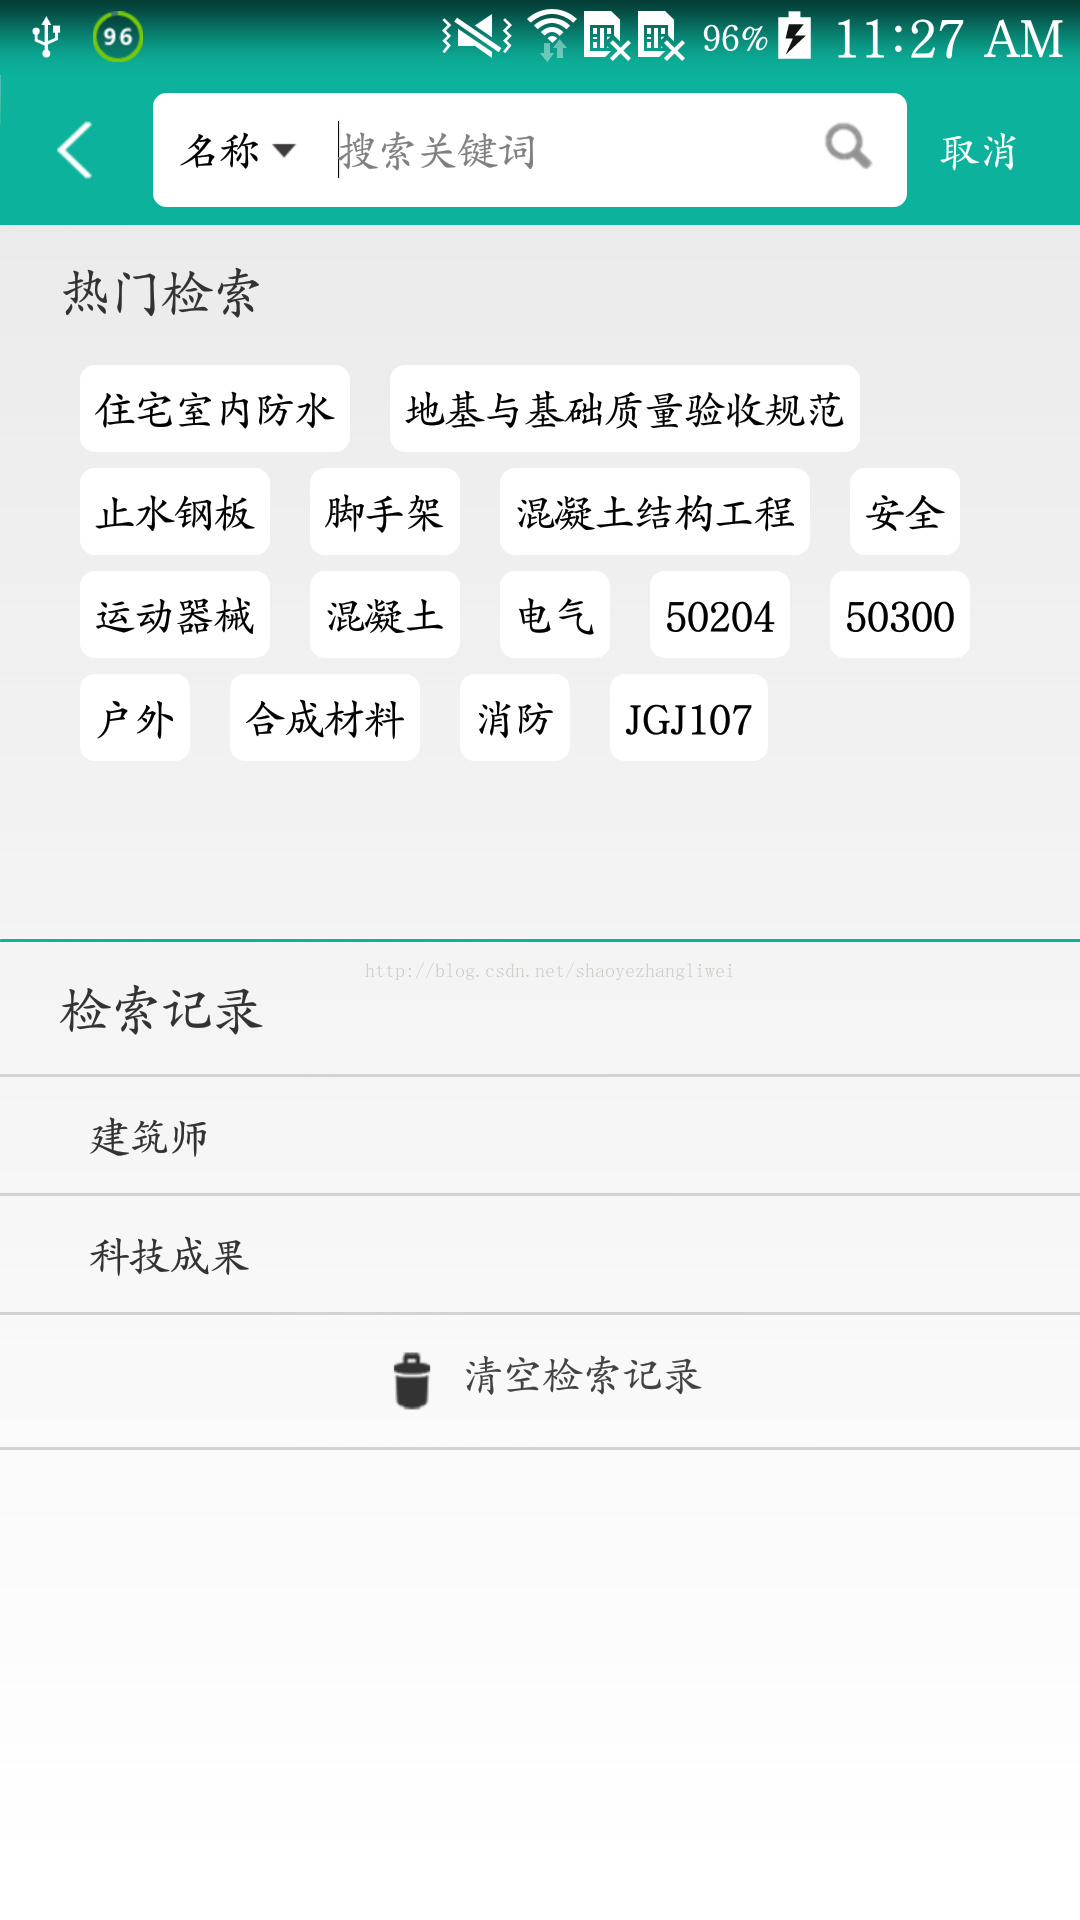
我想大家在开发过程中都碰到过这样的需求,类似标签展示,要展示如上图效果,这里面的数据不确定每项字数,有的非常长,有的很短,数据动态填充。
这种情况用listView和gridView展示效果都没有上图的效果。
这时我们其实是要自己写一个控件来填充上图的数据,也就是我们今天要说的自定义view,流式布局。
方法还是重写onMeasure和onLayout
话不多说 ,代码贴上
一.自定义view
package com.jky.mobilebzt.view;import java.util.ArrayList;
import java.util.List;import android.content.Context;
import android.util.AttributeSet;
import android.view.View;
import android.view.ViewGroup;public class XCFlowLayout extends ViewGroup {// 存储所有子Viewprivate List<List<View>> mAllChildViews = new ArrayList<List<View>>();// 每一行的高度private List<Integer> mLineHeight = new ArrayList<Integer>();public XCFlowLayout(Context context, AttributeSet attrs, int defStyleAttr) {super(context, attrs, defStyleAttr);}public XCFlowLayout(Context context, AttributeSet attrs) {this(context, attrs, 0);}public XCFlowLayout(Context context) {this(context, null);}@Overrideprotected void onMeasure(int widthMeasureSpec, int heightMeasureSpec) {// TODO Auto-generated method stub// 父控件传进来的宽度和高度以及对应的测量模式int sizeWidth = MeasureSpec.getSize(widthMeasureSpec);int modeWidth = MeasureSpec.getMode(widthMeasureSpec);int sizeHeight = MeasureSpec.getSize(heightMeasureSpec);int modeHeight = MeasureSpec.getMode(heightMeasureSpec);// 如果当前ViewGroup的宽高为wrap_content的情况int width = 0; // 自己测量的宽度int height = 0; // 自己测量的高度int lineWidth = 0;// 每一行的宽度int lineHeight = 0; // 每一行的高度int childCount = getChildCount();// 获取子view的个数for (int i = 0; i < childCount; i++) {View child = getChildAt(i);// 测量子View的宽和高measureChild(child, widthMeasureSpec, heightMeasureSpec);// 得到LayoutParamsMarginLayoutParams lp = (MarginLayoutParams) getLayoutParams();// 得到子View占据的宽度int childWidth = child.getMeasuredWidth() + lp.leftMargin+ lp.rightMargin;// 得到子View占据的高度int childHeight = child.getMeasuredHeight() + lp.topMargin+ lp.bottomMargin;if (lineWidth + childWidth > sizeWidth) {// 需要进行换行width = Math.max(width, lineWidth); // 得到最大宽度lineWidth = childWidth; // 重置lineWidthheight += lineHeight; // 得到高度lineHeight = childHeight;// 重置LineHeight} else {// 不需要进行换行lineWidth += childWidth;// 叠加行宽lineHeight = Math.max(lineHeight, childHeight);}if (i == childCount - 1) {// 处理最后一个子View的情况width = Math.max(width, lineWidth);height += lineHeight;}}// wrapcontentsetMeasuredDimension(modeWidth == MeasureSpec.EXACTLY ? sizeWidth: width, modeHeight == MeasureSpec.EXACTLY ? sizeHeight: height);//		super.onMeasure(widthMeasureSpec, heightMeasureSpec);}@Overrideprotected void onLayout(boolean changed, int l, int t, int r, int b) {// TODO Auto-generated method stubmAllChildViews.clear();mLineHeight.clear();int width = getWidth();// 获取当前ViewGroup宽度int lineWidth = 0;int lineHeight = 0;List<View> lineViews = new ArrayList<View>();// 记录当前行的Viewint childCount = getChildCount();for (int i = 0; i < childCount; i++) {View child = getChildAt(i);MarginLayoutParams lp = (MarginLayoutParams) child.getLayoutParams();int childWidth = child.getMeasuredWidth();int childHeight = child.getMeasuredHeight();// 需要换行if (lineWidth + childWidth + lp.leftMargin + lp.rightMargin > width) {mLineHeight.add(lineHeight); // 记录lineHeightmAllChildViews.add(lineViews); // 记录当前行的Views// 重置 行的宽高lineWidth = 0;lineHeight = childHeight + lp.topMargin + lp.bottomMargin;// 重置当前行的View集合;lineViews = new ArrayList<View>();}lineWidth += childWidth + lp.leftMargin + lp.rightMargin;lineHeight = Math.max(lineHeight, childHeight + lp.topMargin+ lp.bottomMargin);lineViews.add(child);}// 处理最后一行mLineHeight.add(lineHeight);mAllChildViews.add(lineViews);// 设置子View的位置int left = 0;int top = 0;// 获取行数int lineCount = mAllChildViews.size();for (int i = 0; i < lineCount; i++) {// 当前行的views和高度lineViews = mAllChildViews.get(i);lineHeight = mLineHeight.get(i);for (int j = 0; j < lineViews.size(); j++) {View child = lineViews.get(j);// 判断是否显示if (child.getVisibility() == View.GONE) {continue;}MarginLayoutParams lp = (MarginLayoutParams) child.getLayoutParams();int cLeft = left + lp.leftMargin;int cTop = top + lp.topMargin;int cRight = cLeft + child.getMeasuredWidth();int cBottom = cTop + child.getMeasuredHeight();// 进行子View进行布局child.layout(cLeft, cTop, cRight, cBottom);left += child.getMeasuredWidth() + lp.leftMargin+ lp.rightMargin;}left = 0;top += lineHeight;}}/*** 与当前ViewGroup对应的LayoutParams*/@Overridepublic LayoutParams generateLayoutParams(AttributeSet attrs) {return new MarginLayoutParams(getContext(), attrs);}
}
二.xml部分
xml布局中加上这个
<com.jky.mobilebzt.view.XCFlowLayoutandroid:id="@+id/xcf_hot_words"android:layout_width="match_parent"android:layout_height="wrap_content"android:layout_marginLeft="@dimen/margin_lsmall"android:layout_marginBottom="@dimen/margin_normal"android:layout_marginRight="@dimen/margin_normal" />三.初始化数据部分
@SuppressLint("NewApi")private void initHotWordViews() {MarginLayoutParams lp = new MarginLayoutParams(LayoutParams.WRAP_CONTENT, LayoutParams.WRAP_CONTENT);lp.leftMargin = 20;lp.rightMargin = 20;lp.topMargin = 8;lp.bottomMargin = 8;for (int i = 0; i < hotWords.size(); i++) {final String hotWord = hotWords.get(i);TextView view = new TextView(this);view.setGravity(Gravity.CENTER);view.setText(hotWords.get(i));view.setTextColor(Color.BLACK);view.setBackground(getResources().getDrawable(R.drawable.hot_word_selector));mFlowLayout.addView(view, lp);view.setOnClickListener(new OnClickListener() {@Overridepublic void onClick(View v) {}});}}hotWords就是你要填充的数据集合
基本核心的东西就上面这些 ,最上面的图是我的项目里面最后实现的效果图。如果还有其他问题欢迎加入我们的qq群:
开发一群:454430053开发二群:537532956
这篇关于自定义FlowLayout,android flowLayout实现的文章就介绍到这儿,希望我们推荐的文章对编程师们有所帮助!


