本文主要是介绍ItemDecoration详解以及用ItemDecoration实现按字母排序列表,希望对大家解决编程问题提供一定的参考价值,需要的开发者们随着小编来一起学习吧!
首先看看实现的效果
可以看出要实现上面效果,有三个步骤:
1.汉字转化为拼音,并且根据首字母排序
2.用ItemDecoration实现字母行的显示
3.自定义实现右侧的按字母导航栏
当然重点讲讲ItemDecoration的实现。都知道RecyclerView本身都没有分割线,需要分割线都是在item中画一条线或者使用ItemDecoration来实现分割线。在RecyclerView中我们可以给每一个item都添加ItemDecoration,所以可以自定义ItemDecoration来实现各种我们所需要的效果。
ItemDecoration
ItemDecoration是RecyclerView内部的一个抽象类,要实现这个抽象类自然需要实现内部的抽象方法,除了deprecated的方法只有下面三个方法:
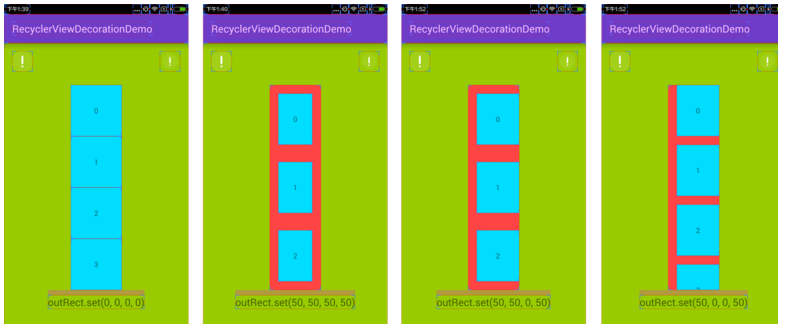
1.void getItemOffsets(Rect outRect, View view, RecyclerView parent, State state)
这个方法是用来指定每一个的item对应decoration的大小区域,主要实现方式就是设置outRect的left、top、right、bottom,如果一个item不需要decoration把outRect的上下左右设置为0即可。盗用网上一张图看看outRect具体什么意思
2.void onDraw(Canvas c, RecyclerView parent, State state)
onDraw方法看名字大家都应该很熟悉,这个方法自然是用来画具体的ItemDecoration的,绘制的内容是显示在itemView的下层。下层什么意思,待会来看看。
3.void onDrawOver(Canvas c, RecyclerView parent, State state)
也是一个绘制的方法,不过是绘制在itemView的上层
以上三个方法的调用顺序也就是按照上面的排列的顺序来调用的。
首先来看看用ItemDecoration实现的分割线DividerItemDecoration
public class DividerItemDecoration extends RecyclerView.ItemDecoration {private static final int[] ATTRS = new int[]{android.R.attr.listDivider};public static final int HORIZONTAL_LIST = LinearLayoutManager.HORIZONTAL;public static final int VERTICAL_LIST = LinearLayoutManager.VERTICAL;private Drawable mDivider;private int mOrientation;public DividerItemDecoration(Context context, int orientation) {//获取系统的dividerfinal TypedArray a = context.obtainStyledAttributes(ATTRS);mDivider = a.getDrawable(0);a.recycle();setOrientation(orientation);}public void setOrientation(int orientation) {if (orientation != HORIZONTAL_LIST && orientation != VERTICAL_LIST) {throw new IllegalArgumentException("invalid orientation");}mOrientation = orientation;}@Overridepublic void onDraw(Canvas c, RecyclerView parent, RecyclerView.State state) {super.onDraw(c, parent, state);if (mOrientation == VERTICAL_LIST) {drawVertical(c, parent);} else {drawHorizontal(c, parent);}}//画竖直分割线public void drawVertical(Canvas c, RecyclerView parent) {//左边缘距离RecyclerView左边的距离final int left = parent.getPaddingLeft();//右边缘距离RecyclerView右边边的距离final int right = parent.getWidth() - parent.getPaddingRight();final int childCount = parent.getChildCount();for (int i = 0; i < childCount; i++) {final View child = parent.getChildAt(i);final RecyclerView.LayoutParams params = (RecyclerView.LayoutParams) child.getLayoutParams();final int top = child.getBottom() + params.bottomMargin;final int bottom;//去掉最后一条的分割线if (i == childCount - 1) {//bottom和top相等,即高度为0 不显示bottom = top;} else {bottom = top + mDivider.getIntrinsicHeight();}mDivider.setBounds(left, top, right, bottom);mDivider.draw(c);}}//画水平分割线public void drawHorizontal(Canvas c, RecyclerView parent) {final int top = parent.getPaddingTop();final int bottom = parent.getHeight() - parent.getPaddingBottom();final int childCount = parent.getChildCount();for (int i = 0; i < childCount; i++) {final View child = parent.getChildAt(i);final RecyclerView.LayoutParams params = (RecyclerView.LayoutParams) child.getLayoutParams();final int left = child.getRight() + params.rightMargin;final int right = left + mDivider.getIntrinsicHeight();mDivider.setBounds(left, top, right, bottom);mDivider.draw(c);}}@Overridepublic void getItemOffsets(Rect outRect, View view, RecyclerView parent, RecyclerView.State state) {super.getItemOffsets(outRect, view, parent, state);if (mOrientation == VERTICAL_LIST) {outRect.set(0, 0, 0, mDivider.getIntrinsicHeight());} else {outRect.set(0, 0, mDivider.getIntrinsicWidth(), 0);}}
}在上面onDraw画竖直分割线的方法中,把分割线高度加上80px,即:
mDivider.setBounds(left, top, right, bottom+80);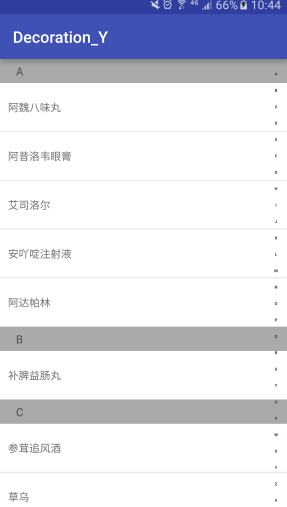
效果没变化?意思是onDraw里面画的区域大小不会超过outRect设置的大小吗?记得之前说过,onDraw方法绘制的内容是在itemView的下层的,会不会是被itemView遮挡而没有显示出来呢,那么下面我们把itemView的背景色改为透明,看看效果
android:background="@android:color/transparent"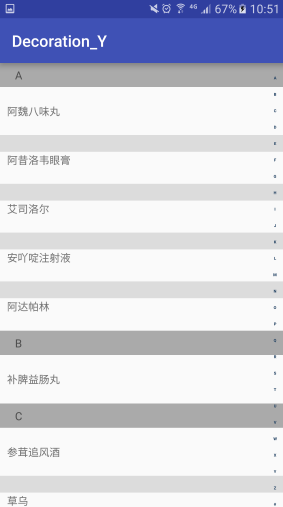
这次看到了不同了吧,正是我们所猜想的那样。也就证明了onDraw方法显示的内容实在itemView的下层,同时它绘制的内容并不是不会超过outRect指定的区域,而outRect指定的区域也是实际分配给ItemDecoration的区域,在这个区域绘制才不会影响itemView,所以onDraw绘制的内容我们应该要保持和outRect给定的区域是相同的。
显示字母的ItemDecoration
现在来看看显示字母的ItemDecoration是怎么实现的。看上面的效果可以发现,最上面始终显示了一个ItemDecoration,上面说过onDrawOver方法绘制的内容是显示在最上层,所以用这个方法来绘制最上面再适合不过了。其他itemView显示字母的ItemDecoration也并不是采用onDraw方法绘制,而是用xml实现的,因为采用xml方式来实现可以更方便的来定制ItemDecoration的内容,也可以实现其中的点击事件。
在看ItemDecoration之前,先看看所用到的一个接口和RecyclerView的Adapter
public interface StickyHeaderAdapter<T extends RecyclerView.ViewHolder> {String getHeaderId(int position);T onCreateHeaderViewHolder(ViewGroup parent);void onBindHeaderViewHolder(T viewholder, int position);
}/*** Created by lzy .* Date: 16/11/24*/
public class MedicineAdapter extends RecyclerView.Adapter<MedicineAdapter.ViewHolder> implementsStickyHeaderAdapter<MedicineAdapter.HeaderHolder> {private Context mContext;private List<MedicineBean> mDatas;private LayoutInflater mInflater;private int i;public MedicineAdapter(Context mContext, List<MedicineBean> mDatas) {this.mContext = mContext;this.mDatas = mDatas;mInflater = LayoutInflater.from(mContext);}@Overridepublic ViewHolder onCreateViewHolder(ViewGroup parent, int viewType) {return new ViewHolder(mInflater.inflate(R.layout.item_medicine, parent, false));}@Overridepublic void onBindViewHolder(final ViewHolder holder, final int position) {final MedicineBean MedicineBean = mDatas.get(position);holder.tvName.setText(MedicineBean.getName());}@Overridepublic int getItemCount() {return mDatas != null ? mDatas.size() : 0;}@Overridepublic String getHeaderId(int position) {return mDatas.get(position).getLetter();}@Override//生成header的布局public HeaderHolder onCreateHeaderViewHolder(ViewGroup parent) {return new HeaderHolder(mInflater.inflate(R.layout.item_decoration, parent, false));}@Override//绑定header的数据public void onBindHeaderViewHolder(HeaderHolder viewholder, int position) {viewholder.header.setText(mDatas.get(position).getLetter());}/*** 根据分类的首字母获取其第一次出现该首字母的位置*/public int getPositionForSection(String section) {for (int i = 0; i < mDatas.size(); i++) {String sortStr = mDatas.get(i).getLetter();if (sortStr.equals(section)) {return i;}}return -1;}public static class ViewHolder extends RecyclerView.ViewHolder {TextView tvName;public ViewHolder(View itemView) {super(itemView);tvName = (TextView) itemView.findViewById(R.id.name);}}public static class HeaderHolder extends RecyclerView.ViewHolder {public TextView header;public HeaderHolder(View itemView) {super(itemView);header = (TextView) itemView;}}
}getItemOffsets方法
首先看看第一个getItemOffsets方法的实现
@Overridepublic void getItemOffsets(Rect outRect, View view, RecyclerView parent, RecyclerView.State state) {super.getItemOffsets(outRect, view, parent, state);//得到该item所在的位置int position = parent.getChildAdapterPosition(view);int headerHeight = 0;//在使用adapterPosition时最好的加上这个判断if (position != RecyclerView.NO_POSITION && hasHeader(position)) {//获取到ItemDecoration所需要的高度View header = getHeader(parent, position).itemView;headerHeight = header.getHeight();}outRect.set(0, headerHeight, 0, 0);}判断是否需要header
判断是否需要header的方法,之前不是在Adapter里面写了getHeaderId的方法吗,这里就用到了,根据前两个headerId是否相同来判断是否需要设置ItemDecoration
private boolean hasHeader(int position) {if (position == 0) {//第一个位置必然有return true;}//判断和上一个的id不同则有headerint previous = position - 1;return !mAdapter.getHeaderId(position).equals(mAdapter.getHeaderId(previous));}获取Header的方法
private RecyclerView.ViewHolder getHeader(RecyclerView parent, int position) {//创建HeaderViewHolderMedicineAdapter.HeaderHolder holder = mAdapter.onCreateHeaderViewHolder(parent);final View header = holder.itemView;//绑定数据mAdapter.onBindHeaderViewHolder(holder, position);//测量View并且layoutint widthSpec = View.MeasureSpec.makeMeasureSpec(parent.getWidth(), View.MeasureSpec.EXACTLY);int heightSpec = View.MeasureSpec.makeMeasureSpec(parent.getHeight(), View.MeasureSpec.UNSPECIFIED);//根据父View的MeasureSpec和子view自身的LayoutParams以及padding来获取子View的MeasureSpecint childWidth = ViewGroup.getChildMeasureSpec(widthSpec,parent.getPaddingLeft() + parent.getPaddingRight(), header.getLayoutParams().width);int childHeight = ViewGroup.getChildMeasureSpec(heightSpec,parent.getPaddingTop() + parent.getPaddingBottom(), header.getLayoutParams().height);//进行测量header.measure(childWidth, childHeight);//根据测量后的宽高放置位置header.layout(0, 0, header.getMeasuredWidth(), header.getMeasuredHeight());return holder;}onDrawOver方法
@Overridepublic void onDrawOver(Canvas c, RecyclerView parent, RecyclerView.State state) {final int count = parent.getChildCount();for (int layoutPos = 0; layoutPos < count; layoutPos++) {final View child = parent.getChildAt(layoutPos);final int adapterPos = parent.getChildAdapterPosition(child);//只有在最上面一个item或者有header的item才绘制ItemDecorationif (adapterPos != RecyclerView.NO_POSITION && (layoutPos == 0 || hasHeader(adapterPos))) {View header = getHeader(parent, adapterPos).itemView;c.save();final int left = child.getLeft();final int top = getHeaderTop(parent, child, header, adapterPos, layoutPos);c.translate(left, top);header.setTranslationX(left);header.setTranslationY(top);header.draw(c);c.restore();}}}private int getHeaderTop(RecyclerView parent, View child, View header, int adapterPos, int layoutPos) {int headerHeight = header.getHeight();int top = ((int) child.getY()) - headerHeight;if (layoutPos == 0) {//处理最上面两个ItemDecoration切换时final int count = parent.getChildCount();final String currentId = mAdapter.getHeaderId(adapterPos);for (int i = 1; i < count; i++) {int adapterPosHere = parent.getChildAdapterPosition(parent.getChildAt(i));if (adapterPosHere != RecyclerView.NO_POSITION) {String nextId = mAdapter.getHeaderId(adapterPosHere);if (!nextId.equals(currentId)) { //找到下一个不同类的viewfinal View next = parent.getChildAt(i);//这里计算offset画个图会很清楚final int offset = ((int) next.getY()) - (headerHeight + getHeader(parent, adapterPosHere).itemView.getHeight());if (offset < 0) {//如果大于0的话,此时并没有切换return offset;} else {break;}}}}//top不能小于0,否则最上面的ItemDecoration不会一直存在top = Math.max(0, top);}return top;}1.当此view不是最上面的显示的时候,header距离顶部直接就是此view距离顶部距离减去header的高度即可
2.当此view是最上面的view的时候,首先用for循环找到它下一个和它headerId不同的第一个view,利用找到的这个view和它本身来计算出它的header距离顶部的距离,当这个距离大于0时,代表此view的header还全部显示出来,这时直接用上面的方式获取这个距离,当这个距离小于0时就是我们所希望的。
OK完成,下面贴出ItemDecoration的所以代码
/*** Created by lzy on 2016/11/23.*/
public class StickyItemDecoration extends RecyclerView.ItemDecoration {private static final String TAG = "lzy";private MedicineAdapter mAdapter;public StickyItemDecoration(MedicineAdapter mAdapter) {super();this.mAdapter = mAdapter;}//最后调用 绘制顶部固定的header@Overridepublic void onDrawOver(Canvas c, RecyclerView parent, RecyclerView.State state) {final int count = parent.getChildCount();for (int layoutPos = 0; layoutPos < count; layoutPos++) {final View child = parent.getChildAt(layoutPos);final int adapterPos = parent.getChildAdapterPosition(child);//只有在最上面一个item或者有header的item才绘制ItemDecorationif (adapterPos != RecyclerView.NO_POSITION && (layoutPos == 0 || hasHeader(adapterPos))) {View header = getHeader(parent, adapterPos).itemView;c.save();final int left = child.getLeft();final int top = getHeaderTop(parent, child, header, adapterPos, layoutPos);c.translate(left, top);header.setTranslationX(left);header.setTranslationY(top);header.draw(c);c.restore();}}}@Overridepublic void getItemOffsets(Rect outRect, View view, RecyclerView parent, RecyclerView.State state) {super.getItemOffsets(outRect, view, parent, state);//得到该item所在的位置int position = parent.getChildAdapterPosition(view);int headerHeight = 0;//在使用adapterPosition时最好的加上这个判断if (position != RecyclerView.NO_POSITION && hasHeader(position)) {//获取到ItemDecoration所需要的高度View header = getHeader(parent, position).itemView;headerHeight = header.getHeight();}outRect.set(0, headerHeight, 0, 0);}/*** 判断是否有header** @param position* @return*/private boolean hasHeader(int position) {if (position == 0) {//第一个位置必然有return true;}//判断和上一个的id不同则有headerint previous = position - 1;return !mAdapter.getHeaderId(position).equals(mAdapter.getHeaderId(previous));}/*** 获得自定义的Header** @param parent* @param position* @return*/private RecyclerView.ViewHolder getHeader(RecyclerView parent, int position) {//创建HeaderViewHolderMedicineAdapter.HeaderHolder holder = mAdapter.onCreateHeaderViewHolder(parent);final View header = holder.itemView;//绑定数据mAdapter.onBindHeaderViewHolder(holder, position);//测量View并且layoutint widthSpec = View.MeasureSpec.makeMeasureSpec(parent.getWidth(), View.MeasureSpec.EXACTLY);int heightSpec = View.MeasureSpec.makeMeasureSpec(parent.getHeight(), View.MeasureSpec.UNSPECIFIED);//根据父View的MeasureSpec和子view自身的LayoutParams以及padding来获取子View的MeasureSpecint childWidth = ViewGroup.getChildMeasureSpec(widthSpec,parent.getPaddingLeft() + parent.getPaddingRight(), header.getLayoutParams().width);int childHeight = ViewGroup.getChildMeasureSpec(heightSpec,parent.getPaddingTop() + parent.getPaddingBottom(), header.getLayoutParams().height);//进行测量header.measure(childWidth, childHeight);//根据测量后的宽高放置位置header.layout(0, 0, header.getMeasuredWidth(), header.getMeasuredHeight());return holder;}/*** 计算距离顶部的高度** @param parent* @param child* @param header* @param adapterPos* @param layoutPos* @return*/private int getHeaderTop(RecyclerView parent, View child, View header, int adapterPos, int layoutPos) {int headerHeight = header.getHeight();int top = ((int) child.getY()) - headerHeight;if (layoutPos == 0) {//处理最上面两个ItemDecoration切换时final int count = parent.getChildCount();final String currentId = mAdapter.getHeaderId(adapterPos);for (int i = 1; i < count; i++) {int adapterPosHere = parent.getChildAdapterPosition(parent.getChildAt(i));if (adapterPosHere != RecyclerView.NO_POSITION) {String nextId = mAdapter.getHeaderId(adapterPosHere);//找到下一个不同类的viewif (!nextId.equals(currentId)) {final View next = parent.getChildAt(i);//这里计算offset画个图会很清楚final int offset = ((int) next.getY()) - (headerHeight + getHeader(parent, adapterPosHere).itemView.getHeight());if (offset < 0) {//如果大于0的话,此时并没有切换return offset;} else {break;}}}}//top不能小于0,否则最上面的ItemDecoration不会一直存在top = Math.max(0, top);}return top;}
}
汉字转拼音
通过一个三方的类库pinyin4j来实现,这里就是调用方法PinyinHelper.toHanyuPinyinStringArray获取一个汉字的拼音,然后得到第一个英文字母并转化为大写
private List<MedicineBean> filledData(String[] data) {List<MedicineBean> mSortList = new ArrayList<MedicineBean>();for (int i = 0; i < data.length; i++) {MedicineBean medicineBean = new MedicineBean();medicineBean.setName(data[i]);//汉字转换成拼音String[] pinyin = PinyinHelper.toHanyuPinyinStringArray(data[i].toCharArray()[0]);String sortString = pinyin[0].substring(0, 1).toUpperCase();// 正则表达式,判断首字母是否是英文字母if (sortString.matches("[A-Z]")) {medicineBean.setLetter(sortString.toUpperCase());} else {medicineBean.setLetter("#");}mSortList.add(medicineBean);}return mSortList;}右边的字母导航栏
public class SideBar extends View {// 触摸事件private OnTouchingLetterChangedListener onTouchingLetterChangedListener;// 26个字母public static String[] b = {"A", "B", "C", "D", "E", "F", "G", "H", "I","J", "K", "L", "M", "N", "O", "P", "Q", "R", "S", "T", "U", "V","W", "X", "Y", "Z", "#"};private int choose = -1;// 选中private Paint paint = new Paint();private TextView mTextDialog;public void setTextView(TextView mTextDialog) {this.mTextDialog = mTextDialog;}public SideBar(Context context, AttributeSet attrs, int defStyle) {super(context, attrs, defStyle);}public SideBar(Context context, AttributeSet attrs) {super(context, attrs);}public SideBar(Context context) {super(context);}@Overrideprotected void onDraw(Canvas canvas) {super.onDraw(canvas);// 获取焦点改变背景颜色.int height = getHeight();// 获取对应高度int width = getWidth(); // 获取对应宽度int singleHeight = height / b.length;// 获取每一个字母的高度for (int i = 0; i < b.length; i++) {paint.setColor(Color.rgb(33, 65, 98));// paint.setColor(Color.WHITE);paint.setTypeface(Typeface.DEFAULT_BOLD);paint.setAntiAlias(true);paint.setTextSize(20);// 选中的状态if (i == choose) {paint.setColor(Color.parseColor("#3399ff"));paint.setFakeBoldText(true);}// x坐标等于中间-字符串宽度的一半.float xPos = width / 2 - paint.measureText(b[i]) / 2;float yPos = singleHeight * i + singleHeight;canvas.drawText(b[i], xPos, yPos, paint);paint.reset();// 重置画笔}}@Overridepublic boolean dispatchTouchEvent(MotionEvent event) {final int action = event.getAction();final float y = event.getY();// 点击y坐标final int oldChoose = choose;final OnTouchingLetterChangedListener listener = onTouchingLetterChangedListener;final int c = (int) (y / getHeight() * b.length);// 点击y坐标所占总高度的比例*b数组的长度就等于点击b中的个数.switch (action) {case MotionEvent.ACTION_UP:setBackgroundDrawable(new ColorDrawable(0x00000000));choose = -1;//invalidate();if (mTextDialog != null) {mTextDialog.setVisibility(View.INVISIBLE);}break;default:setBackgroundColor(Color.parseColor("#808080"));if (oldChoose != c) {if (c >= 0 && c < b.length) {if (listener != null) {listener.onTouchingLetterChanged(b[c]);}if (mTextDialog != null) {mTextDialog.setText(b[c]);mTextDialog.setVisibility(View.VISIBLE);}choose = c;invalidate();}}break;}return true;}/*** 向外公开的方法** @param onTouchingLetterChangedListener*/public void setOnTouchingLetterChangedListener(OnTouchingLetterChangedListener onTouchingLetterChangedListener) {this.onTouchingLetterChangedListener = onTouchingLetterChangedListener;}/*** 接口** @author coder*/public interface OnTouchingLetterChangedListener {void onTouchingLetterChanged(String s);}}public class MainActivity extends AppCompatActivity {private String[] mData = {"阿魏八味丸", "阿昔洛韦眼膏", "艾司洛尔", "安吖啶注射液", "阿达帕林", "参茸追风酒", "草乌", "石斛夜光丸","骨质增生片", "乌鸡白凤丸", "人参益母丸", "补脾益肠丸", "丹参片", "小金丸", "妇宁康", "糖脉康", "菲伯瑞", "乙肝解毒片", "脑血栓片"};private static final String TAG = "lzy";private RecyclerView mRecyclerView;private SideBar sideBar;private StickyItemDecoration mDecoration;private PinyinComparator pinyinComparator;private MedicineAdapter medicineAdapter;@Overrideprotected void onCreate(Bundle savedInstanceState) {super.onCreate(savedInstanceState);setContentView(R.layout.activity_main);mRecyclerView = (RecyclerView) findViewById(R.id.rv);mRecyclerView.setLayoutManager(new LinearLayoutManager(this));//按照字母排序pinyinComparator = new PinyinComparator();List<MedicineBean> data = filledData(mData);Collections.sort(data, pinyinComparator);medicineAdapter = new MedicineAdapter(this, data);mRecyclerView.setAdapter(medicineAdapter);mDecoration = new StickyItemDecoration(medicineAdapter);mRecyclerView.addItemDecoration(mDecoration);//添加分割线mRecyclerView.addItemDecoration(new DividerItemDecoration(MainActivity.this, DividerItemDecoration.VERTICAL_LIST));sideBar = (SideBar) findViewById(R.id.sideBar);sideBar.setTextView((TextView) findViewById(R.id.dialog));//设置右侧触摸监听sideBar.setOnTouchingLetterChangedListener(new SideBar.OnTouchingLetterChangedListener() {@Overridepublic void onTouchingLetterChanged(String s) {//该字母首次出现的位置int position = medicineAdapter.getPositionForSection(s);if (position != -1) {mRecyclerView.scrollToPosition(position);}}});}/*** 填充数据** @param data* @return*/private List<MedicineBean> filledData(String[] data) {List<MedicineBean> mSortList = new ArrayList<MedicineBean>();for (int i = 0; i < data.length; i++) {MedicineBean medicineBean = new MedicineBean();medicineBean.setName(data[i]);//汉字转换成拼音String[] pinyin = PinyinHelper.toHanyuPinyinStringArray(data[i].toCharArray()[0]);String sortString = pinyin[0].substring(0, 1).toUpperCase();// 正则表达式,判断首字母是否是英文字母if (sortString.matches("[A-Z]")) {medicineBean.setLetter(sortString.toUpperCase());} else {medicineBean.setLetter("#");}mSortList.add(medicineBean);}return mSortList;}
}最后贴出源码的下载地址: http://download.csdn.net/detail/lylodyf/9695270
这篇关于ItemDecoration详解以及用ItemDecoration实现按字母排序列表的文章就介绍到这儿,希望我们推荐的文章对编程师们有所帮助!


