本文主要是介绍f1c200s---编译uboot,希望对大家解决编程问题提供一定的参考价值,需要的开发者们随着小编来一起学习吧!
目录
- 前言
- 安装必要工具
- 安装交叉编译链工具
- 下载Uboot
- 切换分支
- 查看配置文件
- 配置Uboot
- 修改Makefile
- 配置文件
- 编译uboot
- 出现/bin/sh: 1: python: not found错误
- 出现multiple definition of `yylloc'错误
- 出现FATAL ERROR: Unable to parse input tree错误
- 出现/usr/bin/env: 'python2': No such file or directory错误
- 出现ImportError: No module named _libfdt的错误
- 出现scripts/dtc/pylibfdt/libfdt_wrap.c:154:11: fatal error: Python.h: No such file or directory错误
- 烧录
- 快速搭建
- 修改后的Uboot
- 快速部署环境的Docker镜像
前言
本章所解决问题后的Uboot仓库、docker镜像可在文章末尾找到,如果不想一步步配置编译环境可到文章末尾下载docker镜像直接运行
安装必要工具
sudo apt update
sudo apt upgrade
sudo apt-get install git vim wget
sudo apt-get install xz-utils nano unzip build-essential bc swig libncurses5-dev libpython3-dev libssl-dev pkg-config zlib1g-dev libusb-dev libusb-1.0-0-dev python3-pip gawk bison flex
安装交叉编译链工具
下载交叉编译链:
wget http://releases.linaro.org/components/toolchain/binaries/7.2-2017.11/arm-linux-gnueabi/gcc-linaro-7.2.1-2017.11-x86_64_arm-linux-gnueabi.tar.xz
解压交叉编译链:
mkdir /usr/local/arm
tar -vxf gcc-linaro-7.2.1-2017.11-x86_64_arm-linux-gnueabi.tar.xz -C /usr/local/arm
配置环境变量:
vim ~/.bashrc
打开后在文件最后一行添加以下变量:
export PATH=$PATH:/usr/local/arm/gcc-linaro-7.2.1-2017.11-x86_64_arm-linux-gnueabi/bin
生效环境变量:
source ~/.bashrc
查询版本确保安装无误:
arm-linux-gnueabi-gcc -v

下载Uboot
由于官方Uboot并没有对f1c200s有支持,所以我们使用基于licheepi的Uboot进行编译和后续的开发工作
git clone https://github.com/Lichee-Pi/u-boot.git
cd u-boot
切换分支
git checkout nano-v2018.01

查看配置文件
进入configs目录查看配置文件,可以看到有两个配置文件,一个是带spiflash的一个是不带的,根据自己需求选择
cd configs && find -name "*lichee*" && cd ..

配置Uboot
修改Makefile
vim Makefile
输入/CROSS_COMPILE定位到修改的位置,如果用别的编辑器修改,大概在246行,修改为如下内容:
ARCH?=arm
CROSS_COMPILE?=arm-linux-gnueabi-
修改前:

修改后: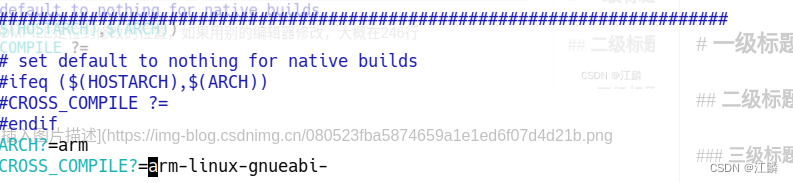
配置文件
make licheepi_nano_spiflash_defconfig
make menuconfig
需要在menuconfig里面配置成如图这样就可以,当然如果你是高手也可以自己配置
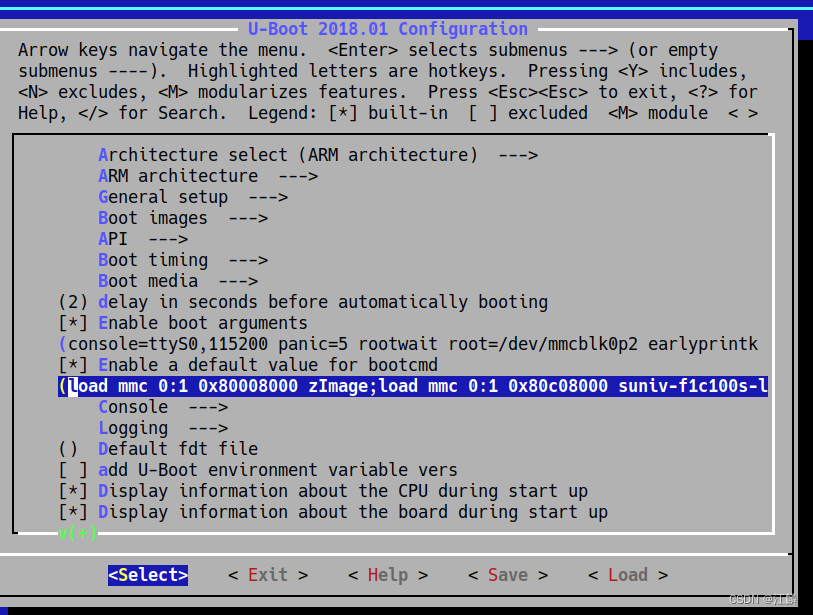
boot arguments参数:
console=ttyS0,115200 panic=5 rootwait root=/dev/mmcblk0p2 earlyprintk rw
boot cmd参数:
load mmc 0:1 0x80008000 zImage;load mmc 0:1 0x80c08000 suniv-f1c100s-licheepi-nano.dtb;bootz 0x80008000 - 0x80c08000;
保存并退出写入到.config中
编译uboot
make -j8
出现/bin/sh: 1: python: not found错误
具体出错细节如下:
/bin/sh: 1: python: not found
make[3]: *** [scripts/dtc/pylibfdt/Makefile:26: scripts/dtc/pylibfdt/_libfdt.so] Error 127HOSTCC  scripts/dtc/checks.o
make[2]: *** [scripts/Makefile.build:425: scripts/dtc/pylibfdt] Error 2
make[2]: *** Waiting for unfinished jobs....HOSTCC  scripts/dtc/util.oCHK     include/config.hCFG     u-boot.cfgCHK     include/generated/version_autogenerated.hCC      lib/asm-offsets.sCC      arch/arm/lib/asm-offsets.sCHK     include/generated/generic-asm-offsets.hCHK     include/generated/asm-offsets.h
make[1]: *** [scripts/Makefile.build:425: scripts/dtc] Error 2
make: *** [Makefile:493: scripts] Error 2
经过测试我们只有python3,没有python,并且找到了python3相对应的目录
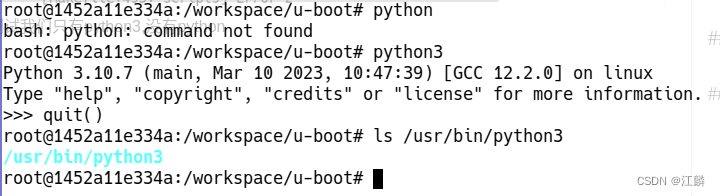
执行下列命令后进行python测试:
cp /usr/bin/python3 /usr/bin/python

重新编译:
make -j8
出现multiple definition of `yylloc’错误
错误具体详细如下:
/usr/bin/ld: scripts/dtc/dtc-parser.tab.o:(.bss+0x10): multiple definition of `yylloc'; scripts/dtc/dtc-lexer.lex.o:(.bss+0x0): first defined here
/workspace/u-boot/scripts/dtc/pylibfdt/setup.py:21: DeprecationWarning: The distutils package is deprecated and slated for removal in Python 3.12. Use setuptools or check PEP 632 for potential alternativesfrom distutils.core import setup, Extension
collect2: error: ld returned 1 exit status
make[2]: *** [scripts/Makefile.host:108: scripts/dtc/dtc] Error 1
make[2]: *** Waiting for unfinished jobs....
make[1]: *** [scripts/Makefile.build:425: scripts/dtc] Error 2
make: *** [Makefile:493: scripts] Error 2
make: *** Waiting for unfinished jobs....
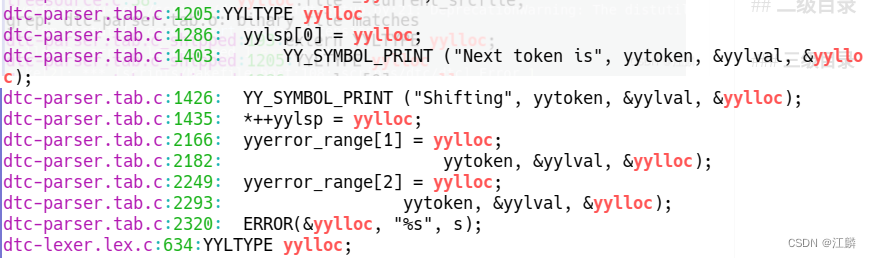
看起来是yylloc这个变量重复定义了,具体目录看起来应该是在scripts/dtc/文件夹下的dtc-lexer.lex.c下第一次定义了yylloc变量然后又在别的c文件定义了yylloc变量,输入以下命令进行查找
cd scripts/dtc/ && grep -nR yylloc
果然,在dtc-parser.tab.c的1205行和dtc-lexer.lex.c的634行出现了多重定义,由于编译器提示dtc-lexer.lex.c是第一次定义,所以我们去注释dtc-parser.tab.c的定义
注释dtc-parser.tab.c的定义后如下图:

重新编译:
make -j8
出现FATAL ERROR: Unable to parse input tree错误
具体错误详情如下:
DTC     arch/arm/dts/suniv-f1c100s-licheepi-nano.dtb
Error: arch/arm/dts/.suniv-f1c100s-licheepi-nano.dtb.pre.tmp:59.1-10 syntax error
FATAL ERROR: Unable to parse input tree
make[2]: *** [scripts/Makefile.lib:329: arch/arm/dts/suniv-f1c100s-licheepi-nano.dtb] Error 1
make[1]: *** [dts/Makefile:51: arch/arm/dts/suniv-f1c100s-licheepi-nano.dtb] Error 2
make: *** [Makefile:878: dts/dt.dtb] Error 2
看起来是设备树的问题,这里也是困扰我最久的地方
进入scrpit文件夹,修改Makefile.lib的第321行,多了个斜杠,紫色选中为多的那个斜杠
cd scripts
vim Makefile.lib

删除斜杠后:

重新编译:
make -j8
出现/usr/bin/env: ‘python2’: No such file or directory错误
具体出错信息:
BINMAN  u-boot-sunxi-with-spl.bin
/usr/bin/env: 'python2': No such file or directory
make: *** [Makefile:1150: u-boot-sunxi-with-spl.bin] Error 127
看起来没安装python2,安装一下
sudo apt-get install python2
重新编译
make -j8
出现ImportError: No module named _libfdt的错误
具体报错信息如下:
Traceback (most recent call last):File "./tools/binman/binman", line 32, in <module>import controlFile "/workspace/u-boot/tools/binman/control.py", line 16, in <module>import fdtFile "/workspace/u-boot/tools/binman/../dtoc/fdt.py", line 13, in <module>import libfdtFile "scripts/dtc/pylibfdt/libfdt.py", line 15, in <module>import _libfdt
ImportError: No module named _libfdt
看起来我们之前无脑的把python3拷贝为python的方法是错误的,他的脚本用python2写的,与python3兼容性并不好,一些库已经不再支持,我们切换回python2
cp /usr/bin/python2 /usr/bin/python
重新编译:
make -j8
出现scripts/dtc/pylibfdt/libfdt_wrap.c:154:11: fatal error: Python.h: No such file or directory错误
具体出错信息如下:
  CHK     include/generated/asm-offsets.h
scripts/dtc/pylibfdt/libfdt_wrap.c:154:11: fatal error: Python.h: No such file or directory154 | # include <Python.h>|           ^~~~~~~~~~
compilation terminated.
error: command 'x86_64-linux-gnu-gcc' failed with exit status 1
make[3]: *** [scripts/dtc/pylibfdt/Makefile:26: scripts/dtc/pylibfdt/_libfdt.so] Error 1
make[2]: *** [scripts/Makefile.build:425: scripts/dtc/pylibfdt] Error 2
make[1]: *** [scripts/Makefile.build:425: scripts/dtc] Error 2
make: *** [Makefile:493: scripts] Error 2
应该是python2的dev没有安装,安装试一下
sudo apt-get install python2-dev
重新编译:
make -j8
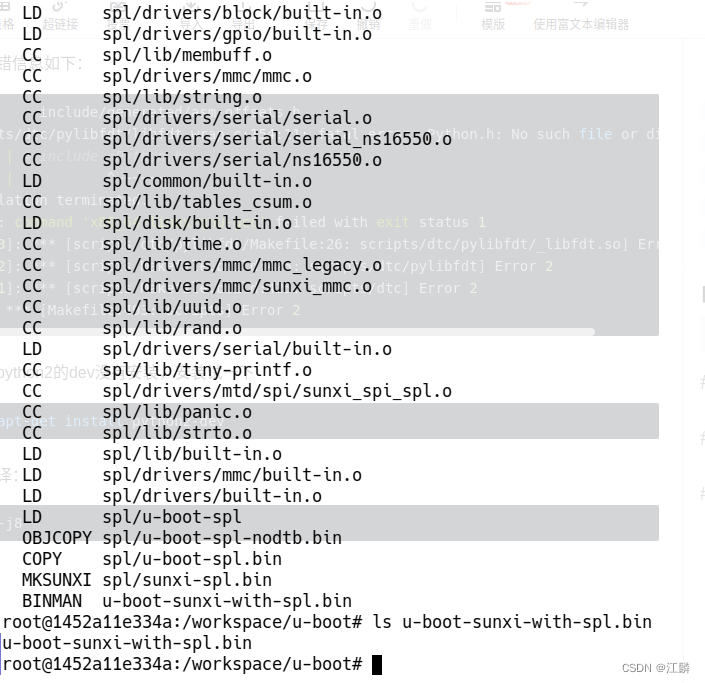
编译成功,出现u-boot-sunxi-with-spl.bin文件
烧录
在芯片进入fel模式后,通过sunxi-tools进行烧录(单次,仅验证)
具体安装与使用参考:传送门
sudo sunxi-fel uboot u-boot-sunxi-with-spl.bin
可以看到连接了芯片串口的设备有以下Uboot输出:

快速搭建
修改后的Uboot
Github: https://github.com/JiangLin998/licheepi-nano-u-boot
Gitee:https://gitee.com/jianglin998/licheepi-nano-u-boot
快速部署环境的Docker镜像
Docker镜像:https://github.com/JiangLin998/dockerImages
这篇关于f1c200s---编译uboot的文章就介绍到这儿,希望我们推荐的文章对编程师们有所帮助!


