本文主要是介绍别再写jsp了,Thymeleaf它不香吗?,希望对大家解决编程问题提供一定的参考价值,需要的开发者们随着小编来一起学习吧!

1. 啥是 Thymeleaf
在学 Thymeleaf 之前我们先看一下使用 jsp 开发遇到的主要问题:
jsp 的痛点
1.页面包含大量 java 代码,代码太混乱
<%@ page contentType="text/html;charset=UTF-8" language="java" %>
<html><head><title>jsp</title></head><body><%String name = (String)request.getAttribute("name");int age = (int)request.getAttribute("age");%><p>姓名: <%=name%></p><p>年龄: <%=age%></p></body>
</html>
2.jsp 技术已经是很多年前的老技术了,现在的主流框架都不推荐使用,基本被淘汰了。
模板引擎技术
虽然 jsp 基本被淘汰了,但是它的技术替代品如雨后春笋,层不出穷。
模板引擎技术就是其中的代表。
我们都知道传统的页⾯开发通常采⽤ HTML+ JS 技术,⽽现在⼤部分⽹站都采⽤标签化 + 模块化的设计。
模板引擎技术就是根据这种⽅式,使⽤户界⾯与业务数据分离⽽产⽣的。
它可以⽣成特定格式的⽂档,⽤于⽹站的模板引擎就会⽣成⼀个标准的 HTML ⽂档在原有的 HTML 页⾯中来填充数据,最终达到渲染页⾯的⽬的。
模板引擎技术说白了就是把数据和页⾯整合在⼀起的技术。
Thymeleaf 简介
Thymeleaf 是一种可以替代 jsp 的模板引擎技术。它有如下优点:
1.与 SpringBoot 完美整合:SpringBoot 提供了 Thymeleaf 的默认配置,我们可以像以前操作 jsp 一样来操作 Thymeleaf。
2.开箱即用:支持 JSTL 格式语法。
3.多方言支持:Thymeleaf 提供 spring 标准方言和一个与 SpringMVC 完美集成的可选模块,可以快速的实现表单绑定、国际化等功能。
2. 环境搭建
这里我们创建 springboot 项目。
1.引入依赖
<dependencies><!-- thymeleaf --><dependency><groupId>org.springframework.boot</groupId><artifactId>spring-boot-starter-thymeleaf</artifactId></dependency><!-- web --><dependency><groupId>org.springframework.boot</groupId><artifactId>spring-boot-starter-web</artifactId></dependency><!-- lombok --><dependency><groupId>org.projectlombok</groupId><artifactId>lombok</artifactId><optional>true</optional></dependency><!-- test --><dependency><groupId>org.springframework.boot</groupId><artifactId>spring-boot-starter-test</artifactId><scope>test</scope></dependency></dependencies>
2.Thymeleaf 配置
application.yml
server:port: 8081servlet:context-path: /thymeleaf-demospring:thymeleaf:# thymeleaf 配置cache: false # 禁用缓存,修改完实时展示数据prefix: classpath:/templates/ # 文件所在位置suffix: .html # 后缀web:resources:static-locations: classpath:/static/ # 静态资源
在 springboot 的配置文件中,我们配置了 thymeleaf 的默认前缀和后缀。
还配置了静态资源的访问路径。

3.html 文件引入 Thymeleaf 的命名空间
xmlns:th="http://www.thymeleaf.org"

html 文件必须引入 thymeleaf 的命名空间才能使用相关语法。
3. 常用语法
1.th:text
作用:如果变量有值,则替换标签里面的默认值,否则展示标签的默认值。
例如:
@GetMapping("hello")
public String hello(Model model) {model.addAttribute("msg", "黄沙百战穿金甲,不破楼兰终不还!");return "hello";
}
<!DOCTYPE html>
<html lang="en" xmlns:th="http://www.thymeleaf.org">
<head><meta charset="UTF-8"><title>msg</title>
</head>
<body>
<p>-------------诗句赏析-------------</p>
<p th:text="${msg}">人生得意须尽欢,莫使金樽空对月。</p>
</body>
</html>
测试:

2.th:href
作用:用来指向文件的 url。
例如:
<link rel="stylesheet" type="text/css" th:href="@{css/login.css}"/>

3.th:action
作用:用来配置 form 表单的请求路径
th:action="@{/login}"
例如:
<form th:action="@{/login}" method="post">姓名: <input type="text" name="username"/>密码: <input type="password" name="password"/><input type="submit" class="button" value="登录"/>
</form>
4.th:if
作用:条件判断,如果判断为真就显示数据或者执行相关操作。
例如:
<p th:if="${username!=null && username!=''}"> 欢迎你: <span th:text="${username}"></span></p>
5.th:src
作用:用来指向文件的 url。
例如:
<img th:src="@{images/title.jpg}" >
6.th:onclick
作用:绑定事件。
例如:
<a href="javascript:;" th:onclick="'deleteUser('+${user.id}+')'">删除</a>
4. 小案例
场景:用户登录成功之后,展示用户信息和用户列表。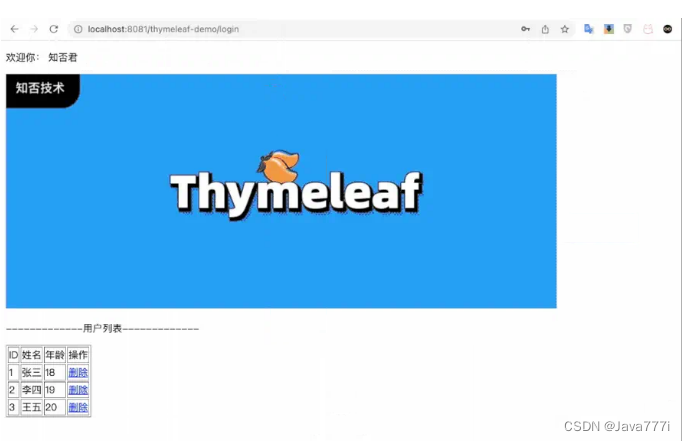
controller
/* 进入登录界面 */
@GetMapping("/toLogin")
public String toLogin() {return "login";
}@PostMapping("/login")
public String login(Model model, String username, String password) {// 用户名model.addAttribute("username", username);// 用户列表信息List<User> userList = Stream.of(new User(1, "张三", 18), new User(2, "李四", 19), new User(3, "王五", 20)).collect(Collectors.toList());model.addAttribute("userList", userList);return "index";
}
login.html
<!DOCTYPE html>
<html lang="en" xmlns:th="http://www.thymeleaf.org">
<head><meta charset="UTF-8"><link rel="stylesheet" type="text/css" th:href="@{css/login.css}"/><title>登录界面</title>
</head>
<body>
<p class="login_title">登录页面</p>
<form th:action="@{/login}" method="post">姓名: <input type="text" name="username"/>密码: <input type="password" name="password"/><input type="submit" class="button" value="登录"/>
</form>
</body>
</html>
index.html
<!DOCTYPE html>
<html lang="en" xmlns:th="http://www.thymeleaf.org">
<head><meta charset="UTF-8"><title>用户列表</title>
</head>
<body>
<p th:if="${username!=null && username!=''}"> 欢迎你: <span th:text="${username}"></span></p>
<img th:src="@{images/title.jpg}">
<p>-------------用户列表-------------</p>
<table class="table" border><tr><td> ID </td><td> 姓名 </td><td> 年龄 </td><td> 操作 </td></tr><tr th:each="user:${userList}"><td><span th:text="${user.id}"></span></td><td><span th:text="${user.name}"></span></td><td><span th:text="${user.age}"></span></td><td><a href="javascript:;" th:onclick="'deleteUser('+${user.id}+')'">删除</a></td></tr>
</table>
<script>function deleteUser(id) {console.log("id: " + id);}
</script>
</body>
</html>
这篇关于别再写jsp了,Thymeleaf它不香吗?的文章就介绍到这儿,希望我们推荐的文章对编程师们有所帮助!