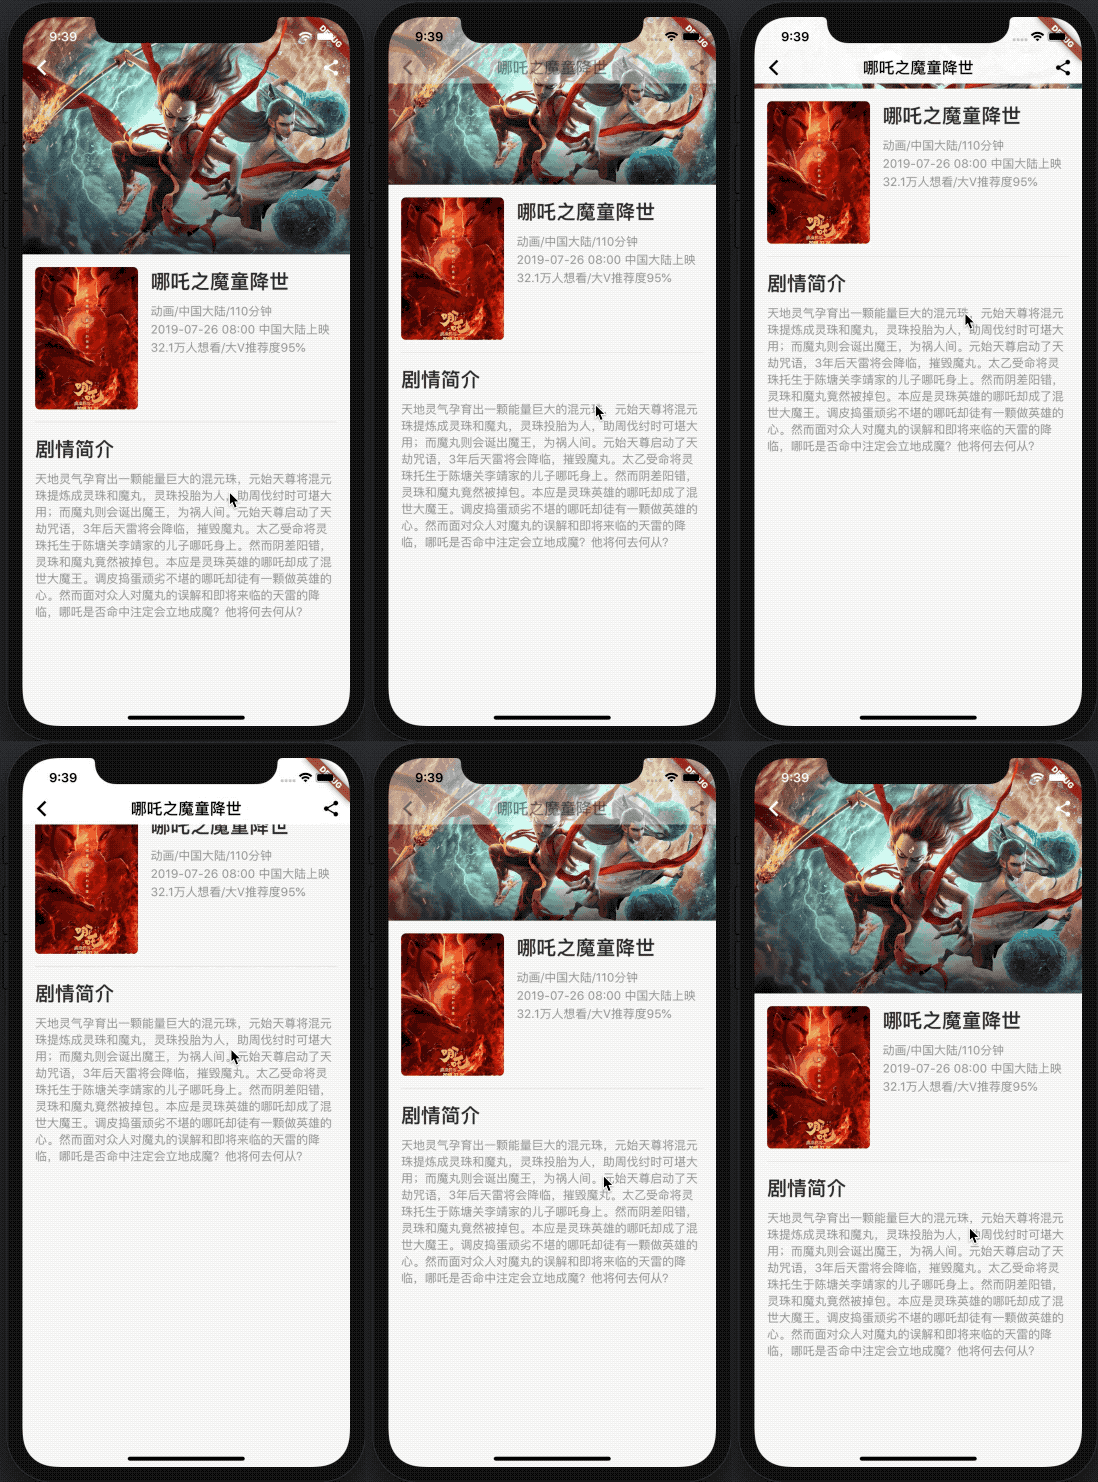
本文主要是介绍Flutter中有意思的滚动效果 - Sliver系列,希望对大家解决编程问题提供一定的参考价值,需要的开发者们随着小编来一起学习吧!
滚动效果:

出处原文链接:https://segmentfault.com/a/1190000019902201
由于原文代码对屏幕短的手机存在适配问题,本人进行修改,新代码如下:
import 'dart:ui';
import 'package:flutter/material.dart';
import 'package:flutter/services.dart';void main() {runApp(const MyApp());
}class MyApp extends StatelessWidget {const MyApp({super.key});@overrideWidget build(BuildContext context) {return const MaterialApp(title: 'Welcome to Flutter',home: MyHomePage(),);}
}class MyHomePage extends StatefulWidget {const MyHomePage({super.key});@overrideState<StatefulWidget> createState() => _MyHomePageState();
}class _MyHomePageState extends State<MyHomePage> {final double _headerCollapsedHeight = 40;final double _headerExpandedHeight = 300;@overrideWidget build(BuildContext context) {//final double height = MediaQuery.of(context).size.height;final MediaQueryData mqd = MediaQuery.of(context);return Scaffold(body: CustomScrollView(slivers: <Widget>[SliverPersistentHeader(pinned: true,delegate: _MySliverHeaderDelegate(title: '哪吒之魔童降世',collapsedHeight: _headerCollapsedHeight,expandedHeight: _headerExpandedHeight,paddingTop: mqd.padding.top,coverImgUrl:'https://img.zcool.cn/community/01c6615d3ae047a8012187f447cfef.jpg@1280w_1l_2o_100sh.jpg',coverImgName: null,),),SliverFillRemaining(hasScrollBody: false,child: FilmContent(minHeight:(mqd.size.height - mqd.padding.top - _headerCollapsedHeight),),),],),);}
}class _MySliverHeaderDelegate extends SliverPersistentHeaderDelegate {_MySliverHeaderDelegate({required this.collapsedHeight,required this.expandedHeight,required this.paddingTop,this.coverImgUrl,this.coverImgName,required this.title,});final double collapsedHeight;final double expandedHeight;final double paddingTop;final String? coverImgUrl;final String? coverImgName;final String title;String _statusBarMode = 'dark';@overridedouble get minExtent => collapsedHeight + paddingTop;@overridedouble get maxExtent => expandedHeight + paddingTop;@overridebool shouldRebuild(SliverPersistentHeaderDelegate oldDelegate) {return true;}void updateStatusBarBrightness(shrinkOffset) {if (shrinkOffset > 50 && _statusBarMode == 'dark') {_statusBarMode = 'light';SystemChrome.setSystemUIOverlayStyle(const SystemUiOverlayStyle(statusBarBrightness: Brightness.light,statusBarIconBrightness: Brightness.light,));} else if (shrinkOffset <= 50 && _statusBarMode == 'light') {_statusBarMode = 'dark';SystemChrome.setSystemUIOverlayStyle(const SystemUiOverlayStyle(statusBarBrightness: Brightness.dark,statusBarIconBrightness: Brightness.dark,));}}Color makeStickyHeaderBgColor(shrinkOffset) {final int alpha =(shrinkOffset / (maxExtent - minExtent) * 255).clamp(0, 255).toInt();return Color.fromARGB(alpha, 255, 255, 255);}Color makeStickyHeaderTextColor(shrinkOffset, isIcon) {if (shrinkOffset <= 50) {return isIcon ? Colors.white : Colors.transparent;} else {final int alpha =(shrinkOffset / (maxExtent - minExtent) * 255).clamp(0, 255).toInt();return Color.fromARGB(alpha, 0, 0, 0);}}@overrideWidget build(BuildContext context, double shrinkOffset, bool overlapsContent) {updateStatusBarBrightness(shrinkOffset);return SizedBox(height: maxExtent,width: MediaQuery.of(context).size.width,child: Stack(fit: StackFit.expand,children: <Widget>[coverImgUrl != null? Image.network(coverImgUrl!, fit: BoxFit.cover): coverImgName != null? Image.asset(coverImgName!, fit: BoxFit.cover): Container(color: Colors.orangeAccent,),Positioned(left: 0,top: maxExtent / 2,right: 0,bottom: 0,child: Container(decoration: const BoxDecoration(gradient: LinearGradient(begin: Alignment.topCenter,end: Alignment.bottomCenter,colors: [Color(0x00000000),Color(0x90000000),],),),),),Positioned(left: 0,right: 0,top: 0,child: Container(color: makeStickyHeaderBgColor(shrinkOffset),child: SafeArea(bottom: false,child: SizedBox(height: collapsedHeight,child: Row(mainAxisAlignment: MainAxisAlignment.spaceBetween,children: <Widget>[IconButton(icon: Icon(Icons.arrow_back_ios,color: makeStickyHeaderTextColor(shrinkOffset, true),),onPressed: () => Navigator.pop(context),),Text(title,style: TextStyle(fontSize: 20,fontWeight: FontWeight.w500,color: makeStickyHeaderTextColor(shrinkOffset, false),),),IconButton(icon: Icon(Icons.share,color: makeStickyHeaderTextColor(shrinkOffset, true),),onPressed: () {},),],),),),),),],),);}
}class FilmContent extends StatelessWidget {const FilmContent({super.key, required this.minHeight});final double minHeight;@overrideWidget build(BuildContext context) {return Container(constraints: BoxConstraints(minHeight: minHeight),padding: const EdgeInsets.all(16),child: Column(crossAxisAlignment: CrossAxisAlignment.start,children: <Widget>[Row(crossAxisAlignment: CrossAxisAlignment.start,children: <Widget>[Container(width: 130,height: 180,decoration: BoxDecoration(borderRadius: BorderRadius.circular(6),// color: Colors.orangeAccent,),clipBehavior: Clip.hardEdge,child: Image.network('https://img1.gamersky.com/image2019/07/20190725_ll_red_136_2/gamersky_07small_14_201972510258D0.jpg',width: 130,height: 180,fit: BoxFit.cover,),),const SizedBox(width: 10),Expanded(child: Column(crossAxisAlignment: CrossAxisAlignment.start,children: <Widget>[_buildText('哪吒之魔童降世',fontSize: 25,fontWeight: FontWeight.bold,),const SizedBox(height: 10),_buildText('动画/中国大陆/110分钟',color: const Color(0xFF999999),),const SizedBox(height: 8),_buildText('2019-07-26 08:00 中国大陆上映',color: const Color(0xFF999999),),const SizedBox(height: 8),_buildText('32.1万人想看/大V推荐度95%',color: const Color(0xFF999999),),],),),],),const Divider(height: 32),Column(crossAxisAlignment: CrossAxisAlignment.start,children: <Widget>[_buildText('剧情简介',fontSize: 25,fontWeight: FontWeight.bold,),const SizedBox(height: 10),_buildText('天地灵气孕育出一颗能量巨大的混元珠,元始天尊将混元珠提炼成灵珠和魔丸,灵珠投胎为人,助周伐纣时可堪大用;而魔丸则会诞出魔王,为祸人间。元始天尊启动了天劫咒语,3年后天雷将会降临,摧毁魔丸。太乙受命将灵珠托生于陈塘关李靖家的儿子哪吒身上。然而阴差阳错,灵珠和魔丸竟然被掉包。本应是灵珠英雄的哪吒却成了混世大魔王。调皮捣蛋顽劣不堪的哪吒却徒有一颗做英雄的心。然而面对众人对魔丸的误解和即将来临的天雷的降临,哪吒是否命中注定会立地成魔?他将何去何从?',color: const Color(0xFF999999),textAlign: TextAlign.justify,),],),],),);}_buildText(String data, {double fontSize = 15,FontWeight? fontWeight,Color? color = const Color(0xFF333333),TextAlign? textAlign,}) {return Text(data,style: TextStyle(fontSize: fontSize,fontWeight: fontWeight,color: color,height: 1,),textAlign: textAlign,overflow: TextOverflow.clip,);}
}
这篇关于Flutter中有意思的滚动效果 - Sliver系列的文章就介绍到这儿,希望我们推荐的文章对编程师们有所帮助!


