本文主要是介绍Laravel implements Google login,希望对大家解决编程问题提供一定的参考价值,需要的开发者们随着小编来一起学习吧!
先注册一个google账号,google旗下工具还是挺强大的。
声明:如果你是后端开发者,请参考:Socialite的使用,毕竟如果后端能完成的事情,就尽量别给前端小姐姐添麻烦呗,方便你我他,除非他是个男的,你随意。。。言归正传,强烈建议使用Socialite开发。下面是我按照官方手册走的弯路,功能单一。
1、先附上google登录的前端代码网站:google登录前端代码
Add Google Sign-In to Your Web App
Enable Google Sign-In with only a few lines of code:<html lang="en"><head><meta name="google-signin-scope" content="profile email"><meta name="google-signin-client_id" content="YOUR_CLIENT_ID.apps.googleusercontent.com"><script src="https://apis.google.com/js/platform.js" async defer></script></head><body><div class="g-signin2" data-onsuccess="onSignIn" data-theme="dark"></div><script>function onSignIn(googleUser) {// Useful data for your client-side scripts:var profile = googleUser.getBasicProfile();console.log("ID: " + profile.getId()); // Don't send this directly to your server!console.log('Full Name: ' + profile.getName());console.log('Given Name: ' + profile.getGivenName());console.log('Family Name: ' + profile.getFamilyName());console.log("Image URL: " + profile.getImageUrl());console.log("Email: " + profile.getEmail());// The ID token you need to pass to your backend:var id_token = googleUser.getAuthResponse().id_token;console.log("ID Token: " + id_token);}</script></body>
</html>
2、点击图上蓝色按钮一步步到最后创建自己的Client ID 和Client Secret,中间需要填写自己的应用名称 和 回调地址

3、创建完成之后将Client ID 和Client Secret保存起来并配置到.env文件中
#google登录
GOOGLE_CLIENT_ID = 864839441-9cmpeudr3iqelc68f33rf73ofm1is
GOOGLE_CLIENT_SECRET = snS0wihWjFTwEuigKcqdV
GOOGLE_REDIRECT = 'http://laravel55.com/api/callback/google'
4、配置项目代码
4.1、加载Google平台库
您必须在整合Google登录的网页上加入Google平台库。
<script src="https://apis.google.com/js/platform.js" async defer></script>4.2、指定应用的客户端ID
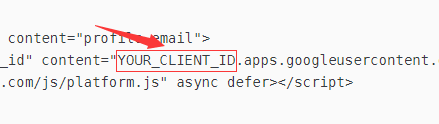
使用google-signin-client_id元素指定您在Google Developers Console中为应用创建的客户端ID 。即,将获取到的Client ID 添加到下面的代码里,并替换YOUR_CLIENT_ID
<meta name =“google- signin -client_id”content =“ YOUR_CLIENT_ID.apps.googleusercontent.com ”>4.3、添加Google登录按钮
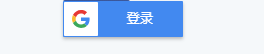
<div class="g-signin2" data-onsuccess="onSignIn"></div>5、将上述代码(第一步的代码)复制到login页面,就可以看见如下按钮
6、登录获取个人资料信息
使用默认范围登录Google用户后,您可以访问用户的Google ID,姓名,个人资料网址和电子邮件地址。
要检索用户的配置文件信息,请使用该getBasicProfile() 方法。
function onSignIn(googleUser) {var profile = googleUser.getBasicProfile();console.log('ID: ' + profile.getId()); // Do not send to your backend! Use an ID token instead.console.log('Name: ' + profile.getName());console.log('Image URL: ' + profile.getImageUrl());console.log('Email: ' + profile.getEmail()); // This is null if the 'email' scope is not present.
}注意:默认情况下,fetch_basic_profile参数 gapi.auth2.init()设置为 true,将自动添加'email profile openid'为范围。
重要提示:请勿使用返回的Google ID getId()或用户的个人资料信息将当前登录的用户与您的后端服务器进行通信。而是发送ID令牌,可以在服务器上安全地验证。
7、使用后端服务器进行身份验证
如果您使用与后端服务器通信的应用或站点进行Google登录,则可能需要识别服务器上当前登录的用户。为安全起见,在用户成功登录后,使用HTTPS将用户的ID令牌发送到您的服务器。然后,在服务器上,验证ID令牌的完整性,并使用令牌中包含的用户信息来建立会话或创建新帐户。
7.1、将ID令牌发送到您的服务器
用户成功登录后,获取用户的ID令牌:
function onSignIn(googleUser) {var id_token = googleUser.getAuthResponse().id_token;...
}
然后,使用HTTPS POST请求将ID令牌发送到您的服务器:
var xhr = new XMLHttpRequest();
xhr.open('POST', 'https://yourbackend.example.com/tokensignin');
xhr.setRequestHeader('Content-Type', 'application/x-www-form-urlencoded');
xhr.onload = function() {console.log('Signed in as: ' + xhr.responseText);
};
xhr.send('idtoken=' + id_token);7.2、验证ID令牌的完整性
通过HTTPS POST收到ID令牌后,您必须验证令牌的完整性。要验证令牌是否有效,请确保满足以下条件:
- ID令牌已由Google正确签名。使用Google的公钥(以 JWK或 PEM格式提供)来验证令牌的签名。这些键定期旋转; 检查
Cache-Control响应中的标头以确定何时应再次检索它们。 - 值
aud在ID令牌等于你的应用程序的客户端ID之一。此检查是必要的,以防止发布到恶意应用程序的ID令牌被用于访问应用程序后端服务器上相同用户的数据。 - 的值
iss在ID令牌是等于accounts.google.com或https://accounts.google.com。 expID令牌的到期时间()未通过。- 如果您只想限制对G Suite域成员的访问权限,请验证ID令牌是否具有
hd与您的G Suite域名匹配的声明。
我们强烈建议您为自己的平台或通用JWT库使用Google API客户端库,而不是编写自己的代码来执行这些验证步骤。对于开发和调试,您可以调用我们的tokeninfo 验证端点。
7.3、使用Google API客户端库 :PHP的验证官方手册
//PHP版本的验证
To validate an ID token in PHP, use the Google API Client Library for PHP. Install the library (for example, using Composer):composer require google/apiclient
Then, call the verifyIdToken() function. For example:
require_once 'vendor/autoload.php';// Get $id_token via HTTPS POST.$client = new Google_Client(['client_id' => $CLIENT_ID]);  // Specify the CLIENT_ID of the app that accesses the backend
$payload = $client->verifyIdToken($id_token);
if ($payload) {$userid = $payload['sub'];// If request specified a G Suite domain://$domain = $payload['hd'];
} else {// Invalid ID token
}该verifyIdToken功能验证JWT签名,aud索赔,exp索赔和iss索赔。
如果您只想限制对G Suite域成员的访问权限,请同时验证该hd声明是否与您的G Suite域名相符。
7.4、调用tokeninfo端点(包含JWT权限)
验证ID令牌以进行调试的简单方法是使用tokeninfo端点。调用此端点涉及额外的网络请求,该请求可为您执行大部分验证,但会引入一些延迟并可能导致网络错误。
要使用tokeninfo端点验证ID令牌,请对端点发出HTTPS POST或GET请求,并在id_token参数中传递ID令牌 。例如,要验证令牌“XYZ123”,请发出以下GET请求:
https://oauth2.googleapis.com/tokeninfo?id_token=XYZ123如果令牌已正确签名且iss且exp 声明具有预期值,您将获得HTTP 200响应,其中正文包含JSON格式的ID令牌声明。这是一个示例响应:
{// These six fields are included in all Google ID Tokens."iss": "https://accounts.google.com","sub": "110169484474386276334","azp": "1008719970978-hb24n2dstb40o45d4feuo2ukqmcc6381.apps.googleusercontent.com","aud": "1008719970978-hb24n2dstb40o45d4feuo2ukqmcc6381.apps.googleusercontent.com","iat": "1433978353","exp": "1433981953",// These seven fields are only included when the user has granted the "profile" and// "email" OAuth scopes to the application."email": "testuser@gmail.com","email_verified": "true","name" : "Test User","picture": "https://lh4.googleusercontent.com/-kYgzyAWpZzJ/ABCDEFGHI/AAAJKLMNOP/tIXL9Ir44LE/s99-c/photo.jpg","given_name": "Test","family_name": "User","locale": "en"
}7.5、创建一个帐户或会话
验证令牌后,请检查用户是否已在您的用户数据库中。如果是,请为用户建立经过身份验证的会话。如果用户尚未在您的用户数据库中,请从ID令牌有效内容中的信息创建新用户记录,并为该用户建立会话。当您在应用中检测到新创建的用户时,可以提示用户输入所需的任何其他配置文件信息。
8、退出用户
您可以通过添加注销按钮或指向您网站的链接,让用户退出您的应用,而无需退出Google。要创建注销链接,请将调用该GoogleAuth.signOut() 方法的函数附加到链接的onclick事件。
<a href="#" onclick="signOut();">Sign out</a>
<script>function signOut() {var auth2 = gapi.auth2.getAuthInstance();auth2.signOut().then(function () {console.log('User signed out.');});}
</script>
9、题外话
9.1、构建自定义Google登录按钮
要创建包含自定义设置的Google登录按钮,请在登录页面中添加一个包含登录按钮的元素,编写一个signin2.render()使用样式和范围设置调用的函数,并将https://apis.google.com/js/platform.js 脚本包含在查询字符串中onload=YOUR_RENDER_FUNCTION。
以下是指示自定义样式参数的Google登录按钮的示例:
![]()
以下HTML,JavaScript和CSS代码生成上面的按钮:
<html>
<head><meta name="google-signin-client_id" content="YOUR_CLIENT_ID.apps.googleusercontent.com">
</head>
<body><div id="my-signin2"></div><script>function onSuccess(googleUser) {console.log('Logged in as: ' + googleUser.getBasicProfile().getName());}function onFailure(error) {console.log(error);}function renderButton() {gapi.signin2.render('my-signin2', {'scope': 'profile email','width': 240,'height': 50,'longtitle': true,'theme': 'dark','onsuccess': onSuccess,'onfailure': onFailure});}</script><script src="https://apis.google.com/js/platform.js?onload=renderButton" async defer></script>
</body>
</html>您还可以通过data-为div具有该类的元素定义属性来指定自定义Google登录按钮的设置 g-signin2。例如:
<div class="g-signin2" data-width="300" data-height="200" data-longtitle="true">10、google可以在用户离线时代表用户使用Google服务、登录服务器原理(多余且稍微麻烦,暂不使用)

11、跨平台单点登录(重要)
当用户在网络浏览器或Android设备上使用其Google帐户登录时,可以使用相同的Google帐户在网络浏览器和Android设备之间无缝登录。此功能使用户可以更轻松地登录您的服务,从而获得多种设备的最佳体验。
当按钮加载到Web上时,它会立即检查用户是否已授权该应用程序。此检查称为“立即模式”,如果成功,Google服务器将返回访问令牌并将新的授权结果对象传递给回调。如果按钮无法进行立即模式授权,则用户必须单击登录按钮才能触发访问流程。
要启用跨平台单点登录:
- Android和Web应用必须在同一 Google API控制台项目中注册。
- 每个平台上请求的范围必须与其他平台的范围相匹配。
满足以下要求时,跨平台单点登录适用于用户:
- 用户已在浏览器或Android设备上登录Google。
- 用户之前已授权您的应用使用相同的范围。
此体验类似于用户第二次打开Android应用程序时的体验。如果用户先前已授权该应用,则用户仍会登录:用户每次打开应用时都不会点击登录按钮。
当用户无缝登录时,Google会显示一条提醒,告知他们是使用自己的Google帐户登录的。此提醒仅在每台设备上显示一次。
12、更新中。。。
这篇关于Laravel implements Google login的文章就介绍到这儿,希望我们推荐的文章对编程师们有所帮助!


