本文主要是介绍.NET Core微服务之基于Ocelot+IdentityServer实现统一验证与授权,希望对大家解决编程问题提供一定的参考价值,需要的开发者们随着小编来一起学习吧!
一、案例结构总览
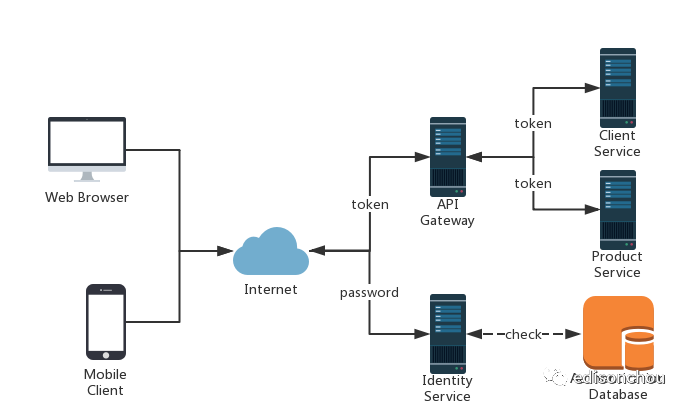
这里,假设我们有两个客户端(一个Web网站,一个移动App),他们要使用系统,需要先向IdentityService进行Login以进行验证并获取Token,在IdentityService的验证过程中会访问数据库以验证。然后再带上Token通过API网关去访问具体的API Service。这里我们的IdentityService基于IdentityServer4开发,它具有统一登录验证和授权的功能。当然,我们也可以将统一登录验证独立出来,写成一个单独的API Service,托管在API网关中,这里我不想太麻烦,便直接将其也写在了IdentityService中。
二、改写API Gateway
这里主要基于前两篇已经搭好的API Gateway进行改写,如不熟悉,可以先浏览前两篇文章:Part 1和Part 2。
2.1 配置文件的改动

...... "AuthenticationOptions": { "AuthenticationProviderKey": "ClientServiceKey", "AllowedScopes": []}...... "AuthenticationOptions": { "AuthenticationProviderKey": "ProductServiceKey", "AllowedScopes": []}......

上面分别为两个示例API Service增加Authentication的选项,为其设置ProviderKey。下面会对不同的路由规则设置的ProviderKey设置具体的验证方式。
2.2 改写StartUp类

public void ConfigureServices(IServiceCollection services){ // IdentityServer#region IdentityServerAuthenticationOptions => need to refactorAction<IdentityServerAuthenticationOptions> isaOptClient = option =>{option.Authority = Configuration["IdentityService:Uri"];option.ApiName = "clientservice";option.RequireHttpsMetadata = Convert.ToBoolean(Configuration["IdentityService:UseHttps"]);option.SupportedTokens = SupportedTokens.Both;option.ApiSecret = Configuration["IdentityService:ApiSecrets:clientservice"];};Action<IdentityServerAuthenticationOptions> isaOptProduct = option =>{option.Authority = Configuration["IdentityService:Uri"];option.ApiName = "productservice";option.RequireHttpsMetadata = Convert.ToBoolean(Configuration["IdentityService:UseHttps"]);option.SupportedTokens = SupportedTokens.Both;option.ApiSecret = Configuration["IdentityService:ApiSecrets:productservice"];}; #endregionservices.AddAuthentication().AddIdentityServerAuthentication("ClientServiceKey", isaOptClient).AddIdentityServerAuthentication("ProductServiceKey", isaOptProduct); // Ocelot services.AddOcelot(Configuration);...... }

这里的ApiName主要对应于IdentityService中的ApiResource中定义的ApiName。这里用到的配置文件定义如下:
 View Code
这里的定义方式,我暂时还没想好怎么重构,不过肯定是需要重构的,不然这样一个一个写比较繁琐,且不利于配置。
三、新增IdentityService
这里我们会基于之前基于IdentityServer的两篇文章,新增一个IdentityService,不熟悉的朋友可以先浏览一下Part 1和Part 2。
3.1 准备工作
新建一个ASP.NET Core Web API项目,绑定端口5100,NuGet安装IdentityServer4。配置好证书,并设置其为“较新则复制”,以便能够在生成目录中读取到。
3.2 定义一个InMemoryConfiguration用于测试

/// <summary>/// One In-Memory Configuration for IdentityServer => Just for Demo Use /// </summary>public class InMemoryConfiguration{ public static IConfiguration Configuration { get; set; } /// <summary>/// Define which APIs will use this IdentityServer /// </summary>/// <returns></returns>public static IEnumerable<ApiResource> GetApiResources(){ return new[]{ new ApiResource("clientservice", "CAS Client Service"), new ApiResource("productservice", "CAS Product Service"), new ApiResource("agentservice", "CAS Agent Service")};} /// <summary>/// Define which Apps will use thie IdentityServer /// </summary>/// <returns></returns>public static IEnumerable<Client> GetClients(){ return new[]{ new Client{ClientId = "cas.sg.web.nb",ClientName = "CAS NB System MPA Client",ClientSecrets = new [] { new Secret("websecret".Sha256()) },AllowedGrantTypes = GrantTypes.ResourceOwnerPassword,AllowedScopes = new [] { "clientservice", "productservice",IdentityServerConstants.StandardScopes.OpenId,IdentityServerConstants.StandardScopes.Profile }}, new Client{ClientId = "cas.sg.mobile.nb",ClientName = "CAS NB System Mobile App Client",ClientSecrets = new [] { new Secret("mobilesecret".Sha256()) },AllowedGrantTypes = GrantTypes.ResourceOwnerPassword,AllowedScopes = new [] { "productservice",IdentityServerConstants.StandardScopes.OpenId,IdentityServerConstants.StandardScopes.Profile }}, new Client{ClientId = "cas.sg.spa.nb",ClientName = "CAS NB System SPA Client",ClientSecrets = new [] { new Secret("spasecret".Sha256()) },AllowedGrantTypes = GrantTypes.ResourceOwnerPassword,AllowedScopes = new [] { "agentservice", "clientservice", "productservice",IdentityServerConstants.StandardScopes.OpenId,IdentityServerConstants.StandardScopes.Profile }}, new Client{ClientId = "cas.sg.mvc.nb.implicit",ClientName = "CAS NB System MVC App Client",AllowedGrantTypes = GrantTypes.Implicit,RedirectUris = { Configuration["Clients:MvcClient:RedirectUri"] },PostLogoutRedirectUris = { Configuration["Clients:MvcClient:PostLogoutRedirectUri"] },AllowedScopes = new [] {IdentityServerConstants.StandardScopes.OpenId,IdentityServerConstants.StandardScopes.Profile, "agentservice", "clientservice", "productservice"}, //AccessTokenLifetime = 3600, // one hourAllowAccessTokensViaBrowser = true // can return access_token to this client }};} /// <summary>/// Define which IdentityResources will use this IdentityServer /// </summary>/// <returns></returns>public static IEnumerable<IdentityResource> GetIdentityResources(){ return new List<IdentityResource>{ new IdentityResources.OpenId(), new IdentityResources.Profile(),};}}

这里使用了上一篇的内容,不再解释。实际环境中,则应该考虑从NoSQL或数据库中读取。
3.3 定义一个ResourceOwnerPasswordValidator
在IdentityServer中,要实现自定义的验证用户名和密码,需要实现一个接口:IResourceOwnerPasswordValidator

public class ResourceOwnerPasswordValidator : IResourceOwnerPasswordValidator{ private ILoginUserService loginUserService; public ResourceOwnerPasswordValidator(ILoginUserService _loginUserService){ this.loginUserService = _loginUserService;} public Task ValidateAsync(ResourceOwnerPasswordValidationContext context){LoginUser loginUser = null; bool isAuthenticated = loginUserService.Authenticate(context.UserName, context.Password, out loginUser); if (!isAuthenticated){context.Result = new GrantValidationResult(TokenRequestErrors.InvalidGrant, "Invalid client credential");} else{context.Result = new GrantValidationResult(subject : context.UserName,authenticationMethod : "custom",claims : new Claim[] { new Claim("Name", context.UserName), new Claim("Id", loginUser.Id.ToString()), new Claim("RealName", loginUser.RealName), new Claim("Email", loginUser.Email)});} return Task.CompletedTask;}}

这里的ValidateAsync方法中(你也可以把它写成异步的方式,这里使用的是同步的方式),会调用EF去访问数据库进行验证,数据库的定义如下(密码应该做加密,这里只做demo,没用弄):

至于EF部分,则是一个典型的简单的Service调用Repository的逻辑,下面只贴Repository部分:
 View Code
其他具体逻辑请参考示例代码。
3.4 改写StarUp类

public void ConfigureServices(IServiceCollection services){ // IoC - DbContextservices.AddDbContextPool<IdentityDbContext>(options => options.UseSqlServer(Configuration["DB:Dev"])); // IoC - Service & Repositoryservices.AddScoped<ILoginUserService, LoginUserService>();services.AddScoped<ILoginUserRepository, LoginUserRepository>(); // IdentityServer4string basePath = PlatformServices.Default.Application.ApplicationBasePath;InMemoryConfiguration.Configuration = this.Configuration;services.AddIdentityServer().AddSigningCredential(new X509Certificate2(Path.Combine(basePath,Configuration["Certificates:CerPath"]),Configuration["Certificates:Password"])) //.AddTestUsers(InMemoryConfiguration.GetTestUsers().ToList()) .AddInMemoryIdentityResources(InMemoryConfiguration.GetIdentityResources()).AddInMemoryApiResources(InMemoryConfiguration.GetApiResources()).AddInMemoryClients(InMemoryConfiguration.GetClients()) .AddResourceOwnerValidator<ResourceOwnerPasswordValidator>().AddProfileService<ProfileService>();......}

这里高亮的是新增的部分,为了实现自定义验证。关于ProfileService的定义如下:
 View Code
3.5 新增统一Login入口
这里新增一个LoginController:

[Produces("application/json")][Route("api/Login")] public class LoginController : Controller{ private IConfiguration configuration; public LoginController(IConfiguration _configuration){configuration = _configuration;}[HttpPost] public async Task<ActionResult> RequestToken([FromBody]LoginRequestParam model){Dictionary<string, string> dict = new Dictionary<string, string>();dict["client_id"] = model.ClientId;dict["client_secret"] = configuration[$"IdentityClients:{model.ClientId}:ClientSecret"];dict["grant_type"] = configuration[$"IdentityClients:{model.ClientId}:GrantType"];dict["username"] = model.UserName;dict["password"] = model.Password; using (HttpClient http = new HttpClient()) using (var content = new FormUrlEncodedContent(dict)){ var msg = await http.PostAsync(configuration["IdentityService:TokenUri"], content); if (!msg.IsSuccessStatusCode){ return StatusCode(Convert.ToInt32(msg.StatusCode));} string result = await msg.Content.ReadAsStringAsync(); return Content(result, "application/json");}}}

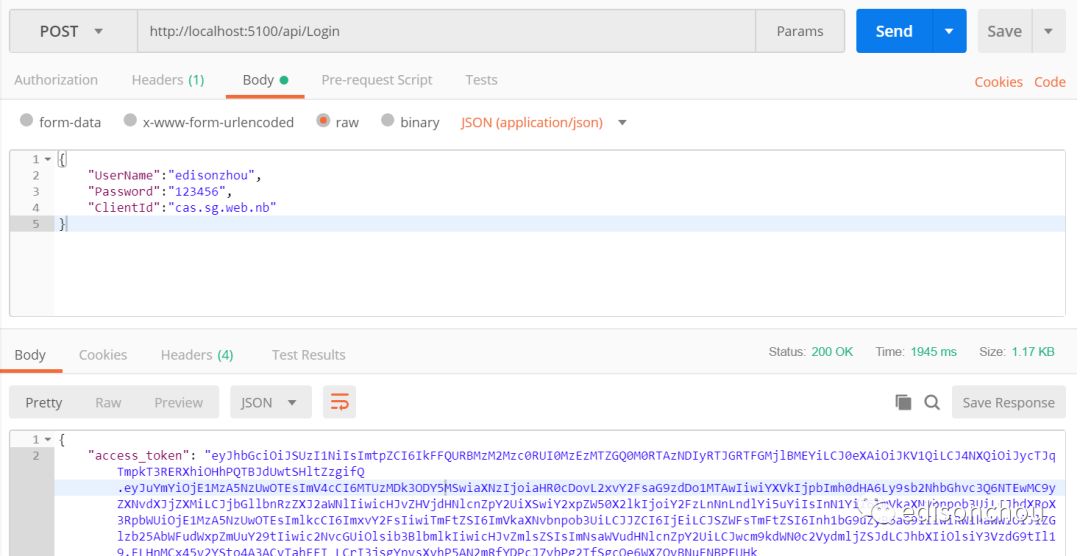
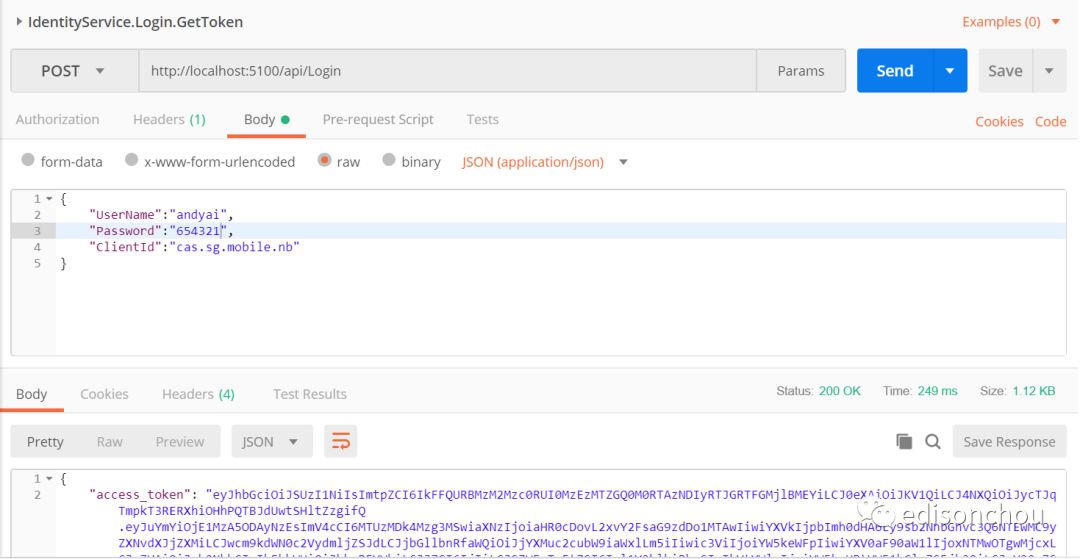
这里假设客户端会传递用户名,密码以及客户端ID(ClientId,比如上面InMemoryConfiguration中的cas.sg.web.nb或cas.sg.mobile.nb)。然后构造参数再调用connect/token接口进行身份验证和获取token。这里将client_secret等机密信息封装到了服务器端,无须客户端传递(对于机密信息一般也不会让客户端知道):

"IdentityClients": { "cas.sg.web.nb": { "ClientSecret": "websecret", "GrantType": "password"}, "cas.sg.mobile.nb": { "ClientSecret": "mobilesecret", "GrantType": "password"}}

四、改写业务API Service
4.1 ClientService
(1)安装IdentityServer4.AccessTokenValidation
NuGet>Install-Package IdentityServer4.AccessTokenValidation
(2)改写StartUp类

public IServiceProvider ConfigureServices(IServiceCollection services){...... // IdentityServerservices.AddAuthentication(Configuration["IdentityService:DefaultScheme"]).AddIdentityServerAuthentication(options =>{options.Authority = Configuration["IdentityService:Uri"];options.RequireHttpsMetadata = Convert.ToBoolean(Configuration["IdentityService:UseHttps"]);});......}

这里配置文件的定义如下:

"IdentityService": { "Uri": "http://localhost:5100", "DefaultScheme": "Bearer", "UseHttps": false, "ApiSecret": "clientsecret"}

4.2 ProductService
与ClientService一致,请参考示例代码。
五、测试
5.1 测试Client: cas.sg.web.nb
(1)统一验证&获取token
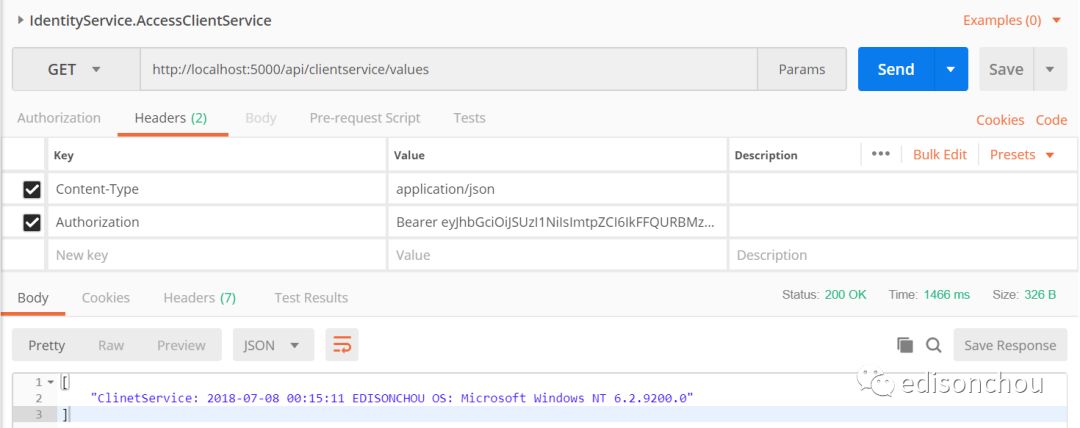
(2)访问clientservice (by API网关)
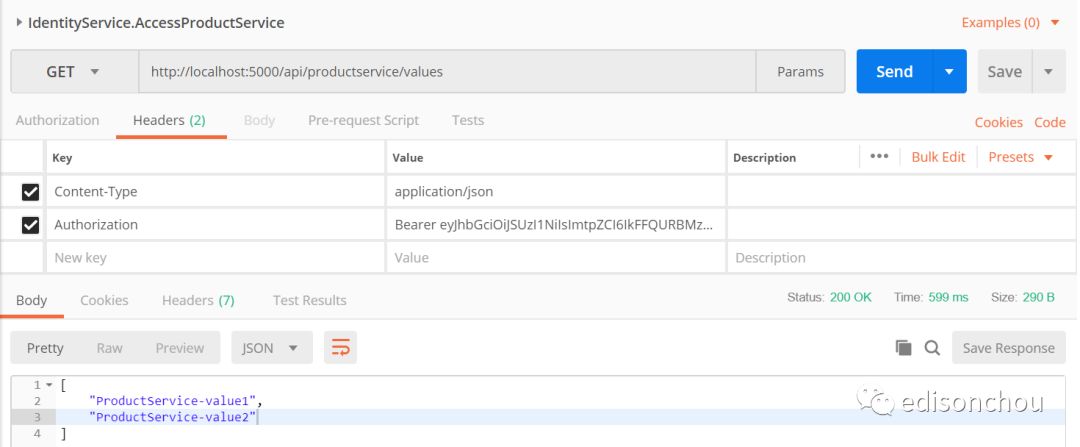
(3)访问productservice(by API网关)
5.2 测试Client: cas.sg.mobile.nb
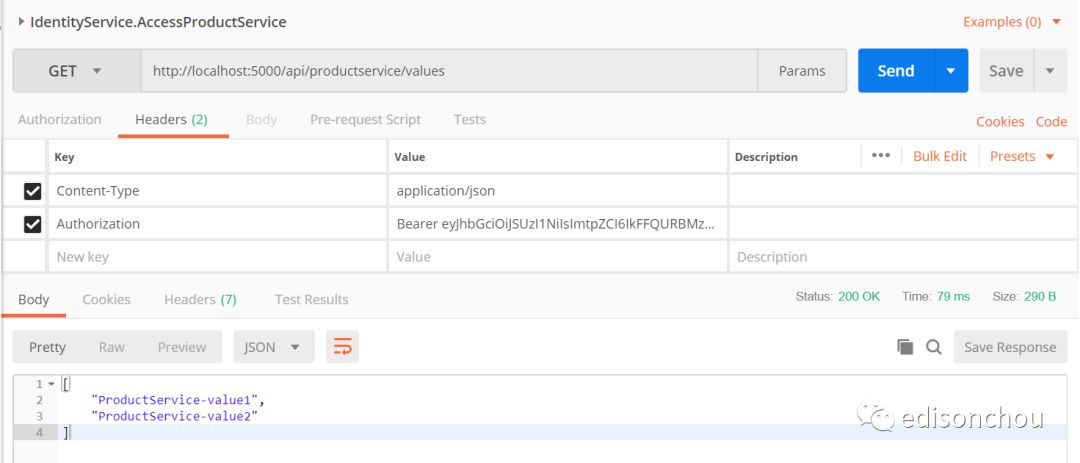
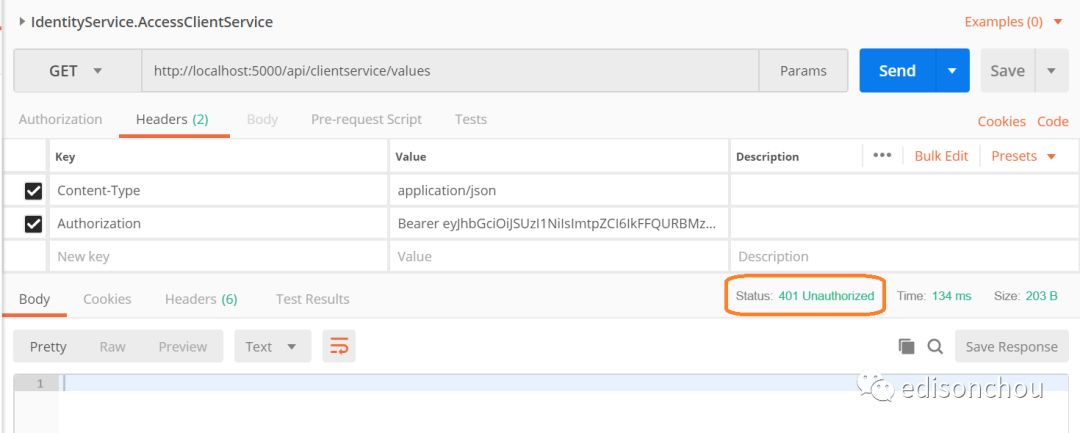
由于在IdentityService中我们定义了一个mobile的客户端,但是其访问权限只有productservice,所以我们来测试一下:
(1)统一验证&获取token
(2)访问ProductService(by API网关)
(3)访问ClientService(by API网关) => 401 Unauthorized
六、小结
本篇主要基于前面Ocelot和IdentityServer的文章的基础之上,将Ocelot和IdentityServer进行结合,通过建立IdentityService进行统一的身份验证和授权,最后演示了一个案例以说明如何实现。不过,本篇实现的Demo还存在诸多不足,比如需要重构的代码较多如网关中各个Api的验证选项的注册,没有对各个请求做用户角色和权限的验证等等,相信随着研究和深入的深入,这些都可以逐步解决。后续会探索一下数据一致性的基本知识以及框架使用,到时再做一些分享。
示例代码
Click Here => 点我进入GitHub
参考资料
杨中科,《.NET Core微服务介绍课程》
这篇关于.NET Core微服务之基于Ocelot+IdentityServer实现统一验证与授权的文章就介绍到这儿,希望我们推荐的文章对编程师们有所帮助!


