本文主要是介绍Postgresql在linux环境下以源码方式安装,希望对大家解决编程问题提供一定的参考价值,需要的开发者们随着小编来一起学习吧!
linux环境下源码方式的安装
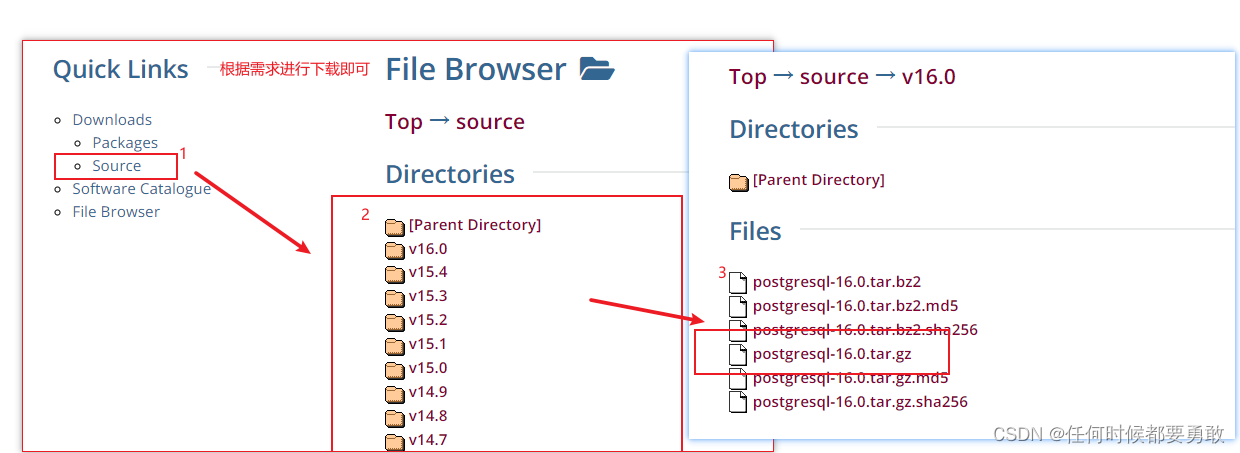
1.下载安装包(源码安装方式)
安装包下载
https://www.postgresql.org/ftp/source/

2.安装postgresql
① 创建安装目录
mkdir /opt/pgsql12
② 解压下载的安装包
cd /opt/pgsql12
tar -zxvf postgresql-12.16.tar.gz
③编译安装
#指定源码的位置./configure --prefix=/opt/pgsql12/postgresql-12.16./configure --help查看可定制的参数,其中打印的结果中–with类的都是打开一些功能,此外还有–without,–disable等,具体参考官网;
–prefix=prefix:安装到prefix指向的目录;默认为/usr/local/pgsql
或者./configure --without-readline 按照默认的
–bindir=dir:安装应用程序到dir;默认为prefix/bin
–with-docdir=dir:安装文档到dir;默认为prefix/doc
–with-pgport=port:设置默认的服务器端网络连接服务TCP端口号
–with-tcl:为服务端提供Tcl存储过程支持
–with-perl:为服务端提供Perl存储过程支持
–with-python:为服务端提供Python存储过程支持
④ 创建用户、组、数据目录
创建新用户,PostgreSQL不允许使用root用户运行服务,需要创建新用户用于管理PostgreSQL服务
# 创建组
groupadd postgres
# 创建用户
useradd -g postgres postgres
# 创建数据目录
mkdir –p /opt/pgsql12/postgresql-12.16/data
# 修改目录归属
chown postgres:postgres /opt/pgsql12/postgresql-12.16/data
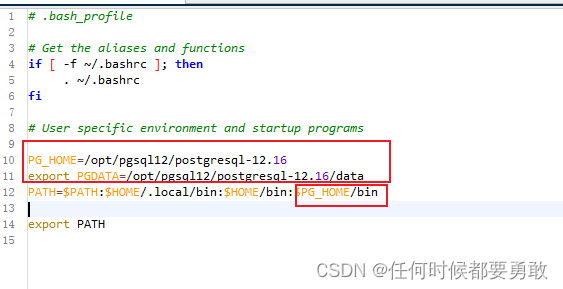
⑤配置环境变量
环境变量的配置方式可参考
root用户执行以下操作
编辑修改.bash_profile文件
#/home/postgres是你刚才创建的用户
vim /home/postgres/.bash_profile
在原有内容添加

 PG_HOME=/opt/pgsql12/postgresql-12.16#注意 PGDATA是固定名称
export PGDATA=/opt/pgsql12/postgresql-12.16/data
使修改的.bash_profile文件立即生效
source /home/postgres/.bash_profile
#切换到postgres用户
su - postgres
#检测postgresql版本
psql --version
输出版本号则证明环境变量配置正确
⑥初始化数据库
# 切换至postgres用户su - postgres
# 使用initdb命令初始化数据库initdb -A md5 -D $PG_DATA -E utf8 --locale=C -W
-A 是加密方式
-D 是数据目录
-E 是字符集 (默认即utf8)
执行之后会提示输入密码。(设置你的数据库的密码)
⑦ 启停数据库
可以使用初始化打印的结果来启动

pg_ctl -D /opt/pgsql12/postgresql-12.16/data -l logfile start如果配了环境变量(⑤中的环境变量)也可以直接pg_ctl start来启动,因为pgdata能识别到;
重启:pg_ctl restart
关闭:pg_ctl stop
通过pg_ctl --help可以查看完整的选项,
其中关闭和重启选项中的shutdown modes包括smart、fast、immediate;
smart是最安全的关闭方法,等待所有客户端连接关闭之后才关闭;
fast是用的生产中最多的,自动杀掉连接,回滚未完成事务;
immediate相当于kill -9;
pg_ctl -D /opt/pgsql12/postgresql-12.16/data stop -ms
pg_ctl -D /opt/pgsql12/postgresql-12.16/data  stop -mf
pg_ctl -D /opt/pgsql12/postgresql-12.16/data   stop -mi
此外启动数据库还可以通过脚本启动,需要切换回root用户执行
/opt/pgsql12/postgresql-12.16/contrib/start-scripts/linux
使用此脚本需要修改脚本中prefix、PGDATA等内容。
3.利用chkconfig设置PostgreSQL为服务自启动(没啥必要)
①拷贝启动脚本
PostgreSQL的开机自启动脚本位于/opt/pgsql12/postgresql-12.16/contrib/start-scripts/linux
是postgresql在linux系统上的启动脚本。
# 复制到系统的/etc/init.d/目录下的postgresql文件上
cp /opt/pgsql12/postgresql-12.16/contrib/start-scripts/linux  /etc/init.d/postgresql
②修改/etc/init.d/postgresql文件的两个变量prefix、PGDATA
# Installation prefix
prefix=/opt/pgsql12/postgresql-12.16# Data directory
PGDATA="/opt/pgsql12/postgresql-12.16/data"
③要将 postgresql服务设置为开机自启动
chkconfig --add postgresql
4.配置远程访问
①开放端口号或者关闭linux的防火墙也可以(不推荐)
# 开放5432端口
firewall-cmd --zone=public --add-port=5432/tcp --permanent
# 配置立即生效
firewall-cmd --reload
②修改ip绑定
vim /opt/pgsql12/postgresql-12.16/data/postgresql.conf
将监听地址由localhost改为*
listen_addresses = '*'
在esc命令模式下通过/listen_addresses找到 将注释打开修改为*
*代表监听任意ip可以修改为实际网络的地址
③允许所有ip访问
vim /opt/pgsql12/postgresql-12.16/data/pg_hba.conf
大概86行下面添加如下内容
host all all 0.0.0.0/0 md5

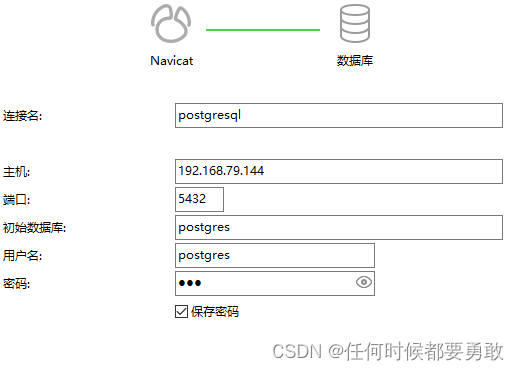
④在windows环境下测试连接

telnet ip 端口号 可查看某端口是否开放
这篇关于Postgresql在linux环境下以源码方式安装的文章就介绍到这儿,希望我们推荐的文章对编程师们有所帮助!


