本文主要是介绍Proxysql读写分离,希望对大家解决编程问题提供一定的参考价值,需要的开发者们随着小编来一起学习吧!
Proxysql读写分离
主从配置
# /etc/my.cnf
主节点
[mysqld]
log-bin=mysql-bin
server-id=1从节点
[mysqld]
server-id=2
read_only=1
#初始化以及创建主从复制用户
mysql> alter user 'root'@'localhost' identified  with mysql_native_password by 'Jianren@123';
Query OK, 0 rows affected (0.00 sec)mysql> grant all privileges on *.* to 'root'@'localhost';
Query OK, 0 rows affected (0.00 sec)mysql> create user 'slave'@'%' identified with mysql_native_password by 'Jianren@123';
Query OK, 0 rows affected (0.00 sec)mysql> grant replication  slave  on *.* to 'slave'@'%';
Query OK, 0 rows affected (0.00 sec)mysql> flush privileges;
Query OK, 0 rows affected (0.01 sec)
主从复制部署文档参考
#创建proxysql用户及监控用户
mysql> create user 'proxy'@'%' identified with mysql_native_password by 'Jianren@123';
Query OK, 0 rows affected (0.01 sec)mysql> grant all on  *.* to proxy;
Query OK, 0 rows affected (0.00 sec)mysql> create user 'monitor'@'%' identified with mysql_native_password by 'Jianren@123' ;
Query OK, 0 rows affected (0.00 sec)mysql> grant all on *.* to monitor ;
Query OK, 0 rows affected (0.00 sec)
安装proxysql
# 配置源
cat <<EOF | tee /etc/yum.repos.d/proxysql.repo
[proxysql_repo]
name= ProxySQL
baseurl=http://repo.proxysql.com/ProxySQL/proxysql-2.5.x/centos/\$releasever
gpgcheck=0
gpgkey=http://repo.proxysql.com/ProxySQL/repo_pub_key
EOF# 安装
yum -y install proxysql# 安装mysql客户端proxysql使用
wget https://dev.mysql.com/get/mysql80-community-release-el7-11.noarch.rpm
rpm -ivh mysql80-community-release-el7-11.noarch.rpm
yum -y install mysql-community-client# 启动proxysql
systemctl enable --now proxysql
加入节点
# 登录管理
mysql -uadmin -padmin -P6032 -h127.0.0.1 --prompt='Admin>'# 加入主节点,可以称为写节点
Admin> INSERT INTO mysql_servers(hostgroup_id,hostname,port,weight,comment) VALUES (1,'10.10.10.10',3306,1,'主');# 加入从节点,可以称为读节点
Admin> INSERT INTO mysql_servers(hostgroup_id,hostname,port,weight,comment) VALUES (2,'10.10.10.11',3306,1,'备');Admin> SELECT hostgroup_id, hostname, port,weight,comment,status FROM mysql_servers;
+--------------+-------------+------+--------+---------+--------+
| hostgroup_id | hostname    | port | weight | comment | status |
+--------------+-------------+------+--------+---------+--------+
| 1            | 10.10.10.10 | 3306 | 1      | 主      | ONLINE |
| 2            | 10.10.10.11 | 3306 | 1      | 备      | ONLINE |
+--------------+-------------+------+--------+---------+--------+
2 rows in set (0.00 sec)注: hostgroup_id区分读写组、hostname为节点IP、portMySQL端口、weight默认1、comment备注区分作用
# 查询监控配置
Admin> select * from global_variables where variable_name like "mysql-monitor%";# 配置监控用户名
Admin> UPDATE global_variables SET variable_value='monitor' WHERE variable_name='mysql-monitor_username';
Query OK, 1 row affected (0.00 sec)# 配置密码
Admin> UPDATE global_variables SET variable_value='Jianren@123' WHERE variable_name='mysql-monitor_password';
Query OK, 1 row affected (0.00 sec)# 查询监控配置
Admin> select * from global_variables where variable_name like "mysql-monitor%";#载入使用当前配置
Admin> LOAD MYSQL VARIABLES TO RUNTIME;
Query OK, 0 rows affected (0.00 sec)# 持久化到磁盘,重启配置依然还在
Admin> SAVE MYSQL VARIABLES TO DISK;
Query OK, 158 rows affected (0.01 sec)Admin> LOAD MYSQL SERVERS TO RUNTIME;
Query OK, 0 rows affected (0.00 sec)Admin> SAVE MYSQL SERVERS TO DISK;
Query OK, 0 rows affected (0.01 sec)# 监视和分析 ProxySQL 中 MySQL 服务器的性能和可用性
Admin> SELECT * FROM monitor.mysql_server_ping_log ORDER BY time_start_us DESC LIMIT 4;
+-------------+------+------------------+----------------------+------------+
| hostname    | port | time_start_us    | ping_success_time_us | ping_error |
+-------------+------+------------------+----------------------+------------+
| 10.10.10.10 | 3306 | 1698902922196895 | 427                  | NULL       |
| 10.10.10.11 | 3306 | 1698902922196793 | 508                  | NULL       |
| 10.10.10.10 | 3306 | 1698902912195542 | 324                  | NULL       |
| 10.10.10.11 | 3306 | 1698902912195448 | 398                  | NULL       |
+-------------+------+------------------+----------------------+------------+
注: error表中 null为正常 有error为异常# 监视和分析 ProxySQL 与 MySQL 服务器之间的连接事件和活动
Admin> SELECT * FROM monitor.mysql_server_connect_log ORDER BY time_start_us DESC LIMIT 4;
+-------------+------+------------------+-------------------------+---------------+
| hostname    | port | time_start_us    | connect_success_time_us | connect_error |
+-------------+------+------------------+-------------------------+---------------+
| 10.10.10.11 | 3306 | 1698902932300587 | 1438                    | NULL          |
| 10.10.10.10 | 3306 | 1698902931312451 | 1337                    | NULL          |
| 10.10.10.10 | 3306 | 1698902872353367 | 1380                    | NULL          |
| 10.10.10.11 | 3306 | 1698902871311131 | 2046                    | NULL          |
+-------------+------+------------------+-------------------------+---------------+
# 将一个新的用户记录插入到 mysql_users 表中 用于创建数据库用户 并连接到数据库服务器。
Admin> INSERT INTO mysql_users(username,password,default_hostgroup) VALUES ('proxy','Jianren@123',1);
Query OK, 1 row affected (0.00 sec)Admin> INSERT INTO mysql_users(username,password,default_hostgroup) VALUES ('monitor','Jianren@123',2);
Query OK, 1 row affected (0.01 sec)Admin> LOAD MYSQL USERS TO RUNTIME;
Query OK, 0 rows affected (0.00 sec)Admin> SAVE MYSQL USERS TO DISK;
Query OK, 0 rows affected (0.01 sec)# 查询用户
Admin> select username, password, active, default_hostgroup from mysql_users;
+----------+-------------+--------+-------------------+
| username | password    | active | default_hostgroup |
+----------+-------------+--------+-------------------+
| proxy    | Jianren@123 | 1      | 1                 |
| monitor  | Jianren@123 | 1      | 2                 |
+----------+-------------+--------+-------------------+
2 rows in set (0.00 sec)Admin> select * from mysql_users \G
*************************** 1. row ***************************username: proxypassword: Jianren@123active: 1use_ssl: 0default_hostgroup: 1default_schema: NULLschema_locked: 0
transaction_persistent: 1fast_forward: 0backend: 1frontend: 1max_connections: 10000attributes: comment:
*************************** 2. row ***************************username: monitorpassword: Jianren@123active: 1use_ssl: 0default_hostgroup: 2default_schema: NULLschema_locked: 0
transaction_persistent: 1fast_forward: 0backend: 1frontend: 1max_connections: 10000attributes: comment:
2 rows in set (0.00 sec)
创建规则
# 创建规则写入,更新操作使用主节点
Admin> insert into mysql_query_rules(rule_id,active,match_digest,destination_hostgroup,apply) values(1,1,'^select.*from update$',1,1);
Query OK, 1 row affected (0.00 sec)#创建规则查询数据使用从节点
Admin> insert into mysql_query_rules(rule_id,active,match_digest,destination_hostgroup,apply) values(2,1,'^select',2,1);
Query OK, 1 row affected (0.00 sec)#创建规则查询库使用从节点
Admin> insert into mysql_query_rules(rule_id,active,match_digest,destination_hostgroup,apply) values(3,1,'^show',2,1);
Query OK, 1 row affected (0.00 sec)# 查看规则
Admin> select rule_id,active,match_digest,destination_hostgroup,apply from mysql_query_rules;
+---------+--------+-----------------------+-----------------------+-------+
| rule_id | active | match_digest          | destination_hostgroup | apply |
+---------+--------+-----------------------+-----------------------+-------+
| 1       | 1      | ^select.*from update$ | 1                     | 1     |
| 2       | 1      | ^select               | 2                     | 1     |
| 3       | 1      | ^show                 | 2                     | 1     |
+---------+--------+-----------------------+-----------------------+-------+
3 rows in set (0.00 sec)# 载入使用并持久化到磁盘
Admin> load mysql query rules to runtime;
Query OK, 0 rows affected (0.00 sec)Admin> load admin variables to runtime;
Query OK, 0 rows affected (0.00 sec)Admin> save mysql query rules to disk ;
Query OK, 0 rows affected (0.02 sec)Admin> save admin variables to disk ;
Query OK, 49 rows affected (0.00 sec)
插入数据,查询数据
# 切换proxy用户
[root@localhost ~]# mysql -uproxy -pJianren@123 -P6033 -h127.0.0.1
mysql: [Warning] Using a password on the command line interface can be insecure.
Welcome to the MySQL monitor.  Commands end with ; or \g.
Your MySQL connection id is 2
Server version: 5.5.30 (ProxySQL)Copyright (c) 2000, 2023, Oracle and/or its affiliates.Oracle is a registered trademark of Oracle Corporation and/or its
affiliates. Other names may be trademarks of their respective
owners.Type 'help;' or '\h' for help. Type '\c' to clear the current input statement.mysql> show databases;
+--------------------+
| Database           |
+--------------------+
| information_schema |
| mysql              |
| performance_schema |
| sys                |
+--------------------+
4 rows in set (0.01 sec)mysql> create database db1;
Query OK, 1 row affected (0.00 sec)mysql> USE db1;
Database changedmysql> CREATE TABLE test1 (id INT AUTO_INCREMENT PRIMARY KEY,name VARCHAR(255));
Query OK, 0 rows affected (0.02 sec)mysql> INSERT INTO test1 (id, name) VALUES(1, 'kk'),(2, 'nameqq');
Query OK, 2 rows affected (0.01 sec)
Records: 2  Duplicates: 0  Warnings: 0
查询记录验证
# 切换管理 查询
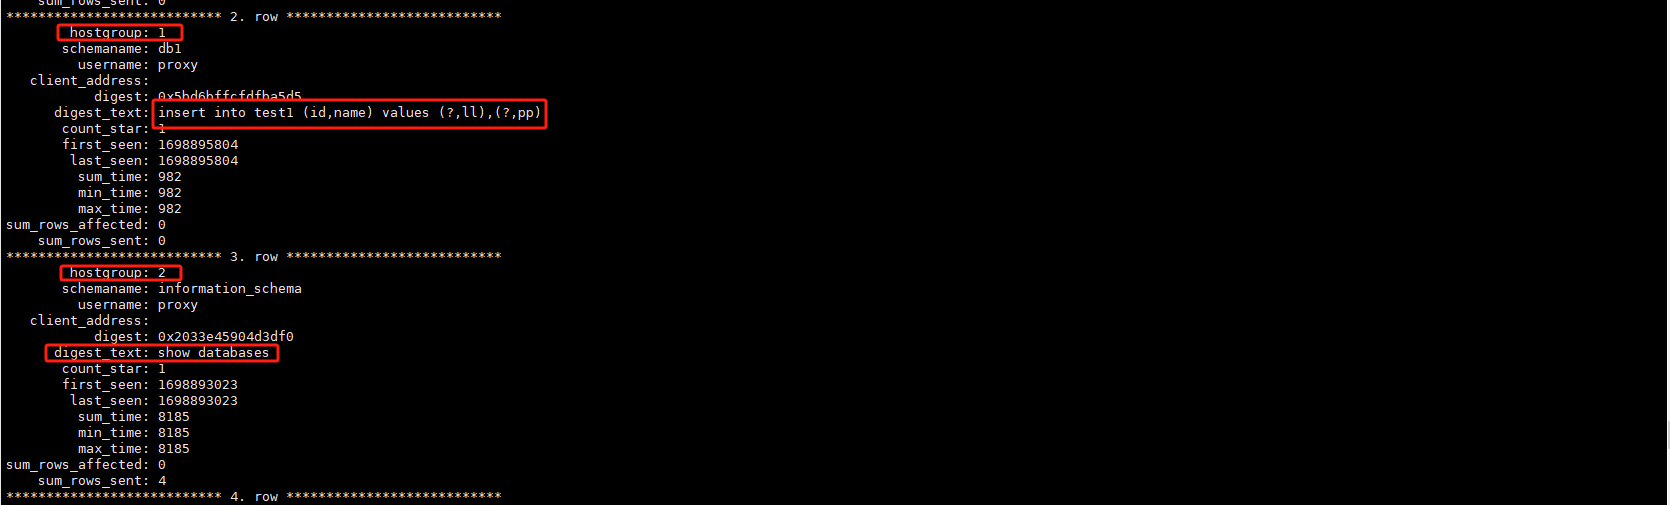
mysql -uadmin -padmin -P6032 -h127.0.0.1 --prompt='Admin>'Admin> select * from stats_mysql_query_digest \G
规则生效
这篇关于Proxysql读写分离的文章就介绍到这儿,希望我们推荐的文章对编程师们有所帮助!


