本文主要是介绍MySQL数据库入门到精通——运维篇(2),希望对大家解决编程问题提供一定的参考价值,需要的开发者们随着小编来一起学习吧!
MySQL数据库入门到精通——运维篇(2)
- 1. 分库分表
- 1.1 分库分表介绍
- 1.1.1 现在的问题
- 1.1.2 拆分策略
- 1.1.2.1 垂直拆分策略
- 1.1.2.2 水平拆分策略
- 1.2 Mycat概述
- 1.3 Mycat入门
- 1.4 Mycat配置
- 1.4.1 Schema标签
- 1.4.2 Datanode标签
- 1.4.3 Datahost标签
- 1.4.4 rule.xml
- 1.4.5 server.xml
- 1.5 Mycat分片
- 1.5.1 垂直拆分
- 1.5.2 水平拆分
- 1.6 Mycat管理及监控
- 2. 读写分离
- 2.1 读写分离——介绍
- 2.2 读写分离——一主一从准备
- 2.3 读写分离——一主一从读写分离
- 2.4 读写分离——双主双从介绍
- 2.5 读写分离——双主双从搭建
- 2.6 读写分离——双主双从读写分离


1. 分库分表
1.1 分库分表介绍
1.1.1 现在的问题
单数据库
所有数据都是存放在一个数据库文件里的,经过常年累月,内存不足了怎么办?

随着互联网及移动互联网的发展,应用系统的数据量也是成指数式增长,若采用单数据库进行数据存储,存在以下性能瓶颈:
- IO瓶颈:热点数据太多,数据库缓存不足,产生大量磁盘IO,效率较低。请求数据太多,带宽不够,网络IO瓶颈。
- CPU瓶颈: 排序、分组、连接查询、聚合统计等SQL会耗费大量的CPU资源,请求数太多, CPU出现瓶颈。

分库分表的中心思想:
将数据分散存储,使得单一数据库/表的数据量变小来缓解单一数据库的性能问题,从而达到提升数据库性能的目的。
1.1.2 拆分策略

1.1.2.1 垂直拆分策略

特点:
- 每个库的表结构都不一样。
- 每个库的数据也不一样 。
- 所有,库的并集是全量数据。

特点:
- 每个表的结构都不一样。
- 每个表的数据也术一样,一般通过一列(主键/外键)关联。
- 所有表的并集是全量数据。
1.1.2.2 水平拆分策略

水平分库:以“字段”为依据,改为以“行(记录)”为依据。讲一个库的数据拆分到多个库
特点:
- 每个库的表结构都一样。
- 每个库的数据都不一样。
- 所有库的并集是全量数据。

特点:
- 每个表的表结构都一样 。
- 每个表的数据都不一样 。
- 所有表的并集是全量数据。

- shardingJDBC:基于AOP原理,在应用程序中对本地执行的SQL进行拦截,解析、改写、路由处理。需要自行编码配置实现,只支持java语言,性能较高。
- MyCat:数据库分库分表中间件,不用调整代码即可实现分库分表,支持多种语言,性能不及前者。

1.2 Mycat概述

🐬Mycat是开源的、活跃的、基于Java语言编写的MySQL数据库中间件。
可以像使用mysql一样来使用mycat,对于开发人员来说根本感觉不到mycat的存在。

不用连接MySQL服务器 ,直接连接mycat,这是为什么呢?四个大字嗷!
优势:
- 性能可靠稳定
- 强大的技术团队
- 体系完善
- 社区活跃
下载
下载地址: http://dl.mycat.org.cn/

MyCat1.6版本还是相对于2来讲使用更多一些,更主流一些

Mycat是采用java语言开发的开源的数据库中间件,支持Windows和Linux运行环境,下面介绍MyCat的Linux中的环境搭建。 我们需要在准备好的服务器中安装如下软件。
- MySQL
- jDK
- Mycat
| 服务器 | 安装软件 | 说明 |
|---|---|---|
| 192.168.200.210 | JDK、Mycat | MyCat中间件服务器 |
| 192.168.200.210 | MySQL | 分片服务器 |
| 192.168.200.213 | MySQL | 分片服务器 |
| 192.168.200.214 | MySQL | 分片服务器 |
JDK安装
JDK具体安装步骤如下:
- 上传安装包
使用FinalShell自带的上传工具将jdk的二进制发布包上传到Linux
由于上述在进行文件上传时,选择的上传目录为根目录 /,上传完毕后,我们执行指令 cd / 切换到根目录下,查看上传的安装包。

- 解压安装包
执行如下指令,将上传上来的压缩包进行解压,并通过-C参数指定解压文件存放目录为/usr/local。
tar -zxvf jdk-8u171-linux-x64.tar.gz -C /usr/local

3. 配置环境变量
使用vim命令修改/etc/profile文件,在文件末尾加入如下配置
JAVA_HOME=/usr/local/jdk1.8.0_171
PATH=$JAVA_HOME/bin:$PATH
具体操作指令如下:
1). 编辑/etc/profile文件,进入命令模式vim /etc/profile2). 在命令模式中,输入指令 G , 切换到文件最后G3). 在命令模式中输入 i/a/o 进入插入模式,然后切换到文件最后一行i4). 将上述的配置拷贝到文件中export JAVA_HOME=/usr/local/jdk1.8.0_171export PATH=$JAVA_HOME/bin:$PATH5). 从插入模式,切换到指令模式ESC6). 按:进入底行模式,然后输入wq,回车保存:wq
- 重新加载profile文件
为了使更改的配置立即生效,需要重新加载profile文件,执行命令:
source /etc/profile


MyCat不存数据
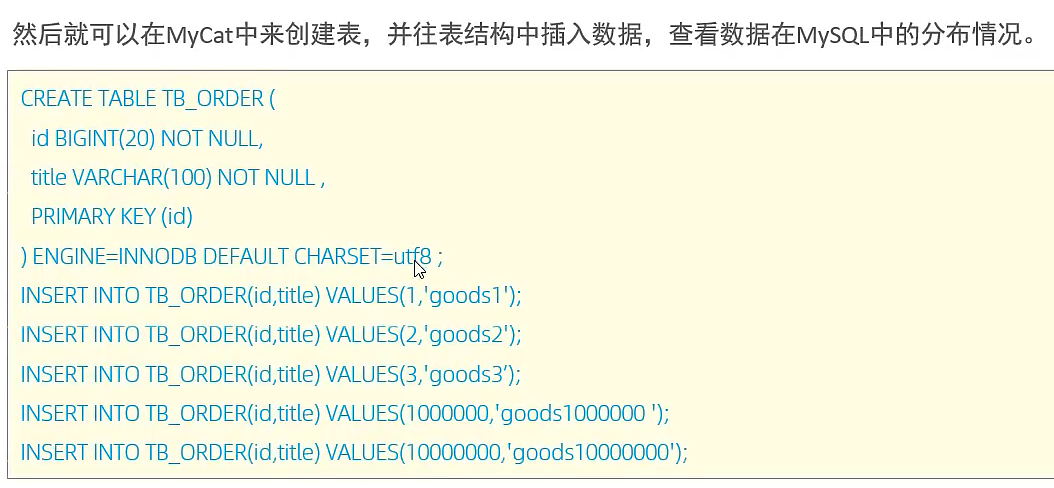
1.3 Mycat入门
由于tb_gorder 表中数据量很大,磁盘IO及容量都到达了瓶颈,现在需要对tb_order表进行数据分片,分为三个数据节点,每一个节点主机位于不同的服务器上,具体的结构,参考下图:


<?xml version="1.0"?>
<!DOCTYPE mycat:schema SYSTEM "schema.dtd">
<mycat:schema xmlns:mycat="http://io.mycat/"><schema name="DB01" checkSQLschema="true" sqlMaxLimit="100"><table name="TB_ORDER" dataNode="dn1,dn2,dn3" rule="auto-sharding-long" /></schema><dataNode name="dn1" dataHost="dhost1" database="db01" /><dataNode name="dn2" dataHost="dhost2" database="db01" /><dataNode name="dn3" dataHost="dhost3" database="db01" /><dataHost name="dhost1" maxCon="1000" minCon="10" balance="0"writeType="0" dbType="mysql" dbDriver="jdbc" switchType="1" slaveThreshold="100"><heartbeat>select user()</heartbeat><writeHost host="master" url="jdbc:mysql://192.168.200.210:3306?useSSL=false&serverTimezone=Asia/Shanghai&characterEncoding=utf8" user="root" password="1234" /></dataHost><dataHost name="dhost2" maxCon="1000" minCon="10" balance="0"writeType="0" dbType="mysql" dbDriver="jdbc" switchType="1" slaveThreshold="100"><heartbeat>select user()</heartbeat><writeHost host="master" url="jdbc:mysql://192.168.200.213:3306?useSSL=false&serverTimezone=Asia/Shanghai&characterEncoding=utf8" user="root" password="1234" /></dataHost><dataHost name="dhost3" maxCon="1000" minCon="10" balance="0"writeType="0" dbType="mysql" dbDriver="jdbc" switchType="1" slaveThreshold="100"><heartbeat>select user()</heartbeat><writeHost host="master" url="jdbc:mysql://192.168.200.214:3306?useSSL=false&serverTimezone=Asia/Shanghai&characterEncoding=utf8" user="root" password="1234" /></dataHost>
</mycat:schema>

<?xml version="1.0" encoding="UTF-8"?>
<!-- - - Licensed under the Apache License, Version 2.0 (the "License"); - you may not use this file except in compliance with the License. - You may obtain a copy of the License at - - http://www.apache.org/licenses/LICENSE-2.0 - - Unless required by applicable law or agreed to in writing, software - distributed under the License is distributed on an "AS IS" BASIS, - WITHOUT WARRANTIES OR CONDITIONS OF ANY KIND, either express or implied. - See the License for the specific language governing permissions and - limitations under the License. -->
<!DOCTYPE mycat:server SYSTEM "server.dtd">
<mycat:server xmlns:mycat="http://io.mycat/"><system><property name="nonePasswordLogin">0</property> <!-- 0为需要密码登陆、1为不需要密码登陆 ,默认为0,设置为1则需要指定默认账户--><property name="useHandshakeV10">1</property><property name="useSqlStat">1</property>  <!-- 1为开启实时统计、0为关闭 --><property name="useGlobleTableCheck">0</property>  <!-- 1为开启全加班一致性检测、0为关闭 --><property name="sqlExecuteTimeout">300</property>  <!-- SQL 执行超时 单位:秒--><property name="sequnceHandlerType">2</property><!--<property name="sequnceHandlerPattern">(?:(\s*next\s+value\s+for\s*MYCATSEQ_(\w+))(,|\)|\s)*)+</property>--><!--必须带有MYCATSEQ_或者 mycatseq_进入序列匹配流程 注意MYCATSEQ_有空格的情况--><property name="sequnceHandlerPattern">(?:(\s*next\s+value\s+for\s*MYCATSEQ_(\w+))(,|\)|\s)*)+</property><property name="subqueryRelationshipCheck">false</property> <!-- 子查询中存在关联查询的情况下,检查关联字段中是否有分片字段 .默认 false --><!--  <property name="useCompression">1</property>--> <!--1为开启mysql压缩协议--><!--  <property name="fakeMySQLVersion">5.6.20</property>--> <!--设置模拟的MySQL版本号--><!-- <property name="processorBufferChunk">40960</property> --><!-- <property name="processors">1</property> <property name="processorExecutor">32</property> --><!--默认为type 0: DirectByteBufferPool | type 1 ByteBufferArena | type 2 NettyBufferPool --><property name="processorBufferPoolType">0</property><!--默认是65535 64K 用于sql解析时最大文本长度 --><!--<property name="maxStringLiteralLength">65535</property>--><!--<property name="sequnceHandlerType">0</property>--><!--<property name="backSocketNoDelay">1</property>--><!--<property name="frontSocketNoDelay">1</property>--><!--<property name="processorExecutor">16</property>--><!--<property name="serverPort">8066</property> <property name="managerPort">9066</property> <property name="idleTimeout">300000</property> <property name="bindIp">0.0.0.0</property><property name="dataNodeIdleCheckPeriod">300000</property> 5 * 60 * 1000L; //连接空闲检查<property name="frontWriteQueueSize">4096</property> <property name="processors">32</property> --><!--分布式事务开关,0为不过滤分布式事务,1为过滤分布式事务(如果分布式事务内只涉及全局表,则不过滤),2为不过滤分布式事务,但是记录分布式事务日志--><property name="handleDistributedTransactions">0</property><!--off heap for merge/order/group/limit      1开启   0关闭--><property name="useOffHeapForMerge">0</property><!--单位为m--><property name="memoryPageSize">64k</property><!--单位为k--><property name="spillsFileBufferSize">1k</property><property name="useStreamOutput">0</property><!--单位为m--><property name="systemReserveMemorySize">384m</property><!--是否采用zookeeper协调切换  --><property name="useZKSwitch">false</property><!-- XA Recovery Log日志路径 --><!--<property name="XARecoveryLogBaseDir">./</property>--><!-- XA Recovery Log日志名称 --><!--<property name="XARecoveryLogBaseName">tmlog</property>--><!--如果为 true的话 严格遵守隔离级别,不会在仅仅只有select语句的时候在事务中切换连接--><property name="strictTxIsolation">false</property><property name="useZKSwitch">true</property></system><!-- 全局SQL防火墙设置 --><!--白名单可以使用通配符%或着*--><!--例如<host host="127.0.0.*" user="root"/>--><!--例如<host host="127.0.*" user="root"/>--><!--例如<host host="127.*" user="root"/>--><!--例如<host host="1*7.*" user="root"/>--><!--这些配置情况下对于127.0.0.1都能以root账户登录--><!--<firewall><whitehost><host host="1*7.0.0.*" user="root"/></whitehost><blacklist check="false"></blacklist></firewall>--><user name="root" defaultAccount="true"><property name="password">123456</property><property name="schemas">DB01</property><!-- 表级 DML 权限设置 --><!-- 	<privileges check="true"><schema name="DB01" dml="0110" > <table name="TB_ORDER" dml="1110"></table></schema></privileges>		--></user><user name="user"><property name="password">123456</property><property name="schemas">DB01</property><property name="readOnly">true</property></user></mycat:server>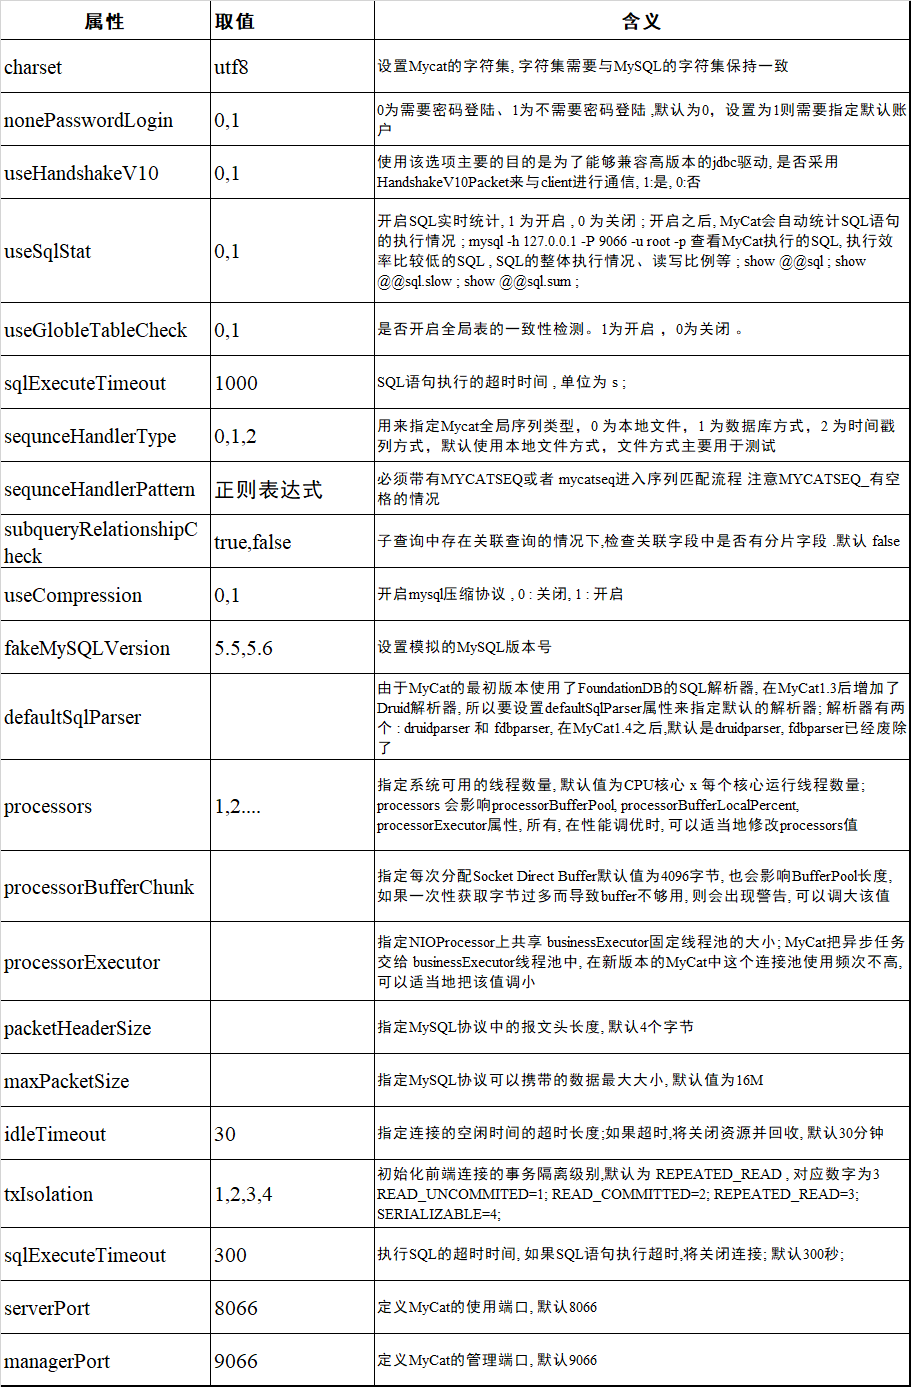
给自己留个点——建议看视频跟着做。
1.4 Mycat配置

1.4.1 Schema标签

schema标签用于定义MyCat实例中的逻辑库,一个MyCat实例中,可以有多个逻辑库,可以通过schema标签来划分不同的逻辑库。MyCat中的逻辑库的概念,等同于MySQL中的database概念,需要操作某个逻辑库下的表时也需要切换逻辑库(use xxx)。


1.4.2 Datanode标签

1.4.3 Datahost标签

1.4.4 rule.xml
rule.xml中定义所有拆分表的规则,在使用过程中可以灵活的使用分片算法,或者对同一个分片算法使用不同的参数,它让分片过程可配置化。主要包含两类标签:tableRule、Function。

1.4.5 server.xml

1.5 Mycat分片
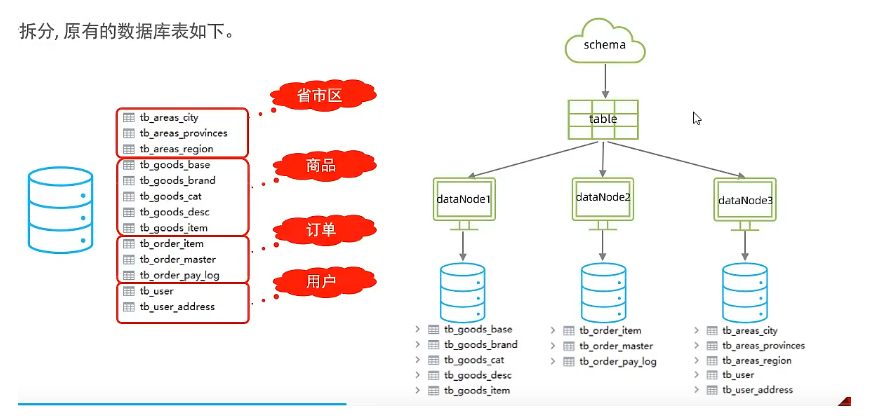
1.5.1 垂直拆分
场景:在业务系统中,涉及以下表结构,但是由于用户与订单每天都会产生大量的数据,单台服务器的数据存储及处理能力是有限的,可以对数据库表进行拆分,原有的数据库表如下。
ps:分库不需要指定 rule,涉及分表需要使用rule;
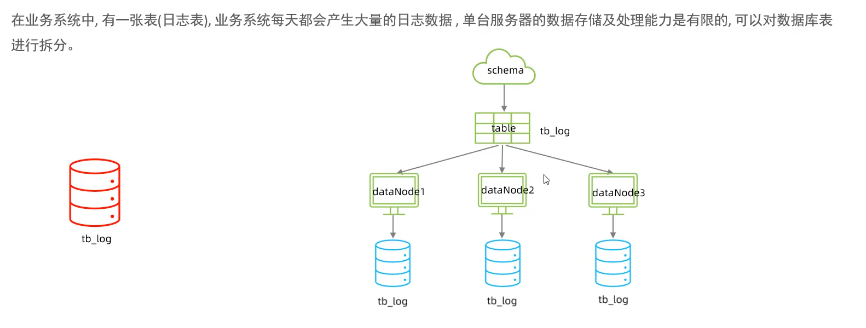
1.5.2 水平拆分

一致性
create table tb_order(id  varchar(100) not null primary key,money   int null,content varchar(200) null
);INSERT INTO tb_order (id, money, content) VALUES ('b92fdaaf-6fc4-11ec-b831-482ae33c4a2d', 10, 'b92fdaf8-6fc4-11ec-b831-482ae33c4a2d');
INSERT INTO tb_order (id, money, content) VALUES ('b93482b6-6fc4-11ec-b831-482ae33c4a2d', 20, 'b93482d5-6fc4-11ec-b831-482ae33c4a2d');
INSERT INTO tb_order (id, money, content) VALUES ('b937e246-6fc4-11ec-b831-482ae33c4a2d', 50, 'b937e25d-6fc4-11ec-b831-482ae33c4a2d');
INSERT INTO tb_order (id, money, content) VALUES ('b93be2dd-6fc4-11ec-b831-482ae33c4a2d', 100, 'b93be2f9-6fc4-11ec-b831-482ae33c4a2d');
INSERT INTO tb_order (id, money, content) VALUES ('b93f2d68-6fc4-11ec-b831-482ae33c4a2d', 130, 'b93f2d7d-6fc4-11ec-b831-482ae33c4a2d');
INSERT INTO tb_order (id, money, content) VALUES ('b9451b98-6fc4-11ec-b831-482ae33c4a2d', 30, 'b9451bcc-6fc4-11ec-b831-482ae33c4a2d');
INSERT INTO tb_order (id, money, content) VALUES ('b9488ec1-6fc4-11ec-b831-482ae33c4a2d', 560, 'b9488edb-6fc4-11ec-b831-482ae33c4a2d');
INSERT INTO tb_order (id, money, content) VALUES ('b94be6e6-6fc4-11ec-b831-482ae33c4a2d', 10, 'b94be6ff-6fc4-11ec-b831-482ae33c4a2d');
INSERT INTO tb_order (id, money, content) VALUES ('b94ee10d-6fc4-11ec-b831-482ae33c4a2d', 123, 'b94ee12c-6fc4-11ec-b831-482ae33c4a2d');
INSERT INTO tb_order (id, money, content) VALUES ('b952492a-6fc4-11ec-b831-482ae33c4a2d', 145, 'b9524945-6fc4-11ec-b831-482ae33c4a2d');
INSERT INTO tb_order (id, money, content) VALUES ('b95553ac-6fc4-11ec-b831-482ae33c4a2d', 543, 'b95553c8-6fc4-11ec-b831-482ae33c4a2d');
INSERT INTO tb_order (id, money, content) VALUES ('b9581cdd-6fc4-11ec-b831-482ae33c4a2d', 17, 'b9581cfa-6fc4-11ec-b831-482ae33c4a2d');
INSERT INTO tb_order (id, money, content) VALUES ('b95afc0f-6fc4-11ec-b831-482ae33c4a2d', 18, 'b95afc2a-6fc4-11ec-b831-482ae33c4a2d');
INSERT INTO tb_order (id, money, content) VALUES ('b95daa99-6fc4-11ec-b831-482ae33c4a2d', 134, 'b95daab2-6fc4-11ec-b831-482ae33c4a2d');
INSERT INTO tb_order (id, money, content) VALUES ('b9667e3c-6fc4-11ec-b831-482ae33c4a2d', 156, 'b9667e60-6fc4-11ec-b831-482ae33c4a2d');
INSERT INTO tb_order (id, money, content) VALUES ('b96ab489-6fc4-11ec-b831-482ae33c4a2d', 175, 'b96ab4a5-6fc4-11ec-b831-482ae33c4a2d');
INSERT INTO tb_order (id, money, content) VALUES ('b96e2942-6fc4-11ec-b831-482ae33c4a2d', 180, 'b96e295b-6fc4-11ec-b831-482ae33c4a2d');
INSERT INTO tb_order (id, money, content) VALUES ('b97092ec-6fc4-11ec-b831-482ae33c4a2d', 123, 'b9709306-6fc4-11ec-b831-482ae33c4a2d');
INSERT INTO tb_order (id, money, content) VALUES ('b973727a-6fc4-11ec-b831-482ae33c4a2d', 230, 'b9737293-6fc4-11ec-b831-482ae33c4a2d');
INSERT INTO tb_order (id, money, content) VALUES ('b978840f-6fc4-11ec-b831-482ae33c4a2d', 560, 'b978843c-6fc4-11ec-b831-482ae33c4a2d');
应用指定分片
运行阶段由应用自主决定路由分到哪个分片直接根据字符子串(必须是数字)计算分片号。

<tableRule name="sharding-by-substring"><rule><columns>id</columns><algorithm>sharding-by-substring</algorithm></rule>
</tableRule><function name="sharding-by-substring" class="io.mycat.route.function.PartitionDirectBySubString"><property name="startIndex">0</property> <!-- zero-based --><property name="size">2</property><property name="partitionCount">3</property><property name="defaultPartition">0</property>
</function>CREATE TABLE tb_app (id varchar(10) NOT NULL COMMENT 'ID',name varchar(200) DEFAULT NULL COMMENT 'Ãû³Æ',PRIMARY KEY (`id`)
) ENGINE=InnoDB DEFAULT CHARSET=utf8mb4;insert into tb_app (id,name) values('0000001','Testx00001');
insert into tb_app (id,name) values('0100001','Test100001');
insert into tb_app (id,name) values('0100002','Test200001');
insert into tb_app (id,name) values('0200001','Test300001');
insert into tb_app (id,name) values('0200002','TesT400001');
固定分片hash算法
该算法类似于十进制的求模运算,但是为二进制的操作。例如:取id的二进制低10位与1111111111进行位运算。

字符串hash解析
create table tb_monthpart(id   bigint  not null comment 'ID'  primary key,name varchar(100) null comment 'ÐÕÃû',create_time date  null
);insert into tb_monthpart(id,name ,create_time) values(1,'Tom','2022-01-01');
insert into tb_monthpart(id,name ,create_time) values(2,'Cat','2022-01-10');
insert into tb_monthpart(id,name ,create_time) values(3,'Rose','2022-01-31');
insert into tb_monthpart(id,name ,create_time) values(4,'Coco','2022-02-20');
insert into tb_monthpart(id,name ,create_time) values(5,'Rose2','2022-02-25');
insert into tb_monthpart(id,name ,create_time) values(6,'Coco2','2022-03-10');
insert into tb_monthpart(id,name ,create_time) values(7,'Coco3','2022-03-31');
insert into tb_monthpart(id,name ,create_time) values(8,'Coco4','2022-04-10');
insert into tb_monthpart(id,name ,create_time) values(9,'Coco5','2022-04-30');
按(天)日期分片

<tableRule name="sharding-by-stringhash"><rule><columns>user_id</columns><algorithm>sharding-by-stringhash</algorithm></rule>
</tableRule><function name="sharding-by-stringhash" class="io.mycat.route.function.PartitionByString"><property name="partitionLength">512</property> <!-- zero-based --><property name="partitionCount">2</property><property name="hashSlice">0:2</property>
</function>create table tb_strhash(name varchar(20) primary key,content varchar(100)
)engine=InnoDB DEFAULT CHARSET=utf8mb4;INSERT INTO tb_strhash (name,content) VALUES('T1001', UUID());
INSERT INTO tb_strhash (name,content) VALUES('ROSE', UUID());
INSERT INTO tb_strhash (name,content) VALUES('JERRY', UUID());
INSERT INTO tb_strhash (name,content) VALUES('CRISTINA', UUID());
INSERT INTO tb_strhash (name,content) VALUES('TOMCAT', UUID());
1.6 Mycat管理及监控


2. 读写分离
2.1 读写分离——介绍


读写分离,简单地说是把对数据库的读和写操作分开,以对应不同的数据库服务器。主数据库提供写操作,从数据库提供读操作,这样能有效地减轻单台数据库的压力。
通过MyCat即可轻易实现上述功能,不仅可以支持MySQL,也可以支持Oracle和SQL Server。
2.2 读写分离——一主一从准备
MySQL的主从复制,是基于二进制日志(binlog) 实现的。


create database itcast;use itcast;create table tb_user(id int(11) not null,name varchar(50) not null,sex varchar(1),primary key (id)
)engine=innodb default charset=utf8;insert into tb_user(id,name,sex) values(1,'Tom','1');
insert into tb_user(id,name,sex) values(2,'Trigger','0');
insert into tb_user(id,name,sex) values(3,'Dawn','1');
2.3 读写分离——一主一从读写分离


-
balance一般设置为1或3;
-
从节点不会同步到主节点
-
主库宕机后,依然可以查询,但不能写入了
2.4 读写分离——双主双从介绍

2.5 读写分离——双主双从搭建


create database db01;use db01;create table tb_user(id int(11) not null,name varchar(50) not null,sex varchar(1),primary key (id)
)engine=innodb default charset=utf8;insert into tb_user(id,name,sex) values(1,'Tom','1');
insert into tb_user(id,name,sex) values(2,'Trigger','0');
insert into tb_user(id,name,sex) values(3,'Dawn','1');insert into tb_user(id,name,sex) values(4,'Jack Ma','1');
insert into tb_user(id,name,sex) values(5,'Coco','0');
insert into tb_user(id,name,sex) values(6,'Jerry','1');
2.6 读写分离——双主双从读写分离


这篇关于MySQL数据库入门到精通——运维篇(2)的文章就介绍到这儿,希望我们推荐的文章对编程师们有所帮助!


