我们日常使用window的时候,经常会用到压缩与解压缩,如果要压缩一个文件,右击选择【添加到压缩文件】,解压缩则右击选择【解压到当前文件夹】,“点点点”就能完成。但是在一个没有装图形化界面的linux操作系统又不能使用“点点点”,那该怎么操作呢?本文就linux中如何使用压缩和打包工具做出解释。
为什么要压缩文件
压缩的目的是为了就是将文件通过压缩算法转变成一个体积更小格式的文件,减小了文件在硬盘上的占用空间,压缩文件的时候,特别的消耗CPU的时钟周期,因为CPU要进行大量的计算,所有压缩也是一种拿时间换空间的操作,同时也能使文件能够通过较慢的网络连接来实现更快的传输。
常用的压缩工具
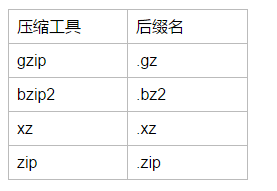
在linux操作系统中提供了很多的压缩和解压缩工具,每个压缩工具在执行压缩的时候所用的算法是不一样的,设计越优良的算法,压缩的程度就越高。比较老的压缩工具有compress(现在已经不常用了),常用的压缩工具有:gzip、bzip、xz和zip。我们可以通过后缀名来区分压缩文件是被什么工具压缩的,例如如果使用compress压缩文件,得到的文件的后缀名是.z,其他的压缩的后缀名如下:
gzip、gunzip和zcat
gzip是最常用的压缩工具了,gunzip是对应的解压缩工具。zcat可以在不解压.gz格式的压缩文件的情况下查看文件的内容。
语法:gzip [OPTION]... FILE...
常用选项: -d:解压缩,相当于gunzip;-#:指定压缩比,默认是6,数字越大压缩比越大(1-9),压缩比=压缩前文件大小/压缩后文件的大小;-c:将压缩结果输出至标准输出。  gzip -c file  >  /path/to/somefile.gz
举例:
将/etc/init.d/functions复制到tmp目录下执行gzip压缩:
[root@localhost tmp]# cp /etc/init.d/functions /tmp/
[root@localhost tmp]# ll
total 16
-rw-r--r--. 1 root root 15131 Sep  3 06:20 functions
[root@localhost tmp]# gzip functions
[root@localhost tmp]# ll
total 8
-rw-r--r--. 1 root root 4694 Sep  3 06:20 functions.gz
也可以使用gunzip,为了方便记忆,建议大家直接使用-d选项就好了:
[root@localhost tmp]# gzip functions
[root@localhost tmp]# ll
total 8
-rw-r--r--. 1 root root 4694 Sep  3 06:20 functions.gz
[root@localhost tmp]# gunzip functions.gz
[root@localhost tmp]# ll
total 16
-rw-r--r--. 1 root root 15131 Sep  3 06:20 functions
指定压缩比:
[root@localhost tmp]# gzip -9 functions
[root@localhost tmp]# ll
total 8
-rw-r--r--. 1 root root 4686 Sep  3 06:20 functions.gz
将压缩比设置为9之后,相对于压缩比6,仅仅只减少了8个字节,一般情况下都不需要去动压缩比,因为6已经是一个最好的选择。
使用-c将输出结果至标准输出,我们将看到一堆乱码,那-c选项到底有什么用呢?

我们在压缩文件的时候原文件会被删除,如果想保留原文件就可以通过-c选项来实现啦!
[root@localhost tmp]# gzip -c functions > functions.gz
[root@localhost tmp]# ll
total 24
-rw-r--r--. 1 root root 15131 Sep  3 06:20 functions
-rw-r--r--. 1 root root  4694 Sep  3 06:39 functions.gz
可以使用zcat在不解压缩的情况下查看文件的内容:
[root@localhost tmp]# zcat functions.gz
# -*-Shell-script-*-
#
# functions    This file contains functions to be used by most or all
#        shell scripts in the /etc/init.d directory.
#TEXTDOMAIN=initscripts# Make sure umask is sane
umask 022# Set up a default search path.
PATH="/sbin:/usr/sbin:/bin:/usr/bin"
......(略)
bzip2、bunzip2和bzcat
和gzip类似,bzip2为压缩工具,bunzip2为解压缩工具,同样bzcat的作用了在不解压文件的情况下,查看文件内容。
语法:bzip2 [OPTION]... FILE...
常用选项: -d:解压缩,相当于bunzip2-#:指定压缩比,默认是6,数字越大压缩比越大(1-9)-k:keep,压缩并保留原文件,bzip2不需要像gzip那样使用输出重定向至指定的文件,这样就方便多啦
我们来举例看一下:
将/etc/init.d/functions复制到tmp目录下,使用bzip2压缩:
[root@localhost tmp]# bzip2 functions
[root@localhost tmp]# ll
total 8
-rw-r--r--. 1 root root 4763 Sep  3 06:20 functions.bz2
说明bzip2在默认压缩的情况下也会删除原文件,节约了磁盘的空间。
再来看一下解压缩的方法:
[root@localhost tmp]# ll
total 8
-rw-r--r--. 1 root root 4763 Sep  3 06:20 functions.bz2
[root@localhost tmp]#
[root@localhost tmp]# bunzip2 functions.bz2
[root@localhost tmp]# ll
total 16
-rw-r--r--. 1 root root 15131 Sep  3 06:20 functions
[root@localhost tmp]# bzip2 functions
[root@localhost tmp]# ll
total 8
-rw-r--r--. 1 root root 4763 Sep  3 06:20 functions.bz2
[root@localhost tmp]# bzip2 -d functions.bz2
[root@localhost tmp]# ll
total 16
-rw-r--r--. 1 root root 15131 Sep  3 06:20 functions
[root@localhost tmp]# ll
total 16
-rw-r--r--. 1 root root 15131 Sep  3 06:20 functions
[root@localhost tmp]# bzip2 -k functions
[root@localhost tmp]# ll
total 24
-rw-r--r--. 1 root root 15131 Sep  3 06:20 functions
-rw-r--r--. 1 root root  4763 Sep  3 06:20 functions.bz2
使用bzcat在不打开压缩文件的情况下查看文件的内容:
[root@localhost tmp]# bzcat functions.bz2
# -*-Shell-script-*-
#
# functions    This file contains functions to be used by most or all
#        shell scripts in the /etc/init.d directory.
#TEXTDOMAIN=initscripts# Make sure umask is sane
umask 022# Set up a default search path.
PATH="/sbin:/usr/sbin:/bin:/usr/bin"
export PATH
......(略)
xz、unxz和xzcat
压缩工具的新秀,xz为压缩工具,unxz为解压缩工具,xzcat也是在不打开压缩文件的情况下查看文件内容。
语法:xz [OPTION]... FILE...
常用选项: -d:解压缩-#:指定压缩比,默认为6-k:压缩并保留原文件
[root@localhost tmp]# xz functions
[root@localhost tmp]# ll
total 8
-rw-r--r--. 1 root root 4576 Sep  3 06:20 functions.xz
解压缩:
[root@localhost tmp]# unxz functions.xz     #使用unxz解压缩
[root@localhost tmp]# ll
total 16
-rw-r--r--. 1 root root 15131 Sep  3 06:20 functions
[root@localhost tmp]# xz functions
[root@localhost tmp]# ll
total 8
-rw-r--r--. 1 root root 4576 Sep  3 06:20 functions.xz
[root@localhost tmp]# xz -d functions.xz   #使用-d选项解压缩
[root@localhost tmp]# ll
total 16
-rw-r--r--. 1 root root 15131 Sep  3 06:20 functions
使用-k选项压缩并保留原文件:
[root@localhost tmp]# xz -k  functions
[root@localhost tmp]# ll
total 24
-rw-r--r--. 1 root root 15131 Sep  3 06:20 functions
-rw-r--r--. 1 root root  4576 Sep  3 06:20 functions.xz
试试xzcat:
[root@localhost tmp]# xzcat functions.xz
# -*-Shell-script-*-
#
# functions    This file contains functions to be used by most or all
#        shell scripts in the /etc/init.d directory.
#TEXTDOMAIN=initscripts# Make sure umask is sane
umask 022# Set up a default search path.
PATH="/sbin:/usr/sbin:/bin:/usr/bin"
export PATH
......(略)
扩展,是用man手册的时候,我们会发现另外一个工具lzma、unlzma和lzcat,其后缀名为.lzma,记住xz就好啦,它和lzma是有一定的关系的,详细可见man手册。
lzma is equivalent to xz --format=lzma
unlzma is equivalent to xz --format=lzma --decompress
lzcat is equivalent to xz --format=lzma --decompress --stdout
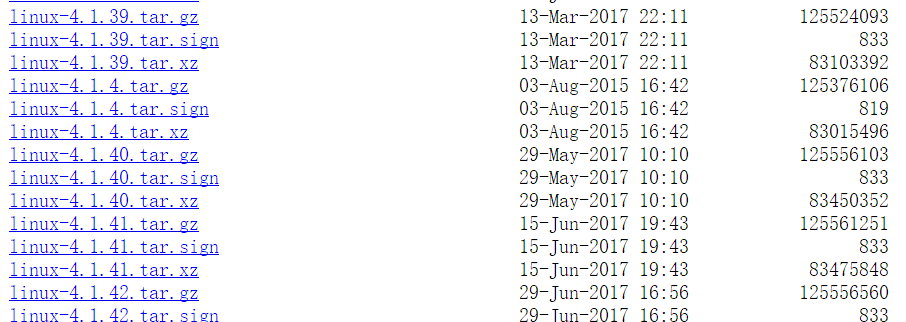
我们linux内核官网查找内核文件的时候,文件被压缩使用的工具是gzip和xz,也可以看到xz的压缩率更大。
https://www.kernel.org/pub/linux/kernel/v4.x/
现在存在的一个问题是,仅仅只是对单个文件进行压缩,那么这些工具能够对目录进行压缩吗?
我们在tmp文件下创建test目录,拷贝几个文件到里面:
[root@localhost tmp]# ll /tmp/test/
total 332
-rw-r--r--. 1 root root  15131 Sep  3 06:59 functions
-rw-------. 1 root root 318014 Sep  3 06:59 messages
-rw-r--r--. 1 root root   1054 Sep  3 06:58 passwd
现在来试试压缩目录:
[root@localhost tmp]# gzip /tmp/test/
gzip: /tmp/test/ is a directory -- ignored
[root@localhost tmp]# bzip2 /tmp/test/
bzip2: Input file /tmp/test/ is a directory.
[root@localhost tmp]# xz /tmp/test/
xz: /tmp/test/: Is a directory, skipping
都不行,那该怎么办呢?接下来我们讲讲tar吧!
打包工具tar
tar命令是用来归档文件的,可以将多个文件或者一个目录归一成一个后缀名为.tar的文件,归档文件并不会压缩文件,反而可能使文件的大小稍微大一点,所以一般在归档之后再执行压缩!。下面我们就来看一下tar的使用方法吧!
语法:tar [OPTION]... FILE...
方法:
(1)创建归档-c -f /path/to/somefile.tar  file...-cf /path/to/somefile.tar  file...
(2)展开归档-xf /path/from/somefile.tar-xf /path/from/somefile.tar -C /path/to/somedir
(3)查看归档文件的文件列表-tf /path/to/somefile.tar归档之后然后进行压缩,结合之前的压缩工具,就能实现压缩多个文件。
(4)归档压缩-z:gzip2-zcf  /path/to/somefile.tar.gz   file...-zxf  /path/to/somefile.tar.gz   -C /path/to/somedir  #z可以去掉-j:bzip2-jcf  /path/to/somefile.tar.bz2   file...-jxf  /path/to/somefile.tar.bz2   -C /path/to/somedir  #j可以去掉-J:xz-Jcf  /path/to/somefile.tar.xz   file...-Jxf  /path/to/somefile.tar.xz   -C /path/to/somedir  #J可以去掉
下面我们就将/tmp/test先使用tar打包成tar文件,再将tar压缩成.xz的压缩文件:
[root@localhost tmp]# tar -cf test.tar test/
[root@localhost tmp]# ll
total 340
drwxr-xr-x. 2 root root     53 Sep  3 06:59 test
-rw-r--r--. 1 root root 348160 Sep  3 07:35 test.tar
[root@localhost tmp]# xz test.tar
[root@localhost tmp]# ll
total 28
drwxr-xr-x. 2 root root    53 Sep  3 06:59 test
-rw-r--r--. 1 root root 26748 Sep  3 07:35 test.tar.xz
使用unxz解压缩,再展开归档至/root下:
[root@localhost tmp]# unxz test.tar.xz #解压缩
[root@localhost tmp]# ll
total 340
drwxr-xr-x. 2 root root     53 Sep  3 06:59 test
-rw-r--r--. 1 root root 348160 Sep  3 07:35 test.tar
[root@localhost tmp]# tar -xf test.tar  -C /root/   #展开归档至指定的目录
[root@localhost tmp]# ll /root/
total 4
-rw-------. 1 root root 1707 Aug 10 07:14 anaconda-ks.cfg
drwxr-xr-x. 2 root root   53 Sep  3 06:59 test
这样显得有点麻烦,所有在生产环境中,我们一般直接使用选项-z,-j,-J来实现压缩归档。
[root@localhost tmp]# tar -zcf  test.tar.gz  test/
[root@localhost tmp]# ll
total 48
drwxr-xr-x. 2 root root    53 Sep  3 06:59 test
-rw-r--r--. 1 root root 46416 Sep  3 07:48 test.tar.gz
[root@localhost tmp]#  tar -zxf  test.tar.gz  -C /root/
[root@localhost tmp]# ll /root/test/
total 332
-rw-r--r--. 1 root root  15131 Sep  3 06:59 functions
-rw-------. 1 root root 318014 Sep  3 06:59 messages
-rw-r--r--. 1 root root   1054 Sep  3 06:58 passwd
所有两组命令 tar -zcf,tar -zxf 或者 tar -Jcf,tar -Jxf 的是非常好用的,也是最常用的组合。
zip和unzip
一个可以在windows和Linux共用的压缩工具,方便在这两种操作系统之间压缩和解压缩文件,这里就简单的看一下:
[root@localhost tmp]# ll /tmp/test
total 360
-rw-r--r--. 1 root root 15131 Sep 5 21:41 functions
-rw-------. 1 root root 345807 Sep 5 21:41 messages
-rw-r--r--. 1 root root 1117 Sep 5 21:41 passwd
[root@localhost tmp]# zip -r test.zip test #选项-r实现递归压缩
adding: test/ (stored 0%)
adding: test/functions (deflated 69%)
adding: test/passwd (deflated 57%)
adding: test/messages (deflated 90%)
[root@localhost tmp]# unzip test.zip -d /root/ #选项-d可以指定解压缩的路径
Archive: test.zip
creating: /root/test/
inflating: /root/test/functions
inflating: /root/test/passwd
inflating: /root/test/messages
[root@localhost tmp]# ll /root/test
total 360
-rw-r--r--. 1 root root 15131 Sep 5 21:41 functions
-rw-------. 1 root root 345807 Sep 5 21:41 messages
-rw-r--r--. 1 root root 1117 Sep 5 21:41 passwd


