本文主要是介绍视网膜分辨率_如何以原始分辨率运行视网膜显示器,希望对大家解决编程问题提供一定的参考价值,需要的开发者们随着小编来一起学习吧!

视网膜分辨率
MacBook displays normally run at a scaled resolution, which uses the additional pixels of higher resolution monitors to improve the clarity of text on screen while keeping everything at the same size. However, this leads to the display essentially being “zoomed in” with everything much bigger than it should be.
MacBook显示器通常以缩放的分辨率运行,该分辨率使用高分辨率显示器的其他像素来提高屏幕上文本的清晰度,同时使所有内容保持相同大小。 但是,这实际上导致显示器“放大”了所有比其应有的要大得多的内容。
If the display runs at its native, non-scaled resolution, you’ll have a lot more space to work with, which may be good for those who are trying to squeeze every inch of workspace out of a smaller MacBook.
如果显示器以其原始的非缩放分辨率运行,则您将拥有更多的可用空间,这对于那些试图从较小的MacBook挤压出每一英寸工作空间的人们来说可能是个好选择。
首先尝试内置控件 (Try Out the Built-in Controls First)
Apple does include some controls for changing how zoomed in the display is, which you can find under the “Display” settings in System Preferences:
苹果确实提供了一些用于更改显示缩放比例的控件,您可以在“系统偏好设置”的“显示”设置下找到这些控件:
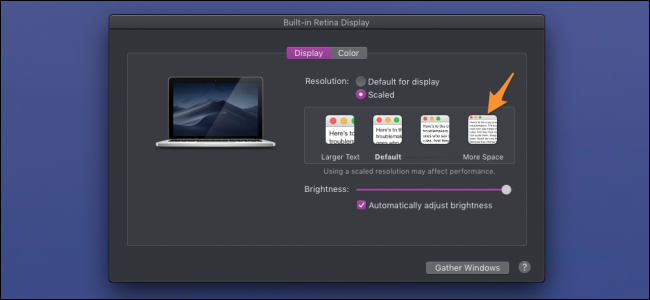
If you’re currently using the default settings, it’s probably best to try this out before resorting to a third-party solution.
如果您当前使用的是默认设置,则最好在诉诸第三方解决方案之前尝试一下。
使用Retina Display菜单在Native上运行 (Run at Native with Retina Display Menu)
Retina Display Menu is a simple menu bar app that lets you select a custom resolution from a drop-down list. It’s an older app but has no issues running on macOS Mojave. If it ends up breaking in the future, you can try SwitchResX, which has been updated much more recently, but is a paid app.
视网膜显示菜单是一个简单的菜单栏应用程序,可让您从下拉列表中选择自定义分辨率。 它是一个较旧的应用程序,但在macOS Mojave上运行没有任何问题。 如果最终无法解决 ,您可以尝试SwitchResX ,它已经更新了很多,但是是付费应用程序。
Download the DMG for the app from the release link at the bottom of the app’s page and open it up. From the icon in the menu bar, you can select which resolution you want to run.
从应用页面底部的发布链接下载该应用的DMG,然后将其打开。 从菜单栏中的图标,您可以选择要运行的分辨率。
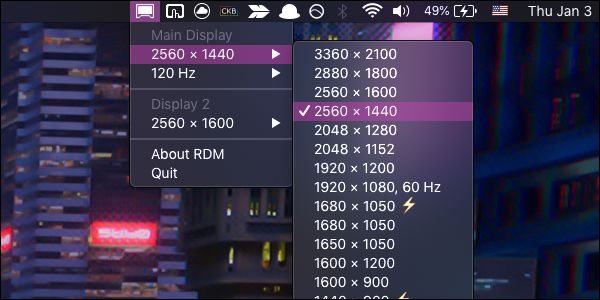
RDM does allow you to run higher resolutions than your native display, but they’ll be blurry as it will have to interpolate. Here my 13″ MacBook has a native resolution of 2560×1600, but is able to run at closer to 4K with scaling. It won’t look particularly good though, and might be too small to even read, so it’s best to stick with your native resolution. You can find your native resolution under the “Display” tab in About This Mac.
RDM确实允许您运行比本机显示器更高的分辨率,但是由于必须进行插值,因此它们将变得模糊。 在这里,我的13英寸MacBook的原始分辨率为2560×1600,但在缩放时能够以接近4K的速度运行。 不过它看起来不会特别好,甚至可能太小而无法阅读,因此最好坚持使用本机分辨率。 您可以在“关于本机”的“显示”选项卡下找到您的原始分辨率。
RDM has support for multiple displays at once, and even for changing refresh rates of high refresh rate displays, though may be limited if you have an older DisplayPort cable.
RDM一次支持多个显示器,甚至支持更改高刷新率显示器的刷新率,尽管如果您使用较旧的DisplayPort电缆可能会受到限制。
It’s not without some bugs and inconveniences though. Even if you launch the app at startup, it won’t load your default resolution, leaving you to manually select it. Additionally, if you use multiple monitors, every time you unplug your secondary monitor, your MacBook’s monitor will be reset to the default settings, and you’ll have to reselect the resolution you use again. Sometimes it will bug out and you’ll have to select the resolution twice. Overall though, it does its job pretty well.
但是,这并非没有错误和不便之处。 即使您在启动时启动应用程序,它也不会加载您的默认分辨率,而您需要手动选择它。 此外,如果您使用多台显示器,则每次拔下辅助显示器时,MacBook的显示器都将重置为默认设置,并且您将不得不重新选择使用的分辨率。 有时它会出错,您必须选择两次分辨率。 总体而言,它做得很好。
Image Credits: guteksk7/Shutterstock
图片来源: guteksk7 / Shutterstock
翻译自: https://www.howtogeek.com/400808/how-to-run-your-retina-display-at-its-native-resolution/
视网膜分辨率
这篇关于视网膜分辨率_如何以原始分辨率运行视网膜显示器的文章就介绍到这儿,希望我们推荐的文章对编程师们有所帮助!


