本文主要是介绍sheng的学习笔记-注册中心Eureka和负载均衡Ribbon,希望对大家解决编程问题提供一定的参考价值,需要的开发者们随着小编来一起学习吧!
Eureka-注册中心
Eureka简介
官方网址:
https://spring.io/projects/spring-cloud-netflix
Eureka介绍
Spring Cloud 封装了 Netflix 公司开发的 Eureka 模块来实现服务注册和发现(请对比Zookeeper)。Zooleeper nacos.
Eureka 采用了 C-S 的设计架构。Eureka Server 作为服务注册功能的服务器,它是服务注册中心。而系统中的其他微服务,使用 Eureka 的客户端连接到 Eureka Server并维持心跳连接。这样系统的维护人员就可以通过 Eureka Server 来监控系统中各个微服务是否正常运行。SpringCloud 的一些其他模块(比如Zuul)就可以通过 Eureka Server 来发现系统中的其他微服务,并执行相关的逻辑。
Eureka包含两个组件:Eureka Server和Eureka Client
Eureka Server提供服务注册服务
各个节点启动后,会在EurekaServer中进行注册,这样EurekaServer中的服务注册表中将会存储所有可用服务节点的信息,服务节点的信息可以在界面中直观的看到EurekaClient是一个Java客户端,用于简化Eureka Server的交互,客户端同时也具备一个内置的、使用轮询(round-robin)负载算法的负载均衡器。在应用启动后,将会向Eureka Server发送心跳(默认周期为30秒)。如果Eureka Server在多个心跳周期内没有接收到某个节点的心跳,EurekaServer将会从服务注册表中把这个服务节点移除(默认90秒)
Eureka基本原理
基本原理
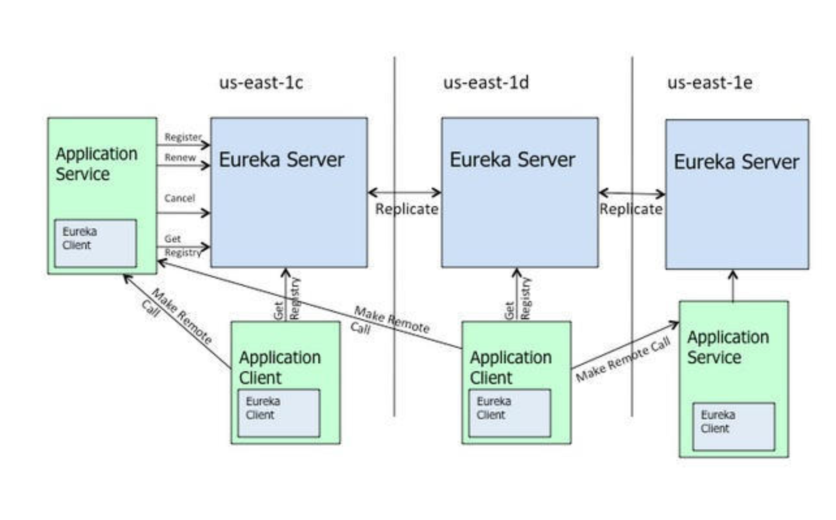
上图是来自eureka的官方架构图,这是基于集群配置的eureka;
- 处于不同节点的eureka通过Replicate进行数据同步
- Application Service为服务提供者
- Application Client为服务消费者
- Make Remote Call完成一次服务调用
服务启动后向Eureka注册,Eureka Server会将注册信息向其他Eureka Server进行同步,当服务消费者要调用服务提供者,则向服务注册中心获取服务提供者地址,然后会将服务提供者地址缓存在本地,下次再调用时,则直接从本地缓存中取,完成一次调用。
当服务注册中心Eureka Server检测到服务提供者因为宕机、网络原因不可用时,则在服务注册中心将服务置为DOWN状态,并把当前服务提供者状态向订阅者发布,订阅过的服务消费者更新本地缓存。
服务提供者在启动后,周期性(默认30秒)向Eureka Server发送心跳,以证明当前服务是可用状态。Eureka Server在一定的时间(默认90秒)未收到客户端的心跳,则认为服务宕机,注销该实例。
Eureka服务端流程图

看图说明:
1. 应用server的服务实例一上线,就会将自己注册到Eureka Server的注册表中;
2. 服务注册表一旦检测到有更新,就会将实例同步到读写缓存表;
3. 读写缓存表每隔30s,就会将实例信息同步给读缓存表;
4. 应用Client的服务,每隔30s,就会去Eureka Server的读缓存拉取所有的服务实例,这时候通信已经建立起来;
5. 服务注册表每隔60s,会自检测服务状态是否有更新,如果有不可用的服务,及时剔除掉;
6. 如果在90s这段时间内,服务实例还没发送心跳给Eureka Server,Eureka Server就会认为该实例的服务已经挂掉了,就会将其从注册表中剔除,并立马同步给读写缓存。
参数调优
默认参数弊端
从上图可看出:
一个服务感知另一个服务上线的最久时间是: 步骤3和步骤4,也就是60s;
一个服务感知另一个服务下线的最久时间是:步骤3和步骤4和步骤6,也就是150s。
稍微对时间敏感一点的项目,等这么久,是很难受的,需要进行调优。
我修改了默认的值,在下面配置中
eureka搭建

四个子项目作用如下:
①EurekaService:Eureka服务中心子项目,作用是作为Eureka服务程序,管理其他微服务的状态。其他Eureka客户端子项目运行时需在此模块进行注册。
②ServiceOne:Eureka客户端-微服务1,提供了一个业务接口“serviceOne”。
③ServiceTwo:Eureka客户端-微服务2,提供了一个业务接口“serviceTwo”。
④ServiceThree:Eureka客户端-微服务3,提供了两个业务接口:
“serviceThree_toOne”:内部调用ServiceOne的“serviceOne接口”
“serviceThree_toTwo”:内部调用ServiceTwo的“serviceTwo接口”
新建SpringCloud父项目
1.新建基于Maven的项目
作为SpringCloud其他子模块的父项目,new->Project,选择基于Maven的项目,填入GroupId和AtrifactId(项目名称)然后创建。
2.父项目不需要写源码,所以删除项目的src文件夹。
3.配置父项目pom.xml中需增加的内容:
<!--指定版本属性,下面引用-->
<properties><java.version>1.8</java.version><spring-cloud.version>2021.0.3</spring-cloud.version><fastjson.version>1.2.47</fastjson.version>
</properties>
<!--引入SpringBoot父项目,不要通过dependencyManagement方式引入,否则打包会有问题-->
<parent><groupId>org.springframework.boot</groupId><artifactId>spring-boot-starter-parent</artifactId><version>2.6.8</version><relativePath/> <!--lookup parent from repository-->
</parent><!--dependencyManagement可以理解为多继承父项目-->
<dependencyManagement><dependencies><!--引入SpringCloud父项目--><dependency><groupId>org.springframework.cloud</groupId><artifactId>spring-cloud-dependencies</artifactId><version>${spring-cloud.version}</version><type>pom</type><scope>import</scope></dependency><!--阿里巴巴Fastjson--><dependency><groupId>com.alibaba</groupId><artifactId>fastjson</artifactId><version>${fastjson.version}</version></dependency></dependencies>
</dependencyManagement><!--统一设置打包插件-->
<build><plugins><!--SpringBoot帮助maven打包项目的插件--><plugin><groupId>org.springframework.boot</groupId><artifactId>spring-boot-maven-plugin</artifactId></plugin></plugins>
</build>
新建Eureka服务中心模块
Eureka服务中心子项目,作用是作为Eureka服务程序,管理其他微服务的状态。
1.在父项目中,新建子模块项目:new->Module依然选择maven项目。
Eureka服务中心项目名称我们命名为EurekaService。
配置文件
Eureka的pom.xml中新增对Eureka的依赖包和maven打包插件:
<dependencies><!--Eureka项目核心包--><dependency><groupId>org.springframework.cloud</groupId><artifactId>spring-cloud-starter-netflix-eureka-server</artifactId></dependency>
<dependency><groupId>org.springframework.boot</groupId><artifactId>spring-boot-starter-web</artifactId></dependency>
</dependencies>
配置Eureka服务中心的application.yml配置文件
下面是文字版本的,便于拷贝
server:port: 8000eureka:instance:hostname: 127.0.0.1client:#由于该应用为注册中心,所以设置为false,代表不向注册中心注册自己register-with-eureka: false#由于注册中心的职责是维护服务器示例,它不需要去检索服务,所以设置为falsefetch-registry: falseservice-url:defaultZone: http://${eureka.instance.hostname}:${server.port}/eurekaserver:enable-self-preservation: false #关闭自我保护机制# 读写缓存同步给读缓存,默认是30s,将其改为3sresponse-cache-update-interval-ms: 3000# eureka定时检查实例时间, 如果在lease-expiration-duration-in-seconds时间内未收到实例心跳则注销该实例eviction-interval-timer-in-ms: 3000#关闭一级缓存,让客户端直接从二级缓存去读取,省去各缓存之间的同步的时间use-read-only-response-cache: falsespring:application:name: service-eureka
主类main方法:
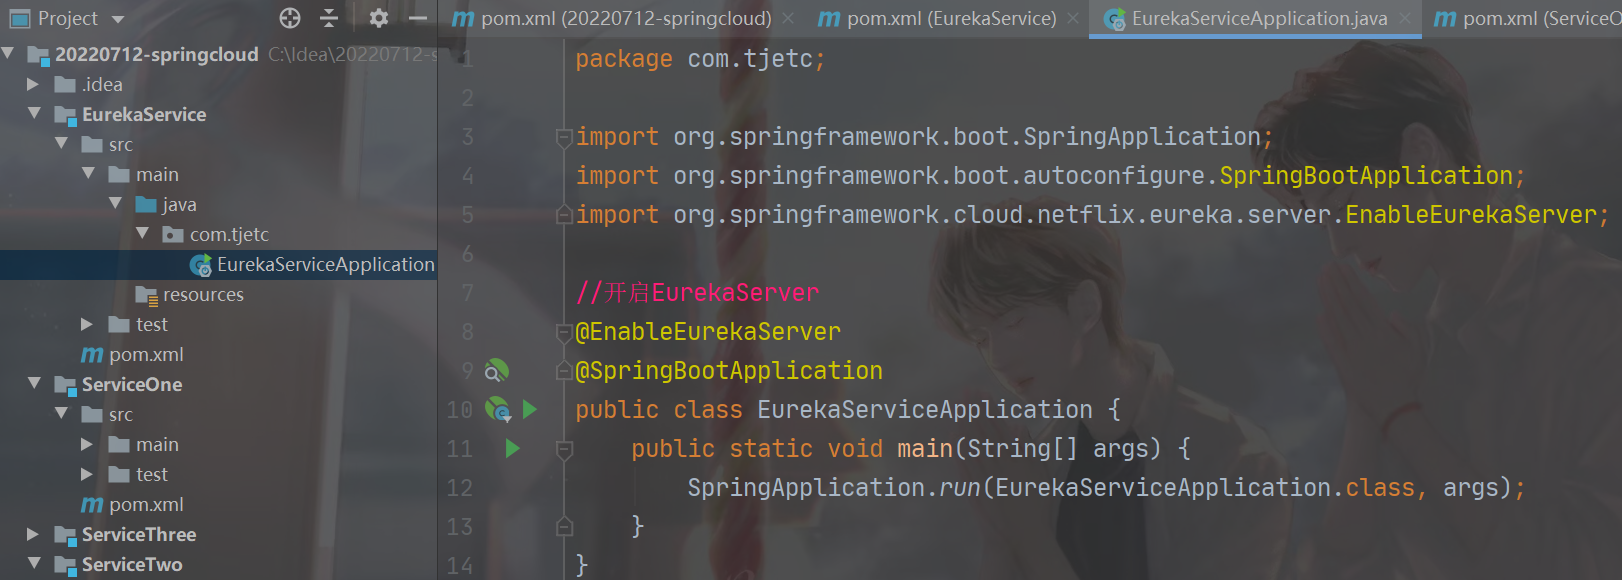
创建三个微服务子模块并注册为Eureka客户端
创建三个Eureka客户端子项目
我们创建3个Eureka客户端子项目,命名为ServiceOne、ServiceTwo、ServiceThree。它们的配置都基本一致。
①ServiceOne:在Eureka中注册为客户端,提供一个业务接口:http://127.0.0.1:8001/serviceOne
②ServiceTwo:在Eureka中注册为客户端,提供一个业务接口:http://127.0.0.1:8002/serviceTwo
③ServiceThree:在Eureka中注册为客户端,提供两个业务接口(内部调用ServiceOne和ServiceTwo的接口):
http://127.0.0.1:8003/serviceThree_toOne
http://127.0.0.1:8003/serviceThree_toTwo
配置Eureka客户端子项目的pom.xml
三个子项目pom.xml的依赖包完全一致:
<dependencies>
<!-- Eureka客户端 -->
<dependency>
<groupId>org.springframework.cloud</groupId>
<artifactId>spring-cloud-starter-netflix-eureka-client</artifactId>
</dependency>
<dependency>
<groupId>org.springframework.boot</groupId>
<artifactId>spring-boot-starter-web</artifactId>
</dependency>
<dependency>
<groupId>com.alibaba</groupId>
<artifactId>fastjson</artifactId>
</dependency>
</dependencies>
配置三个子项目的application.yml
三个子项目的application.yml配置文件基本一样:
ServiceOne的application.yml
server:port: 8001eureka:client:service-url:defaultZone: http://127.0.0.1:8000/eurekaregister-with-eureka: truefetch-registry: trueregistry-fetch-interval-seconds: 8instance:# eureka 客户端向服务端发送心跳得时间间隔  单位为秒(默认30秒)lease-renewal-interval-in-seconds: 1# eureka 服务端在收到最后一次心跳的等待时间上限,单位为秒(默认60秒)超时将踢出服务lease-expiration-duration-in-seconds: 3# 显示ipprefer-ip-address: true
spring:application:name: service1
ServiceTwo的application.yml
server:port: 8002eureka:client:service-url:defaultZone: http://127.0.0.1:8000/eurekaregister-with-eureka: truefetch-registry: trueregistry-fetch-interval-seconds: 8instance:# eureka 客户端向服务端发送心跳得时间间隔  单位为秒(默认30秒)lease-renewal-interval-in-seconds: 1# eureka 服务端在收到最后一次心跳的等待时间上限,单位为秒(默认60秒)超时将踢出服务lease-expiration-duration-in-seconds: 3# 显示ipprefer-ip-address: true
spring:application:name: service2
ServiceThree的application.yml
server:port: 8003eureka:client:service-url:defaultZone: http://127.0.0.1:8000/eurekaregister-with-eureka: truefetch-registry: trueregistry-fetch-interval-seconds: 8instance:# eureka 客户端向服务端发送心跳得时间间隔  单位为秒(默认30秒)lease-renewal-interval-in-seconds: 1# eureka 服务端在收到最后一次心跳的等待时间上限,单位为秒(默认60秒)超时将踢出服务lease-expiration-duration-in-seconds: 3# 显示ipprefer-ip-address: true
spring:application:name: service3
三个子项目的主类main方法
ServiceOne的主类(与ServiceTwo基本一致)
package com.example.demo;import org.springframework.boot.SpringApplication;
import org.springframework.boot.autoconfigure.SpringBootApplication;
import org.springframework.cloud.netflix.eureka.EnableEurekaClient;@EnableEurekaClient
@SpringBootApplication
public class Demo1Application {public static void main(String[] args) {SpringApplication.run(Demo1Application.class, args);}}
ServiceTwo的主类(与ServiceOne基本一致)
package com.example.demo;import org.springframework.boot.SpringApplication;
import org.springframework.boot.autoconfigure.SpringBootApplication;
import org.springframework.cloud.netflix.eureka.EnableEurekaClient;@EnableEurekaClient
@SpringBootApplication
public class Demo2Application {public static void main(String[] args) {SpringApplication.run(Demo2Application.class, args);}}
ServiceThree的主类,略有不同,需配置RestTemplate的Bean
package com.example.demo;import org.springframework.boot.SpringApplication;
import org.springframework.boot.autoconfigure.SpringBootApplication;
import org.springframework.cloud.client.loadbalancer.LoadBalanced;
import org.springframework.cloud.netflix.eureka.EnableEurekaClient;
import org.springframework.context.annotation.Bean;
import org.springframework.web.client.RestTemplate;@EnableEurekaClient
@SpringBootApplication
public class Demo3Application {@LoadBalanced@Beanpublic RestTemplate restTemplate(){return new RestTemplate();}public static void main(String[] args) {SpringApplication.run(Demo3Application.class, args);}}
三个子项目的Controller控制器
ServiceOne的控制器(与ServiceTwo基本一致)
package com.example.demo;import com.alibaba.fastjson.JSONObject;
import org.springframework.web.bind.annotation.RequestMapping;
import org.springframework.web.bind.annotation.RestController;@RestController
public class Server1Controller {@RequestMapping("/serviceOne")public JSONObject serviceOne(){JSONObject jsonObject  = new JSONObject();jsonObject.put("code","200");jsonObject.put("msg","service one return message");return jsonObject;}
}
ServiceTwo的控制器(与ServiceOne基本一致)
package com.example.demo;import com.alibaba.fastjson.JSONObject;
import org.springframework.web.bind.annotation.RequestMapping;
import org.springframework.web.bind.annotation.RestController;@RestController
public class Server2Controller {@RequestMapping("/serviceTwo")public JSONObject serviceOne(){JSONObject jsonObject  = new JSONObject();jsonObject.put("code","200");jsonObject.put("msg","service 2 return message");return jsonObject;}
}
ServiceThree的控制器
与前两个略有不同,需注入主类配置的RestTemplate,通过它内部调用微服务ServiceOne和ServiceTwo的业务接口
package com.example.demo;
import com.alibaba.fastjson.JSONObject;
import org.springframework.beans.factory.annotation.Autowired;
import org.springframework.web.bind.annotation.RequestMapping;
import org.springframework.web.bind.annotation.RestController;
import org.springframework.web.client.RestTemplate;@RestController
public class Service3Controller {@Autowiredprivate RestTemplate restTemplate;/*** http请求serviceOne的url并接收返回值* @return*/@RequestMapping("serviceThree_toOne")public JSONObject serviceThreeToOne() {//restTemplate发出get请求String result = restTemplate.getForObject("http://service1/serviceOne", String.class);JSONObject jsonObject = new JSONObject();jsonObject.put("code", "200");jsonObject.put("msg", "service three to one, return msg");jsonObject.put("data", result);return jsonObject;}@RequestMapping("serviceThree_toTwo")public JSONObject serviceThreeToTwo() {String result = restTemplate.getForObject("http://127.0.0.1:8002/serviceTwo", String.class);JSONObject jsonObject = new JSONObject();jsonObject.put("code", "200");jsonObject.put("msg", "service three to two, return msg");jsonObject.put("data", result);return jsonObject;}@RequestMapping("serviceThree")public JSONObject serviceThree() {JSONObject jsonObject = new JSONObject();jsonObject.put("code", "200");jsonObject.put("msg", "service three, return msg");return jsonObject;}
}
结果验证
1.按顺序启动各个子项目
先启动EurekaService子项目,它是Eureka服务器,其他子模块都需作为Eureka客户端在它上面进行注册!
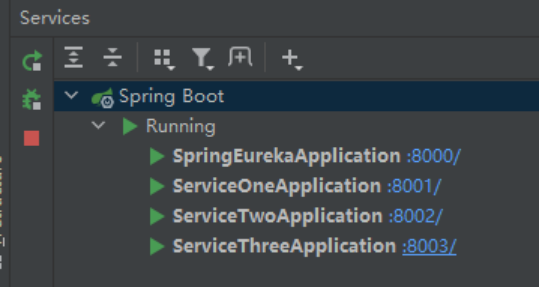
再启动ServiceOne、ServiceTwo和ServiceThree,启动后如下图:
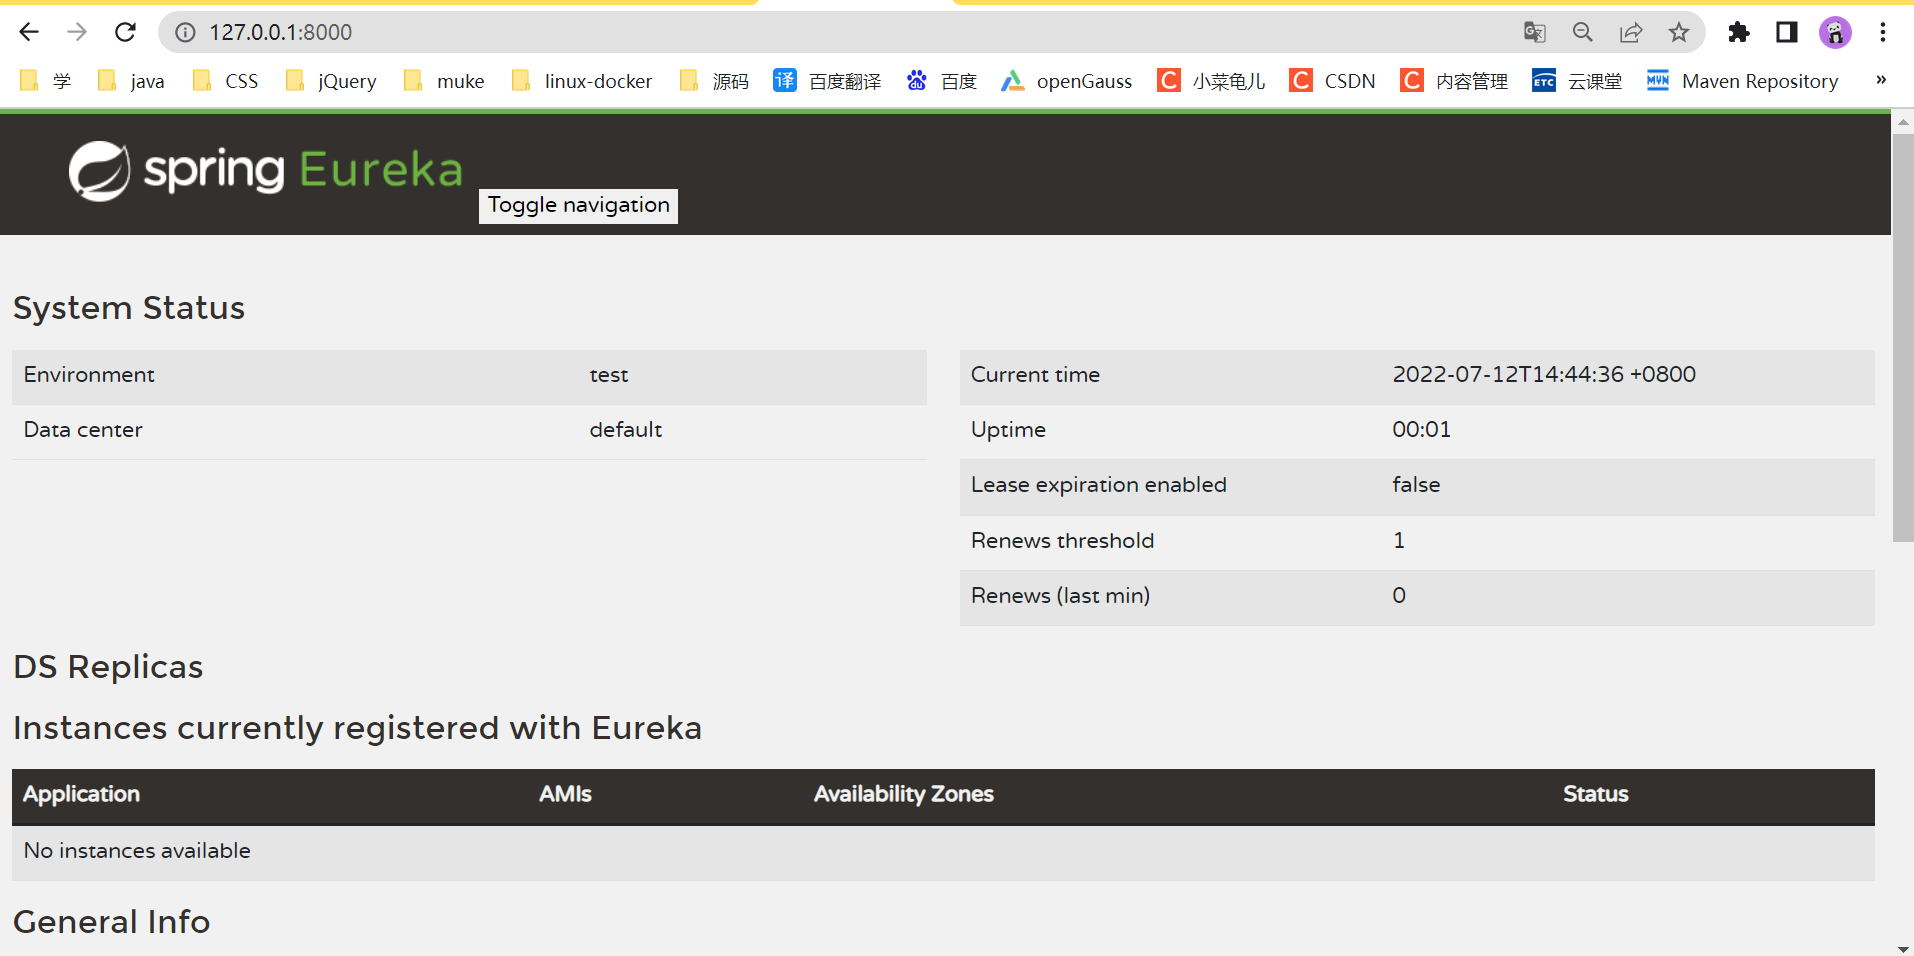
2.进入Eureka服务状态页面,查看服务注册情况
在谷歌浏览器中输入:http://127.0.0.1:8000/,进入Eureka服务页面,我们主要查看当前注册情况:

如上图所示,三个Eureka客户端子项目都注册成功。
3.验证ServiceOne的接口
在浏览器地址栏或者PostMan中请求ServiceOne的接口地址http://127.0.0.1:8001/serviceOne,验证请求结果:

5.验证ServiceThree包装的接口
在浏览器地址栏或者PostMan中请求ServiceThree的两个接口地址。
①http://127.0.0.1:8003/serviceThree_toOne,验证请求结果:

如上图所示,其内部成功的调用了ServiceOne提供的接口。
②http://127.0.0.1:8003/serviceThree_toTwo,验证请求结果:

如上图所示,其内部成功的调用了ServiceTwo提供的接口。
Ribbon-负载均衡
Ribbon简介
Spring Cloud Ribbon是基于Netflix Ribbon实现的一套客户端 负载均衡的工具。
简单的说,Ribbon是Netflix发布的开源项目,主要功能是提供客户端的软件负载均衡算法,将Netflix的中间层服务连接在一起。Ribbon客户端组件提供一系列完善的配置项如连接超时,重试等。简单的说,就是在配置文件中列出Load Balancer(简称LB)后面所有的机器,Ribbon会自动的帮助你基于某种规则(如简单轮询,随机连接等)去连接这些机器。我们也很容易使用Ribbon实现自定义的负载均衡算法。
LB,即负载均衡(Load Balance),在微服务或分布式集群中经常用的一种应用。
负载均衡简单的说就是将用户的请求平摊的分配到多个服务上,从而达到系统的HA。
常见的负载均衡有软件Nginx,LVS,硬件 F5等。
相应的在中间件,例如:dubbo和SpringCloud中均给我们提供了负载均衡,SpringCloud的负载均衡算法可以自定义。
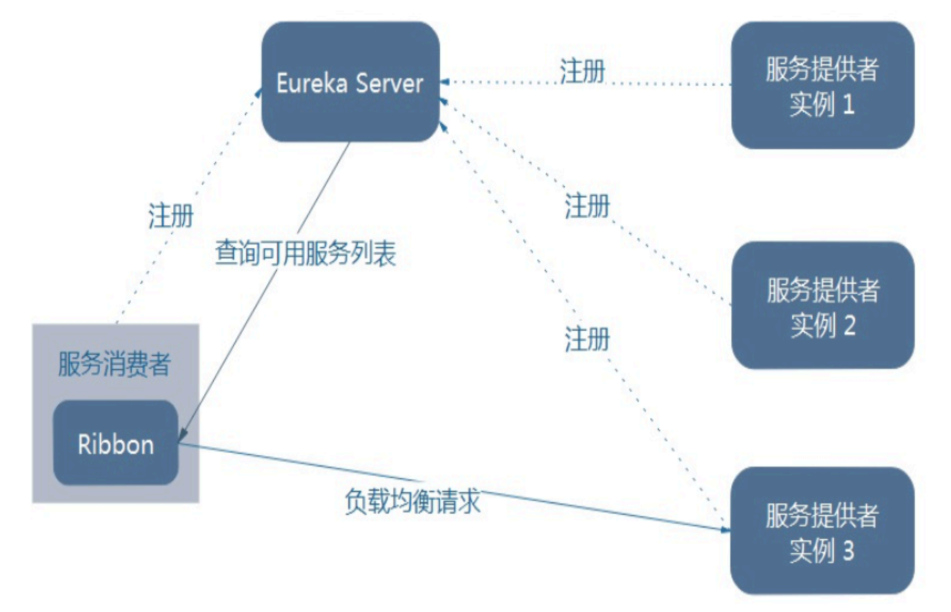
Ribbon在工作时分成两步:
第一步先选择 EurekaServer ,它优先选择在同一个区域内负载较少的server.
第二步再根据用户指定的策略,在从server取到的服务注册列表中选择一个地址。
其中Ribbon提供了多种策略:比如轮询、随机和根据响应时间加权。
Ribbon代码编写
模仿ServiceOne子项目“复制”出ServiceOneCopy子项目
在上面eureka项目中,把service1的项目复制一下,取名ServiceOneCopy.ServiceOneCopy的作用是对ServiceOne提供的业务进行分流,因此我们把ServiceOne中的所有内容全部复制到新项目中一份,包括:pom.xml、application.yml、SpringBoot应用主类“ServiceOneApplication”和业务控制器“ServiceOneController”:然后再做接下来的修改。
修改application.yml
ServiceOne中也作了说明:由于在ServiceThree中开启了ribbon负载均衡后,需要通过ServiceOne的“应用名称”而不是IP+端口号访问业务接口,因此我们要把需要负载均衡的业务模块,其应用名称保持一致!
注意,改下端口,改成8004

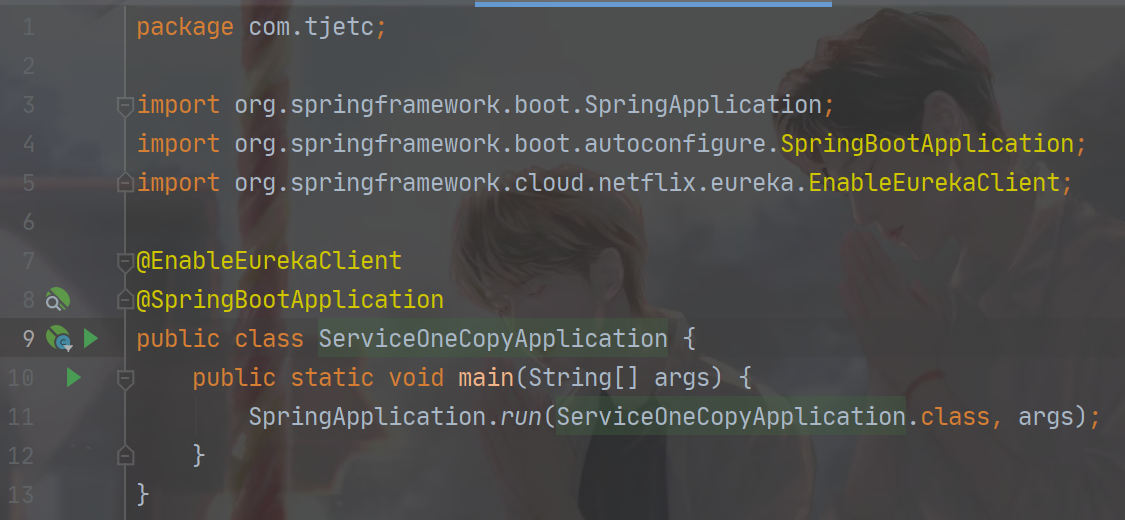
修改SpringBoot应用主类名称
在idea中直接运行项目时,会按主类的名称作为SpringBoot启动栏目的名称,因此我们需要把主类名称修改一下,我们修改为:“ServiceOneCopyApplication”。
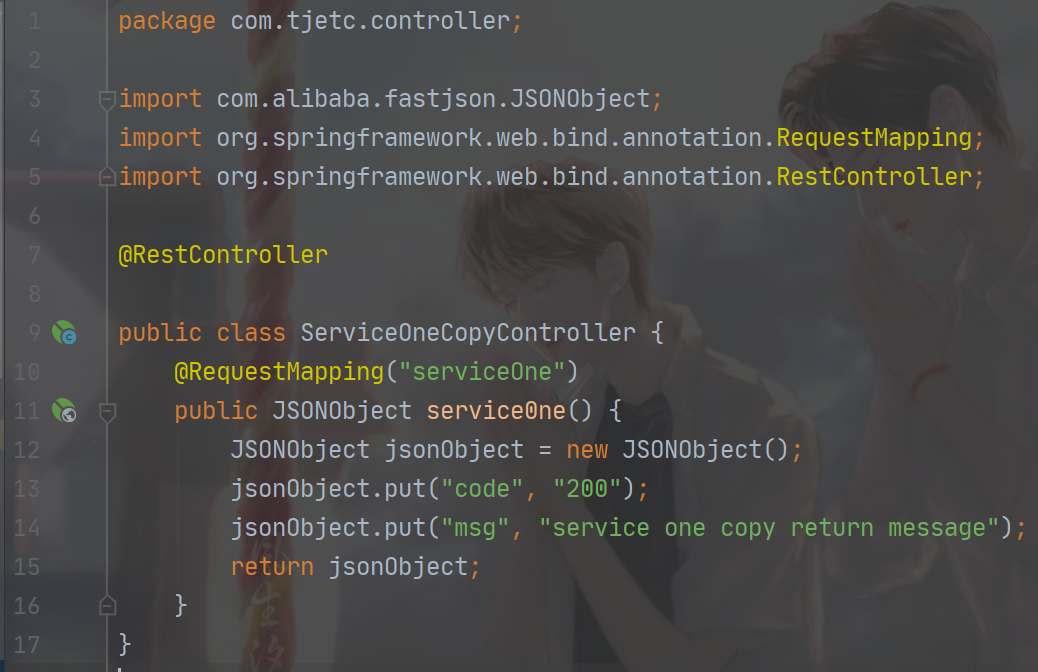
修改业务接口的响应结果
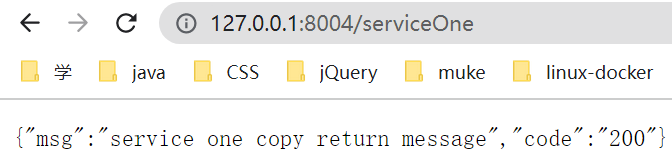
我们要分流ServiceOne的业务方法“serviceOne”,因此方法本身不能做改变(方法名、参数、返回结果格式),但为了验证分流的结果,我们在返回的响应结果中增加了“copy”字样文字:
http://127.0.0.1:8004/serviceOne
http://127.0.0.1:8000/

修改ServiceThree子项目
我们需要在ServiceThree中开启ribbon的负载均衡功能,由于ribbon依赖包已被Eureka引用,因此我们无需引入任何新依赖包,所以不需要修改pom.xml文件。
application.yml文件也不做任何修改。
下面对需要修改的两处进行说明:
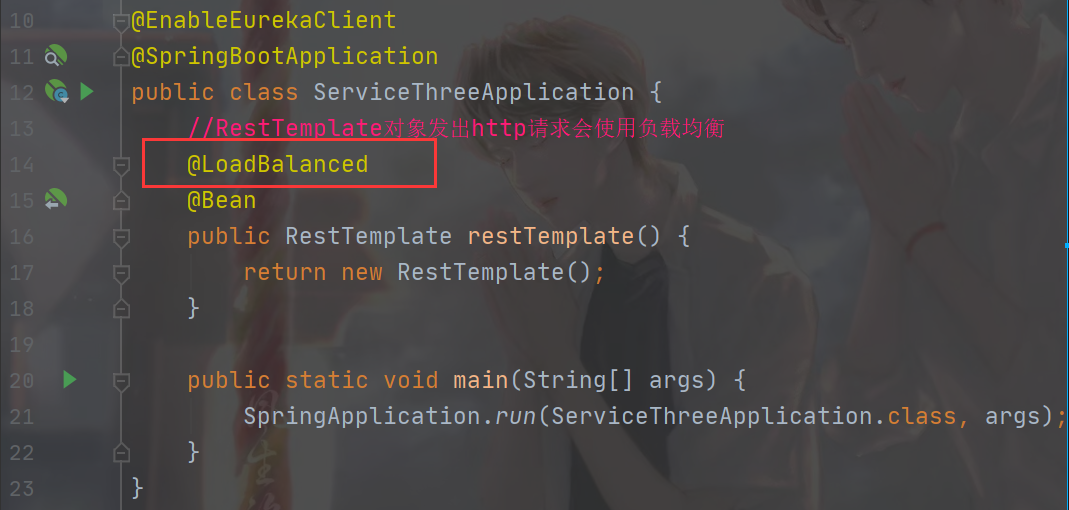
修改SpringBoot应用主类,提供负载均衡能力
我们在“ServiceThreeApplication”主类中,给RestTemplate的Bean方法上添加@LoadBalanced注解,给RestTemplate对象开启ribbon负载均衡能力。
之后RestTemplate发送请求时,就会自动进行请求的分流。
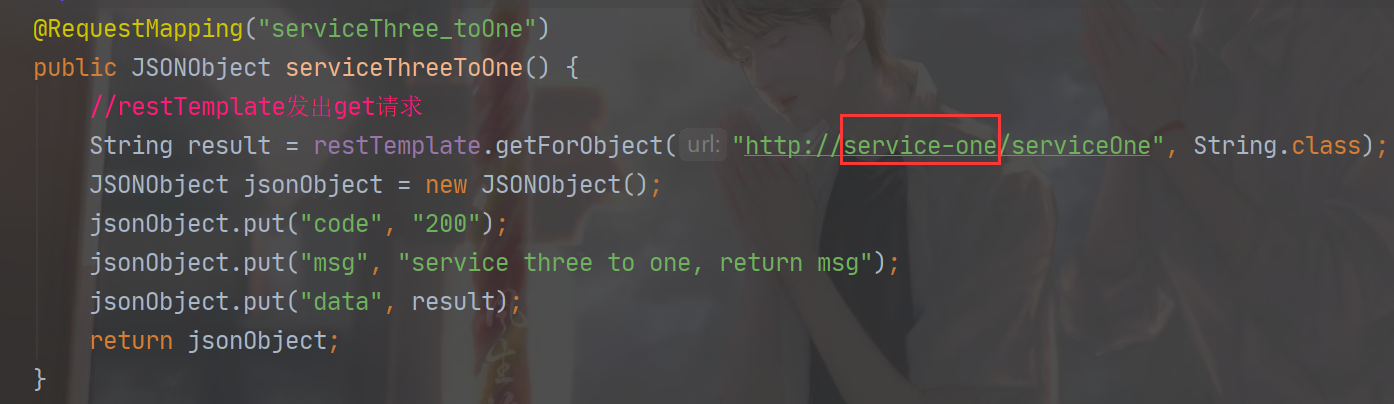
修改请求其他内部业务接口的调用方式
由于需要对某一业务接口“负载均衡”,那么我们就不能再使用原先的IP+端口号的方式调用了,否则还是会把请求指定到一个部署的服务中。
ribbon的负载均衡是通过使用“应用程序名”来代替IP+端口号,来调用业务接口的。
因此我们需要在控制器中修改调用ServieOne的业务接口方式:
从:http://127.0.0.1:8001/serviceOne
修改为:http://service-one/serviceOne
结果验证
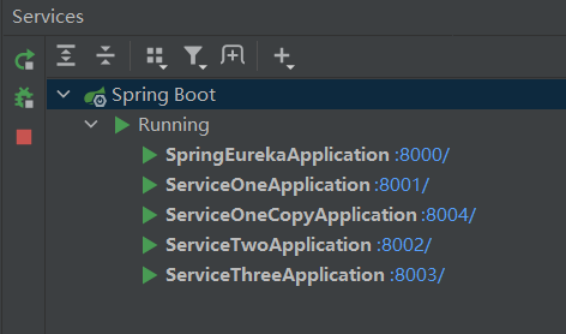
按顺序启动各个子项目
先启动EurekaService子项目,它是Eureka服务器,其他子模块都需作为Eureka客户端在它上面进行注册!
再启动ServiceOne、ServiceOneCopy、ServiceTwo和ServiceThree,启动后如下图:
进入Eureka服务状态页面,查看服务注册情况
在谷歌浏览器中输入:http://127.0.0.1:8000/,进入Eureka服务页面,我们主要查看当前注册情况:

如上图所示,名为“service-one”的微服务,在Eureka中注册数量为2,一个是ServiceOne启动的实例、另一个是ServiceOneCopy启动的实例。
验证ServiceThree的接口,验证负载均衡情况
在浏览器地址栏或者PostMan中重复请求ServiceThree的接口地址:
http://127.0.0.1:8003/serviceThree_toOne
第一次调用:

第二次调用:

如上图所示,其内部成功的调用了ServiceOne提供的接口,并负载均衡分流至了两个模块!
参考文章:
https://blog.csdn.net/weixin_45701868/article/details/125738876
这篇关于sheng的学习笔记-注册中心Eureka和负载均衡Ribbon的文章就介绍到这儿,希望我们推荐的文章对编程师们有所帮助!