本文主要是介绍使用pinpoint服务微服务链路跟踪,希望对大家解决编程问题提供一定的参考价值,需要的开发者们随着小编来一起学习吧!
服务依赖
- jdk 1.8
- hadoop 2.5.1
- hbase 1.2.6
- pinpoint 3.3.3
- windows7系统
hadoop安装
- 下载Hadoop包
http://archive.apache.org/dist/hadoop/core/hadoop-2.5.1/下载地址2.5.1版本安装包,访问http://archive.apache.org/dist/hadoop/core/hadoop-2.5.1/。

- 解压Hadoop包,并添加环境变量
将上面下载好的Hadoop包解压到一个目录,并设置环境变量
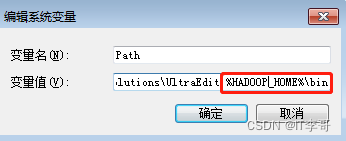
HADOOP_HOME=D:\hadoop-2.5.1
将该路径"%HADOOP_HOME%\bin"添加到系统路径path中

- 下载window util for hadoop
下载地址是:https://codeload.github.com/gvreddy1210/bin/zip/master,注意该工具的版本与Hadoop版本的需要兼容,下载完成后解压覆盖到上述路径的bin目录下,例如:D:\hadoop-2.5.1\bin。
- 创建DataNode和NameNode
创建 Data目录和Name目录,用来存储数据,例如:D:\hadoop-2.5.1\hadoop-2.5.1\data\datanode和D:\hadoop-2.5.1\data\namenode。
- 修改Hadoop相关的配置文件
主要修改四个配置文件:core-site.xml, hdfs-site.xml, mapred-site.xml, yarn-site.xml,,这四个文件的路径为:D:\hadoop-2.5.1\etc\hadoop:
- core-site.xml完整内容如下
<?xml version="1.0" encoding="UTF-8"?>
<?xml-stylesheet type="text/xsl" href="configuration.xsl"?>
<!--Licensed under the Apache License, Version 2.0 (the "License");you may not use this file except in compliance with the License.You may obtain a copy of the License athttp://www.apache.org/licenses/LICENSE-2.0Unless required by applicable law or agreed to in writing, softwaredistributed under the License is distributed on an "AS IS" BASIS,WITHOUT WARRANTIES OR CONDITIONS OF ANY KIND, either express or implied.See the License for the specific language governing permissions andlimitations under the License. See accompanying LICENSE file.
--><!-- Put site-specific property overrides in this file. --><configuration><property><name>fs.defaultFS</name><value>hdfs://localhost:9000</value></property>
</configuration>
- hdfs-site.xml完整内容如下
<?xml version="1.0" encoding="UTF-8"?>
<?xml-stylesheet type="text/xsl" href="configuration.xsl"?>
<!--Licensed under the Apache License, Version 2.0 (the "License");you may not use this file except in compliance with the License.You may obtain a copy of the License athttp://www.apache.org/licenses/LICENSE-2.0Unless required by applicable law or agreed to in writing, softwaredistributed under the License is distributed on an "AS IS" BASIS,WITHOUT WARRANTIES OR CONDITIONS OF ANY KIND, either express or implied.See the License for the specific language governing permissions andlimitations under the License. See accompanying LICENSE file.
--><!-- Put site-specific property overrides in this file. --><configuration>
<configuration><property><name>dfs.replication</name><value>1</value></property><property><name>dfs.namenode.name.dir</name><value>/D:/hadoop-2.5.1/data/namenode</value></property><property><name>dfs.datanode.data.dir</name><value>/D:/hadoop-2.5.1/data/datanode</value></property>
</configuration>
</configuration>
- mapred-site.xml完整内容如下
<?xml version="1.0"?>
<?xml-stylesheet type="text/xsl" href="configuration.xsl"?>
<!--Licensed under the Apache License, Version 2.0 (the "License");you may not use this file except in compliance with the License.You may obtain a copy of the License athttp://www.apache.org/licenses/LICENSE-2.0Unless required by applicable law or agreed to in writing, softwaredistributed under the License is distributed on an "AS IS" BASIS,WITHOUT WARRANTIES OR CONDITIONS OF ANY KIND, either express or implied.See the License for the specific language governing permissions andlimitations under the License. See accompanying LICENSE file.
--><!-- Put site-specific property overrides in this file. --><configuration><property><name>mapreduce.framework.name</name><value>yarn</value></property>
</configuration>
- yarn-site.xml完整内容如下
<?xml version="1.0"?>
<!--Licensed under the Apache License, Version 2.0 (the "License");you may not use this file except in compliance with the License.You may obtain a copy of the License athttp://www.apache.org/licenses/LICENSE-2.0Unless required by applicable law or agreed to in writing, softwaredistributed under the License is distributed on an "AS IS" BASIS,WITHOUT WARRANTIES OR CONDITIONS OF ANY KIND, either express or implied.See the License for the specific language governing permissions andlimitations under the License. See accompanying LICENSE file.
-->
<configuration><!-- Site specific YARN configuration properties --><property><name>yarn.nodemanager.aux-services</name><value>mapreduce_shuffle</value></property><property><name>yarn.nodemanager.aux-services.mapreduce.shuffle.class</name><value>org.apache.hadoop.mapred.ShuffleHandler</value></property><property><name>yarn.scheduler.minimum-allocation-mb</name><value>1024</value></property><property><name>yarn.nodemanager.resource.memory-mb</name><value>4096</value></property><property><name>yarn.nodemanager.resource.cpu-vcores</name><value>2</value></property></configuration>
注意:上面涉及的路径改成你自己的路径。
- 初始化节点
进入到hadoop\bin目录下,执行命令:hadoop namenode -format
- 启动Hadoop
完成上面的初始化工作后,就可以启动Hadoop了,进入到hadoop\sbin目录下,执行命令:start-all(关闭命令是 stop-all)
启动成功后访问:http://localhost:50070 查看是否成功
hbase 安装
- 下载Hbase包
下载地址:Index of /dist/hbase/1.2.6

- 解压并修改配置
修改conf/hbase-env.cmd、conf/hbase-site.xml配置文件
- hbase-env.cmd修改其中的set JAVA_HOME=D:\java\jdk1.8.0_162。完整内容如下:
@rem/**
@rem * Licensed to the Apache Software Foundation (ASF) under one
@rem * or more contributor license agreements.  See the NOTICE file
@rem * distributed with this work for additional information
@rem * regarding copyright ownership.  The ASF licenses this file
@rem * to you under the Apache License, Version 2.0 (the
@rem * "License"); you may not use this file except in compliance
@rem * with the License.  You may obtain a copy of the License at
@rem *
@rem *     http://www.apache.org/licenses/LICENSE-2.0
@rem *
@rem * Unless required by applicable law or agreed to in writing, software
@rem * distributed under the License is distributed on an "AS IS" BASIS,
@rem * WITHOUT WARRANTIES OR CONDITIONS OF ANY KIND, either express or implied.
@rem * See the License for the specific language governing permissions and
@rem * limitations under the License.
@rem */@rem Set environment variables here.@rem The java implementation to use.  Java 1.7+ required.
set JAVA_HOME=D:\java\jdk1.8.0_162@rem Extra Java CLASSPATH elements.  Optional.
@rem set HBASE_CLASSPATH=@rem The maximum amount of heap to use. Default is left to JVM default.
@rem set HBASE_HEAPSIZE=1000@rem Uncomment below if you intend to use off heap cache. For example, to allocate 8G of
@rem offheap, set the value to "8G".
@rem set HBASE_OFFHEAPSIZE=1000@rem For example, to allocate 8G of offheap, to 8G:
@rem etHBASE_OFFHEAPSIZE=8G@rem Extra Java runtime options.
@rem Below are what we set by default.  May only work with SUN JVM.
@rem For more on why as well as other possible settings,
@rem see http://wiki.apache.org/hadoop/PerformanceTuning
@rem JDK6 on Windows has a known bug for IPv6, use preferIPv4Stack unless JDK7.
@rem @rem See TestIPv6NIOServerSocketChannel.
set HBASE_OPTS="-XX:+UseConcMarkSweepGC" "-Djava.net.preferIPv4Stack=true"@rem Configure PermSize. Only needed in JDK7. You can safely remove it for JDK8+
set HBASE_MASTER_OPTS=%HBASE_MASTER_OPTS% "-XX:PermSize=128m" "-XX:MaxPermSize=128m"
set HBASE_REGIONSERVER_OPTS=%HBASE_REGIONSERVER_OPTS% "-XX:PermSize=128m" "-XX:MaxPermSize=128m"@rem Uncomment below to enable java garbage collection logging for the server-side processes
@rem this enables basic gc logging for the server processes to the .out file
@rem set SERVER_GC_OPTS="-verbose:gc" "-XX:+PrintGCDetails" "-XX:+PrintGCDateStamps" %HBASE_GC_OPTS%@rem this enables gc logging using automatic GC log rolling. Only applies to jdk 1.6.0_34+ and 1.7.0_2+. Either use this set of options or the one above
@rem set SERVER_GC_OPTS="-verbose:gc" "-XX:+PrintGCDetails" "-XX:+PrintGCDateStamps" "-XX:+UseGCLogFileRotation" "-XX:NumberOfGCLogFiles=1" "-XX:GCLogFileSize=512M" %HBASE_GC_OPTS%@rem Uncomment below to enable java garbage collection logging for the client processes in the .out file.
@rem set CLIENT_GC_OPTS="-verbose:gc" "-XX:+PrintGCDetails" "-XX:+PrintGCDateStamps" %HBASE_GC_OPTS%@rem Uncomment below (along with above GC logging) to put GC information in its own logfile (will set HBASE_GC_OPTS)
@rem set HBASE_USE_GC_LOGFILE=true@rem Uncomment and adjust to enable JMX exporting
@rem See jmxremote.password and jmxremote.access in $JRE_HOME/lib/management to configure remote password access.
@rem More details at: http://java.sun.com/javase/6/docs/technotes/guides/management/agent.html
@rem
@rem set HBASE_JMX_BASE="-Dcom.sun.management.jmxremote.ssl=false" "-Dcom.sun.management.jmxremote.authenticate=false"
@rem set HBASE_MASTER_OPTS=%HBASE_JMX_BASE% "-Dcom.sun.management.jmxremote.port=10101"
@rem set HBASE_REGIONSERVER_OPTS=%HBASE_JMX_BASE% "-Dcom.sun.management.jmxremote.port=10102"
@rem set HBASE_THRIFT_OPTS=%HBASE_JMX_BASE% "-Dcom.sun.management.jmxremote.port=10103"
@rem set HBASE_ZOOKEEPER_OPTS=%HBASE_JMX_BASE% -Dcom.sun.management.jmxremote.port=10104"@rem File naming hosts on which HRegionServers will run.  $HBASE_HOME/conf/regionservers by default.
@rem set HBASE_REGIONSERVERS=%HBASE_HOME%\conf\regionservers@rem Where log files are stored.  $HBASE_HOME/logs by default.
@rem set HBASE_LOG_DIR=%HBASE_HOME%\logs@rem A string representing this instance of hbase. $USER by default.
@rem set HBASE_IDENT_STRING=%USERNAME%@rem Seconds to sleep between slave commands.  Unset by default.  This
@rem can be useful in large clusters, where, e.g., slave rsyncs can
@rem otherwise arrive faster than the master can service them.
@rem set HBASE_SLAVE_SLEEP=0.1@rem Tell HBase whether it should manage it's own instance of Zookeeper or not.
@rem set HBASE_MANAGES_ZK=true
- hbase-site.xml完整内容如下
<?xml version="1.0"?>
<?xml-stylesheet type="text/xsl" href="configuration.xsl"?>
<!--
/**** Licensed to the Apache Software Foundation (ASF) under one* or more contributor license agreements.  See the NOTICE file* distributed with this work for additional information* regarding copyright ownership.  The ASF licenses this file* to you under the Apache License, Version 2.0 (the* "License"); you may not use this file except in compliance* with the License.  You may obtain a copy of the License at**     http://www.apache.org/licenses/LICENSE-2.0** Unless required by applicable law or agreed to in writing, software* distributed under the License is distributed on an "AS IS" BASIS,* WITHOUT WARRANTIES OR CONDITIONS OF ANY KIND, either express or implied.* See the License for the specific language governing permissions and* limitations under the License.*/
-->
<configuration><property> <name>hbase.master</name> <value>localhost</value> </property> <!-- 指定hbase是文件存储路径 1、使用本地路径file:///F:/hbase/hbase-1.2.6/data/root2、使用hdfshdfs://localhost:9000/hbase 使用hdfs集群要把hadoop的hdfs-site.xml和core-site.xml 放到hbase/conf下如果hdfs是集群,可以配成hdfs://集群名/hbase  如:hdfs://ns1/hbase--><property>  <name>hbase.rootdir</name>  <value>hdfs://localhost:9000/hbase</value>  </property><property>  <name>hbase.zookeeper.quorum</name>  <value>localhost</value>  </property>  <!-- 指定hbase master节点信息浏览的端口号 --><property>  <name>hbase.master.info.port</name>  <value>60000</value>  </property> <property>  <name>hbase.cluster.distributed</name>  <value>false</value>  </property>
</configuration>
- 启动Hbase
进入到hbase\bin目录下,执行命令:start-hbase
启动完成后可以在http://localhost:60000/master-status浏览主节点信息
pinpoint 安装
- 初始化脚本
下载脚本,脚本下载地址:https://github.com/pinpoint-apm/pinpoint/tree/2.3.x/hbase/scripts

切换到上面安装的hbase的bin目录。执行如下代码
hbase shell d:/hbase-create.hbase- 下载和启动服务
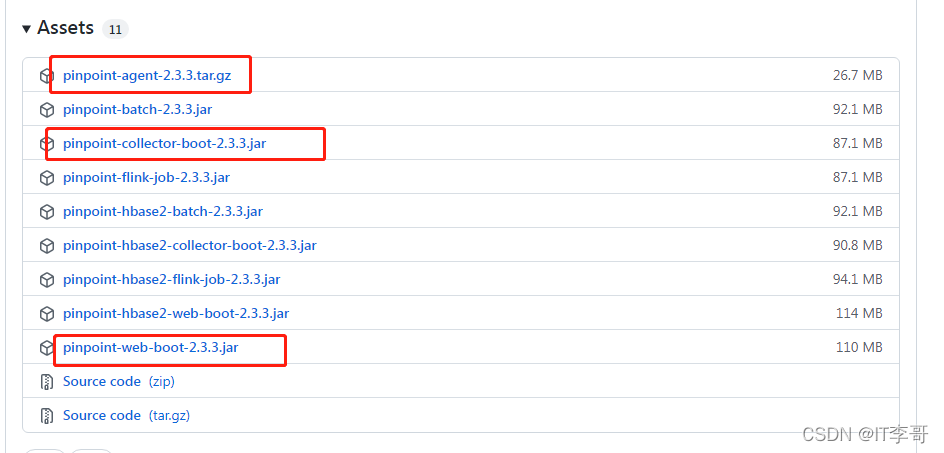
下载地址:https://github.com/pinpoint-apm/pinpoint/releases下载pinpoint-collector、pinpoint-web、pinpoint-agent。

- 启动pinpoint-collector
java -jar -Dpinpoint.zookeeper.address=127.0.0.1 pinpoint-collector-boot-2.3.3.jar- 启动pinpoint-web
java -jar -Dpinpoint.zookeeper.address=127.0.0.1 pinpoint-web-boot-2.3.3.jar启动完成后,访问http://127.0.0.1:8080/即可看到pinpoint界面
- 启动代理
解压pinpoint-agent压缩包,并在服务启动增加启动参数,例如
java -jar -javaagent:pinpoint-agent-2.3.3/pinpoint-bootstrap.jar -Dpinpoint.agentId=test-agent -Dpinpoint.applicationName=TESTAPP pinpoint-quickstart-testapp-2.3.3.jar应用程序打印出pinpoint对应的txid
- 应用程序logback配置文件增加PtxId和PspanId打印
修改前
<property name="log_pattern" value="[%-5p][%d{yyyy-MM-dd HH:mm:ss}] [%t] [%X{requestId}]   %c - %m%n"/>修改后
<property name="log_pattern" value="[%-5p][%d{yyyy-MM-dd HH:mm:ss}] [%t] [%X{requestId}] [TxId : %X{PtxId:-0} , SpanId : %X{PspanId:-0}] %c - %m%n"/>- agent 配置修改
修改D:\pinpoint-agent-2.3.3\profiles\release下的pinpoint.config配置文件,修改内容如下:
profiler.sampling.rate=1
# 如果是用logback修改这个为true,如果是其他的修改对应的profiler.xxx.logging.transactioninfo
profiler.logback.logging.transactioninfo=true
修改完成后,重启服务即可打印出对应的txid.

这篇关于使用pinpoint服务微服务链路跟踪的文章就介绍到这儿,希望我们推荐的文章对编程师们有所帮助!


