本文主要是介绍brownie部署与测试智能合约,希望对大家解决编程问题提供一定的参考价值,需要的开发者们随着小编来一起学习吧!
brownie是一种Python语言的开发与测试框架,它可以部署.sol、.py格式的智能合约。
- 完全支持Solidity和Vyper
- 通过pytest进行智能合约测试,包括基于跟踪的覆盖率评估
- 通过hypothesis进行基于属性和状态的测试
- 强大的调试工具,包括python风格的跟踪和自定义错误字符串
- 内置控制台,用于快速项目互动
- 支持ethPM软件包
下面,介绍brownie的安装、部署智能合约、测试智能合约。
1、准备环境
1.1 安装nodejs、python3
安装nodejs,请参考这篇文章的第1节
安装Python3,请参考这篇文章的第9节
1.2 安装brownie
这里选择brownie==1.12.3版本,进行安装
pip3 install eth-brownie==1.12.3
1.3 安装ganache-cli
npm install -g ganache-cli
2、创建工程browthree
2.1 创建文件与文件夹
a) 打开控制台终端,依次输入如下命令:
mkdir browthree
cd browthree
brownie init
touch brownie-config.yaml
touch .env
b) 填写brownie的配置文件:brownie-config.yaml
// brownthree/brownie-config.yaml
dependencies:- OpenZeppelin/openzeppelin-contracts@3.4.0
compiler:solc:remappings:- '@openzeppelin=OpenZeppelin/openzeppelin-contracts@3.4.0'
dotenv: .env
networks:networks:# any settings given here will replace the defaultsdevelopment:host: http://127.0.0.1gas_price: 0persist: falsereverting_tx_gas_limit: 6721975test_rpc:cmd: ganache-cliport: 8545gas_limit: 6721975accounts: 10# set your Infura API token to the environment variable ${WEB3_INFURA_PROJECT_ID}mainnet:host: https://mainnet.infura.io/v3/${WEB3_INFURA_PROJECT_ID}goerli:host: https://goerli.infura.io/v3/${WEB3_INFURA_PROJECT_ID}kovan:host: https://kovan.infura.io/v3/${WEB3_INFURA_PROJECT_ID}rinkeby:host: https://rinkeby.infura.io/v3/${WEB3_INFURA_PROJECT_ID}ropsten:host: https://ropsten.infura.io/v3/${WEB3_INFURA_PROJECT_ID}classic:host: https://www.ethercluster.com/etckotti:host: https://www.ethercluster.com/kotti
wallets:from_key: ${PRIVATE_KEY}
c) 填写环境变量文件: .env
// brownthree/.env
export WEB3_INFURA_PROJECT_ID='59...b6'
export PRIVATE_KEY='85...84'
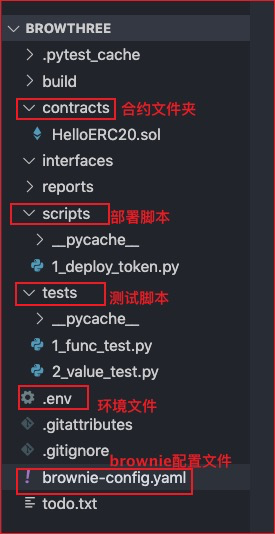
d) browthree工程的目录结构

2.2 编写智能合约
在browthree/contracts目录,创建一个智能合约文件: HelloERC20.sol
cd browthree/contracts
touch HelloERC20.sol
// HelloERC20.sol
pragma solidity >=0.4.22 <0.6.0;interface tokenRecipient { function receiveApproval(address _from, uint256 _value, address _token, bytes calldata _extraData) external;
}contract HelloERC20 {// Public variables of the tokenstring public name;string public symbol;uint8 public decimals = 18;// 18 decimals is the strongly suggested default, avoid changing ituint256 public totalSupply;// This creates an array with all balancesmapping (address => uint256) public balanceOf;mapping (address => mapping (address => uint256)) public allowance;// This generates a public event on the blockchain that will notify clientsevent Transfer(address indexed from, address indexed to, uint256 value);// This generates a public event on the blockchain that will notify clientsevent Approval(address indexed _owner, address indexed _spender, uint256 _value);// This notifies clients about the amount burntevent Burn(address indexed from, uint256 value);constructor(uint256 initialSupply,string memory tokenName,string memory tokenSymbol) public {totalSupply = initialSupply * 10 ** uint256(decimals);  // Update total supply with the decimal amountbalanceOf[msg.sender] = totalSupply;                // Give the creator all initial tokensname = tokenName;                                   // Set the name for display purposessymbol = tokenSymbol;                               // Set the symbol for display purposes}/*** Internal transfer, only can be called by this contract*/function _transfer(address _from, address _to, uint _value) internal {// Prevent transfer to 0x0 address. Use burn() insteadrequire(_to != address(0x0));// Check if the sender has enoughrequire(balanceOf[_from] >= _value);// Check for overflowsrequire(balanceOf[_to] + _value >= balanceOf[_to]);// Save this for an assertion in the futureuint previousBalances = balanceOf[_from] + balanceOf[_to];// Subtract from the senderbalanceOf[_from] -= _value;// Add the same to the recipientbalanceOf[_to] += _value;emit Transfer(_from, _to, _value);// Asserts are used to use static analysis to find bugs in your code. They should never failassert(balanceOf[_from] + balanceOf[_to] == previousBalances);}function transfer(address _to, uint256 _value) public returns (bool success) {_transfer(msg.sender, _to, _value);return true;}function transferFrom(address _from, address _to, uint256 _value) public returns (bool success) {require(_value <= allowance[_from][msg.sender]);     // Check allowanceallowance[_from][msg.sender] -= _value;_transfer(_from, _to, _value);return true;}function approve(address _spender, uint256 _value) publicreturns (bool success) {allowance[msg.sender][_spender] = _value;emit Approval(msg.sender, _spender, _value);return true;}function approveAndCall(address _spender, uint256 _value, bytes memory _extraData)publicreturns (bool success) {tokenRecipient spender = tokenRecipient(_spender);if (approve(_spender, _value)) {spender.receiveApproval(msg.sender, _value, address(this), _extraData);return true;}}function burn(uint256 _value) public returns (bool success) {require(balanceOf[msg.sender] >= _value);   // Check if the sender has enoughbalanceOf[msg.sender] -= _value;            // Subtract from the sendertotalSupply -= _value;                      // Updates totalSupplyemit Burn(msg.sender, _value);return true;}function burnFrom(address _from, uint256 _value) public returns (bool success) {require(balanceOf[_from] >= _value);                // Check if the targeted balance is enoughrequire(_value <= allowance[_from][msg.sender]);    // Check allowancebalanceOf[_from] -= _value;                         // Subtract from the targeted balanceallowance[_from][msg.sender] -= _value;             // Subtract from the sender's allowancetotalSupply -= _value;                              // Update totalSupplyemit Burn(_from, _value);return true;}
}
2.3 编写测试脚本
在browthree/tests目录,创建一个测试脚本文件: 1_func_test.py
cd browthree/tests
touch 1_func_test.py
// 1_func_test.py
import pytest
from brownie import HelloERC20, accounts@pytest.fixture
def token():return accounts[0].deploy(HelloERC20, 1000,"AppleToken", "APT")def test_transfer(token):token.transfer(accounts[1], "100 ether", {'from': accounts[0]})assert token.balanceOf(accounts[0]) == "900 ether"def test_name(token):assert token.name() == "AppleToken"def test_symbol(token):assert token.symbol() == "APT"def test_totalSupply(token):assert token.totalSupply() == "1000 ether"def test_approve(token):token.approve(accounts[1],"100 ether",{'from':accounts[0]})assert token.allowance(accounts[0],accounts[1]) == "100 ether"def test_burn(token):token.burn("100 ether",{'from':accounts[0]})print("addr=",token.address)assert token.totalSupply() == "900 ether"def test_transferFrom(token):token.approve(accounts[1],"100 ether",{'from':accounts[0]})token.transferFrom(accounts[0],accounts[1],"100 ether",{'from':accounts[1]})assert token.balanceOf(accounts[1]) == "100 ether"def test_burnFrom(token):token.approve(accounts[1],"100 ether",{'from':accounts[0]})token.burnFrom(accounts[0],"100 ether",{'from':accounts[1]})assert token.totalSupply() == "900 ether"
2.4 编写部署脚本
在browthree/tests目录,创建一个部署脚本文件: 1_deploy_token.py
cd browthree/scripts
touch 1_deploy_token.py
// 1_deploy_token.py
import os
from brownie import accounts,HelloERC20initial_supply = 1000000  # 1000000
token_name =   "AppleToken"
token_symbol = "APT"def get_account():accAddr = accounts.add(os.getenv('PRIVATE_KEY'))return accAddrdef main():account = get_account()print('account=',account)erc20 = HelloERC20.deploy(initial_supply, token_name, token_symbol, {"from": account})
2.5 进行部署与测试
a) 部署合约到Rinkeby
## 使能.env环境
source .env## 部署到Rinkeby
brownie run scripts/1_deploy_token --network rinkeby
效果如下:

得到HelloERC20.sol的合约地址为: 0x7000A28DCF57883286bd568CCa4733baF91e62ef
b) 测试HelloERC20合约
- 先启动ganache-cli
在黑框框终端里,输入如下命令即可
ganache-cli
- 再运行测试脚本
## 方法一:禁用print
brownie test tests/1_func_test.py## 方法二:启用print
brownie test tests/1_func_test.py -s
效果如下:

参考文献
brownie 单元测试
这篇关于brownie部署与测试智能合约的文章就介绍到这儿,希望我们推荐的文章对编程师们有所帮助!


