本文主要是介绍2021美赛C题赛后记录,希望对大家解决编程问题提供一定的参考价值,需要的开发者们随着小编来一起学习吧!
2021美赛C题赛后记录
原题与翻译:
Problem C: Confirming the Buzz about Hornets
问题C:确认关于大黄蜂的传言
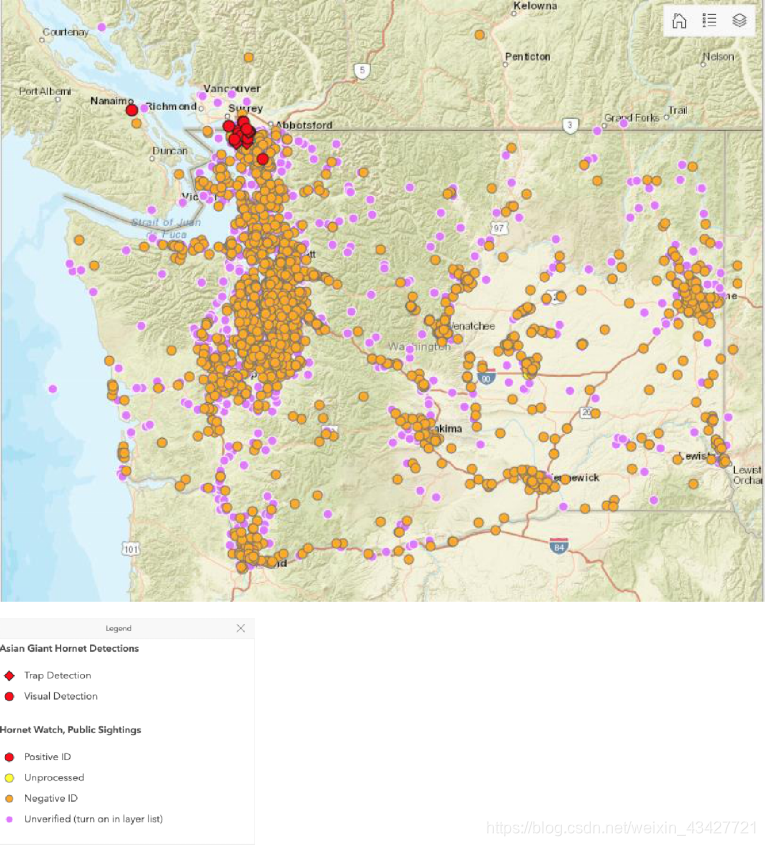
In September 2019, a colony of Vespa mandarinia (also known as the Asian giant hornet) was discovered on Vancouver Island in British Columbia, Canada. The nest was quickly destroyed, but the news of the event spread rapidly throughout the area. Since that time, several confirmed sightings of the pest have occurred in neighboring Washington State, as well as a multitude of mistaken sightings. See Figure 1 below for a map of detections, hornet watches, and public sightings.
2019年9月,在加拿大不列颠哥伦比亚省温哥华岛发现了一群野黄蜂(也被称为亚洲大黄蜂)。鸟巢很快就被摧毁了,但是这件事的消息很快就传遍了整个地区。从那时起,在邻近的华盛顿州发生了几起被证实的关于这种害虫的目击事件,同时也发生了许多错误的目击事件。下面的图1显示了探测、黄蜂观察和公众目击的地图。
Vespa mandarinia is the largest species of hornet in the world, and the occurrence of the nest was alarming. Additionally, the giant hornet is a predator of European honeybees, invading and destroying their nests. A small number of the hornets are capable of destroying a whole colony of European honeybees in a short time. At the same time, they are voracious predators of other insects that are considered agricultural pests.
野黄蜂是世界上最大的黄蜂品种,巢的出现令人担忧。此外,大黄蜂是欧洲蜜蜂的捕食者,入侵并破坏它们的巢穴。少量的大黄蜂能够在短时间内摧毁整个欧洲蜜蜂群。与此同时,它们也是其他被认为是农业害虫的昆虫的贪婪捕食者。
The life cycle of this hornet is similar to many other wasps. Fertilized queens emerge in the spring and begin a new colony. In the fall, new queens leave the nest and will spend the winter in the soil waiting for the spring. A new queen has a range estimated at 30km for establishing her nest. More detailed information on Asian hornets is included in the problem attachments and can also be found online.
这种黄蜂的生命周期与许多其他黄蜂相似。受精卵的蚁后在春天出现,开始一个新的群体。秋天,新的蚁后离开巢穴,在土壤中度过冬天,等待春天的到来。一只新蚁后在30公里的范围内筑巢。更多关于亚洲大黄蜂的详细信息包含在问题附件中,也可以在网上找到。
Due to the potential severe impact on local honeybee populations, the presence of Vespa mandarinia can cause a good deal of anxiety. The State of Washington has created helplines and a website for people to report sightings of these hornets. Based on these reports from the public, the state must decide how to prioritize its limited resources to follow-up with additional investigation. While some reports have been determined to be Vespa mandarinia, many other sightings have turned out to be other types of insects.
由于对当地蜜蜂的潜在严重影响,野蜂的存在会引起很大的焦虑。华盛顿州设立了热线电话和网站,供人们报告目击这些黄蜂的情况。根据公众的这些报告,国家必须决定如何优先利用其有限的资源进行进一步的后续调查。虽然一些报道被确定是野黄蜂,但许多其他目击到的昆虫被证明是其他类型的昆虫。
The primary questions for this problem are “How can we interpret the data provided by the public reports?” and “What strategies can we use to prioritize these public reports for additional investigation given the limited resources of government agencies?”
这个问题的主要问题是“我们如何解释公众报告提供的数据?”以及“鉴于政府机构的资源有限,我们可以采用什么策略来优先考虑这些公开报告,以便进行额外的调查?”
问题:
Address and discuss whether or not the spread of this pest over time can be predicted, and with what level of precision.
•解决并讨论是否可以预测这种害虫随着时间的推移而传播,以及以何种精度。
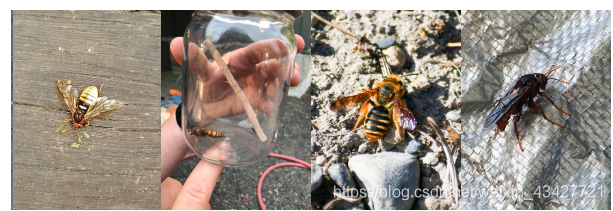
Most reported sightings mistake other hornets for the Vespa mandarinia. Use only the data set file provided, and (possibly) the image files provided, to create, analyze, and discuss a model that predicts the likelihood of a mistaken classification.
•大多数报道的目击事件都将其他黄蜂误认为野黄蜂。只使用提供的数据集文件和可能提供的图像文件来创建、分析和讨论预测错误分类可能性的模型。
Use your model to discuss how your classification analyses leads to prioritizing investigation of the reports most likely to be positive sightings.
•使用您的模型来讨论您的分类分析如何导致优先调查最有可能是正面目击的报告。
Address how you could update your model given additional new reports over time, and how often the updates should occur.
•说明如何随着时间的推移更新额外的新报告,以及更新应该发生的频率。
Using your model, what would constitute evidence that the pest has been eradicated in Washington State?
•使用你的模型,有什么证据可以证明华盛顿州的害虫已经被根除?
Finally, your report should include a two-page memorandum that summarizes your results for the Washington State Department of Agriculture.
•最后,你的报告应该包括一份两页长的备忘录,总结你在华盛顿州农业部的成果。
问题中心:对excel数据进行时空预测、对图片数据进行分类,需要深度学习基础(个人感觉传统模型对预测、分类结果的真确率、召回率、解释性说服力不强,但仍然可以建模)。
简要思路:大数据问题,首先花时间了解附件数据,探索性分析,通过简单的拟合预测性的给出模型的建立方向以及答案。
解题流程:
(1)预测模型
讨论分析大黄蜂的出现量随时间的变化、创新点:考虑空间分布的差异。(2)分类模型
训练图像分类模型,模型需要构建深度学习框架,对有深度学习基础的同学来讲并不难,给出常用的建模指标即可求解,创新点在于分析召回率、正确率等的空间特性。(3)模型评价
预测(LSTM、RNN、ARIMA、MLR、SVR)、分类(CNN、SVM、决策树)的结果是否有利于总结建设性建议,如何提升结果对建议的有效性?(4)模型优化
解释模型的更新机制、复杂度、时效性、不同区域的适用性等。(5)建议方案
给出黄蜂数量减少至认定的安全范围的证据
接下来本篇博客主要对图片分类进行具体详细个人做法总结。
1.首先观察数据,对数据进行预处理
- 数据集成
对于现有的图片,其名称与”FileName”相对应,其标签已在”Lab Status”说明。但是并非所有标签对应的”FileName”都存在相应的图片,所以我们首先将读取到的数据按属性”FileName”进行合并,得到都有”FileName”与”Lab Status”属性的数据。 - 数据变换
将图像数据集中的文件格式统一为jpg格式,并将不存在标签的图片进行剔除,这样得到的图片都可以与文件中的标签一一对应,即存在的图片都有标签。对于得到的图片,由于其尺寸差异,我们将图片归一化为150*200的格式,便于神经网络的后续处理。接下来主要利用图片及其对应的标签来创建、分析和讨论预测错误分类可能性的模型。
2.利用torch工具包中的Dataset与DataLoader库将预处理后的数据制作为数据集,主要目的是将图片转为矩阵,打上对应的标签,代码如下:
import pandas as pd
import numpy as np
import os
from PIL import Image
import torch
from torch.utils.data import Dataset
from torch.utils.data import DataLoaderfilepath1=r"2021MCM_ProblemC_ Images_by_GlobalID.xlsx"
filepath2=r"2021MCMProblemC_DataSet.xlsx"
data1=pd.read_excel(filepath1)# 对文件后缀名进行更改
for i in range(len(data1)):if(data1["FileName"][i].split(".")[-1]!="jpg"):data1["FileName"][i]=data1["FileName"][i].split(".")[0]+".jpg"data2=pd.read_excel(filepath2)
data=pd.merge(data1,data2,on="GlobalID")class MyDataset(Dataset):def __init__(self, data_path):self.data_path = data_pathself.img_list = os.listdir(self.data_path)def __getitem__(self, index):img_title = self.img_list[index]# img_label = img_title.split('.')[0]data=pd.merge(data1,data2,on="GlobalID")ind=data[data["FileName"]==img_title].index.tolist()if(data["Lab Status"][ind[0]]=="Unprocessed"):img_label=np.array([0])elif(data["Lab Status"][ind[0]]=="Unverified"):img_label=np.array([1])elif(data["Lab Status"][ind[0]]=="Positive ID"):img_label=np.array([2])else:img_label=np.array([3])img_path = os.path.join(self.data_path, img_title)img = Image.open(img_path)img = np.array(img)# print(img.shape)return img, img_labeldef __len__(self):return len(self.img_list)if __name__ == '__main__':train_path = r'D:\Spyder\MCM_data'dataset = MyDataset(train_path)# train_dataset=dataset.train_size = int(dataset.__len__() * 0.8)test_size = dataset.__len__() - train_sizetrain_dataset, test_dataset = torch.utils.data.random_split(dataset, [train_size, test_size])train_loader=DataLoader(train_dataset,shuffle=False,batch_size=64)test_loader=DataLoader(test_dataset,shuffle=False,batch_size=64)# Input:[Batch, Channels, Height, Width]for batch_idx, data in enumerate(train_loader):input,tar=data# print(type(input),'\t',input.shape)input=input.permute(0,3,1,2)model=Net()output=model(input)_, predicted = torch.max(output.data, dim=1)# print((input),'\t',input.shape)print(predicted.size()[0])if batch_idx==0:break
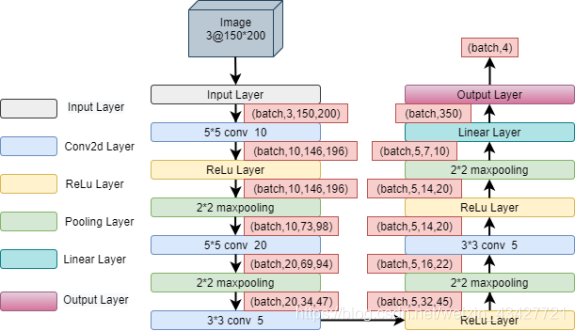
3.构建神经网络进行训练
import torch
from torch.utils.data import DataLoader
from time import *
import torch.nn as nn
import torch.nn.functional as F
import torchsnooper
import torch.optim as optim
from Dataset_make import MyDataset
import matplotlib.pyplot as plt# prepare datasetbatch_size = 64
path = r'D:\Spyder\Data_cut'dataset = MyDataset(path)
train_size = int(dataset.__len__() * 0.8)
test_size = dataset.__len__() - train_size
train_dataset, test_dataset = torch.utils.data.random_split(dataset, [train_size, test_size])train_loader = DataLoader(train_dataset,shuffle=True,batch_size=batch_size)
test_loader = DataLoader(test_dataset,shuffle=False,batch_size=batch_size)class Net(torch.nn.Module):def __init__(self):super(Net, self).__init__()# Input:Batch_size,3,600,450self.conv1 = torch.nn.Conv2d(3,10 , kernel_size=5)self.conv2 = torch.nn.Conv2d(10, 20, kernel_size=5)self.conv3=torch.nn.Conv2d(20,5,kernel_size=3)self.conv4=torch.nn.Conv2d(5,5,kernel_size=3)self.pooling = torch.nn.MaxPool2d(2)self.fc = torch.nn.Linear(350, 4)# @torchsnooper.snoop()def forward(self, x):# 定义了每次执行的计算步骤。 在所有的子类中都需要重写这个函数。# Flatten data from (n, 1, 28, 28) to (n, 784)batch_size = x.size(0)# print(x.size())x = F.relu(self.pooling(self.conv1(x)))# print(x.size())x = F.relu(self.pooling(self.conv2(x)))# print(x.size())x = F.relu(self.pooling(self.conv3(x)))# print(x.size())x = F.relu(self.pooling(self.conv4(x)))# print(x.size())x = x.view(batch_size, -1) # flatten# print(x.size())x = self.fc(x)# print(x.size())return xmodel = Net()
device = torch.device("cuda:0" if torch.cuda.is_available() else "cpu")
model=model.to(device)criterion = torch.nn.CrossEntropyLoss()
optimizer = optim.SGD(model.parameters(), lr=0.00001, momentum=0.5)def train(epoch):# (print(next(model.parameters()).device))running_loss = 0.0for batch_idx, data in enumerate(train_loader):inputs, target = datainputs = inputs.type(torch.FloatTensor)inputs=inputs.permute(0,3,1,2)inputs=inputs.cuda()# print(inputs.is_cuda)target = target.type(torch.LongTensor)target=target.cuda()# print(target.is_cuda)optimizer.zero_grad()#将module中的所有模型参数的梯度设置为0.# forward + backward + updateoutputs = model(inputs)temp=[]for i in range(len(target)):temp.append(target[i].item())# print(len(temp))temp=torch.LongTensor(temp)temp=temp.cuda()# print(temp.shape)loss = criterion(outputs, temp)loss.backward()optimizer.step()running_loss += loss.item()if batch_idx % 10 ==9:print('[%d, %5d] loss: %.3f' % (epoch + 1, batch_idx + 1, running_loss ))running_loss = 0.0torch.save(model.state_dict(), 'cnn_50.pkl')del inputs, target, outputs, loss# torch.cuda.empty_cache()def test():correct = 0total = 0with torch.no_grad():for data in test_loader:inputs, target = datainputs = inputs.type(torch.FloatTensor)inputs=inputs.permute(0,3,1,2)target = target.type(torch.LongTensor)inputs=inputs.cuda()target=target.cuda()outputs = model(inputs)_, predicted = torch.max(outputs.data, dim=1)total += target.size(0)temp=[]for i in range(len(target)):temp.append(target[i].item())temp=torch.LongTensor(temp)temp=temp.cuda()correct += (predicted == temp).sum().item()print('Accuracy on test set: %d %% [%d/%d]' % (100 * correct / total, correct, total))return correct / totalif __name__ == '__main__':auc=[]begin_time = time()for epoch in range(10):train(epoch)auc.append(test())end_time = time()run_time = end_time - begin_timeplt.plot(auc)font={'family' : 'Times New Roman','weight' : 'normal','size'   : 30,}font2 = {'family' : 'Times New Roman','weight' : 'normal','size'   : 20,}plt.xlabel("Epoch",font2)plt.ylabel("Auc",font2)plt.title("AUC Line",font)plt.gridplt.show()# model=Net()# for batch_idx, data in enumerate(train_loader):# 	inputs, target = data# 	inputs = inputs.type(torch.FloatTensor)# 	inputs=inputs.permute(0,3,1,2)# 	outputs=model(inputs)
小结:
1.美赛大数据问题近年来趋于专业,对考生的数据挖掘能力要求很高,并且也在逐渐偏向于深度学习的解题方法。
2.比赛过程中要尽早确定题目,在比赛结束前24小时应该把中文论文完稿,接下来再打磨与翻译。
3.对于非数据科学专业的同学,除非有大佬支持,否则不建议尝试大数据的题目
4.本次比赛让我清晰地认知到自己的专业水平是如此的差。以前只在网上跟着教程看,顶多去拿老师给的例子跑一跑,真到了自己搭建模型的时候会发现老虎啃天–无从下口。所以对于神经网络的架构、参数调整,也是一个需要经历经验的过程。纸上得来终觉浅,行难知易啊。
这篇关于2021美赛C题赛后记录的文章就介绍到这儿,希望我们推荐的文章对编程师们有所帮助!


