本文主要是介绍openGauss5.0一主两备的搭建,希望对大家解决编程问题提供一定的参考价值,需要的开发者们随着小编来一起学习吧!
目录
- 1、安装环境准备
- 2、建立互信(手动)
- 3、安装
前言:
这里选择openEuler20.3LTS的Linux环境(官网推荐),openGauss数据库版本为5.0,参考openGauss官网文档,以下步骤中有个别步骤可以根据自己的具体情况选择设置(有备注)
1、安装环境准备
(1)安装依赖
yum install -y libaio-devel flex bison ncurses-devel glibc-devel patch readline-devel libnsl python3 expect
如果安装不了,执行yum update,然后再执行上面的命令即可(2)设置selinux
vim /etc/selinux/config
将SELINUX=disabled这一行修改成这样,并且设置setenforce 0(3)关闭并禁用防火墙
systemctl status firewalld
systemctl disable firewalld.service
systemctl stop firewalld.service(4)编辑sshd_config文件
vim /etc/ssh/sshd_config
PermitRootLogin no 修改成PermitRootLogin yes
将“Banner”所在的行注释掉
#Banner XXXX(5)关闭交换内存
vim /etc/fstab
将/dev/mapper/openeuler-swap none这一行注释掉
#/dev/mapper/openeuler-swap none swap defaults 0 0(6)编辑/etc/systemd/logind.conf文件
vim /etc/systemd/logind.conf
修改“RemoveIPC“的值“no“,如下
RemoveIPC=no(7)编辑/usr/lib/systemd/system/systemd-logind.service文件
vim /usr/lib/systemd/system/systemd-logind.service
如果存在RemoveIPC,直接将其值改成no,如果没有,直接添加如下‘
RemoveIPC=no执行完以上第6步,第7步后,执行以下命令重新加载配置参数
systemctl daemon-reload
systemctl restart systemd-logind
检查修改是否生效
loginctl show-session | grep RemoveIPC
systemctl show systemd-logind | grep RemoveIPC(8)配置库文件
安装openGauss数据库需要libreadline.so.7,在/usr/lib64文件下有libreadline.so.8这个文件,在这里我们直接将libreadline.so.8链接为libreadline.so.7即可,通过执行下面命令
cd /usr/lib64
ln -s libreadline.so.8 libreadline.so.7
注:这一步一定要做,否则安装或登录数据库时会报错的(9)设置环境变量HISTSIZE
编辑/etc/profile文件
vim /etc/profile
修改如下内容
HISTSIZE=0
使得编辑的内容生效
source /etc/profile
注:如果是自己搭建环境学习用的,可以忽略安全性,这一步可以不设置,反而方便;如果是生产环境,考虑到安全性,最好还是要设置一下。(10)安装jdk
参考博客链接 https://blog.csdn.net/u010080562/article/details/128164073(11)配置hostname
vim /etc/hostname
这里三台主机的主机名依次修改为node1,node2,node3
node1的ip是 192.168.225.43(主机)
node2的ip是 192.168.225.44(备机)
node3的ip是 192.168.225.45(备机)(12)创建用户
useradd openGauss
设置用户密码
echo "Abc123456*" | passwd --stdin openGauss(13) 编辑performance.sh文件
vi /etc/profile.d/performance.sh
用#注释sysctl -w vm.min_free_kbytes=112640 &> /dev/null(14) 文件句柄设置
echo "* soft nofile 1000000" >>/etc/security/limits.conf
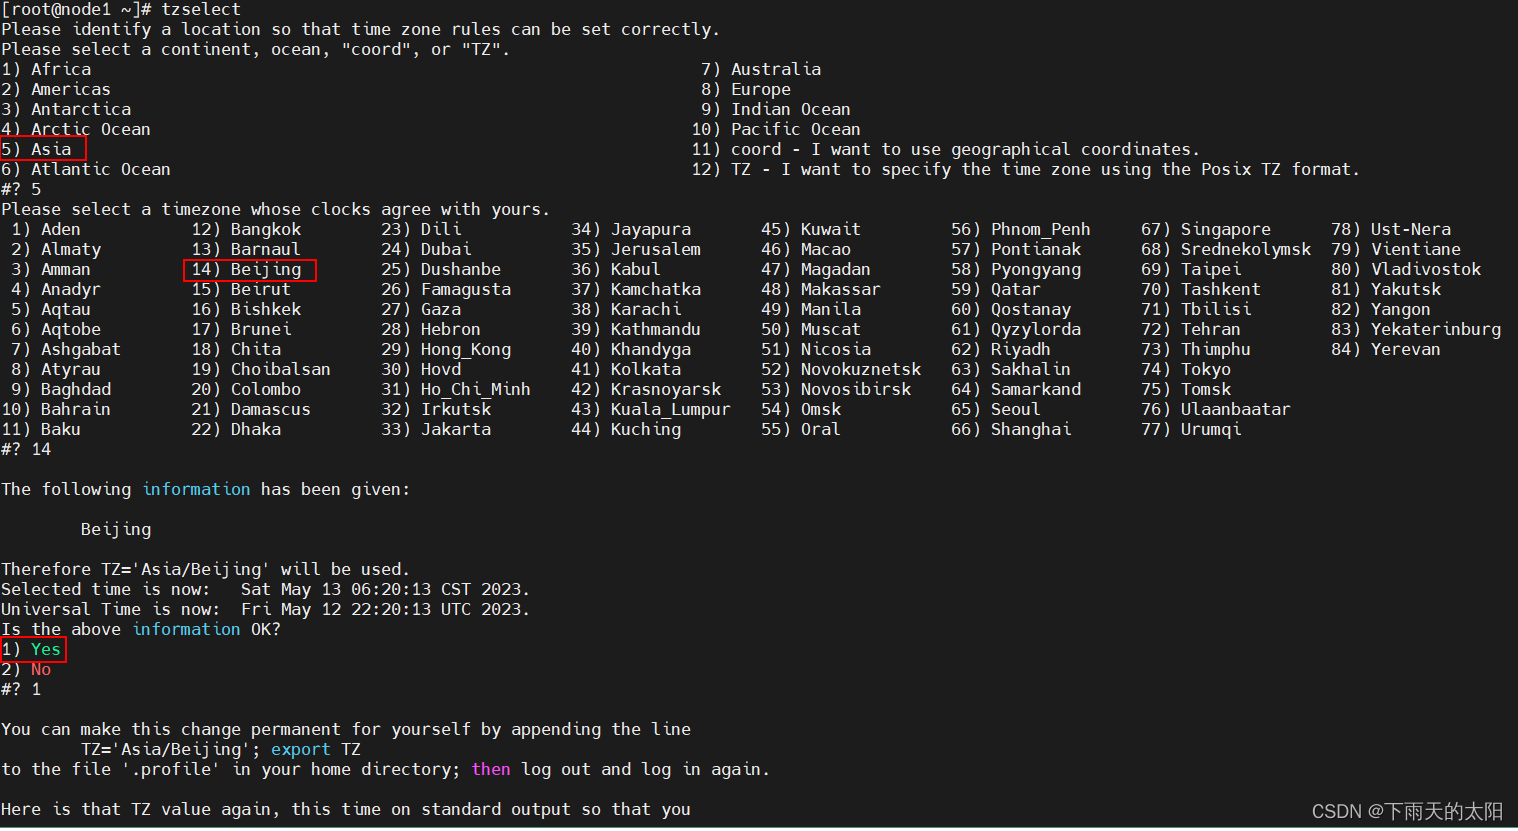
echo "* hard nofile 1000000" >>/etc/security/limits.conf(15) 设置时区(1)执行命令 tzselect 依次输入数字,选择地区、时区
=======================================================================================
[root@node1 ~]# tzselect
Please identify a location so that time zone rules can be set correctly.
Please select a continent, ocean, "coord", or "TZ".
1) Africa 7) Australia
2) Americas 8) Europe
3) Antarctica 9) Indian Ocean
4) Arctic Ocean 10) Pacific Ocean
5) Asia 11) coord - I want to use geographical coordinates.
6) Atlantic Ocean 12) TZ - I want to specify the time zone using the Posix TZ format.
#? 5
Please select a timezone whose clocks agree with yours.1) Aden 12) Bangkok 23) Dili 34) Jayapura 45) Kuwait 56) Phnom_Penh 67) Singapore 78) Ust-Nera2) Almaty 13) Barnaul 24) Dubai 35) Jerusalem 46) Macao 57) Pontianak 68) Srednekolymsk 79) Vientiane3) Amman 14) Beijing 25) Dushanbe 36) Kabul 47) Magadan 58) Pyongyang 69) Taipei 80) Vladivostok4) Anadyr 15) Beirut 26) Famagusta 37) Kamchatka 48) Makassar 59) Qatar 70) Tashkent 81) Yakutsk5) Aqtau 16) Bishkek 27) Gaza 38) Karachi 49) Manila 60) Qostanay 71) Tbilisi 82) Yangon6) Aqtobe 17) Brunei 28) Hebron 39) Kathmandu 50) Muscat 61) Qyzylorda 72) Tehran 83) Yekaterinburg7) Ashgabat 18) Chita 29) Hong_Kong 40) Khandyga 51) Nicosia 62) Riyadh 73) Thimphu 84) Yerevan8) Atyrau 19) Choibalsan 30) Hovd 41) Kolkata 52) Novokuznetsk 63) Sakhalin 74) Tokyo9) Baghdad 20) Colombo 31) Ho_Chi_Minh 42) Krasnoyarsk 53) Novosibirsk 64) Samarkand 75) Tomsk
10) Bahrain 21) Damascus 32) Irkutsk 43) Kuala_Lumpur 54) Omsk 65) Seoul 76) Ulaanbaatar
11) Baku 22) Dhaka 33) Jakarta 44) Kuching 55) Oral 66) Shanghai 77) Urumqi
#? 14The following information has been given:BeijingTherefore TZ='Asia/Beijing' will be used.
Selected time is now: Sat May 13 05:41:35 CST 2023.
Universal Time is now: Fri May 12 21:41:35 UTC 2023.
Is the above information OK?
1) Yes
2) No
#? 1You can make this change permanent for yourself by appending the lineTZ='Asia/Beijing'; export TZ
to the file '.profile' in your home directory; then log out and log in again.Here is that TZ value again, this time on standard output so that you
can use the /usr/bin/tzselect command in shell scripts:
Asia/Beijing
=======================================================================================(2)并同步三台主机的时间一致安装时间同步工具yum install ntpdate同步时间ntpdate ntp.aliyun.com
注:同步时间这一步比较重要(三台主机都必须做),如果三台主机的时间不一致,可能会导致主备安装搭建失败,切记,切记,切记,见图一、图二! (16)禁用透明 HugePagesvim /etc/default/grub,在GRUB_CMDLINE_LINUX参数的末尾添加transparent_hugepage=never。编辑如下所示使用修改后的配置生成/boot/grub2/grub.cfg文件,执行grub2-mkconfig -o /boot/grub2/grub.cfgcat /sys/kernel/mm/transparent_hugepage/enabled查看修改是否生效
注:这一步必须设置,否则会导致数据库安装失败,见图三
图一:
图二:

图三:

2、建立互信(手动)
(1)在其中一个主机上(这里选择node1 192.168.225.43),生成ssh密钥文件
ssh-keygen -t rsa(2) 生成本机授权文件
cd ~
cat .ssh/id_rsa.pub >> ~/.ssh/authorized_keys(3) 在主机node1上编辑hosts文件
vim /etc/hosts,添加如下内容保存
192.168.225.43 node1
192.168.225.44 node2
192.168.225.45 node3(4)收集所有的待建互信主机的公钥,写入到本机的known_hosts文件中,此步骤需要在步骤1执行的主机上执行(node1)
ssh-keyscan -t rsa node1 >> ~/.ssh/known_hosts
ssh-keyscan -t rsa node2 >> ~/.ssh/known_hosts
ssh-keyscan -t rsa node3 >> ~/.ssh/known_hosts(5) 将互信文件分发到node2和node3上
scp -r ~/.ssh node2:~
scp -r ~/.ssh node3:~=======================================================================================
[root@node1 ~]# ssh-keygen -t rsa
Generating public/private rsa key pair.
Enter file in which to save the key (/root/.ssh/id_rsa):
Created directory '/root/.ssh'.
Enter passphrase (empty for no passphrase):
Enter same passphrase again:
Your identification has been saved in /root/.ssh/id_rsa
Your public key has been saved in /root/.ssh/id_rsa.pub
The key fingerprint is:
SHA256:HqKlFRviM48zoyPDmg2T00gryLSVnG7+5EK+ciF60Vo root@node1
The key's randomart image is:
+---[RSA 3072]----+
|                 |
|                 |
|    . o          |
|  ..o. +         |
| o *+ = S        |
|==*oEX o .       |
|@+=*O.. .        |
|=O*=o+           |
|++=++o           |
+----[SHA256]-----+
[root@node1 ~]# cat .ssh/id_rsa.pub >> ~/.ssh/authorized_keys
[root@node1 ~]# ls ~/.ssh/
authorized_keys  id_rsa  id_rsa.pub
[root@node1 ~]# cat ~/.ssh/authorized_keys
ssh-rsa AAAAB3NzaC1yc2EAAAADAQABAAABgQC9oo7PQqxqso9Vf2MmZoTT6z1GZsnWt+JwRnsYUx+9c4junZWqxWXz6FUNTCEymUNfa6s+L2eiviIn0FdTXE9dk52nrC+ShKpUWoAMnzxUwZMgZHon2+GfLwPICh8kE+GubtsHRS8nHIJmkRaQZW+y0bYNLk6xlUS3Ye+xlA6zx+N5G1o8N7shroGRjZCoP/iQQirJkokxmlFVk4xr24OdvG1eHM4p3UC5iNevESEpafIJ29fNmAPg6/sKf3mBN3s/KAvLXnceqY5J0yT0/wrjWeRnXwuAm4zbQ5Akuq+OMQBd6YQS9FUkNebBIEsc2sJU/25cNeDUIKfJ4CReJPkCtHhyHtpVA1HvTv0gH/vvC+wnUZr5fBqYBsYrPLA7T9JmENQf40hZLRx3VTjwN7HTIrhHq+z7e8N5R+8RiWNWNdQMMw9ldmNTM3Uv9z55uKHW7z91mFzb9N4kkjaFS6DmGjyBhjSlsrUNzm8mdnA0udDKylIfdJHOSr336O3syRs= root@node1
[root@node1 ~]# vim /etc/hosts
[root@node1 ~]# cat /etc/hosts
192.168.225.43 node1
192.168.225.44 node2
192.168.225.45 node3
[root@node1 ~]# ssh-keyscan -t rsa node1 >> ~/.ssh/known_hosts
# node1:22 SSH-2.0-OpenSSH_8.2
[root@node1 ~]# ssh-keyscan -t rsa node2 >> ~/.ssh/known_hosts
# node2:22 SSH-2.0-OpenSSH_8.2
[root@node1 ~]# ssh-keyscan -t rsa node3 >> ~/.ssh/known_hosts
# node3:22 SSH-2.0-OpenSSH_8.2
[root@node1 .ssh]# scp -r ~/.ssh node2:~
Warning: Permanently added the RSA host key for IP address '192.168.225.44' to the list of known hosts.Authorized users only. All activities may be monitored and reported.
root@node2's password:
id_rsa.pub                                                                                                              100%  564   438.5KB/s   00:00
authorized_keys                                                                                                         100%  564   300.3KB/s   00:00
known_hosts                                                                                                             100% 2245     2.2MB/s   00:00
id_rsa                                                                                                                  100% 2590     3.1MB/s   00:00
[root@node1 .ssh]# scp -r ~/.ssh node3:~
Warning: Permanently added the RSA host key for IP address '192.168.225.45' to the list of known hosts.Authorized users only. All activities may be monitored and reported.
root@node3's password:
id_rsa.pub                                                                                                              100%  564   414.0KB/s   00:00
authorized_keys                                                                                                         100%  564   627.8KB/s   00:00
known_hosts                                                                                                             100% 2813     2.2MB/s   00:00
id_rsa                                                                                                                  100% 2590     3.2MB/s   00:00
=======================================================================================(6)查看互信是否建成功,可以互相ssh主机名
例如在node1主机上,执行ssh node2 可以不需要输入密码就直接登录到node2主机上,执行ssh node3 可以不需要输入密码就直接登录到node3主机上,如下:
=======================================================================================
[root@node1 .ssh]# ssh node2Authorized users only. All activities may be monitored and reported.Authorized users only. All activities may be monitored and reported.
Activate the web console with: systemctl enable --now cockpit.socketLast failed login: Sat May 13 07:28:41 CST 2023 from 192.168.225.43 on ssh:notty
There was 1 failed login attempt since the last successful login.
Last login: Sat May 13 07:28:19 2023 from 192.168.225.43Welcome to 4.19.90-2112.8.0.0131.oe1.x86_64System information as of time:  Sat May 13 07:32:51 CST 2023System load:    0.00
Processes:      222
Memory used:    4.2%
Swap used:      0.0%
Usage On:       13%
IP address:     192.168.225.44
IP address:     192.168.122.1
Users online:   3[root@node2 ~]# exit
logout
Connection to node2 closed.
[root@node1 .ssh]# ssh node3Authorized users only. All activities may be monitored and reported.Authorized users only. All activities may be monitored and reported.
Activate the web console with: systemctl enable --now cockpit.socketLast login: Sat May 13 06:53:52 2023 from 192.168.224.88Welcome to 4.19.90-2112.8.0.0131.oe1.x86_64System information as of time:  Sat May 13 07:33:27 CST 2023System load:    0.04
Processes:      220
Memory used:    4.2%
Swap used:      0.0%
Usage On:       13%
IP address:     192.168.225.45
IP address:     192.168.122.1
Users online:   3[root@node3 ~]#
=======================================================================================
3、安装
(1)上传openGauss安装压缩包(上传主机即可,两台备机不用上传)
先创建安装目录
mkdir -p /opt/software/openGauss/
chmod 777 -R /opt/software
上传openGauss-5.0.0-openEuler-64bit-all.tar.gz压缩包到/opt/software/openGauss/目录下
解压安装包
tar -zxvf openGauss-5.0.0-openEuler-64bit-all.tar.gz
tar -zxvf openGauss-5.0.0-openEuler-64bit-om.tar.gz(2) 编辑安装配置文件cluster_config.xml
添加如下内容,然后将编辑好的配置文件放到/opt/software/openGauss/目录下(在主机编辑配置文件即可,两台备机不用)
<?xml version="1.0" encoding="UTF-8"?>
<ROOT><!-- openGauss整体信息 --><CLUSTER><!-- 数据库名称 --><PARAM name="clusterName" value="dbCluster" /><!-- 数据库节点名称(hostname) --><PARAM name="nodeNames" value="node1,node2,node3" /><!-- 数据库安装目录--><PARAM name="gaussdbAppPath" value="/opt/huawei/install/app" /><!-- 日志目录--><PARAM name="gaussdbLogPath" value="/var/log/openGauss" /><!-- 临时文件目录--><PARAM name="tmpMppdbPath" value="/opt/huawei/tmp" /><!-- 数据库工具目录--><PARAM name="gaussdbToolPath" value="/opt/huawei/install/openGauss" /><!-- 数据库core文件目录--><PARAM name="corePath" value="/opt/huawei/corefile" /><!-- 节点IP,与数据库节点名称列表一一对应 --><PARAM name="backIp1s" value="192.168.225.43,192.168.225.44,192.168.225.45"/> </CLUSTER><!-- 每台服务器上的节点部署信息 --><DEVICELIST><!-- 节点1上的部署信息 --><DEVICE sn="node1"><!-- 节点1的主机名称 --><PARAM name="name" value="node1"/><!-- 节点1所在的AZ及AZ优先级 --><PARAM name="azName" value="AZ1"/><PARAM name="azPriority" value="1"/><!-- 节点1的IP,如果服务器只有一个网卡可用,将backIP1和sshIP1配置成同一个IP --><PARAM name="backIp1" value="192.168.225.43"/><PARAM name="sshIp1" value="192.168.225.43"/><!--CM节点部署信息--> <PARAM name="cmsNum" value="1"/> <PARAM name="cmServerPortBase" value="15000"/> <PARAM name="cmServerListenIp1" value="192.168.225.43,192.168.225.44,192.168.225.45"/> <PARAM name="cmServerHaIp1" value="192.168.225.43,192.168.225.44,192.168.225.45"/> <PARAM name="cmServerlevel" value="1"/> <PARAM name="cmServerRelation" value="node1,node2,node3"/> <PARAM name="cmDir" value="/opt/huawei/data/cmserver"/> <!--dbnode--><PARAM name="dataNum" value="1"/><PARAM name="dataPortBase" value="5432"/><PARAM name="dataNode1" value="/opt/huawei/install/data/dn,node2,/opt/huawei/install/data/dn,node3,/opt/huawei/install/data/dn"/><PARAM name="dataNode1_syncNum" value="0"/></DEVICE><DEVICE sn="node2"><!-- 节点1的主机名称 --><PARAM name="name" value="node2"/><!-- 节点1所在的AZ及AZ优先级 --><PARAM name="azName" value="AZ1"/><PARAM name="azPriority" value="1"/><!-- 节点1的IP,如果服务器只有一个网卡可用,将backIP1和sshIP1配置成同一个IP --><PARAM name="backIp1" value="192.168.225.44"/><PARAM name="sshIp1" value="192.168.225.44"/><!-- cm --> <PARAM name="cmServerPortStandby" value="15000"/> <PARAM name="cmDir" value="/opt/huawei/data/cmserver"/></DEVICE><DEVICE sn="node3"><!-- 节点1的主机名称 --><PARAM name="name" value="node3"/><!-- 节点1所在的AZ及AZ优先级 --><PARAM name="azName" value="AZ1"/><PARAM name="azPriority" value="1"/><!-- 节点1的IP,如果服务器只有一个网卡可用,将backIP1和sshIP1配置成同一个IP --><PARAM name="backIp1" value="192.168.225.45"/><PARAM name="sshIp1" value="192.168.225.45"/><!-- cm --> <PARAM name="cmServerPortStandby" value="15000"/> <PARAM name="cmDir" value="/opt/huawei/data/cmserver"/></DEVICE></DEVICELIST>
</ROOT>(3)安装expect(三台主机上都要安装)
yum install -y expect(4)在node1主机上使用root进行预安装(预安装其实就是检测安装环境是否合格并且创建一些与安装相关的目录和环境变量)
cd /opt/software/openGauss/script
./gs_preinstall -U openGauss -G openGauss -X /opt/software/openGauss/cluster_config.xml======================================================================================
[root@node1 script]# ./gs_preinstall -U openGauss -G openGauss -X /opt/software/openGauss/cluster_config.xml
Parsing the configuration file.
Successfully parsed the configuration file.
Installing the tools on the local node.
Successfully installed the tools on the local node.
Are you sure you want to create trust for root (yes/no)?yes
Please enter password for root
Password:
Successfully created SSH trust for the root permission user.
Setting host ip env
Successfully set host ip env.
Distributing package.
Begin to distribute package to tool path.
Successfully distribute package to tool path.
Begin to distribute package to package path.
Successfully distribute package to package path.
Successfully distributed package.
Are you sure you want to create the user[openGauss] and create trust for it (yes/no)? yes
Preparing SSH service.
Successfully prepared SSH service.
Installing the tools in the cluster.
Successfully installed the tools in the cluster.
Checking hostname mapping.
Successfully checked hostname mapping.
Creating SSH trust for [openGauss] user.
Please enter password for current user[openGauss].
Password:
Checking network information.
All nodes in the network are Normal.
Successfully checked network information.
Creating SSH trust.
Creating the local key file.
Successfully created the local key files.
Appending local ID to authorized_keys.
Successfully appended local ID to authorized_keys.
Updating the known_hosts file.
Successfully updated the known_hosts file.
Appending authorized_key on the remote node.
Successfully appended authorized_key on all remote node.
Checking common authentication file content.
Successfully checked common authentication content.
Distributing SSH trust file to all node.
Distributing trust keys file to all node successfully.
Successfully distributed SSH trust file to all node.
Verifying SSH trust on all hosts.
Successfully verified SSH trust on all hosts.
Successfully created SSH trust.
Successfully created SSH trust for [openGauss] user.
Checking OS software.
Successfully check os software.
Checking OS version.
Successfully checked OS version.
Creating cluster's path.
Successfully created cluster's path.
Set and check OS parameter.
Setting OS parameters.
Successfully set OS parameters.
Warning: Installation environment contains some warning messages.
Please get more details by "/opt/software/openGauss/script/gs_checkos -i A -h node1,node2,node3 --detail".
Set and check OS parameter completed.
Preparing CRON service.
Successfully prepared CRON service.
Setting user environmental variables.
Successfully set user environmental variables.
Setting the dynamic link library.
Successfully set the dynamic link library.
Setting Core file
Successfully set core path.
Setting pssh path
Successfully set pssh path.
Setting Cgroup.
Successfully set Cgroup.
Set ARM Optimization.
No need to set ARM Optimization.
Fixing server package owner.
Setting finish flag.
Successfully set finish flag.
Preinstallation succeeded.
======================================================================================(4)给安装目录赋权限用户和用户组
这一步需要在三台主机上使用root用户执行
chmod -R 755 /opt/software/
chown -R openGauss:openGauss /opt/software/(5) 正式安装数据库在node1主机上切换到openGauss用户(数据库安装用户),这里主机的内存给了6G
su - openGauss
cd /opt/software/openGauss/script
./gs_install -X /opt/software/openGauss/cluster_config.xml \
--gsinit-parameter="--locale=en_US.utf8" \
--dn-guc="max_connections=2000" \
--dn-guc="max_process_memory=4GB" \
--dn-guc="shared_buffers=128MB" \
--dn-guc="bulk_write_ring_size=128MB" \
--dn-guc="cstore_buffers=16MB"或者是./gs_install -X /opt/software/openGauss/cluster_config.xml \
--gsinit-parameter="--locale=en_US.utf8" \
--dn-guc="max_connections=2000" \
--dn-guc="max_process_memory=3800MB" \
--dn-guc="shared_buffers=128MB" \
--dn-guc="bulk_write_ring_size=128MB" \
--dn-guc="cstore_buffers=16MB"=======================================================================================
[openGauss@node1 script]$ ./gs_install -X /opt/software/openGauss/cluster_config.xml \
> --gsinit-parameter="--locale=en_US.utf8" \
> --dn-guc="max_connections=2000" \
> --dn-guc="max_process_memory=4GB" \
> --dn-guc="shared_buffers=128MB" \
> --dn-guc="bulk_write_ring_size=128MB" \
> --dn-guc="cstore_buffers=16MB"
Parsing the configuration file.
Check preinstall on every node.
Successfully checked preinstall on every node.
Creating the backup directory.
Successfully created the backup directory.
begin deploy..
Installing the cluster.
begin prepare Install Cluster..
Checking the installation environment on all nodes.
begin install Cluster..
Installing applications on all nodes.
Successfully installed APP.
begin init Instance..
encrypt cipher and rand files for database.
Please enter password for database:
Please repeat for database:
begin to create CA cert files
The sslcert will be generated in /opt/huawei/install/app/share/sslcert/om
Create CA files for cm beginning.
Create CA files on directory [/opt/huawei/install/app_a07d57c3/share/sslcert/cm]. file list: ['cacert.pem', 'server.key.cipher', 'client.key.cipher', 'client.key', 'server.key.rand', 'server.key', 'server.crt', 'client.key.rand', 'client.crt']
Non-dss_ssl_enable, no need to create CA for DSS
Cluster installation is completed.
Configuring.
Deleting instances from all nodes.
Successfully deleted instances from all nodes.
Checking node configuration on all nodes.
Initializing instances on all nodes.
Updating instance configuration on all nodes.
Check consistence of memCheck and coresCheck on database nodes.
Successful check consistence of memCheck and coresCheck on all nodes.
Configuring pg_hba on all nodes.
Configuration is completed.
Starting cluster.
======================================================================
Successfully started primary instance. Wait for standby instance.
======================================================================
.
Successfully started cluster.
======================================================================
cluster_state : Normal
redistributing : No
node_count : 3
Datanode Stateprimary : 1standby : 2secondary : 0cascade_standby : 0building : 0abnormal : 0down : 0Successfully installed application.
end deploy..
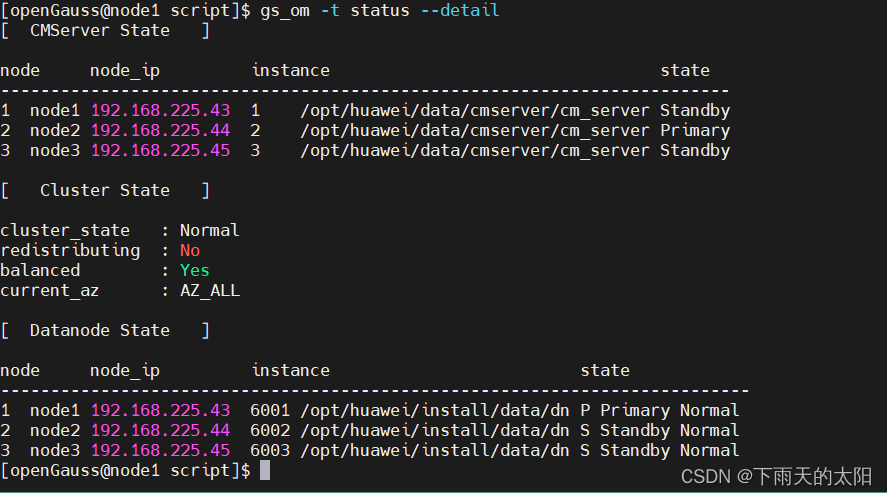
[openGauss@node1 script]$=======================================================================================查看主备状态,如下图四显示表示状态正常,一主两备搭建成功!
gs_om -t status --detail
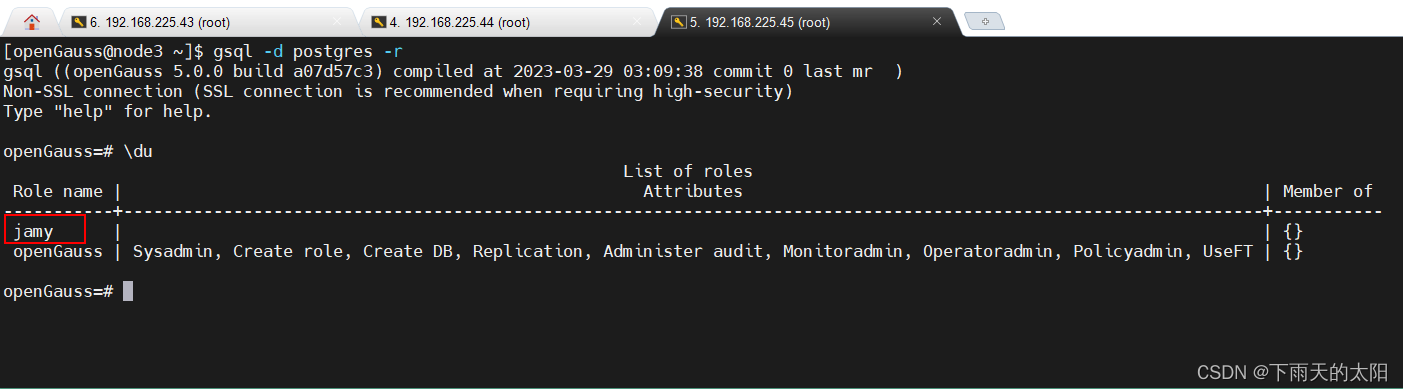
现在来测试看看效果:
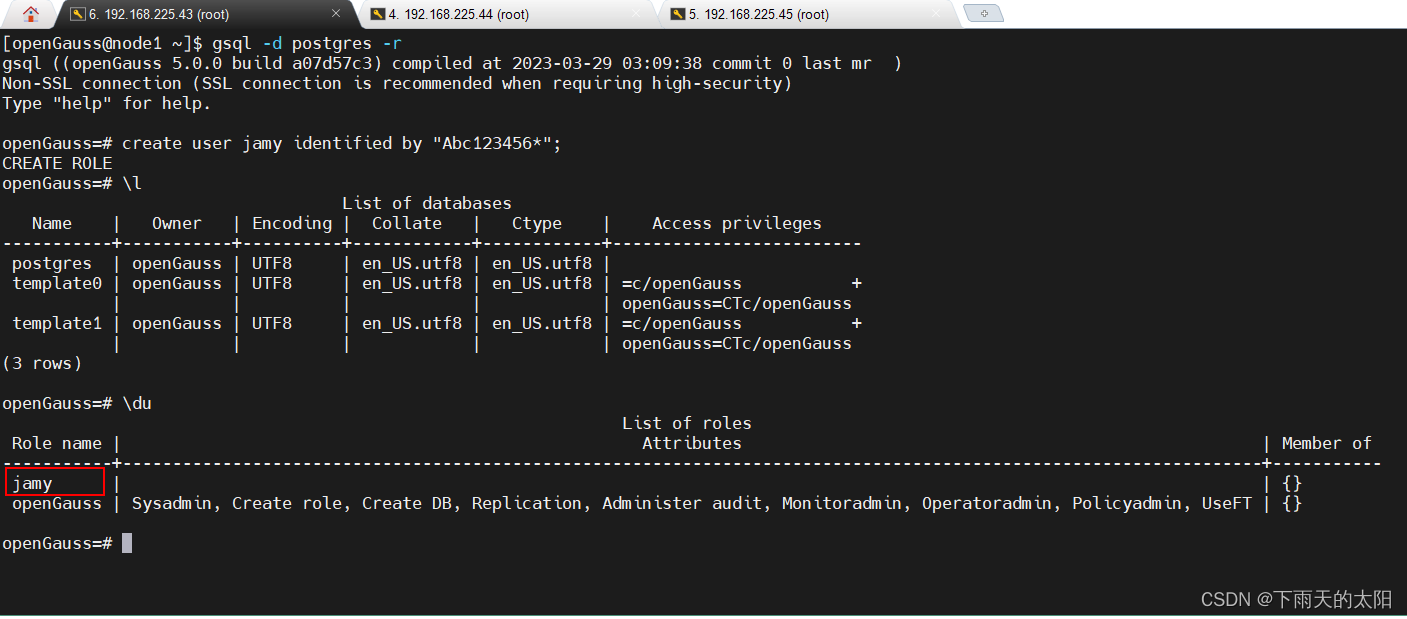
在主机node1上登录openGauss数据库,创建一个用户jamy,然后登录node2和node3上的openGauss数据库可以查看到刚才创建的用户登录node1的openGauss数据库
su - openGauss
gsql -d postgres -r
create user jamy identified by "Abc123456*";
查看创建的用户jamy
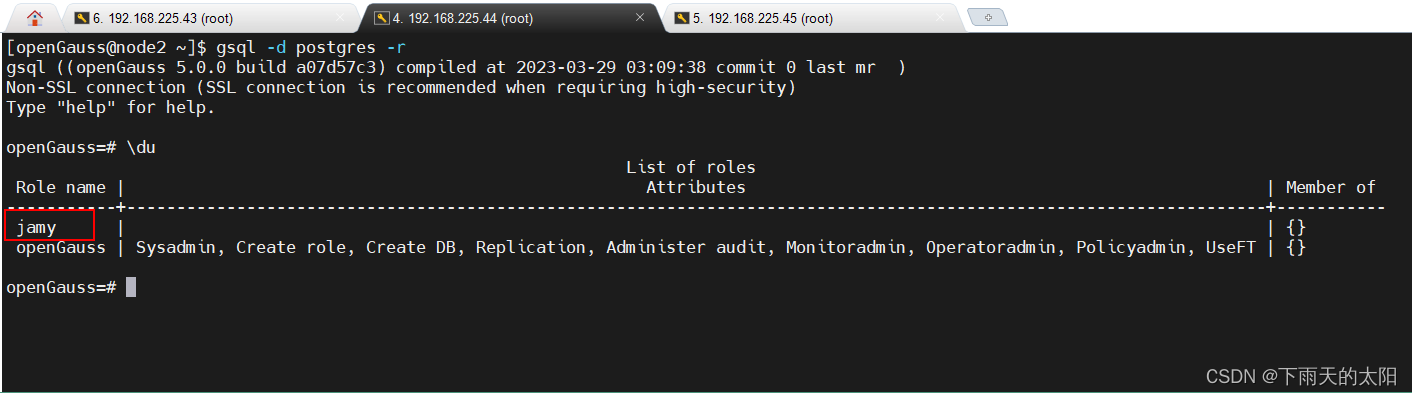
\du登录node2的openGauss数据库
su - openGauss
gsql -d postgres -r
\du登录node3的openGauss数据库
su - openGauss
gsql -d postgres -r
\du如下图所示
这篇关于openGauss5.0一主两备的搭建的文章就介绍到这儿,希望我们推荐的文章对编程师们有所帮助!


