本文主要是介绍SpringCloud之熔断器Hystrix及服务监控Dashboard(单机版),希望对大家解决编程问题提供一定的参考价值,需要的开发者们随着小编来一起学习吧!
转载请标明出处:https://blog.csdn.net/men_ma/article/details/106847165.
本文出自 不怕报错 就怕不报错的小猿猿 的博客
SpringCloud之Eureka集群搭建
- 目标
- 1.服务雪崩效应
- 2.服务熔断服务降级
- 3. Hystrix默认超时时间设置
- 4.Hystrix服务监控Dashboard
目标
1、服务雪崩效应
2、服务熔断服务降级
3、Hystrix默认超时时间设置
4、Hystrix服务监控Dashboard
1.服务雪崩效应
服务雪崩的现象:
分布式架构将一个单体项目中的每一个模块都分解了一个个微服务,在这种架构中可能能出现一种现象,某一个微服务集群的某一节点,出现异常(网络闪退,本身这个微服务节点是调用第三方导致迟迟不给客户响应。。。。。),会导致当前节点服务请求堆积,当积压的请求达到一定的数据量,那么资源耗尽,就会宕机,从而导致同一集群的其他节点压力增大,增加了其他节点宕机的可能性,最终会拖垮整个集群;
雪崩的原因:响应时间过长,请求积压了…
处理的方案:缩短响应时间,让这个请求不堆积
降级:响应错误的结果
请看博客的后续解决方案及实际发生雪崩的状态
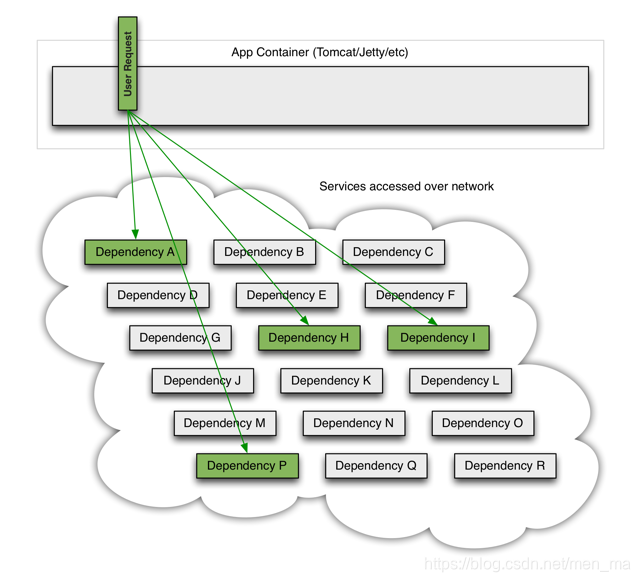
当一个请求依赖多个服务的时候:
正常情况下的访问:

但是,当请求的服务中出现无法访问、异常、超时等问题时(图中的I),那么用户的请求将会被阻塞。

如果多个用户的请求中,都存在无法访问的服务,那么他们都将陷入阻塞的状态中。

Hystrix的引入,可以通过服务熔断和服务降级来解决这个问题。
2.服务熔断服务降级
Hystrix断路器简介:
hystrix对应的中文名字是“豪猪”,豪猪周身长满了刺,能保护自己不受天敌的伤害,代表了一种防御机制,这与hystrix本身的功能不谋而合,因此Netflix团队将该框架命名为Hystrix,并使用了对应的卡通形象做作为logo。

在一个分布式系统里,许多依赖不可避免的会调用失败,比如超时、异常等,如何能够保证在一个依赖出问题的情况下,不会导致整体服务失败,这个就是Hystrix需要做的事情。Hystrix提供了熔断、隔离、Fallback、cache、监控等功能,能够在一个、或多个依赖同时出现问题时保证系统依然可用。
熔断机制是应对雪崩效应的一种微服务链路保护机制。
当某个服务不可用或者响应时间超时,会进行服务降级,进而熔断该节点的服务调用,快速返回自定义的错误影响页面信息。例如:当我们访问一个网站时它会告诉你服务器繁忙,那就是服务雪崩的状态,就是返回一个错误的结果给你,并不是在升级,而是报错了,哈哈哈哈
我们写个项目来测试下;
我们写一个新的带服务熔断的服务提供者项目 microservice-student-provider-hystrix-1004
把之前的microservice-student-provider 配置和 代码 都复制一份到这个项目里;

然后修改:
- pom.xml加下 hystrix支持
<!--Hystrix相关依赖-->
<dependency><groupId>org.springframework.cloud</groupId><artifactId>spring-cloud-starter-hystrix</artifactId>
</dependency>
- application.yml修改下端口和实例名称
server:port: 1004context-path: /
spring:datasource:type: com.alibaba.druid.pool.DruidDataSourcedriver-class-name: com.mysql.jdbc.Driverurl: jdbc:mysql://localhost:3306/t243?useUnicode=true&characterEncoding=utf8username: rootpassword: 123jpa:hibernate:ddl-auto: updateshow-sql: trueapplication:name: microservice-studentprofiles: provider-hystrix-1004eureka:instance:hostname: localhostappname: microservice-studentinstance-id: microservice-student:1004prefer-ip-address: trueclient:service-url:defaultZone: http://eureka2001.javaxl.com:2001/eureka/,http://eureka2002.javaxl.com:2002/eureka/,http://eureka2003.javaxl.com:2003/eureka/hystrix:command:default:execution:isolation:thread:timeoutInMilliseconds: 1500info:groupId: com.xiaoqing.testSpringcloudartifactId: microservice-student-provider-hystrix-1004version: 1.0-SNAPSHOTuserName: http://javaxl.comphone: 123456
- 启动类StudentProviderHystrixApplication_1004加下注解支持 @EnableCircuitBreaker
package com.xiaoqing.microservicestudentproviderhystrix1004;import org.springframework.boot.SpringApplication;
import org.springframework.boot.autoconfigure.SpringBootApplication;
import org.springframework.boot.autoconfigure.domain.EntityScan;
import org.springframework.cloud.client.circuitbreaker.EnableCircuitBreaker;
import org.springframework.cloud.netflix.eureka.EnableEurekaClient;/*** @EnableCircuitBreaker:加入服务熔断的注解,就是告诉你1004一启动服务就自带服务熔断* EnableEurekaClient:加入注册中心*/
@EnableCircuitBreaker
@EntityScan("com.xiaoqing.*.*")
@EnableEurekaClient
@SpringBootApplication
public class MicroserviceStudentProviderHystrix1004Application {public static void main(String[] args) {SpringApplication.run(MicroserviceStudentProviderHystrix1004Application.class, args);}}- 在原有的服务提供者1004中controller新增两个hystrix()和hystrixFallback()方法(也可整个文件都覆盖)
package com.xiaoqing.microservicestudentproviderhystrix1004.controller;import com.netflix.hystrix.contrib.javanica.annotation.HystrixCommand;
import com.xiaoqing.microservicecommon.entity.Student;
import com.xiaoqing.microservicestudentproviderhystrix1004.service.StudentService;
import org.springframework.beans.factory.annotation.Autowired;
import org.springframework.beans.factory.annotation.Value;
import org.springframework.web.bind.annotation.*;import java.util.HashMap;
import java.util.List;
import java.util.Map;@RestController
@RequestMapping("/student")
public class StudentProviderController {@Autowiredprivate StudentService studentService;@Value("${server.port}")private String port;@PostMapping(value="/save")public boolean save(Student student){try{studentService.save(student);  return true;}catch(Exception e){return false;}}@GetMapping(value="/list")public List<Student> list(){return studentService.list();}@GetMapping(value="/get/{id}")public Student get(@PathVariable("id") Integer id){return studentService.findById(id);}@GetMapping(value="/delete/{id}")public boolean delete(@PathVariable("id") Integer id){try{studentService.delete(id);return true;}catch(Exception e){return false;}}@RequestMapping("/ribbon")public String ribbon(){return "工号【"+port+"】正在为您服务";}/*** 测试Hystrix服务降级**      HystrixCommand注解* @return* @throws InterruptedException*/@GetMapping(value="/hystrix")@HystrixCommand(fallbackMethod="hystrixFallback")public Map<String,Object> hystrix() throws InterruptedException{
//        非正常响应Thread.sleep(2000);Map<String,Object> map=new HashMap<String,Object>();map.put("code", 200);map.put("info","工号【"+port+"】正在为您服务");return map;}public Map<String,Object> hystrixFallback() throws InterruptedException{Map<String,Object> map=new HashMap<String,Object>();map.put("code", 500);map.put("info", "系统【"+port+"】繁忙,稍后重试");return map;}
}
这里我正常访问 返回的是 200 业务数据xxxxx
但是我们这里Thread.sleep(2000) 模拟超时;
这里的话 我们加上@HystrixCommand注解 以及 fallbackMethod
表明这个方法我们再 没有异常以及没有超时(hystrix默认1秒算超时)的情况,才返回正常的业务数据;
否则,进入我们fallback指定的本地方法,我们搞的是500 系统出错,稍后重试,有效的解决雪崩效应,以及返回给用户界面
很好的报错提示信息;
microservice-student-consumer-80项目也要对应的加个方法:

/*** 测试Hystrix服务降级* @return*/@GetMapping(value="/hystrix")@ResponseBodypublic Map<String,Object> hystrix(){return restTemplate.getForObject(SERVER_IP_PORT+"/student/hystrix/", Map.class);}
- 然后我们来测试下
先启动eureka2001,再启动带hystrix的provider1004,最后启动普通的consumer80;
浏览器:http://localhost:8080/student/hystrix
在没用睡觉sleep之前(sleep已注释):

返回的结果是正常服务的:

在睡了一觉之后(sleep),为期为1100毫秒(注释的sleep已放开)

这就是熔断降级的结果
因为 Hystrix默认1算超时,所有 sleep了1.1秒 所以进入自定义fallback方法,防止服务雪崩;
我们这里改sleep修改成1100毫秒;

3. Hystrix默认超时时间设置
Hystrix默认超时时间是1秒,我们可以通过hystrix源码看到,
找到 hystrix-core.jar com.netflix.hystrix包下的HystrixCommandProperties类
default_executionTimeoutInMilliseconds属性局势默认的超时时间

默认1000毫秒 1秒
我们系统里假如要自定义设置hystrix的默认时间的话;
application.yml配置文件加上:
hystrix:command:default:execution:isolation:thread:timeoutInMilliseconds: 3000
注意:这段配置idea居然没有提示功能,我比较郁闷;

改成3秒 然后 我们代码里sleep修改成2秒测试;

测试结果:
在之前sleep是睡了1100毫秒就雪崩了,现在我们设置了2秒还是正常服务,这是因为之前没用修改yml的配置文件中的timeoutInMilliseconds时间,它默认的是1秒,当你超过1秒时,那么你就雪崩了,现在我们设置了是3秒,2秒没有超过3秒,所以则不会雪崩

那么我们再来看一个雪崩的状态:把timeoutInMilliseconds改为1.5秒,sleep还是为2秒,你说雪崩还是不雪崩呢,不用想肯定雪崩啊,因为睡觉的时间超过了(2秒大于1.5秒)
结果(雪崩,提示系统繁忙):

4.Hystrix服务监控Dashboard
Hystrix服务监控Dashboard仪表盘
Hystrix提供了 准实时的服务调用监控项目Dashboard,能够实时记录通过Hystrix发起的请求执行情况,
可以通过图表的形式展现给用户看。
我们新建项目:
microservice-student-consumer-hystrix-dashboard-90
pom.xml加依赖:
<?xml version="1.0" encoding="UTF-8"?>
<project xmlns="http://maven.apache.org/POM/4.0.0" xmlns:xsi="http://www.w3.org/2001/XMLSchema-instance"xsi:schemaLocation="http://maven.apache.org/POM/4.0.0 https://maven.apache.org/xsd/maven-4.0.0.xsd"><modelVersion>4.0.0</modelVersion><parent><groupId>com.xiaoqing</groupId><artifactId>t243microservice</artifactId><version>1.0-SNAPSHOT</version></parent><artifactId>microservice-student-consumer-hystrix-dashboard-90</artifactId><properties><java.version>1.8</java.version></properties><dependencies><dependency><groupId>org.springframework.boot</groupId><artifactId>spring-boot-starter</artifactId></dependency><dependency><groupId>org.springframework.boot</groupId><artifactId>spring-boot-starter-test</artifactId><scope>test</scope><exclusions><exclusion><groupId>org.junit.vintage</groupId><artifactId>junit-vintage-engine</artifactId></exclusion></exclusions></dependency><!--Hystrix服务监控Dashboard依赖--><dependency><groupId>org.springframework.cloud</groupId><artifactId>spring-cloud-starter-hystrix</artifactId></dependency><dependency><groupId>org.springframework.cloud</groupId><artifactId>spring-cloud-starter-hystrix-dashboard</artifactId></dependency><dependency><groupId>org.springframework.boot</groupId><artifactId>spring-boot-starter-actuator</artifactId></dependency></dependencies><build><plugins><plugin><groupId>org.springframework.boot</groupId><artifactId>spring-boot-maven-plugin</artifactId></plugin></plugins></build></project>
application.yml配置:
server:port: 90context-path: /
新建启动类:StudentConsumerDashBoardApplication_90
加注解:@EnableHystrixDashboard
package com.xiaoqing.microservicestudentconsumerhystrixdashboard90;import org.springframework.boot.SpringApplication;
import org.springframework.boot.autoconfigure.SpringBootApplication;
import org.springframework.boot.autoconfigure.jdbc.DataSourceAutoConfiguration;
import org.springframework.boot.autoconfigure.orm.jpa.HibernateJpaAutoConfiguration;
import org.springframework.cloud.netflix.hystrix.dashboard.EnableHystrixDashboard;@SpringBootApplication(exclude={DataSourceAutoConfiguration.class, HibernateJpaAutoConfiguration.class})
@EnableHystrixDashboard
public class MicroserviceStudentConsumerHystrixDashboard90Application {public static void main(String[] args) {SpringApplication.run(MicroserviceStudentConsumerHystrixDashboard90Application.class, args);}}
这样就完事了。
配置Configuration
先起我们的上一个项目(是超时的,雪崩状态的),启动顺序:EurekaServer2001Application注册中心----》ProviderHystrix1004Application提供者-------》Consumer80Application消费者----再启动HystrixDashboard90Application这个项目;
然后浏览器输入:http://localhost:90/hystrix

出现这个 就说明OK;
然后我们来测试下;
我们直接请求http://localhost:1004/student/hystrix配置:
返回正常业务
我们监控的话,http://localhost:1004/hystrix.stream 这个路径即可;
一直是ping,然后data返回数据;
用图形化的话

然后我们再去刷新http://localhost:1004/student/hystrix这个路径,这时是雪崩状态,是错误的结果


指标含义:

各种情况:

这篇关于SpringCloud之熔断器Hystrix及服务监控Dashboard(单机版)的文章就介绍到这儿,希望我们推荐的文章对编程师们有所帮助!


