本文主要是介绍在ubuntu上安装ns2和nam(ubuntu16.04),希望对大家解决编程问题提供一定的参考价值,需要的开发者们随着小编来一起学习吧!
在ubuntu上安装ns2和nam
- 版本选择
- 安装ns2
- 安装nam
版本选择
首先,版本的合理选择可以让我们避免很多麻烦
经过测试,ubuntu的版本选择为ubuntu16.04,ns2的版本选择为ns-2.35,nam包含于ns2
资源链接(百度网盘)
链接:https://pan.baidu.com/s/1LMB3DPFlCLqvafDAtyYYXg?pwd=8888
提取码:8888
安装ns2
首先,安装好对应的ubuntu版本后,先对系统的相关项进行更新
sudo apt-get  update #更新源列表
sudo apt-get upgrade #更新已经安装的包
如果觉得速度太慢的话,可以更换国内源
编辑/etc/apt/sources.list文件
添加在代码最前面,任选其一即可
清华源
# 默认注释了源码镜像以提高 apt update 速度,如有需要可自行取消注释
deb https://mirrors.tuna.tsinghua.edu.cn/ubuntu/ focal main restricted universe multiverse
# deb-src https://mirrors.tuna.tsinghua.edu.cn/ubuntu/ focal main restricted universe multiverse
deb https://mirrors.tuna.tsinghua.edu.cn/ubuntu/ focal-updates main restricted universe multiverse
# deb-src https://mirrors.tuna.tsinghua.edu.cn/ubuntu/ focal-updates main restricted universe multiverse
deb https://mirrors.tuna.tsinghua.edu.cn/ubuntu/ focal-backports main restricted universe multiverse
# deb-src https://mirrors.tuna.tsinghua.edu.cn/ubuntu/ focal-backports main restricted universe multiverse
deb https://mirrors.tuna.tsinghua.edu.cn/ubuntu/ focal-security main restricted universe multiverse
# deb-src https://mirrors.tuna.tsinghua.edu.cn/ubuntu/ focal-security main restricted universe multiverse# 预发布软件源,不建议启用
# deb https://mirrors.tuna.tsinghua.edu.cn/ubuntu/ focal-proposed main restricted universe multiverse
# deb-src https://mirrors.tuna.tsinghua.edu.cn/ubuntu/ focal-proposed main restricted universe multiverse
阿里源
deb http://mirrors.aliyun.com/ubuntu/ focal main restricted universe multiverse
deb-src http://mirrors.aliyun.com/ubuntu/ focal main restricted universe multiverse
deb http://mirrors.aliyun.com/ubuntu/ focal-security main restricted universe multiverse
deb-src http://mirrors.aliyun.com/ubuntu/ focal-security main restricted universe multiverse
deb http://mirrors.aliyun.com/ubuntu/ focal-updates main restricted universe multiverse
deb-src http://mirrors.aliyun.com/ubuntu/ focal-updates main restricted universe multiverse
deb http://mirrors.aliyun.com/ubuntu/ focal-proposed main restricted universe multiverse
deb-src http://mirrors.aliyun.com/ubuntu/ focal-proposed main restricted universe multiverse
deb http://mirrors.aliyun.com/ubuntu/ focal-backports main restricted universe multiverse
deb-src http://mirrors.aliyun.com/ubuntu/ focal-backports main restricted universe multiverse
中科大源
deb https://mirrors.ustc.edu.cn/ubuntu/ focal main restricted universe multiverse
deb-src https://mirrors.ustc.edu.cn/ubuntu/ focal main restricted universe multiverse
deb https://mirrors.ustc.edu.cn/ubuntu/ focal-updates main restricted universe multiverse
deb-src https://mirrors.ustc.edu.cn/ubuntu/ focal-updates main restricted universe multiverse
deb https://mirrors.ustc.edu.cn/ubuntu/ focal-backports main restricted universe multiverse
deb-src https://mirrors.ustc.edu.cn/ubuntu/ focal-backports main restricted universe multiverse
deb https://mirrors.ustc.edu.cn/ubuntu/ focal-security main restricted universe multiverse
deb-src https://mirrors.ustc.edu.cn/ubuntu/ focal-security main restricted universe multiverse
deb https://mirrors.ustc.edu.cn/ubuntu/ focal-proposed main restricted universe multiverse
deb-src https://mirrors.ustc.edu.cn/ubuntu/ focal-proposed main restricted universe multiverse
重新加载下资源
source /etc/apt/sources.list
更新源
sudo apt-get update
下载相关依赖
sudo apt-get install build-essential
sudo apt-get install tcl8.5 tcl8.5-dev tk8.5 tk8.5-dev  #for tcl and tk
sudo apt-get install libxmu-dev libxmu-headers  #for nam
安装ns2
tar xvfz ns-allinone-2.35.tar.gz -C /opt
cd /opt/ns-allinone-2.35
./install #进行安装
安装可能会报以下错:
linkstate/ls.h:137:20: note: use ‘this->erase’ instead
make: *** [linkstate/ls.o] Error 1
Ns make failed!
解决:
修改ls文件:ns-2.35/linkstate/ls.h 第137行
将 void eraseAll() { erase(baseMap::begin(), baseMap::end()); }
改为:
void eraseAll() { this->erase(baseMap::begin(), baseMap::end()); }
保存后 ./install 即可
配置环境变量
gedit ~/.bashrc
末尾添加以下内容(注意修改路径)
#add path for ns2
export NS_HOME=/opt/ns-allinone-2.35
export PATH=$PATH:$NS_HOME/bin:$NS_HOME/tcl8.5.10/unix:$NS_HOME/tk8.5.10/unix
export LD_LIBRARY_PATH=$NS_HOME/otcl-1.14:$NS_HOME/lib
export TCL_LIBRARY=$NS_HOME/tcl8.5.10/library
验证ns2安装
输入ns,出现%,说明ns2安装成功
安装nam
进入nam目录:
cd /opt/ns-allinone-2.35/nam-1.15
运行配置
sudo ./configure
这里可能会出现以下错误:
configure: error: Installation of tcl seems incomplete or can't be found automatically.
Please correct the problem by telling configure where tcl is
using the argument --with-tcl=/path/to/package
(perhaps after installing it),
or the package is not required, disable it with --with-tcl=no.
指定版本号即可
sudo ./configure --with-tcl-ver=8.5
更新nam
sudo make
最后
sudo make install
最后这里可能会出现
/usr/bin/install -c -m 755 nam /usr/local/bin
运行即可
sudo /usr/bin/install -c -m 755 nam /usr/local/bin
命令行输入nam弹出nam console说明nam安装成功
运行测试
cd /opt/ns-allinone-2.35/ns-2.35/tcl/ex/
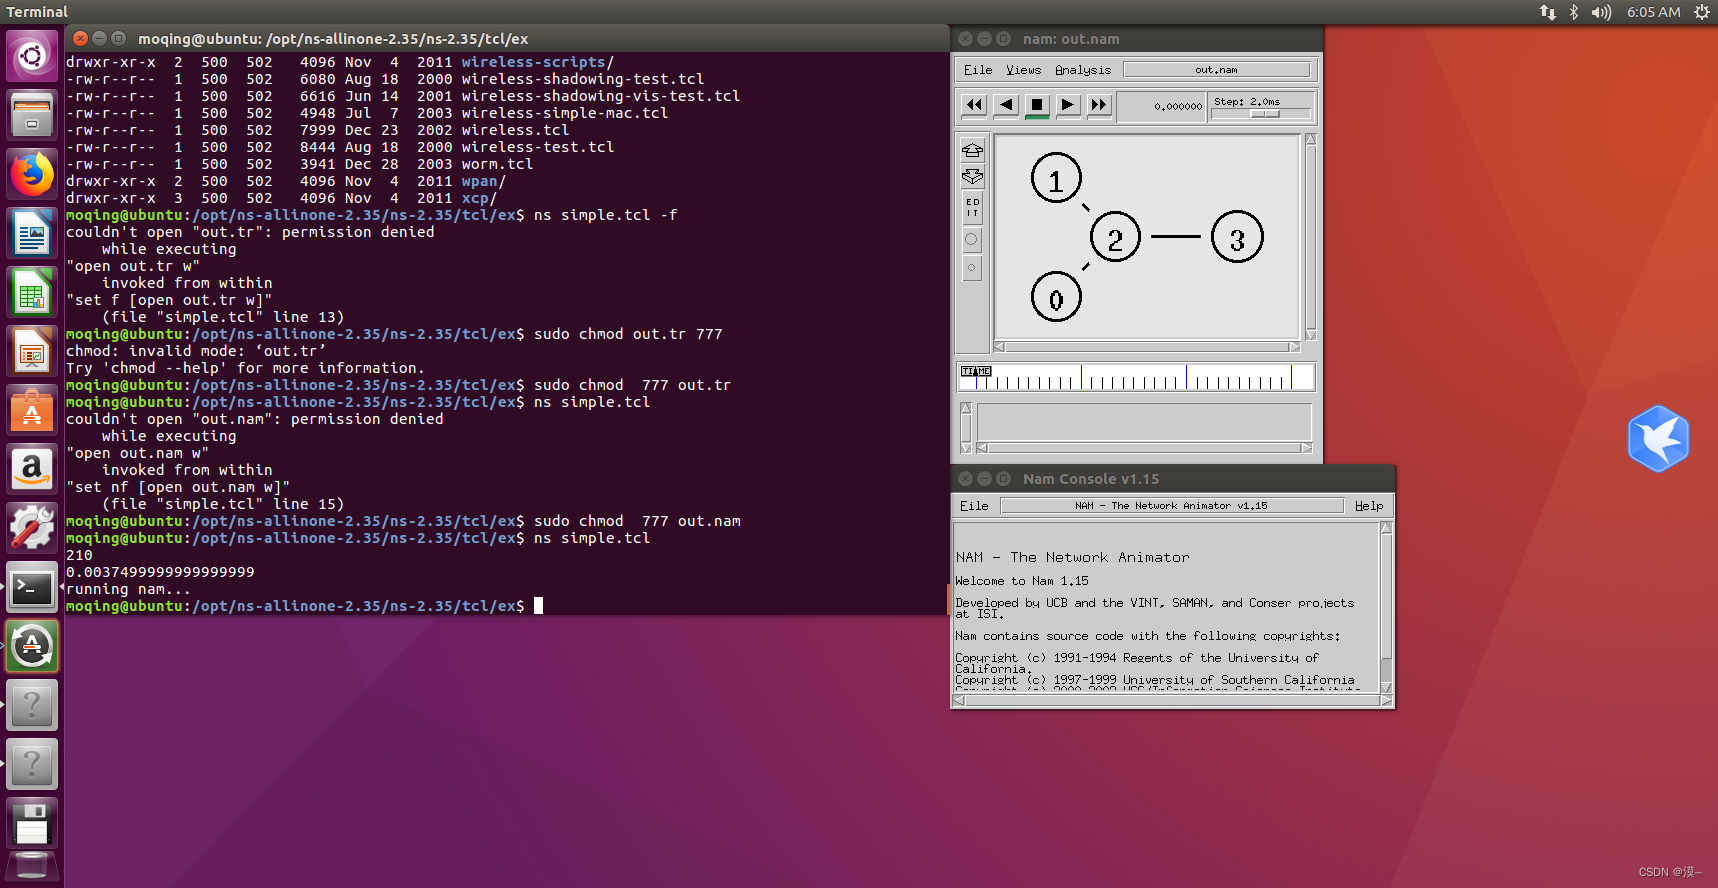
ns simple.tcl
运行时可能会出现以下问题

解决:权限放开
sudo chmod 777 out.tr

解决:权限放开
sudo chmod 777 out.nam
运行结果:

这篇关于在ubuntu上安装ns2和nam(ubuntu16.04)的文章就介绍到这儿,希望我们推荐的文章对编程师们有所帮助!


