本文主要是介绍[Netty源码] ByteBuf相关问题 (十),希望对大家解决编程问题提供一定的参考价值,需要的开发者们随着小编来一起学习吧!
文章目录
- 1.ByteBuf介绍
- 2.ByteBuf分类
- 2.1 AbstractByteBuf
- 2.2 AbstractReferenceCountedByteBuf
- 2.3 UnpooledHeapByteBuf
- 2.4 UnpooledDirectByteBuf
- 2.5 PooledDirectByteBuf
1.ByteBuf介绍
字节缓冲区, jdk NIO的ByteBuffer比较复杂, netty重新设计了ByteBuf用以代替ByteBuffer
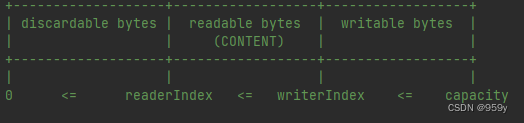
ByteBuf主要是通过readerIndex 和 writerIndex两个指针进行数据的读和写, 整个ByteBuf被这两个指针最多分成三个部分, 分别是可丢弃部分, 可读部分和可写部分
-
readerIndex和writerIndex初始值都是0, 随着写入writerIndex的增加, readerIndex的增加。
-
0 ~ readerIndex之间就被视为discard的, 调用discardReadByte 方法, 可以释放这个空间, readerIndex = 0, writerIndex = writerIndex - readerIndex
-
扩容设计: Nio 的 ByteBuffer没有扩容设计, 底层是数组, 会报BufferOverflowExeption错误, ByteBuf会自动进行动态扩展
2.ByteBuf分类
- 从内存回收的角度来看: Pooled和Unpooled: 基于对象池的ByteBuf和普通ByteBuf
- 从内存分配角度来看: heap和direct: 堆内存和直接内存
- 从如何读取数据角度来看: unsafe和非unsafe: unsafe可以直接拿到byteBuf的内存地址, 不会依赖jdk底层的unsafe, unsafe通过内存地址+偏移量, 非unsafe通过数组+下标或者说jdk底层ButBufferApi获取对应的数据
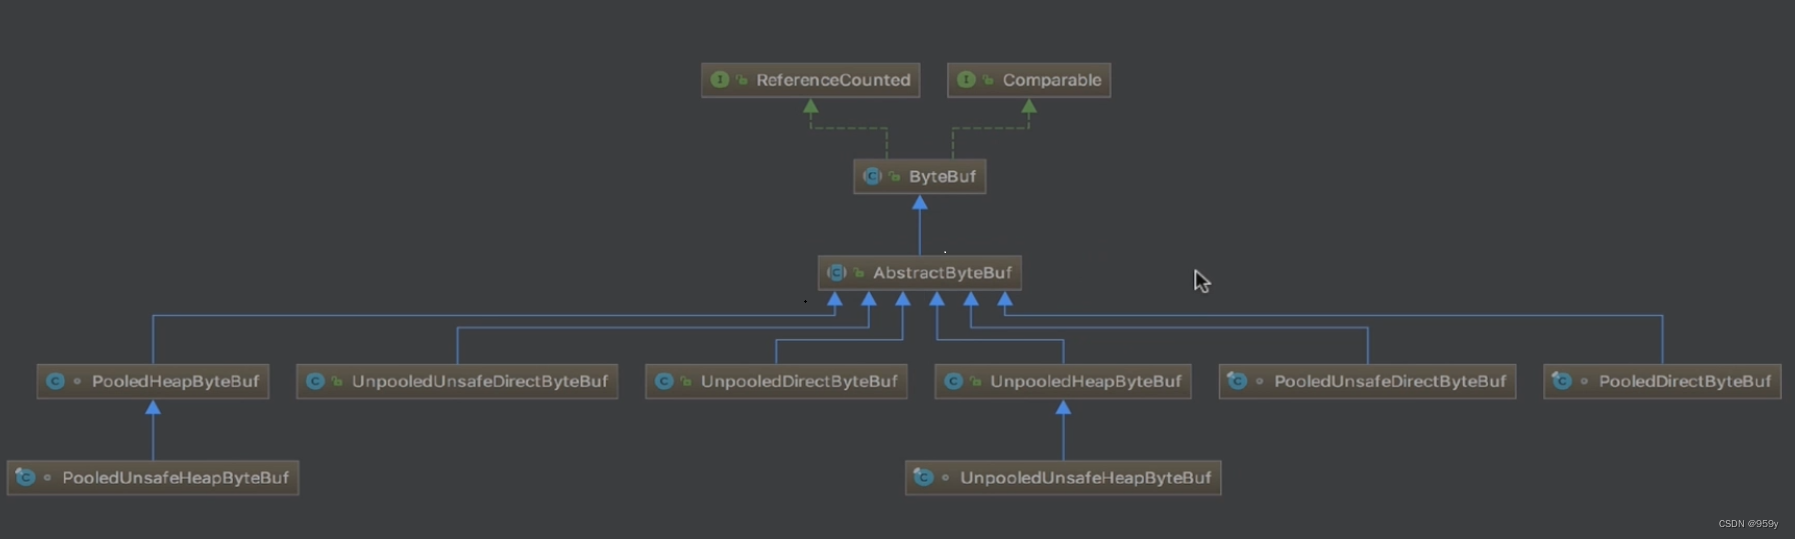
2.1 AbstractByteBuf
AbstractByteBuf 是ByteBuf骨架的一个实现

成员变量
// 用于检测对象是否泄漏static final ResourceLeakDetector<ByteBuf> leakDetector = new ResourceLeakDetector<ByteBuf>(ByteBuf.class);// 读操做 和 写操作 的位置指针int readerIndex;private int writerIndex;// 读操作 和 写操作 的标记,可以通过reset()回到标记的地方private int markedReaderIndex;private int markedWriterIndex;// 最大容量private int maxCapacity;
一些简单的方法
@Overridepublic ByteBuf readerIndex(int readerIndex) {if (checkBounds) {checkIndexBounds(readerIndex, writerIndex, capacity());}this.readerIndex = readerIndex;return this;}@Overridepublic ByteBuf writerIndex(int writerIndex) {if (checkBounds) {checkIndexBounds(readerIndex, writerIndex, capacity());}this.writerIndex = writerIndex;return this;}@Overridepublic ByteBuf clear() {readerIndex = writerIndex = 0;return this;}
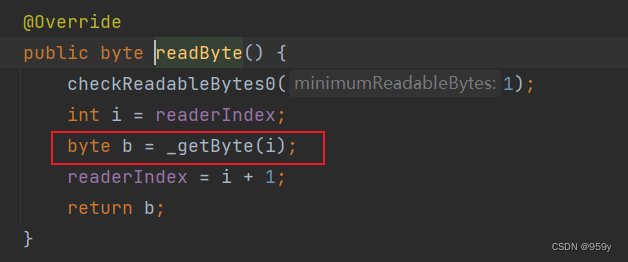
通过一个_getByte()抽象类让实现类实现这个方法, 做不同的功能
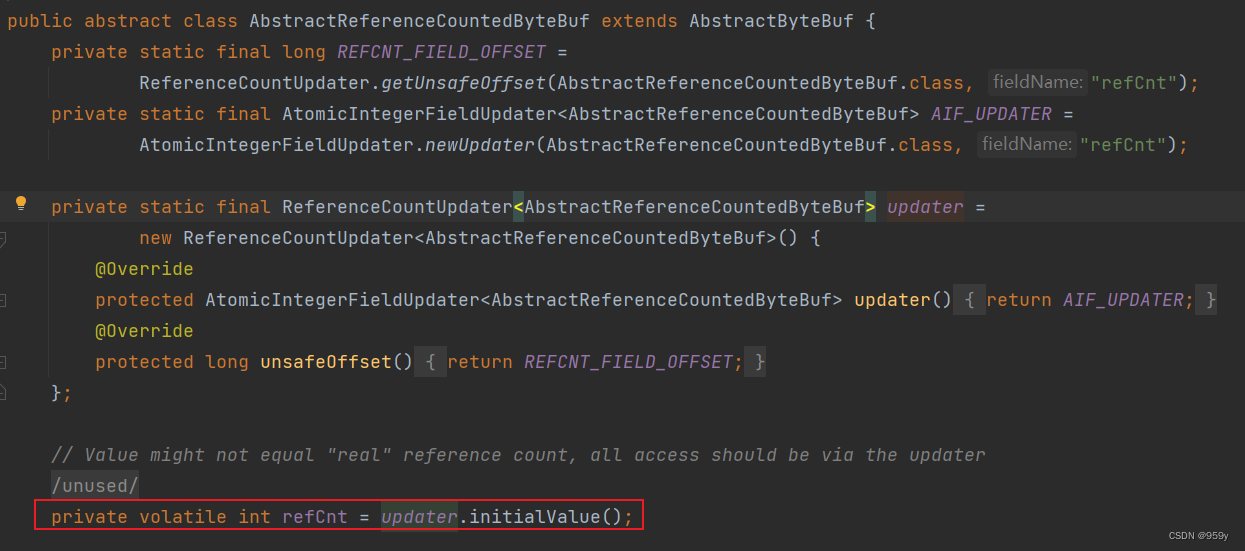
2.2 AbstractReferenceCountedByteBuf
作用主要是对ButeBuf引用进行计数,用于跟踪对象的分配及销毁。
- 每调用一次 retain() 方法,引用计数器就加1
- 由于 refCnt 初始值为1,每次申请加1,释放减1,当申请数等于释放数时,对象被回收,故 refCnt 不可能为0。如果为0,说明对象被错误、意外的引用了,抛出异常*
public ByteBuf retain() {for (;;) {int refCnt = this.refCnt;if (refCnt == 0) {throw new IllegalReferenceCountException(0, 1);}if (refCnt == Integer.MAX_VALUE) {throw new IllegalReferenceCountException(Integer.MAX_VALUE, 1);}if (refCntUpdater.compareAndSet(this, refCnt, refCnt + 1)) {break;}}return this;}public final boolean release() {for (;;) {int refCnt = this.refCnt;if (refCnt == 0) {throw new IllegalReferenceCountException(0, -1);}if (refCntUpdater.compareAndSet(this, refCnt, refCnt - 1)) {if (refCnt == 1) {// 垃圾回收deallocate();return true;}return false;}}}
2.3 UnpooledHeapByteBuf
UnpooledHeapByteBuf 就是普通的堆内存ByteBuf, 没有内存池, 没有堆外内存。
成员变量
// 用于UnpooledHeapByteBuf内存分配private final ByteBufAllocator alloc;// 缓冲区private byte[] array;// Java NIO的ByteBuffer,用于Netty的ByteBuf到NIO的ByteBuffer转换private ByteBuffer tmpNioBuf;
动态扩展缓冲区
- newCapacity > oldCapacity,直接创建一个新数组,拷贝过去就行了
- newCapacity == oldCapacity,不做处理
- newCapacity < oldCapacity,先判断readerIndex,如果readerIndex大于等于newCapacity,说明没有数据需要复制到缓冲区,直接设置readerIndex和writerIndex的值为newCapacity即可;当readerIndex小于newCapacity时,readerIndex到writerIndex之间的数据需要复制到新的byte数组,这个时候,如果writerIndex - readerIndex > newCapacity,就会发生数组下标越界,为了防止越界,当writerIndex > newCapacity时,令writerIndex = newCapacity,然后做 byte 数组赋值操作。最后,替换掉ByteBuf中持有的 byte数组引用,并令NIO 的 ByteBuffer为 null。
public ByteBuf capacity(int newCapacity) {ensureAccessible();// 1. 对入参做合法性校验if (newCapacity < 0 || newCapacity > maxCapacity()) {throw new IllegalArgumentException("newCapacity: " + newCapacity);}int oldCapacity = array.length;if (newCapacity > oldCapacity) {// 2. byte数组copy,然后替换掉原来的byte数组byte[] newArray = new byte[newCapacity];System.arraycopy(array, 0, newArray, 0, array.length);setArray(newArray);} else if (newCapacity < oldCapacity) {// 如果新容量小于老容量,则不需要动态扩展,但是需要截取当前缓冲区创建一个新的子缓冲区byte[] newArray = new byte[newCapacity];int readerIndex = readerIndex();if (readerIndex < newCapacity) {int writerIndex = writerIndex();if (writerIndex > newCapacity) {// 如果writerIndex大于newCapacity,则有可能发生越界,这里直接截断writerIndex(writerIndex = newCapacity);}System.arraycopy(array, readerIndex, newArray, readerIndex, writerIndex - readerIndex);} else {// 如果readerIndex大于等于新的capacity,说明没有数据需要复制到新缓冲区,直接将readerIndex和writerIndex设置为newCapacity即可setIndex(newCapacity, newCapacity);}setArray(newArray);}return this;}private void setArray(byte[] initialArray) {array = initialArray;tmpNioBuf = null;}
字节数组复制
-
在AbstractByteBuf中的读写操作中, 具体的读写操作为子类实现的。
-
UnpooledHeapByteBuf 写操作中, 首先检查入参, 然后将数据copy到ByteBuf的byte数组中。
-
UnpooledHeapByteBuf 读操作中, 首先检查入参, 然后将ByteBuf的byte数组copy到指定的byte数组中。
public ByteBuf setBytes(int index, byte[] src, int srcIndex, int length) {// 根据AbstractByteBuf的写操作可知,index为writerIndexcheckSrcIndex(index, length, srcIndex, src.length);System.arraycopy(src, srcIndex, array, index, length);return this;}protected final void checkSrcIndex(int index, int length, int srcIndex, int srcCapacity) {checkIndex(index, length);if (srcIndex < 0 || srcIndex > srcCapacity - length) {throw new IndexOutOfBoundsException(String.format("srcIndex: %d, length: %d (expected: range(0, %d))", srcIndex, length, srcCapacity));}}protected final void checkIndex(int index, int fieldLength) {ensureAccessible();if (fieldLength < 0) {throw new IllegalArgumentException("length: " + fieldLength + " (expected: >= 0)");}// writerIndex + length > capacity,数组下表越界if (index < 0 || index > capacity() - fieldLength) {throw new IndexOutOfBoundsException(String.format("index: %d, length: %d (expected: range(0, %d))", index, fieldLength, capacity()));}}// 读操作时,将字节数组copy出去public ByteBuf getBytes(int index, byte[] dst, int dstIndex, int length) {checkDstIndex(index, length, dstIndex, dst.length);System.arraycopy(array, index, dst, dstIndex, length);return this;}
Netty 的 ByteBuf 转换为 NIO 的 ByteNuffer
利用byte数组创建一个新的ByteBuffer, 并调用slice方法, 清除 discard 区域。
public ByteBuffer nioBuffer(int index, int length) {ensureAccessible();// slice():copy一个原来的position到limit之间的有效数据,创建一个新的ByteBufferreturn ByteBuffer.wrap(array, index, length).slice();}public static ByteBuffer wrap(byte[] array, int offset, int length) {try {return new HeapByteBuffer(array, offset, length);} catch (IllegalArgumentException x) {throw new IndexOutOfBoundsException();}}
2.4 UnpooledDirectByteBuf
UnpooledDIrectByteBuf是基于堆外内存创建的。
这里使用 ByteBuffer 存储数据, 而UnpooledHeapByteBuf 使用字节数组, 这里的ByteBuffer使用的是NIO的DirectByteBuffer, 需要手动释放内存。
成员变量
// ByteBuf内存分配private final ByteBufAllocator alloc;// 这里跟UnpooledHeapByteBuf不同,这里使用的是NIO的ByteBuffer存储字节数组private ByteBuffer buffer;private ByteBuffer tmpNioBuf;private int capacity;//用于标记ByteBuffer是否释放了(这里使用堆外内存创建ByteBuffer,需要自己做垃圾回收)private boolean doNotFree;
动态扩展缓冲区
不同的是这里使用的是ByteBuffer而不是byte数组。
public ByteBuf capacity(int newCapacity) {ensureAccessible();// 1. 校验粗人惨if (newCapacity < 0 || newCapacity > maxCapacity()) {throw new IllegalArgumentException("newCapacity: " + newCapacity);}int readerIndex = readerIndex();int writerIndex = writerIndex();int oldCapacity = capacity;if (newCapacity > oldCapacity) {// 这里直接创建一个新的ByteBuffer,将老的ByteBuffer数据copy过去ByteBuffer oldBuffer = buffer;// 创建一个DirectByteBufferByteBuffer newBuffer = allocateDirect(newCapacity);// 设置position和limit的值oldBuffer.position(0).limit(oldBuffer.capacity());newBuffer.position(0).limit(oldBuffer.capacity());newBuffer.put(oldBuffer);newBuffer.clear();// 替换老的ByteBuffer并释放掉老的ByteBuffersetByteBuffer(newBuffer);} else if (newCapacity < oldCapacity) {// 这里跟UnpooledHeapByteBuf处理是一样的,详细看UnpooledHeapByteBufByteBuffer oldBuffer = buffer;ByteBuffer newBuffer = allocateDirect(newCapacity);if (readerIndex < newCapacity) {if (writerIndex > newCapacity) {writerIndex(writerIndex = newCapacity);}oldBuffer.position(readerIndex).limit(writerIndex);newBuffer.position(readerIndex).limit(writerIndex);newBuffer.put(oldBuffer);newBuffer.clear();} else {setIndex(newCapacity, newCapacity);}setByteBuffer(newBuffer);}return this;}// 创建DirectByteBufferprotected ByteBuffer allocateDirect(int initialCapacity) {return ByteBuffer.allocateDirect(initialCapacity);}private void setByteBuffer(ByteBuffer buffer) {ByteBuffer oldBuffer = this.buffer;if (oldBuffer != null) {if (doNotFree) {doNotFree = false;} else {// 释放oldByteBufferfreeDirect(oldBuffer);}}this.buffer = buffer;tmpNioBuf = null;capacity = buffer.remaining();}
字节数组复制
- 在AbstractByteBuf中的读写操作中, 具体的读写操作为子类实现的。
- UnpooledDirectByteBuf 写操作, 先验证入参, 再创建一个临时的ByteBuffer, 这个ByteBuffer与buffer的content共用, 向tmpBuf中写数据相当于向buffer写数据。
- UnpooledDirectByteBuf 读操作, 先验证入参, 然后创建出一个临时的 ByteBuffer, 这个临时的 ByteBuffer 做读操作。
public ByteBuf setBytes(int index, byte[] src, int srcIndex, int length) {// 参数校验checkSrcIndex(index, length, srcIndex, src.length);// 创建一个临时的tmpBufByteBuffer tmpBuf = internalNioBuffer();tmpBuf.clear().position(index).limit(index + length);tmpBuf.put(src, srcIndex, length);return this;}private ByteBuffer internalNioBuffer() {ByteBuffer tmpNioBuf = this.tmpNioBuf;if (tmpNioBuf == null) {// 令tempNioBuf和buffer共用同一个ByteBuffer内容,修改了tmpNioByteBuf,也等同于修改了buffer// 但是它们的position、limit都是独立的this.tmpNioBuf = tmpNioBuf = buffer.duplicate();}return tmpNioBuf;}public ByteBuf readBytes(byte[] dst, int dstIndex, int length) {checkReadableBytes(length);getBytes(readerIndex, dst, dstIndex, length, true);readerIndex += length;return this;}private void getBytes(int index, byte[] dst, int dstIndex, int length, boolean internal) {checkDstIndex(index, length, dstIndex, dst.length);if (dstIndex < 0 || dstIndex > dst.length - length) {throw new IndexOutOfBoundsException(String.format("dstIndex: %d, length: %d (expected: range(0, %d))", dstIndex, length, dst.length));}ByteBuffer tmpBuf;if (internal) {tmpBuf = internalNioBuffer();} else {tmpBuf = buffer.duplicate();}tmpBuf.clear().position(index).limit(index + length);tmpBuf.get(dst, dstIndex, length);}
Netty 的 ByteBuf 转换为 NIO 的 ByteNuffer
这里直接拿buufer的content创建一个新的ByteBuffer。
public ByteBuffer nioBuffer(int index, int length) {return ((ByteBuffer) buffer.duplicate().position(index).limit(index + length)).slice();}public ByteBuffer duplicate() {return new DirectByteBuffer(this, this.markValue(), this.position(), this.limit(), this.capacity(), 0);}
2.5 PooledDirectByteBuf
PooledDirectByteBuf基于内存池实现, 与UnpooledDirectByteBuf唯一的不同就是缓冲区的分配和销毁策略。
创建字节缓冲区
由于采用内存池实现, 不可new创建实例, 而是从内存池中获取, 然后设置引用计数器的值。
static PooledDirectByteBuf newInstance(int maxCapacity) {PooledDirectByteBuf buf = RECYCLER.get();buf.setRefCnt(1);buf.maxCapacity(maxCapacity);return buf;}
复制新的字节缓冲区
复制新的字节缓冲区时候, 也需要通过内存池创建一个字节缓冲区, 然后复制。
public ByteBuf copy(int index, int length) {// 参数校验checkIndex(index, length);// 从内存池中创建一个ByteBufByteBuf copy = alloc().directBuffer(length, maxCapacity());// 复制操作copy.writeBytes(this, index, length);return copy;}
这篇关于[Netty源码] ByteBuf相关问题 (十)的文章就介绍到这儿,希望我们推荐的文章对编程师们有所帮助!


