本文主要是介绍contOS7下安装Oracle11g数据库,希望对大家解决编程问题提供一定的参考价值,需要的开发者们随着小编来一起学习吧!
准备工作(安装环境)
1. 使用VMware14 搭建centos7的虚拟机
ip:192.168.126.129
2. 下载Oracle11g安装文件
链接: https://pan.baidu.com/s/1DaMJ8Nei5a9tUfDfvHd8Jw 提取码: nhv6

3.使用xhell5工具连接虚拟机,把两个文件上传到/home目录下
使用命令
[root@localhost ~]# cd /home  进去home目录中
[root@localhost home]#  rz     拉起windows资源管理器选择你Oracle11g的目录
4.使用root用户登录linux,yum安装unzip软件,用来解压上传的oracle安装文件
[root@localhost home]# yum install unzip –y
5…解压oracle安装程序
[root@localhost home]# unzip linux.x64_11gR2_database_1of2.zip[root@localhost home]# unzip linux.x64_11gR2_database_2of2.zip
解压完成后,在/home目录下生成一个database文件夹,里面就是oracle安装文件
6. yum安装vim软件,用于编辑配置文件
[root@localhost home]#yum install vim -y
7.在/etc/hosts文件中添加主机名
a. 查看主机名
[root@localhost home]# hostname
localhost.localdomain
[root@localhost home]#
b. 添加到hosts文件中
[root@localhost home]# vim /etc/hosts127.0.0.1   localhost localhost.localdomain localhost4 localhost4.localdomain4
::1         localhost localhost.localdomain localhost6 localhost6.localdomain6
192.168.126.129 localhost.localdomain
8.关掉selinux
为什么要关闭呢?
那是因为在RedHat linux操作系统中默认开启了防火墙,SELinux也处于启动状态,一般状态为enforing。致使很多服务端口默认是关闭的。
[root@localhost home]# vim /etc/selinux/config
默认是SELINUX=enforcing设置为SELINUX=disabled
[root@localhost home]# setenforce 0   让配置文件生效
9.关闭防火墙,以免安装过程中发生不必要的错误
[root@localhost ~]# systemctl stop firewalld 防火墙暂时关闭[root@localhost ~]# systemctl disable firewalld 防火墙永久关闭
10.安装oracle11g的依赖包
[root@localhost ~]# yum install gcc make binutils gcc-c++ compat-libstdc++-33elfutils-libelf-devel elfutils-libelf-devel-static ksh libaiolibaio-develnumactl-devel sysstat unixODBC unixODBC-devel pcre-devel –y
11.添加用户和组
[root@localhost ~]# groupadd oinstall		创建组名[root@localhost ~]# groupadd dba           创建数据组[root@localhost ~]# useradd -g oinstall -G dba oracle   创建oracle并放到oinstall组#####注意删除用户  需要userdel -r 用户名  ,否则 userdel 用户还需要 rm -rf /home/用户名
[root@localhost ~]# passwd oracle      设置oracle密码[root@localhost ~]# id oracle			显示oracle的ID,以及所属群组的ID。uid=1001(oracle) gid=1001(oinstall) groups=1001(oinstall),1002(dba)
12.修改内核参数配置文件
[root@localhost ~]# vim /etc/sysctl.conf# For more information, see sysctl.conf(5) and sysctl.d(5).   下面添加fs.aio-max-nr = 1048576fs.file-max = 6815744
#所有共享内存段相加大小限制
kernel.shmall = 2097152
#最大单个共享内存段大小(建议为内存一半), >9.2的版本已大幅降低共享内存的使用
kernel.shmmax = 536870912
#一共能生成多少共享内存段,每个PG数据库集群至少2个共享内存段
kernel.shmmni = 4096
#信号量
kernel.sem = 250 32000 100 128
# 本地自动分配的TCP, UDP端口号范围
net.ipv4.ip_local_port_range = 9000 65500  net.core.rmem_default = 262144net.core.rmem_max = 4194304net.core.wmem_default = 262144net.core.wmem_max = 1048576
13.查看配置是否生效
[root@localhost home]# sysctl -p
fs.aio-max-nr = 1048576
fs.file-max = 6815744
kernel.shmall = 2097152
kernel.shmmax = 536870912
kernel.shmmni = 4096
kernel.sem = 250 32000 100 128
net.ipv4.ip_local_port_range = 9000 65500
net.core.rmem_default = 262144
net.core.rmem_max = 4194304
net.core.wmem_default = 262144
net.core.wmem_max = 1048576
14.修改用户的限制文件
[root@localhost home]# vim /etc/security/limits.conf
#@student - maxlogins 4  在这个下面加#系统中最大可同时存在的进程数
oracle soft nproc 2047     oracle hard nproc 16384oracle soft nofile 1024oracle hard nofile 65536oracle soft stack 10240
15.修改用户验证选项(root用户)
[root@localhost home]# vim /etc/pam.d/login#pam_selinux.so close should be the first session rulesession    required     /lib64/security/pam_limits.so
session    required     pam_limits.so
如图:
16.创建oracle安装目录和设置文件权限
普及:https://www.runoob.com/linux/linux-comm-mkdir.html 有关linux命令
-p 确保目录名称存在,不存在的就建一个。
[root@localhost ~]# mkdir -p /data/oracle/product/11.2.0[root@localhost ~]# mkdir /data/oracle/oradata[root@localhost ~]# mkdir /data/oracle/inventory[root@localhost ~]# mkdir /data/oracle/fast_recovery_area[root@localhost ~]# chown -R oracle:oinstall /data/oracle[root@localhost ~]# chmod -R 777 /data/oracle
17.切换为oracle用户,设置oracle用户环境变量
.bash_profile在/home/oracle/目录下
[root@localhost ~]# su - oracle[oracle@localhost ~]$ vim .bash_profile
注意:不要把.bash_profile文件下原有的path和export PATH注释掉
PATH= P A T H : PATH: PATH:HOME/.local/bin:$HOME/bin
export PATH
#User specific environment and startup programs   这个下面添加
PATH=$PATH:$HOME/.local/bin:$HOME/bin
export PATH
在原有的下面添加
ORACLE_BASE=/data/oracle; export ORACLE_BASEORACLE_HOME=$ORACLE_BASE/product/11.2.0; export ORACLE_HOMENLS_LANG=AMERICAN_AMERICA.ZHS16GBK; export NLS_LANGORACLE_SID=infodb; export ORACLE_SIDPATH=$PATH:$ORACLE_HOME/bin:$ORACLE_HOME/jdk/bin:/sbin;export PATHBIN=$ORACLE_HOME/bin; export BINLD_LIBRARY_PATH=$ORACLE_HOME/lib; export LD_LIBRARY_PATHexport LANG=en_US.UTF-8
注意,ORACLE_SID=infodb与创建的数据库实例名称一致,否则数据库启动后无法访问。
17.1 配置完后使用命令使配置生效
 [oracle@localhost ~]$ source .bash_profile
#使用echo $ORACLE_BASE或者echo $ORACLE_HOME#查看配置的信息是否生效,如果正确的话是和你的配置是一致的
17.2 退出在登录,使得环境变量的配置生效
[oracle@loaclhost ~]$ exit
[root@loaclhost ~]$ su - oracle
[oracle@loaclhost ~]$ env |grep ORAORACLE_SID=infodbORACLE_BASE=/data/oracleORACLE_HOME=/data/oracle/product/11.2.0
18. 安装前的最后准备–编辑静默安装响应文件
注:严格按照命令来
a. 将响应文件复制到oracle用户目录 即/home/oracle
[oracle@localhost ~]$ cp -R /home/database/response/ .
[oracle@localhost ~]$ ll
total 0
drwxr-xr-x. 2 oracle oinstall 61 Sep 24 09:00 response
b. 编辑相应文件
[oracle@localhost ~]$ cd response/[oracle@localhost response]$ vim db_install.rsp
注:在这个文件db_install.rsp找对应的将等于号后面填了
oracle.install.option=INSTALL_DB_SWONLYORACLE_HOSTNAME=localhostUNIX_GROUP_NAME=oinstallINVENTORY_LOCATION=/data/oracle/inventorySELECTED_LANGUAGES=en,zh_CNORACLE_HOME=/data/oracle/product/11.2.0ORACLE_BASE=/data/oracleoracle.install.db.InstallEdition=EEoracle.install.db.DBA_GROUP=dbaoracle.install.db.OPER_GROUP=dbaDECLINE_SECURITY_UPDATES=true
19.根据响应文件静默安装Oracle11g
[oracle@localhost database]$ cd /home/database/[oracle@localhost database]$ ./runInstaller -silent -responseFile /home/oracle/response/db_install.rsp -ignorePrereq!!没反应的话耐心等会!!!!!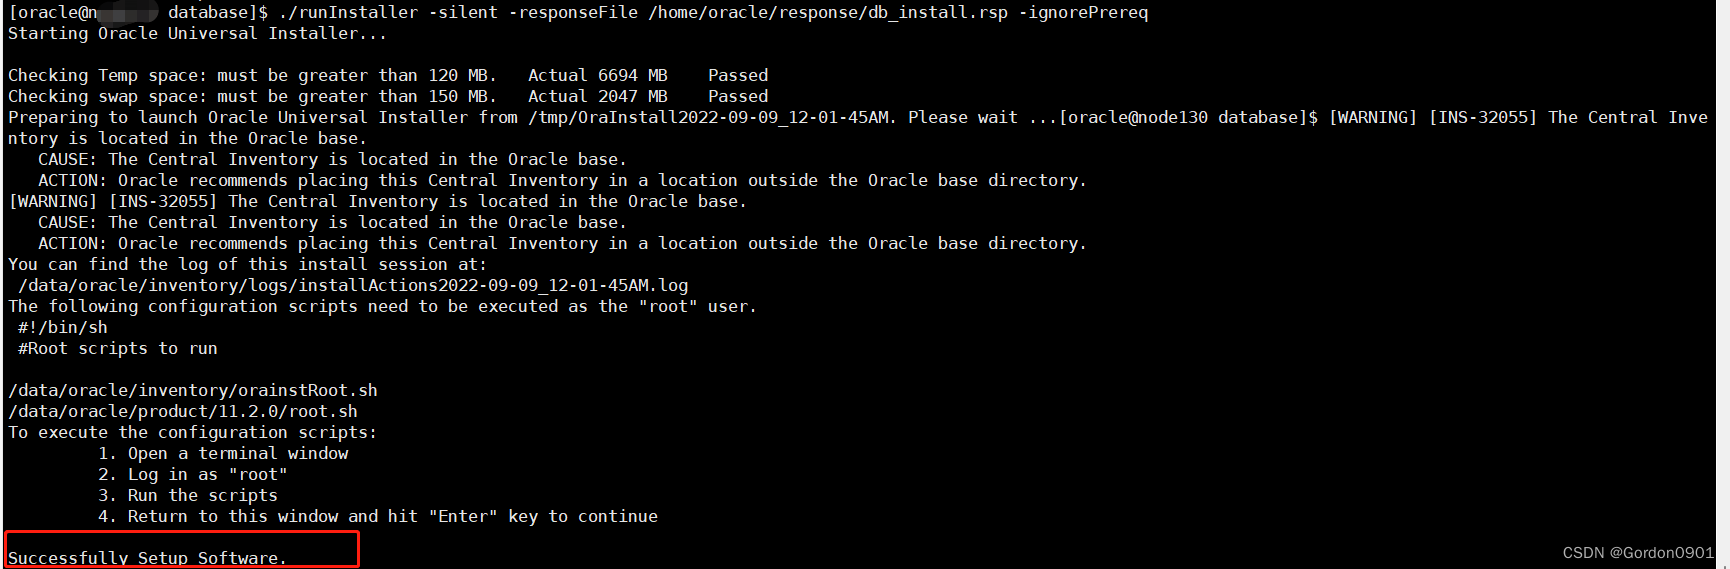
可以切换终端执行,切记!! 不要退出当前用户,从新打开一个窗口
执行tail -f /data/oracle/inventory/logs/installActions2015-06-08_04-00-25PM.log命令查看安装程序日志
如果当前用户的窗口出现以successfully Setup Software提示时,代表安装成功
19.1 安装成功后,按照要求执行脚本
[root@localhost ~]# sh /data/oracle/inventory/db_1/orainstRoot.sh注:如果没有db_1文件夹的话/data/oracle/inventory/orainstRoot.sh[root@localhost ~]# sh /data/oracle/product/11.2.0/root.sh
Check /data/oracle/product/11.2.0/install/root_node130_2015-06-08_00-06-40.log for the output of root script
注意切换用户

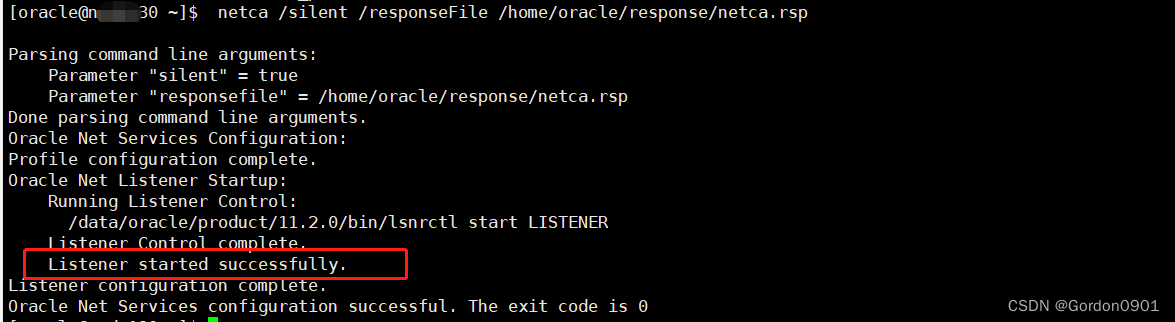
20.静默方式配置监听(图形化、命令)
20.1 命令
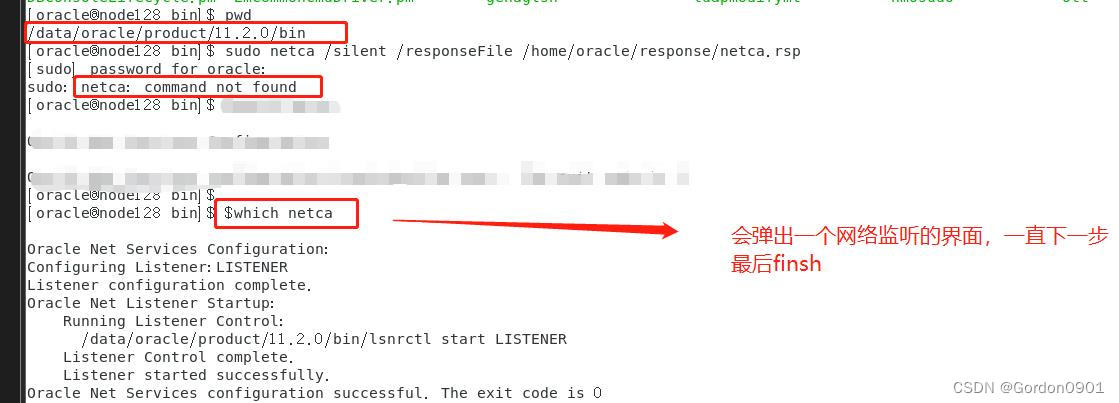
切换oracle用户登录,命令安装
[oracle@localhost ~]$ su - oracle
[oracle@localhost ~]$  netca /silent /responseFile /home/oracle/response/netca.rsp
可能会报错
oracle is not in the sudoers file. This incident will bereported
oracle 用户不在sudoers组中, 切换成root用户 , 执行命令:chmod u+w /etc/sudoers , vim /etc/sudoers 这个目录,找到 root ALL=(ALL) ALL 这行,在这行下面添加 oracle ALL=(ALL) ALL , chmod u-w /etc/sudoers 最后撤销权限
20.2 图形化
我的安装目录 cd /data/oracle/product/11.2.0
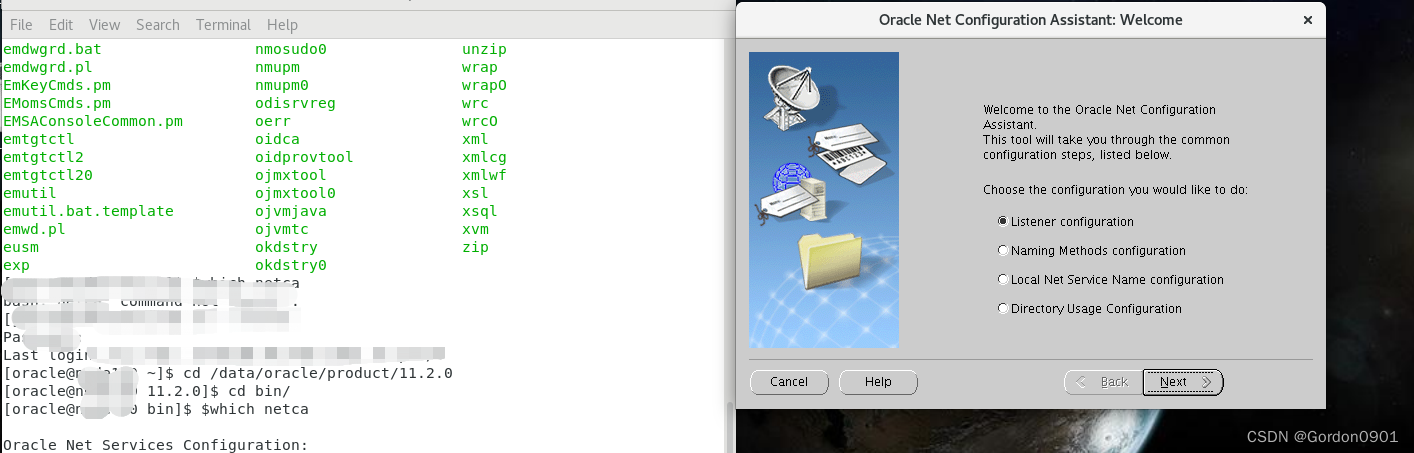
- 成功运行后,在/data/oracle/product/11.2.0/db_1/network/admin/或/data/oracle/product/11.2.0/network/admin/中生成listener.ora和sqlnet.ora
20.3 通过netstat命令可以查看1521端口正在监听。
Yum安装netstat软件,软件包是在net-tools中。
[root@localhost ~]$ yum install net-tools[root@localhost ~]$ netstat -tnulp | grep 1521
tcp6       0      0 :::1521                 :::*                    LISTEN      19955/tnslsnr
21.以静默方式建立新库,同时也建立一个对应的实例。
用oracle用户登录,再次进去响应文件夹
[oracle@localhost ~]$ vim /home/oracle/response/dbca.rsp
注:在这个文件dbca.rsp找对应的将等于号后面填了,并且默认为是注释掉的,把用到的不要注释
设置参数:
GDBNAME= “infodb”SID =” infodb”SYSPASSWORD= “ system@2017”SYSTEMPASSWORD= “system@2017”SYSMANPASSWORD= “ system@2017”DBSNMPPASSWORD= “ system@2017”DATAFILEDESTINATION=/data/oracle/oradataRECOVERYAREADESTINATION=/data/oracle/fast_recovery_areaCHARACTERSET= “ZHS16GBK”TOTALMEMORY= “819”
进行静默配置:
[oracle@localhost ~]$ dbca -silent -responseFile /home/oracle/response/dbca.rsp

查看监听状态(监听命令 启动监听:lsnrctl start、停止监听:lsnrctl stop、查看监听状态:lsnrctl status)
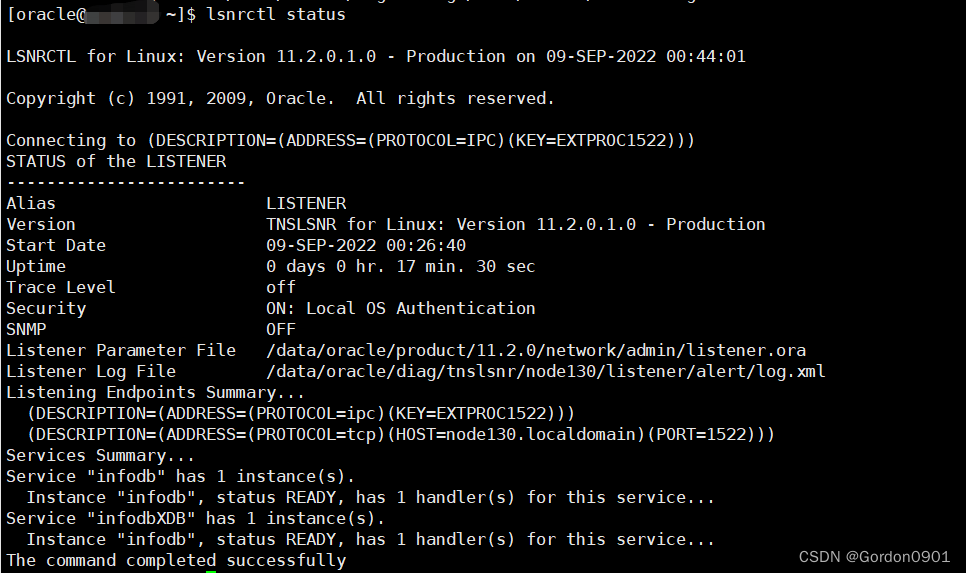
登录查看实例状态:
[oracle@localhost ~]$ sqlplus / as sysdba     #sysdba超级用户SQL*Plus: Release 11.2.0.1.0 Production on Thu Sep 24 12:55:23 2020Copyright (c) 1982, 2009, Oracle.  All rights reserved.Connected to:
Oracle Database 11g Enterprise Edition Release 11.2.0.1.0 - 64bit Production
With the Partitioning, OLAP, Data Mining and Real Application Testing optionsSQL> quit
Disconnected from Oracle Database 11g Enterprise Edition Release 11.2.0.1.0 - 64bit Production
With the Partitioning, OLAP, Data Mining and Real Application Testing options
[oracle@localhost ~]$
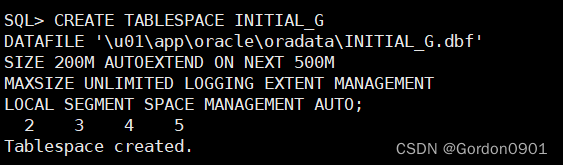
22.创建表空间(模式)、用户及授权
1、创建表空间
INITIAL_G 是表空间的名称,DATAFILE是创建数据库文件的路径,然后初始大小是200m,然后自动增加是500M,参数可以根据自己的需求来调整
SQL> CREATE TABLESPACE INITIAL_G                                                                                                                                          DATAFILE '\u01\app\oracle\oradata\INITIAL_G.dbf'
SIZE 200M AUTOEXTEND ON NEXT 500M
MAXSIZE UNLIMITED LOGGING EXTENT MANAGEMENT
LOCAL SEGMENT SPACE MANAGEMENT AUTO;
2、创建用户 oracle是根据用户区分库的也就是表空间 INITIAL_G 表空间 infodb是数据库用户 by后的是密码
SQL> CREATE USER infodb IDENTIFIED BY infodb DEFAULT TABLESPACE INITIAL_G;User created.
注:如果过出现以下的话就是你没有加分号,oracle语法是非常严格的,加个分号自动退出
SQL> CREATE USER infodb IDENTIFIED BY infodb DEFAULT TABLESPACE INITIAL_G2
3、授权(直接给了 dba权限)
SQL> grant dba to infodb;Grant succeeded.查询数据库用户名
select username, account_status, lock_date from dba_users;
ACCOUNT_STATUS :账户状态 open 启用
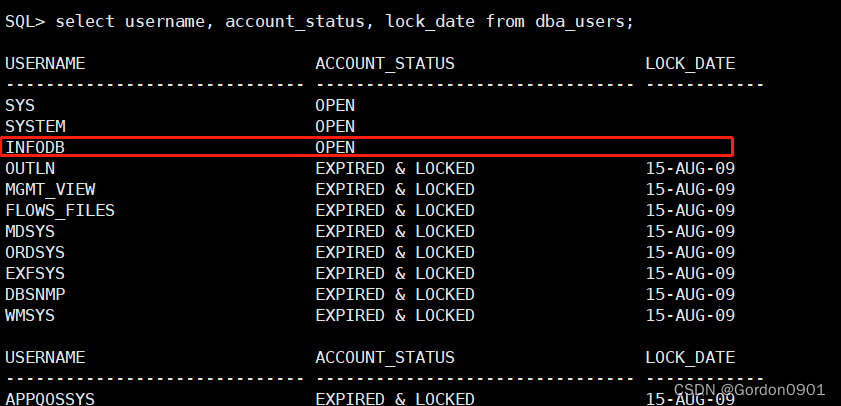
oracle的默认的用户名和密码
1.用户名:sys密码:change_on_install
2.用户名:system密码:manager
3.用户名:scott密码:tiger     普通用户
[oracle@localhost ~]$ sqlplus /nolog 无用户名登录
conn 用户名/密码 切换用户
可能会报错SP2-0306: Invalid option.
换成connect 命令
SQL> connect
Enter user-name: scott
Enter password: tiger
会提示过期,直接修改密码
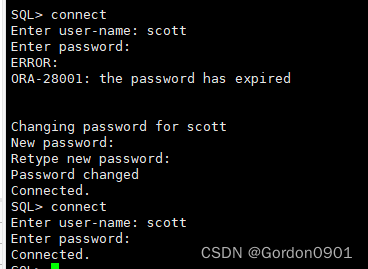
如果多次进行密码输入错误,我记得是3次以上就把你这个用户账号锁住了
4、 解锁用户
alter user 用户名 account unlock;
5、测试远程连接
23、设置开机启动
1、修改/data/oracle/product/11.2.0/bin/dbstart
[oracle@localhost~]$ vim /data/oracle/product/11.2.0/bin/dbstart
#将ORACLE_HOME_LISTNER=$1 修改为ORACLE_HOME_LISTNER=$ORACLE_HOME

2、修改/data/oracle/product/11.2.0/bin/dbshut
[oracle@localhost~]$ vim /data/oracle/product/11.2.0/bin/dbshut
将ORACLE_HOME_LISTNER=$1 修改为ORACLE_HOME_LISTNER=$ORACLE_HOME

3、修改/etc/oratab 文件
infodb:/data/oracle/product/11.2.0:N `将 N 改为 Y `
4、创建启动文件
切换root用户 vim /etc/init.d/oracle 添加以下内容
#!/bin/sh
# chkconfig: 345 61 61
# description: Oracle 11g R2 AutoRun Servimces
# /etc/init.d/oracle
#
# Run-level Startup script for the Oracle Instance, Listener, and
# Web Interface
export ORACLE_BASE=/data/oracle
export ORACLE_HOME=$ORACLE_BASE/product/11.2.0
export ORACLE_SID=infodb
export ORACLE_UNQNAME=$ORACLE_SID
export PATH=$ORACLE_HOME/bin:/user/sbin:$PATH
export LD_LIBRARY_PATH=$ORACLE_HOME/lib:$LD_LIBRARY_PATH
ORA_OWNR="oracle"
# if the executables do not exist -- display error
if [ ! -f $ORACLE_HOME/bin/dbstart -o ! -d $ORACLE_HOME ]
then
echo "Oracle startup: cannot start"
exit 1
fi
# depending on parameter -- startup, shutdown, restart
# of the instance and listener or usage display
case "$1" in
start)
# Oracle listener and instance startup
su $ORA_OWNR -lc $ORACLE_HOME/bin/dbstart
echo "Oracle Start Succesful!OK."
;;
stop)
# Oracle listener and instance shutdown
su $ORA_OWNR -lc $ORACLE_HOME/bin/dbshut
echo "Oracle Stop Succesful!OK."
;;
reload|restart)
$0 stop
$0 start
;;
*)
echo $"Usage: `basename $0` {start|stop|reload|reload}"
exit 1
esac
exit 0
5、设置启动文件权限
[root@localhost~]$ chmod +x oracle
[root@localhost~]$ chkconfig --add oracle
[root@localhost~]$ chkconfig oracle on
6、 重启测试
[root@localhost~]$ reboot
7、查看状态、没有启动

执行启动监听命令
 修改hostname 和 hosts 为同样的
[root@localhost admin]# vim /etc/hostnamelocalhost
修改hosts
[root@localhost admin]# vim /etc/hosts127.0.0.1   localhost
192.168.198.130 localhost
24、解决报错
1、执行了一边命令配置监听有执行了一遍图形化的
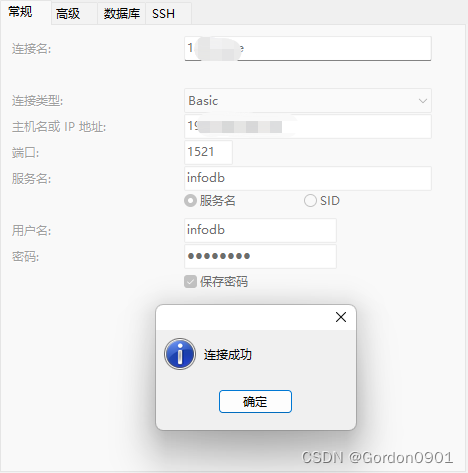
(这个原因可能是我在执行步骤20时,执行了一遍图形化和命令监听导致的)看到这个·Listener "LISTENER" already exists.,但是我监听的名字是infodb,然后我查看/home/oracle/response/netca.rsp文件,将文件中LISTENER_NAMES改为我的监听 infodb,重新执行监听netca /silent /responseFile /home/oracle/response/netca.rsp,启动 lsnrctl statrt
[oracle@oracle ~]$ netca /silent /responseFile /home/oracle/response/netca.rspParsing command line arguments:Parameter "silent" = trueParameter "responsefile" = /home/oracle/response/netca.rsp
Done parsing command line arguments.
Oracle Net Services Configuration:
Profile configuration complete.
Listener "LISTENER" already exists.
Oracle Net Services configuration successful. The exit code is 0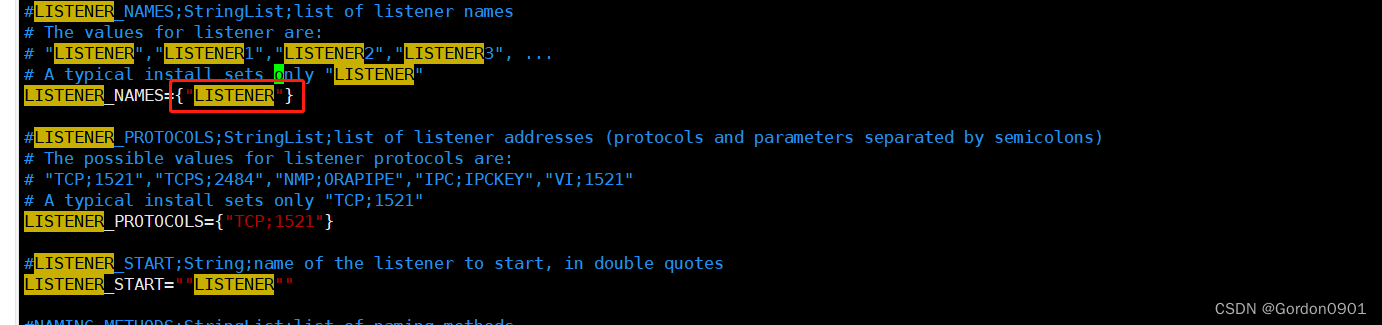
解决过程全命令
[root@oracle ~]# su - oracle
Last login: Fri Sep 9 02:01:08 PDT 2022 on pts/1
[oracle@oracle ~]$ lsnrctl statusLSNRCTL for Linux: Version 11.2.0.1.0 - Production on 09-SEP-2022 02:07:01Copyright (c) 1991, 2009, Oracle. All rights reserved.Connecting to (DESCRIPTION=(ADDRESS=(PROTOCOL=IPC)(KEY=EXTPROC1522)))
TNS-12541: TNS:no listenerTNS-12560: TNS:protocol adapter errorTNS-00511: No listenerLinux Error: 111: Connection refused
Connecting to (DESCRIPTION=(ADDRESS=(PROTOCOL=TCP)(HOST=oracle)(PORT=1522)))
TNS-12541: TNS:no listenerTNS-12560: TNS:protocol adapter errorTNS-00511: No listenerLinux Error: 111: Connection refused
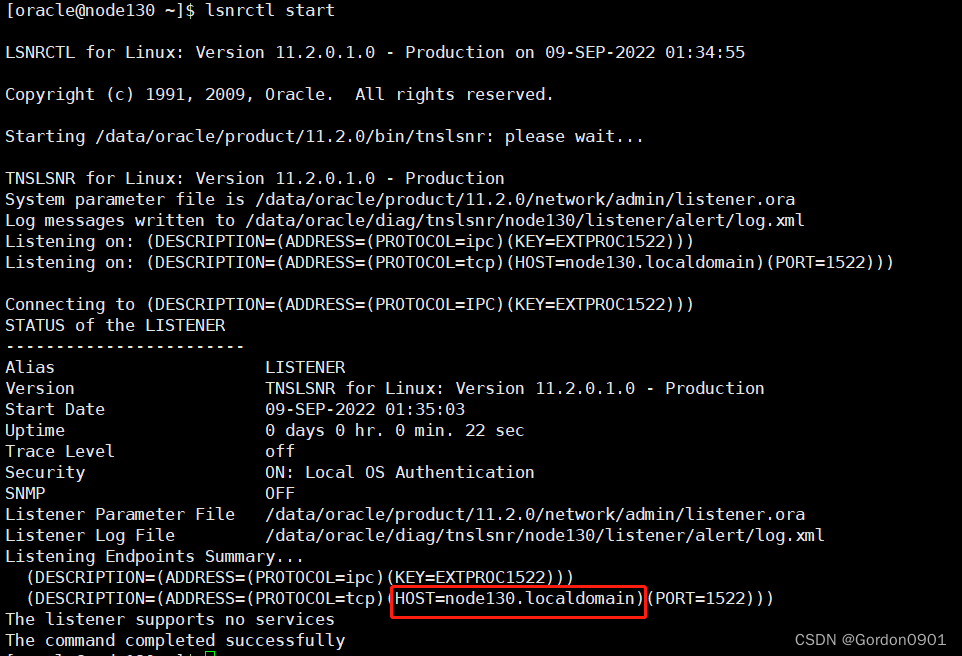
[oracle@oracle ~]$ lsnrctl start\
> LSNRCTL for Linux: Version 11.2.0.1.0 - Production on 09-SEP-2022 02:07:09Copyright (c) 1991, 2009, Oracle. All rights reserved.Starting /data/oracle/product/11.2.0/bin/tnslsnr: please wait...TNSLSNR for Linux: Version 11.2.0.1.0 - Production
System parameter file is /data/oracle/product/11.2.0/network/admin/listener.ora
Log messages written to /data/oracle/diag/tnslsnr/oracle/listener/alert/log.xml
Listening on: (DESCRIPTION=(ADDRESS=(PROTOCOL=ipc)(KEY=EXTPROC1522)))
Listening on: (DESCRIPTION=(ADDRESS=(PROTOCOL=tcp)(HOST=oracle)(PORT=1522)))Connecting to (DESCRIPTION=(ADDRESS=(PROTOCOL=IPC)(KEY=EXTPROC1522)))
STATUS of the LISTENER
------------------------
Alias LISTENER
Version TNSLSNR for Linux: Version 11.2.0.1.0 - Production
Start Date 09-SEP-2022 02:07:11
Uptime 0 days 0 hr. 0 min. 1 sec
Trace Level off
Security ON: Local OS Authentication
SNMP OFF
Listener Parameter File /data/oracle/product/11.2.0/network/admin/listener.ora
Listener Log File /data/oracle/diag/tnslsnr/oracle/listener/alert/log.xml
Listening Endpoints Summary...(DESCRIPTION=(ADDRESS=(PROTOCOL=ipc)(KEY=EXTPROC1522)))(DESCRIPTION=(ADDRESS=(PROTOCOL=tcp)(HOST=oracle)(PORT=1522)))
The listener supports no services
The command completed successfully
[oracle@oracle ~]$ tial -f /data/oracle/diag/tnslsnr/oracle/listener/alert/log.xml
bash: tial: command not found...
Similar command is: 'tail'
[oracle@oracle ~]$ dbstart
Processing Database instance "infodb": log file /data/oracle/product/11.2.0/startup.log
[oracle@oracle ~]$ lsnrctl statusLSNRCTL for Linux: Version 11.2.0.1.0 - Production on 09-SEP-2022 02:10:27Copyright (c) 1991, 2009, Oracle. All rights reserved.Connecting to (DESCRIPTION=(ADDRESS=(PROTOCOL=IPC)(KEY=EXTPROC1522)))
STATUS of the LISTENER
------------------------
Alias LISTENER
Version TNSLSNR for Linux: Version 11.2.0.1.0 - Production
Start Date 09-SEP-2022 02:07:11
Uptime 0 days 0 hr. 3 min. 16 sec
Trace Level off
Security ON: Local OS Authentication
SNMP OFF
Listener Parameter File /data/oracle/product/11.2.0/network/admin/listener.ora
Listener Log File /data/oracle/diag/tnslsnr/oracle/listener/alert/log.xml
Listening Endpoints Summary...(DESCRIPTION=(ADDRESS=(PROTOCOL=ipc)(KEY=EXTPROC1522)))(DESCRIPTION=(ADDRESS=(PROTOCOL=tcp)(HOST=oracle)(PORT=1522)))
Services Summary...
Service "infodb" has 1 instance(s).Instance "infodb", status READY, has 1 handler(s) for this service...
Service "infodbXDB" has 1 instance(s).Instance "infodb", status READY, has 1 handler(s) for this service...
The command completed successfully
[oracle@oracle ~]$ lsnrctl stopLSNRCTL for Linux: Version 11.2.0.1.0 - Production on 09-SEP-2022 02:22:24Copyright (c) 1991, 2009, Oracle. All rights reserved.Connecting to (DESCRIPTION=(ADDRESS=(PROTOCOL=IPC)(KEY=EXTPROC1522)))
The command completed successfully
[oracle@oracle ~]$ lsnrctl statusLSNRCTL for Linux: Version 11.2.0.1.0 - Production on 09-SEP-2022 02:22:34Copyright (c) 1991, 2009, Oracle. All rights reserved.Connecting to (DESCRIPTION=(ADDRESS=(PROTOCOL=IPC)(KEY=EXTPROC1522)))
TNS-12541: TNS:no listenerTNS-12560: TNS:protocol adapter errorTNS-00511: No listenerLinux Error: 2: No such file or directory
Connecting to (DESCRIPTION=(ADDRESS=(PROTOCOL=TCP)(HOST=oracle)(PORT=1522)))
TNS-12541: TNS:no listenerTNS-12560: TNS:protocol adapter errorTNS-00511: No listenerLinux Error: 111: Connection refused
[oracle@oracle ~]$ lsnrctl startLSNRCTL for Linux: Version 11.2.0.1.0 - Production on 09-SEP-2022 02:22:40Copyright (c) 1991, 2009, Oracle. All rights reserved.Starting /data/oracle/product/11.2.0/bin/tnslsnr: please wait...TNSLSNR for Linux: Version 11.2.0.1.0 - Production
System parameter file is /data/oracle/product/11.2.0/network/admin/listener.ora
Log messages written to /data/oracle/diag/tnslsnr/oracle/listener/alert/log.xml
Listening on: (DESCRIPTION=(ADDRESS=(PROTOCOL=ipc)(KEY=EXTPROC1522)))
Listening on: (DESCRIPTION=(ADDRESS=(PROTOCOL=tcp)(HOST=oracle)(PORT=1522)))Connecting to (DESCRIPTION=(ADDRESS=(PROTOCOL=IPC)(KEY=EXTPROC1522)))
STATUS of the LISTENER
------------------------
Alias LISTENER
Version TNSLSNR for Linux: Version 11.2.0.1.0 - Production
Start Date 09-SEP-2022 02:22:40
Uptime 0 days 0 hr. 0 min. 1 sec
Trace Level off
Security ON: Local OS Authentication
SNMP OFF
Listener Parameter File /data/oracle/product/11.2.0/network/admin/listener.ora
Listener Log File /data/oracle/diag/tnslsnr/oracle/listener/alert/log.xml
Listening Endpoints Summary...(DESCRIPTION=(ADDRESS=(PROTOCOL=ipc)(KEY=EXTPROC1522)))(DESCRIPTION=(ADDRESS=(PROTOCOL=tcp)(HOST=oracle)(PORT=1522)))
The listener supports no services
The command completed successfully
[oracle@oracle ~]$ netca /silent /responseFile /home/oracle/response/netca.rsp\
> Parsing command line arguments:Parameter "silent" = trueParameter "responsefile" = /home/oracle/response/netca.rsp
Done parsing command line arguments.
Oracle Net Services Configuration:
Profile configuration complete.
Listener "LISTENER" already exists.
Oracle Net Services configuration successful. The exit code is 0
[oracle@oracle ~]$ vim /home/oracle/response/netca.rsp
[oracle@oracle ~]$ vim /home/oracle/response/netca.rsp
[oracle@oracle ~]$ netca /silent /responseFile /home/oracle/response/netca.rspParsing command line arguments:Parameter "silent" = trueParameter "responsefile" = /home/oracle/response/netca.rsp
Done parsing command line arguments.
Oracle Net Services Configuration:
Profile configuration complete.
Listener "LISTENER" already exists.
Oracle Net Services configuration successful. The exit code is 0
[oracle@oracle ~]$ vim /data/oracle/product/11.2.0/network/admin/
[oracle@oracle ~]$ vim /data/oracle/product/11.2.0/network/admin/listener.ora
[oracle@oracle ~]$ netca /silent /responseFile /home/oracle/response/netca.rspParsing command line arguments:Parameter "silent" = trueParameter "responsefile" = /home/oracle/response/netca.rsp
Done parsing command line arguments.
Oracle Net Services Configuration:
Profile configuration complete.
Oracle Net Listener Startup:Running Listener Control: /data/oracle/product/11.2.0/bin/lsnrctl start LISTENERListener Control complete.Listener started successfully.
Listener configuration complete.
Oracle Net Services configuration successful. The exit code is 0
[oracle@oracle ~]$ lsnrctl statusLSNRCTL for Linux: Version 11.2.0.1.0 - Production on 09-SEP-2022 02:25:51Copyright (c) 1991, 2009, Oracle. All rights reserved.Connecting to (DESCRIPTION=(ADDRESS=(PROTOCOL=IPC)(KEY=EXTPROC1521)))
STATUS of the LISTENER
------------------------
Alias LISTENER
Version TNSLSNR for Linux: Version 11.2.0.1.0 - Production
Start Date 09-SEP-2022 02:25:31
Uptime 0 days 0 hr. 0 min. 20 sec
Trace Level off
Security ON: Local OS Authentication
SNMP OFF
Listener Parameter File /data/oracle/product/11.2.0/network/admin/listener.ora
Listener Log File /data/oracle/diag/tnslsnr/oracle/listener/alert/log.xml
Listening Endpoints Summary...(DESCRIPTION=(ADDRESS=(PROTOCOL=ipc)(KEY=EXTPROC1521)))(DESCRIPTION=(ADDRESS=(PROTOCOL=tcp)(HOST=oracle)(PORT=1521)))
The listener supports no services
The command completed successfully
[oracle@oracle ~]$ lsnrctl statrtLSNRCTL for Linux: Version 11.2.0.1.0 - Production on 09-SEP-2022 02:27:15Copyright (c) 1991, 2009, Oracle. All rights reserved.NL-00853: undefined command "statrt". Try "help"
[oracle@oracle ~]$ lsnrctl startLSNRCTL for Linux: Version 11.2.0.1.0 - Production on 09-SEP-2022 02:27:20Copyright (c) 1991, 2009, Oracle. All rights reserved.TNS-01106: Listener using listener name LISTENER has already been started
[oracle@oracle ~]$ netstat -tnulp | grep 1521
(Not all processes could be identified, non-owned process infowill not be shown, you would have to be root to see it all.)
tcp6 0 0 :::1521 :::* LISTEN 5441/tnslsnr
2、异常关机(我是通过主动实现,因为我进去listener文件只有监听没有SID_LIST)

报错及解决思路:(该问题是由于缺少监听器的SID_LIST描述项引起的,采用netca进行配置的时候经常不会生成SID_LIST,导致连接出现问题)
Ora-12514:TNS:The listener is currently unable to recognize the service requested in the link descriptor
1、监听加载服务有主动和被动两种方式
主动是通过在listener.ora文件中添加代码来实现的。代码如下:
SID_LIST_LISTENER =(SID_LIST =(SID_DESC =(SID_NAME = infodb) #根据自己的配置来(ORACLE_HOME = /data/oracle/product/11.2.0) #根据自己的配置来(GLOBAL_DBNAME = infodb) #根据自己的配置来)(SID_DESC =(GLOBAL_DBNAME = INITIALG)#根据自己的配置来(ORACLE_HOME = /data/oracle/product/11.2.0)#根据自己的配置来(SID_NAME = INITIALG)#根据自己的配置来))
被动是由实例的pmon进程在listener中注册服务。
(解决办法:
1、把Oracle相关的服务关闭了;

lsnrctl stop
2、接着先启动监听服务(OracleOraDb11g_home1TNSListener)
lsnrctl start
3、后启动(OracleServiceORCL)可能会出现ORA-01034 - Oracle not available”和“ORA-27101 - shared memory realm does not exist”
SQL>sqlplus /nolog
SQL>connect / as sysdba
SQL>shutdown immediate;
SQL> shutdown abort;
SQL>sqlplus /nolog
SQL>connect / as sysdba
SQL>startup
下次就直接启动监听和oracleService就ok
卸载oracle11g
如有错误或其他地方哪里不对,大家评论下方评论,及时改正
这篇关于contOS7下安装Oracle11g数据库的文章就介绍到这儿,希望我们推荐的文章对编程师们有所帮助!


