本文主要是介绍React Hooks之useReducer,希望对大家解决编程问题提供一定的参考价值,需要的开发者们随着小编来一起学习吧!
一、useReducer
const [state, dispatch] = useReducer(reducer, initialArg, init?)
- useState 的替代方案。它接收一个形如 (state, action) => newState 的 reducer,并返回当前的 state 以及与其配套的 dispatch 方法。
- 数据结构简单用useState,复杂时用useReducer
- 简化版的redux
- 结合context解决跨组件的问题
- state dispatch默认没有模块化,数据混在一起
- state或store:数据
- action:命令
- reducer: 规定,根据action的type做相应处理返回新的state
- dispatch: 派发action
二、基本使用
CounterReducer.tsx
// import React, { FC, useState } from 'react' //注释的是使用useState的情况
import React, { FC, useReducer } from 'react'type StateType = { count: number }
type ActionType = { type: string }const initialState: StateType = { count: 100 } // 初始值100// 根据传入的action 返回新的state(不可变数据)
function reducer(state: StateType, action: ActionType) {switch(action.type) {case 'increment':return { count: state.count + 1 }case 'decrement':return { count: state.count - 1 }default:throw new Error()}
}const CountReducer:FC = () => {// const [count, setCount] = useState(100)const [state, dispatch] = useReducer(reducer, initialState)return (// <>//   <p>coint: {count}</p>//   <button onClick={() => setCount(count + 1)}>+</button>//   <button onClick={() => setCount(count - 1)}>-</button>// </><><p>coint: {state.count}</p><button onClick={() => dispatch({ type: 'increment' })}>+</button><button onClick={() => dispatch({ type: 'decrement' })}>-</button></>)}export default CountReducer
三、Todo List By useReducer项目
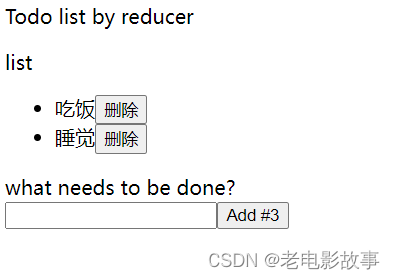
使用Context和useReducer实现跨组件通讯
代码地址:点击跳转
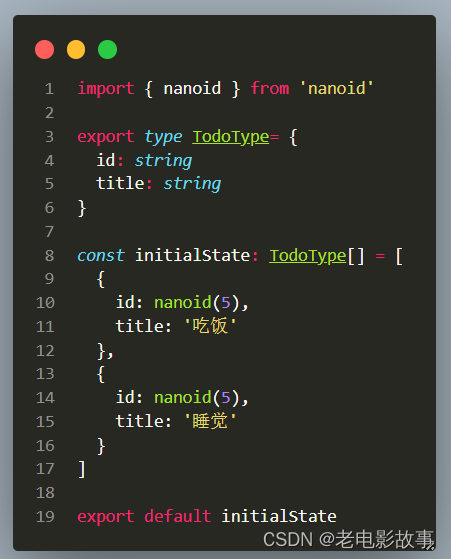
store.ts
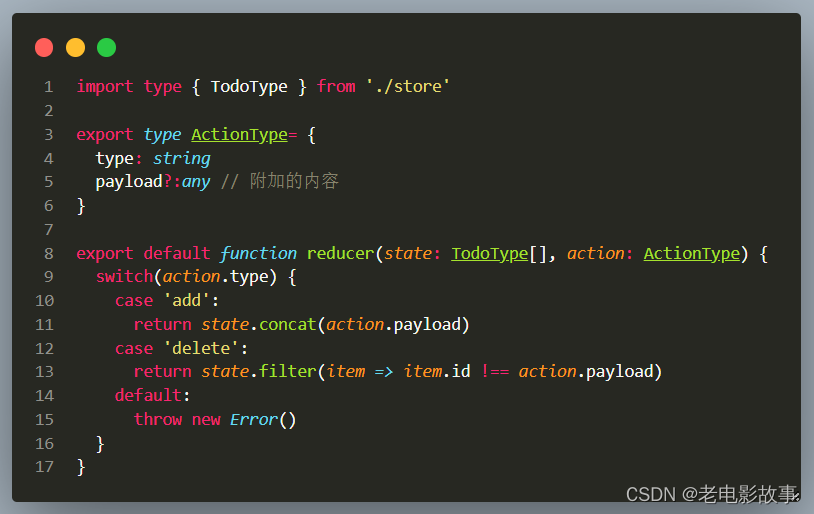
reducer.tsx
List.tsx
import React, { FC, useContext } from 'react'
// import reducer from './reducer'
// import initialState from './store'
import { TodoContext } from '.'const List:FC = () => {// const [state, dispatch] = useReducer(reducer, initialState)// const [state, dispatch] = useReducer(reducer, initialState)const context = useContext(TodoContext)const { state, dispatch } = contextconst del = (id: string) => {dispatch({type: 'delete',payload: id})}return (<><p>list</p><ul>{state.map(item => {return <li key={item.id}><span>{item.title}</span><button onClick={() => del(item.id)}>删除</button></li>})}</ul></>)}export default List
InputForm.tsx
import React, { FC, ChangeEvent, useState, useContext } from 'react'
// import reducer from './reducer'
// import initialState from './store'
import { nanoid } from 'nanoid'
import { TodoContext } from '.'const InputForm:FC = () => {// const [state, dispatch] = useReducer(reducer, initialState)const context = useContext(TodoContext)const { state, dispatch } = context// 输入框文字const [text, setText] = useState('')const handleChange = (event: ChangeEvent<HTMLInputElement>) => {setText(event.target.value)}// 新增todoconst handleSubmit = (event: ChangeEvent<HTMLFormElement>) => {event.preventDefault()if (!text.trim()) returnconst newTodo = {id: nanoid(5),title: text}dispatch({type: 'add',payload: newTodo})setText('')}return (<form onSubmit={handleSubmit}><label htmlFor="new-todo">what needs to be done?</label><br /><input id='new-todo' onChange={handleChange} value={text} /><button type='submit'>Add #{state.length + 1}</button></form>)}export default InputForm
index.tsx
import React, { FC, createContext, useReducer } from 'react'
import List from './List'
import InputForm from './InputForm'
import reducer, { ActionType } from './reducer'
import initialState from './store'export const TodoContext = createContext({state: initialState,// eslint-disable-next-linedispatch: ( action: ActionType ) => {/* 空 */}
})const Demo:FC = () => {const [state, dispatch] = useReducer(reducer, initialState)return (<TodoContext.Provider value={{ state, dispatch }}><p>Todo list by reducer</p><List /><InputForm /></TodoContext.Provider>)}export default Demo
这篇关于React Hooks之useReducer的文章就介绍到这儿,希望我们推荐的文章对编程师们有所帮助!


