本文主要是介绍SpringCloud 分布式配置中心Config Hoxton版本,希望对大家解决编程问题提供一定的参考价值,需要的开发者们随着小编来一起学习吧!
Spring Cloud Config简介:Spring Cloud Config为分布式系统提供了服务端和客户端用于支持外部配置。使用Config Server可以在所有环境中管理应用程序的外部属性。客户端和服务器上的概念映射与Spring中的Environment和PropertySource抽象相同,因此它们非常适合Spring应用程序,但可以与任何语言运行的任何应用程序一起使用。当应用程序通过部署管道从开发到测试并进入生产时,可以管理这些环境之间的配置,并确保应用程序具有迁移时需要运行的所有内容。它默认的服务器存储后端实现使用git,因此可以轻松支持配置环境的标签版本,并且可以访问各种用于管理内容的工具。基于spring配置可以很方便的实现扩展。
本文主要对Spring Cloud Config的基本使用进行简单总结,其中SpringBoot使用的2.2.2.RELEASE版本,SpringCloud使用的Hoxton.SR1版本。这里将沿用SpringCloud 服务注册与发现Eureka Hoxton版本的eureka-server作为注册中心。在搭建Config配置中心之前需要先准备好测试用的Git仓库。
一、准备Git仓库
1.Git仓库结构
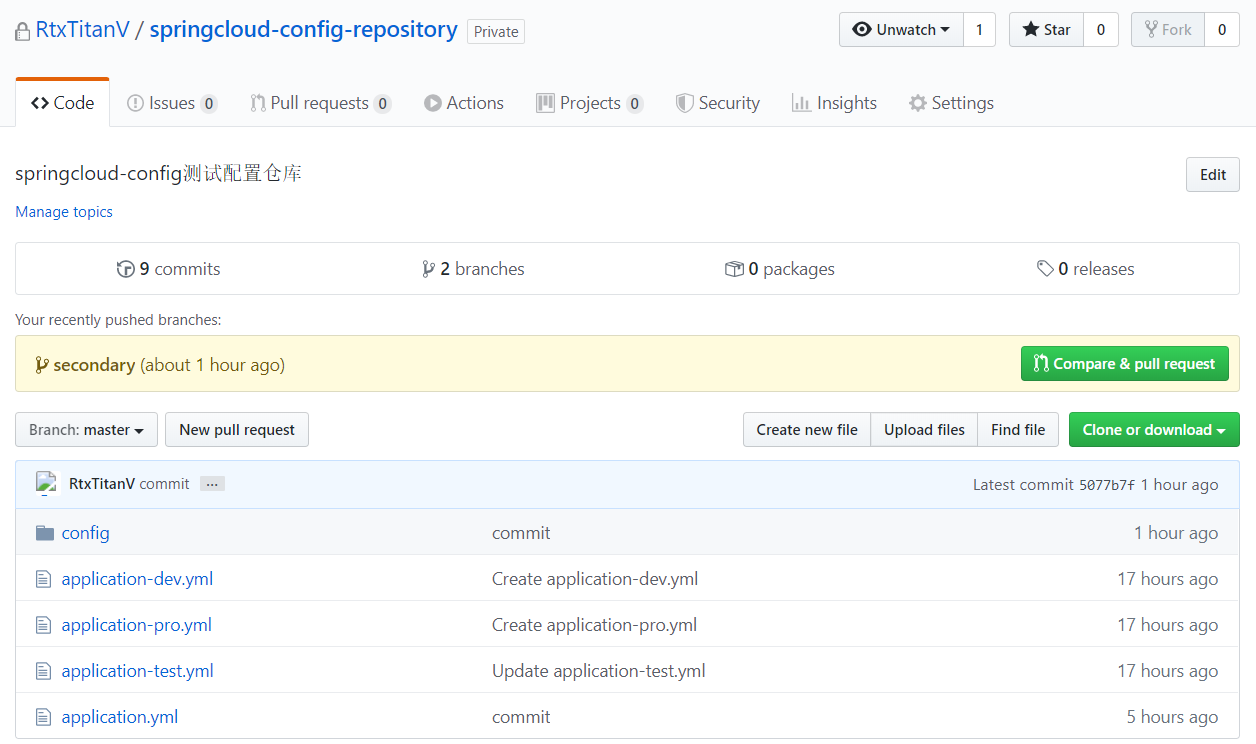
2.master分支配置
application.yml :
application:name: master-config
application-dev.yml:
application:name: master-config-dev
application-test.yml :
application:name: master-config-test
application-pro.yml :
application:name: master-config-pro
3.secondary分支配置
application.yml :
application:name: secondary-config
application-dev.yml:
application:name: secondary-config-dev
application-test.yml :
application:name: secondary-config-test
application-pro.yml :
application:name: secondary-config-pro
二、创建Config服务端
通过Maven新建一个名为spring-cloud-config-server的项目。
1.引入依赖
SpringBoot和SpringCloud依赖这里就不列出来了,还需引入以下依赖:
<!-- Spring Cloud Config 服务端依赖 -->
<dependency><groupId>org.springframework.cloud</groupId><artifactId>spring-cloud-config-server</artifactId>
</dependency>
<!-- Spring Cloud Eureka Client 起步依赖 -->
<dependency><groupId>org.springframework.cloud</groupId><artifactId>spring-cloud-starter-netflix-eureka-client</artifactId>
</dependency>
<!-- SpringSecurity 起步依赖 -->
<dependency><groupId>org.springframework.boot</groupId><artifactId>spring-boot-starter-security</artifactId>
</dependency>
2.主启动类
package com.rtxtitanv;import org.springframework.boot.SpringApplication;
import org.springframework.boot.autoconfigure.SpringBootApplication;
import org.springframework.cloud.config.server.EnableConfigServer;
import org.springframework.cloud.netflix.eureka.EnableEurekaClient;/*** @author rtxtitanv* @version 1.0.0* @name com.rtxtitanv.ConfigServerApplication* @description 主启动类* @date 2020/3/8 17:49*/
@EnableConfigServer
@EnableEurekaClient
@SpringBootApplication
public class ConfigServerApplication {public static void main(String[] args) {SpringApplication.run(ConfigServerApplication.class, args);}
}
@EnableConfigServer:启用配置中心。
3.编写配置文件
在application.yml中进行如下配置:
server:port: ${PORT:9400}spring:application:name: config-serversecurity:# 配置spring security登录用户名和密码,给Config配置中心添加认证user:name: rtxtitanvpassword: rtxtitanvcloud:config:server:git:# 指定git远程仓库地址uri: https://github.com/RtxTitanV/springcloud-config-repository.git# 指定git仓库用户名密码,公开仓库可以不指定用户名密码,私有仓库需要指定# 指定git仓库用户名username: rtxtitanv# 指定git仓库密码password: *********# 指定是否开启启动时直接从git获取配置,true:开启,false:关闭clone-on-start: true# 指定是否强制从远程仓库拉取,true:是,false:否,默认falseforce-pull: trueeureka:client:# 服务注册,是否将服务注册到Eureka注册中心,true:注册,false:不注册register-with-eureka: true# 服务发现,是否从Eureka注册中心获取注册信息,true:获取,false:不获取fetch-registry: true# 配置Eureka注册中心即Eureka服务端的地址,集群地址以,隔开service-url:defaultZone: http://rtxtitanv:rtxtitanv@eureka-server-01:8001/eureka/,http://rtxtitanv:rtxtitanv@eureka-server-02:8002/eureka/,http://rtxtitanv:rtxtitanv@eureka-server-03:8003/eureka/instance:# 将ip地址注册到Eureka注册中心prefer-ip-address: true# 该服务实例在注册中心的唯一实例ID,${spring.cloud.client.ip-address}获取该服务实例ipinstance-id: ${spring.application.name}:${spring.cloud.client.ip-address}:${server.port}# 该服务实例向注册中心发送心跳间隔,单位秒,默认30秒lease-renewal-interval-in-seconds: 20# Eureka注册中心在删除此实例之前收到最后一次心跳后的等待时间,单位秒,默认90秒lease-expiration-duration-in-seconds: 60
4.通过Config服务端获取配置信息
IDEA启动eureka-server集群和config-server,访问注册中心,下图为服务注册信息:

访问配置信息的URL与配置文件的映射关系如下:
# 获取配置信息,{label}可省略,省略后默认获取master分支配置信息
/{application}/{profile}[/{label}]
# 获取master分支配置文件信息
/{application}-{profile}.yml
# 获取配置文件信息
/{label}/{application}-{profile}.yml
# 获取master分支配置文件信息
/{application}-{profile}.properties
# 获取配置文件信息
/{label}/{application}-{profile}.properties
application:为SpringApplication中spring.config.name的注入,没配置spring.config.name的常规情况为spring.application.name,对应Git仓库中文件名的前缀。
profile:环境名称,对应配置文件中的spring.cloud.config.profile。
label:Git仓库的分支名称,对应配置文件中的spring.cloud.config.label,默认为master。
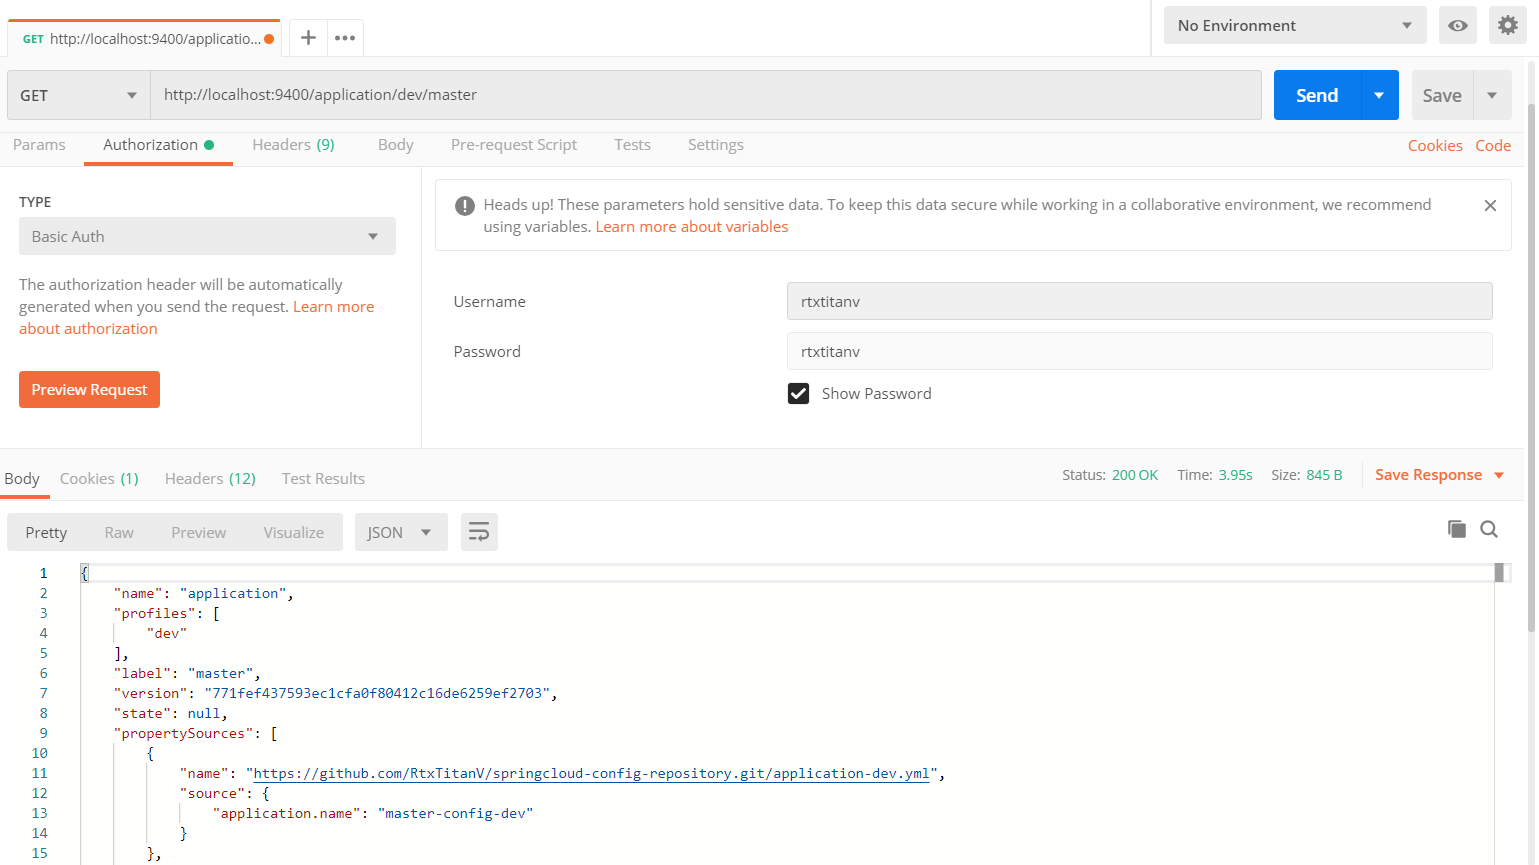
访问http://localhost:9400/application/dev/master获取master分支dev环境配置信息,由于config-server添加了security安全认证,所以需输入用户名和密码,下图为配置信息:
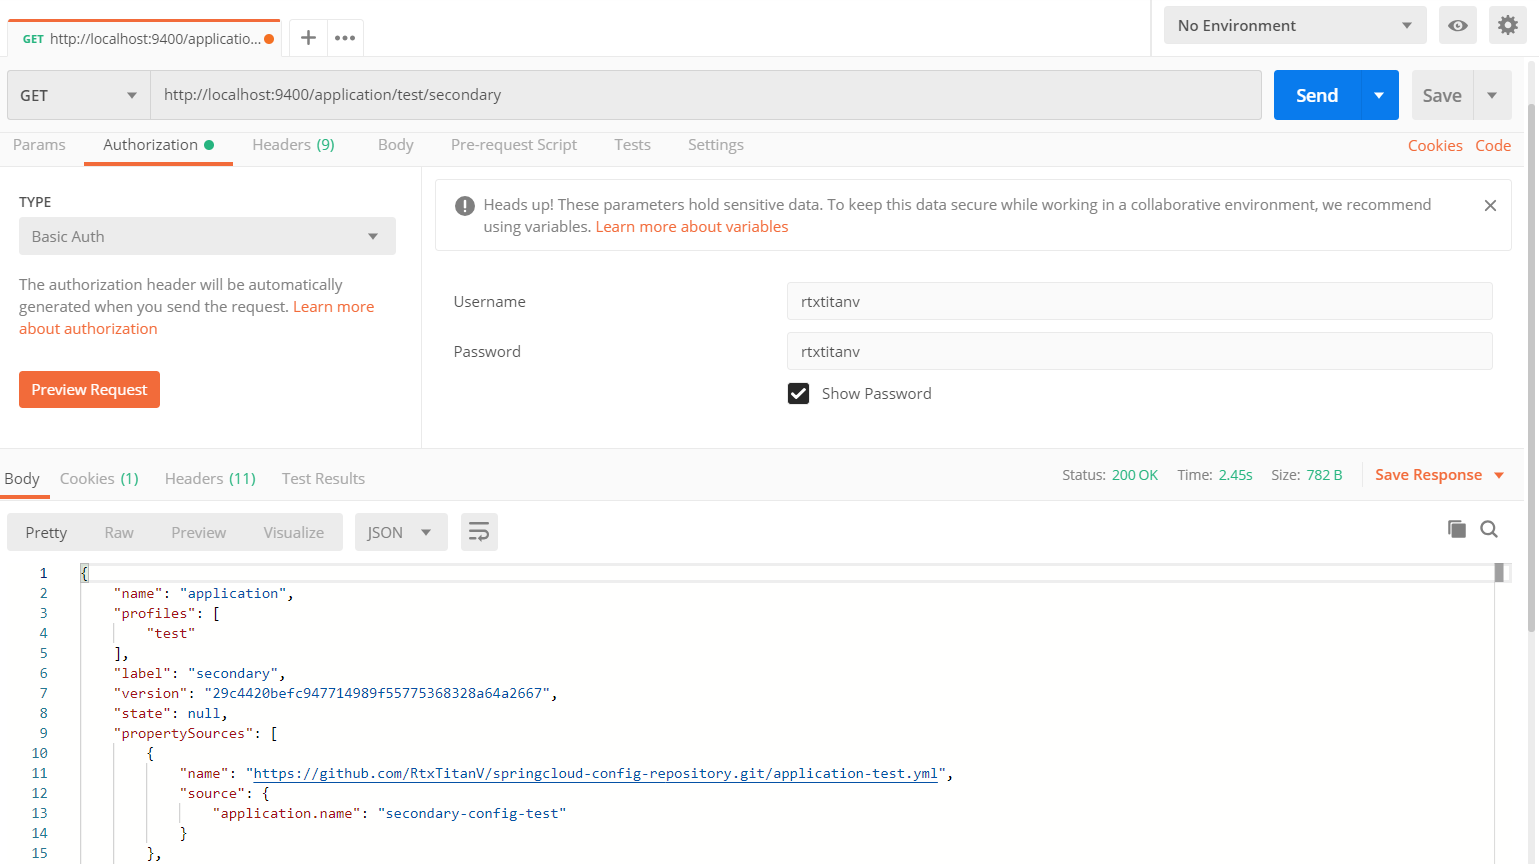
访问http://localhost:9400/application/test/secondary获取secondary分支test环境配置信息,下图为配置信息:
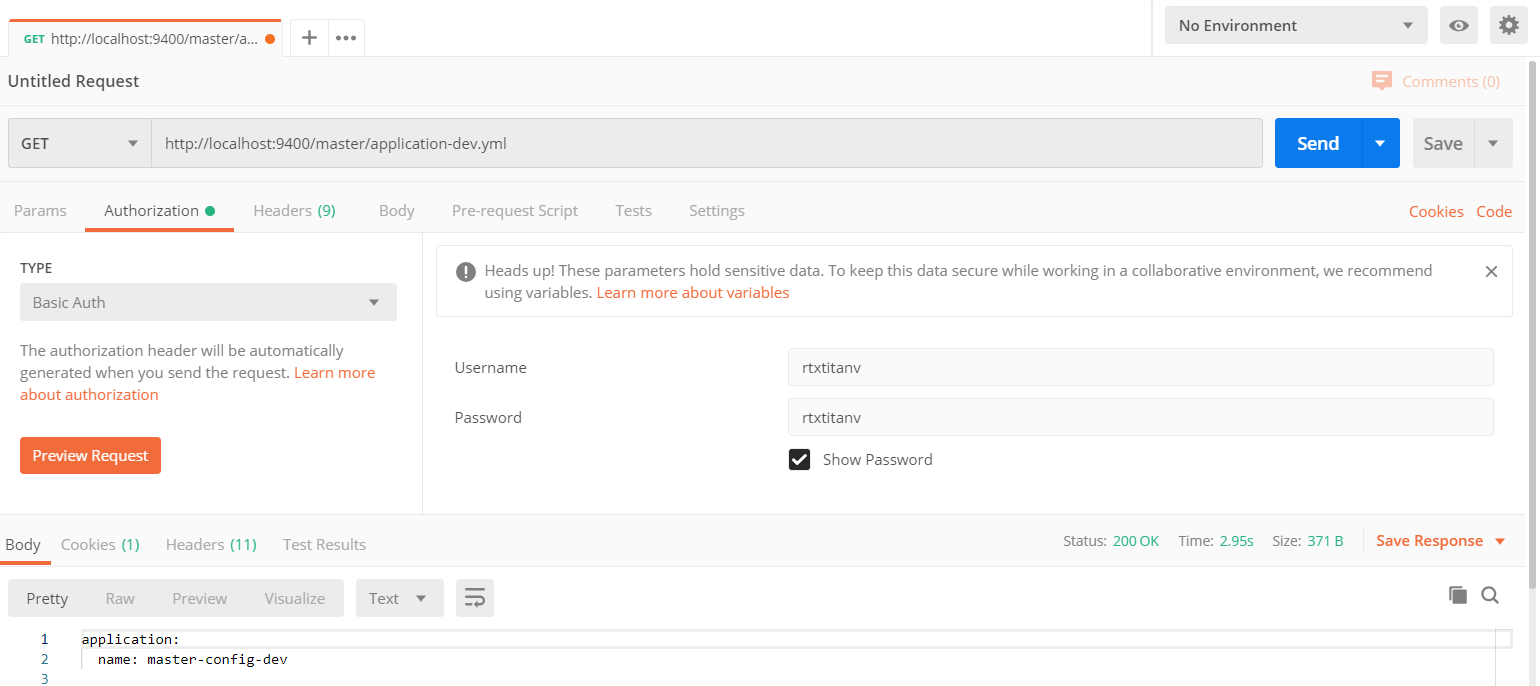
访问http://localhost:9400/master/application-dev.yml获取master分支application-dev.yml配置文件信息,下图为配置文件信息:
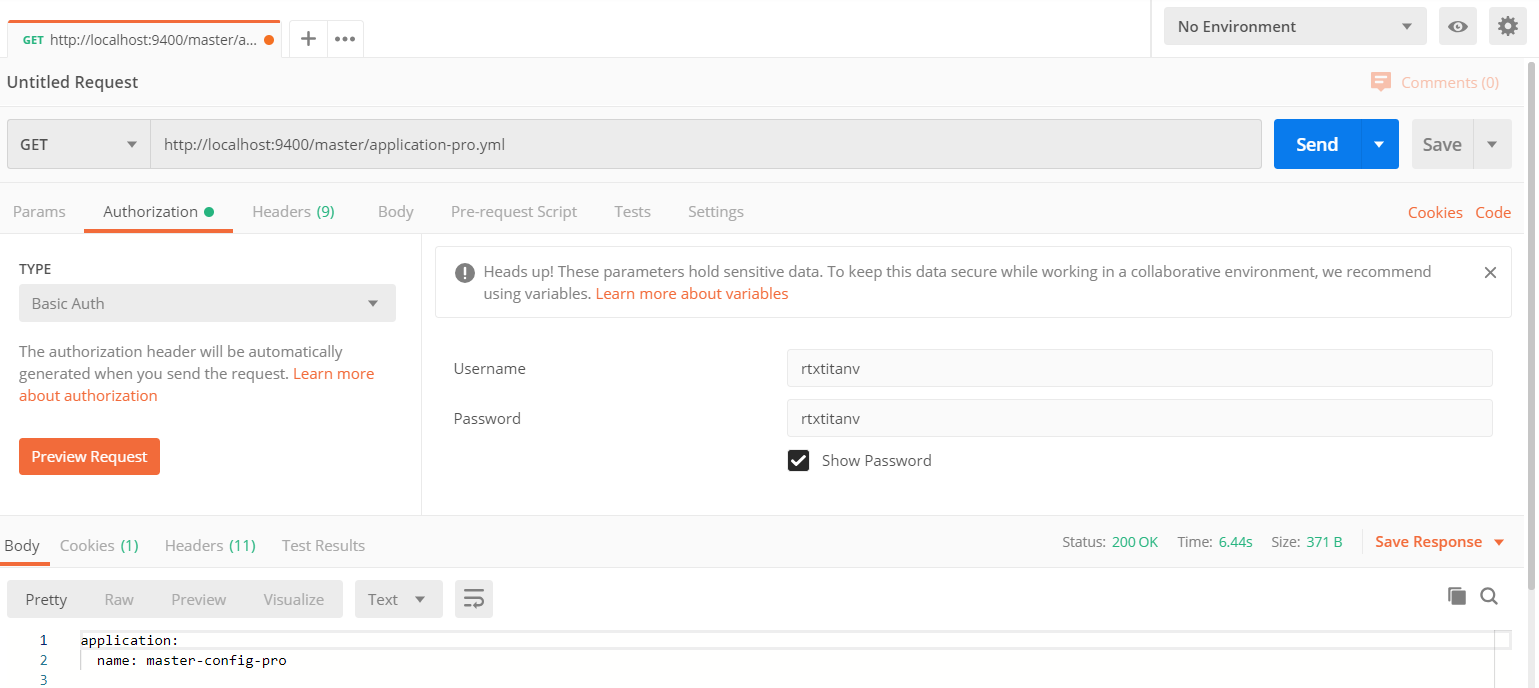
访问http://localhost:9400/master/application-pro.yml获取master分支application-pro.yml配置文件信息,下图为配置文件信息:
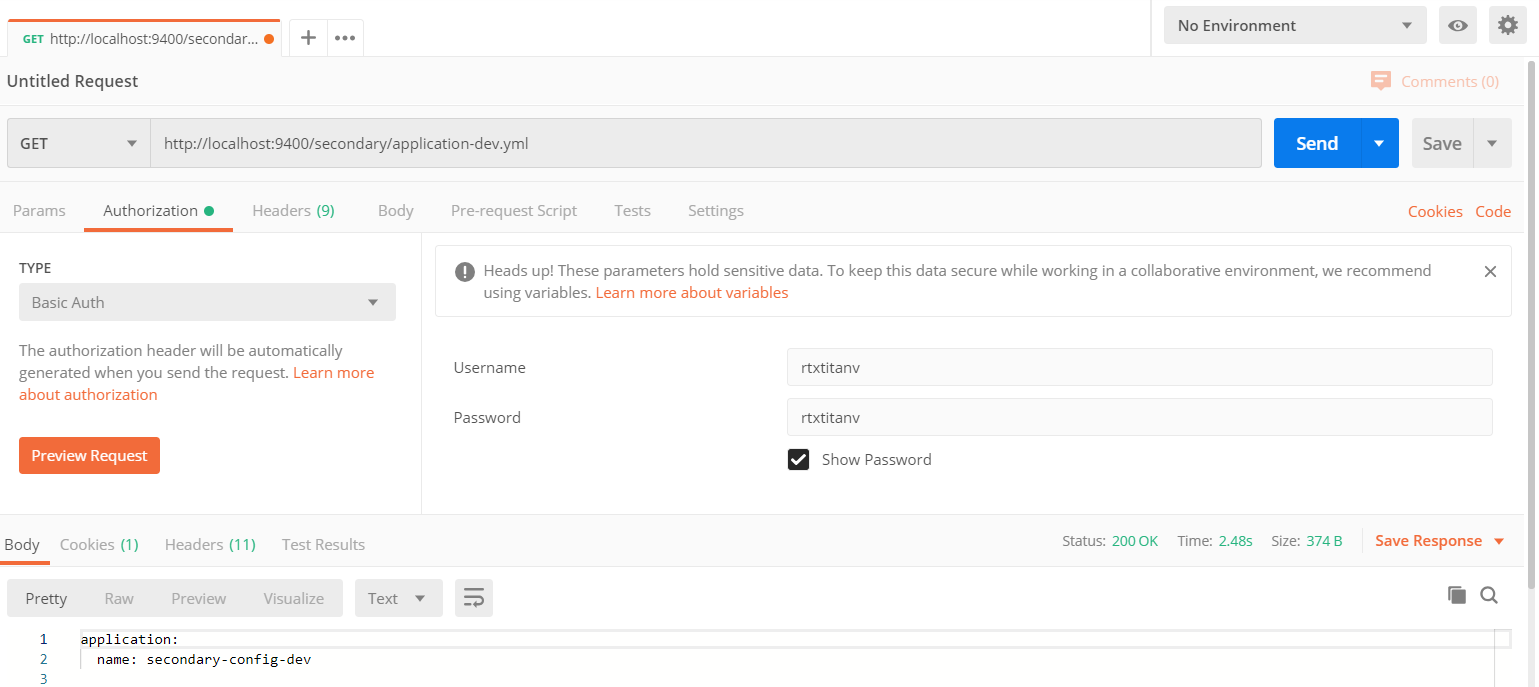
访问http://localhost:9400/secondary/application-dev.yml获取secondary分支application-dev.yml配置文件信息,下图为配置文件信息:
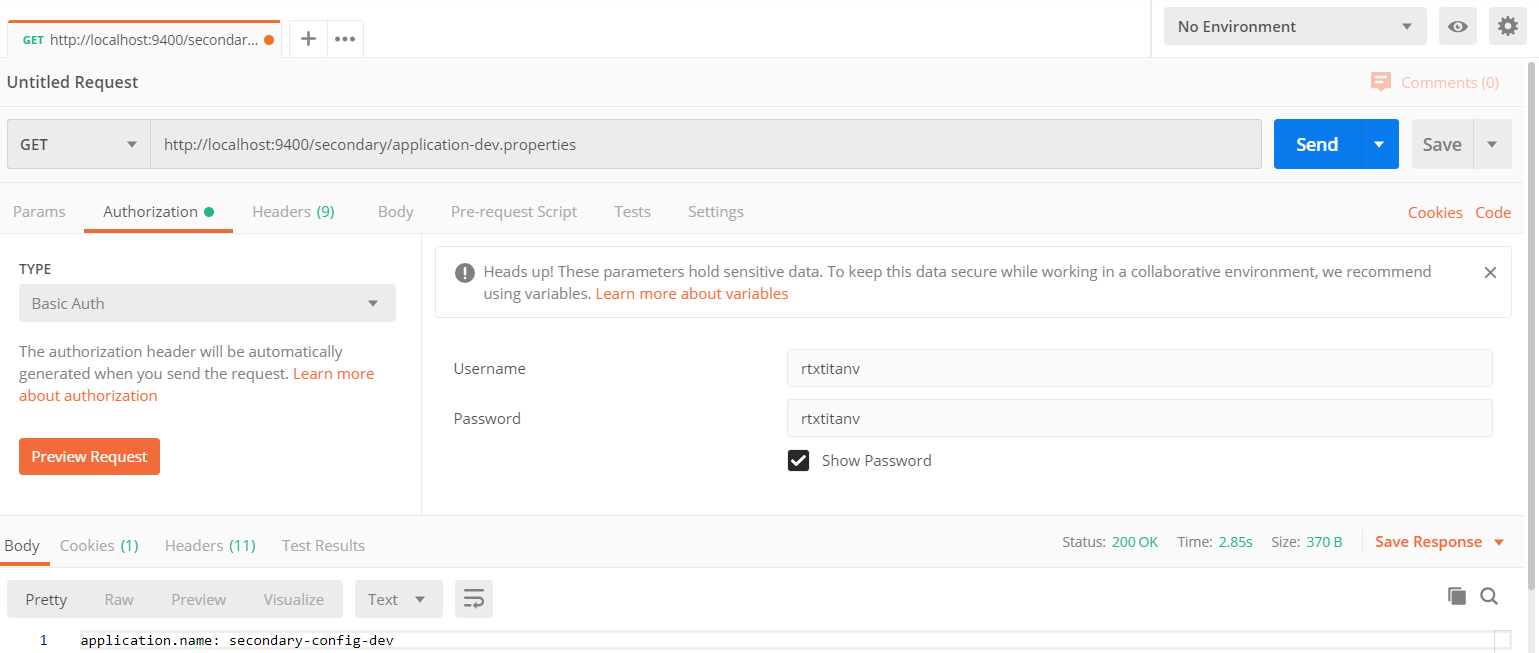
访问http://localhost:9400/secondary/application-dev.properties获取secondary分支application-dev.yml配置文件信息,不过返回的是properties格式,下图为配置文件信息:
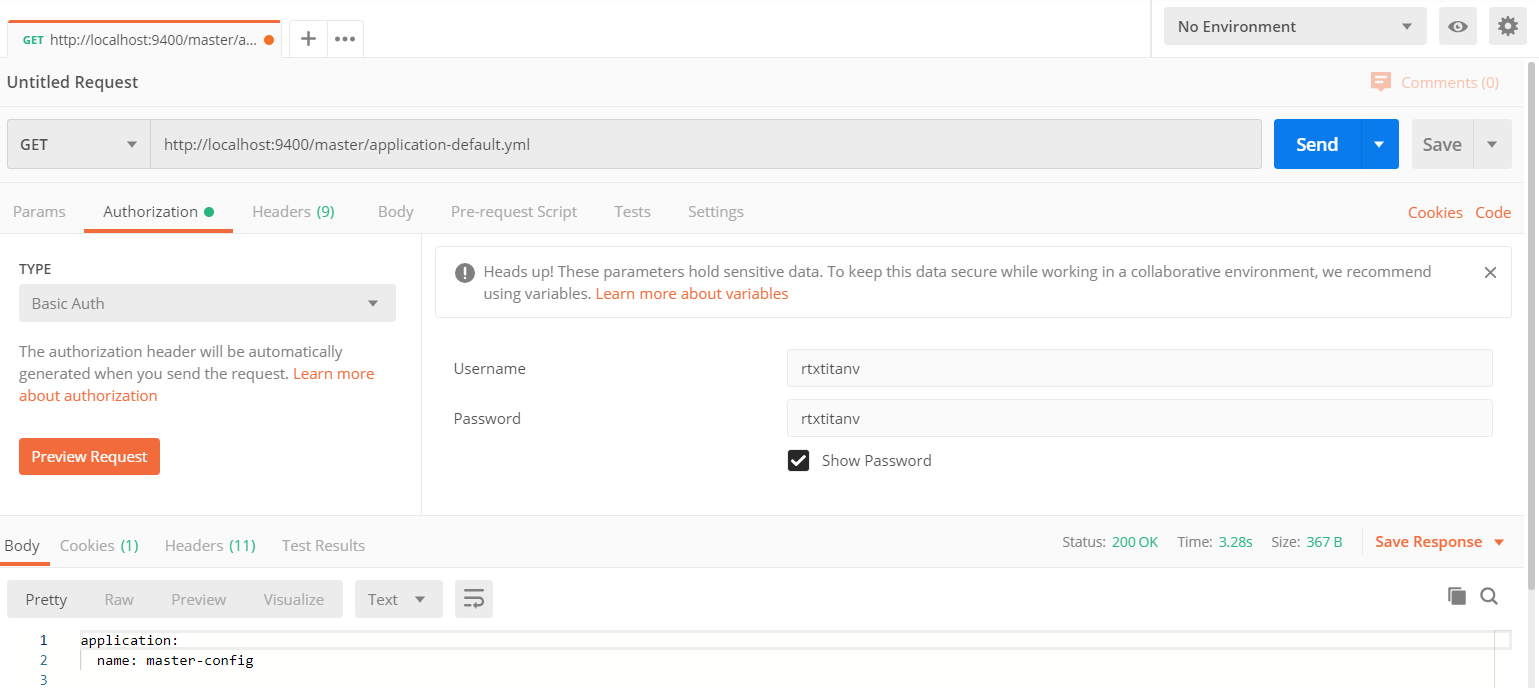
如果想直接获取没有环境名的默认配置,使用default匹配没有环境名的配置文件,访问http://localhost:9400/master/application-default.yml获取master分支application.yml配置文件信息,下图为配置文件信息:
在访问http://localhost:9400/master/application-dev.yml获取master分支application-dev.yml配置文件信息时控制台打印了以下日志:
2020-03-09 19:07:38.710  INFO 3608 --- [nio-9400-exec-2] o.s.c.c.s.e.NativeEnvironmentRepository  : Adding property source: file:/C:/Users/nvidi/AppData/Local/Temp/config-repo-2390265840718149064/application-dev.yml
2020-03-09 19:07:38.710  INFO 3608 --- [nio-9400-exec-2] o.s.c.c.s.e.NativeEnvironmentRepository  : Adding property source: file:/C:/Users/nvidi/AppData/Local/Temp/config-repo-2390265840718149064/application.yml
Config配置中心服务器在从Git远程仓库中获取配置信息后,会在config服务端的文件系统中存储一份,实质上config服务端是通过git clone命令将配置内容复制了一份在本地存储,然后读取这些内容并返回给微服务应用进行加载。可以有效防止Git仓库出现故障时无法加载配置信息的情况。这里断开网络连接再次访问http://localhost:9400/master/application-dev.yml时控制台打印了以下日志并且依然能获取配置文件信息,结果这里就不贴了,这些配置文件信息来自于之前访问时存于config服务端本地文件系统中的配置信息。
2020-03-09 19:08:19.537  WARN 3608 --- [nio-9400-exec-8] .c.s.e.MultipleJGitEnvironmentRepository : Could not fetch remote for master remote: https://github.com/RtxTitanV/springcloud-config-repository.git
2020-03-09 19:08:19.804  INFO 3608 --- [nio-9400-exec-8] o.s.c.c.s.e.NativeEnvironmentRepository  : Adding property source: file:/C:/Users/nvidi/AppData/Local/Temp/config-repo-2390265840718149064/application-dev.yml
2020-03-09 19:08:19.804  INFO 3608 --- [nio-9400-exec-8] o.s.c.c.s.e.NativeEnvironmentRepository  : Adding property source: file:/C:/Users/nvidi/AppData/Local/Temp/config-repo-2390265840718149064/application.yml
三、创建Config客户端
通过Maven新建一个名为spring-cloud-config-client的项目。
1.引入依赖
SpringBoot和SpringCloud依赖这里就不列出来了,还需引入以下依赖:
<!-- Spring Cloud Config 客户端依赖 -->
<dependency><groupId>org.springframework.cloud</groupId><artifactId>spring-cloud-starter-config</artifactId>
</dependency>
<!-- Spring Cloud Eureka Client 起步依赖 -->
<dependency><groupId>org.springframework.cloud</groupId><artifactId>spring-cloud-starter-netflix-eureka-client</artifactId>
</dependency>
<dependency><groupId>org.springframework.boot</groupId><artifactId>spring-boot-starter-web</artifactId>
</dependency>
2.主启动类
package com.rtxtitanv;import org.springframework.boot.SpringApplication;
import org.springframework.boot.autoconfigure.SpringBootApplication;
import org.springframework.cloud.netflix.eureka.EnableEurekaClient;/*** @author rtxtitanv* @version 1.0.0* @name com.rtxtitanv.ConfigClientApplication* @description 主启动类* @date 2020/3/8 17:50*/
@EnableEurekaClient
@SpringBootApplication
public class ConfigClientApplication {public static void main(String[] args) {SpringApplication.run(ConfigClientApplication.class, args);}
}
3.编写配置文件
在bootstrap.yml里进行如下配置:
server:port: ${PORT:9500}spring:application:name: config-clientcloud:config:# 指定配置中心服务端地址# 分布式配置中心服务端没在eureka注册中心注册时需指定该配置中心服务端的地址uri: http://localhost:9400/# 指定连接配置中心服务端的用户名username: rtxtitanv# 指定连接配置中心服务端的密码password: rtxtitanv# 指定要获取的配置文件的前缀名,对应配置文件中的{application}name: application# 指定要获取的配置文件的环境名,对应配置文件中{profile}profile: dev# 指定要获取的配置文件的分支名,对应{label},默认为masterlabel: mastereureka:client:# 服务注册,是否将服务注册到Eureka注册中心,true:注册,false:不注册register-with-eureka: true# 服务发现,是否从Eureka注册中心获取注册信息,true:获取,false:不获取fetch-registry: true# 配置Eureka注册中心即Eureka服务端的地址,集群地址以,隔开service-url:defaultZone: http://rtxtitanv:rtxtitanv@eureka-server-01:8001/eureka/,http://rtxtitanv:rtxtitanv@eureka-server-02:8002/eureka/,http://rtxtitanv:rtxtitanv@eureka-server-03:8003/eureka/instance:# 将ip地址注册到Eureka注册中心prefer-ip-address: true# 该服务实例在注册中心的唯一实例ID,${spring.cloud.client.ip-address}获取该服务实例ipinstance-id: ${spring.application.name}:${spring.cloud.client.ip-address}:${server.port}# 该服务实例向注册中心发送心跳间隔,单位秒,默认30秒lease-renewal-interval-in-seconds: 20# Eureka注册中心在删除此实例之前收到最后一次心跳后的等待时间,单位秒,默认90秒lease-expiration-duration-in-seconds: 60
4.用于获取配置的Controller
package com.rtxtitanv.controller;import org.springframework.beans.factory.annotation.Value;
import org.springframework.web.bind.annotation.GetMapping;
import org.springframework.web.bind.annotation.RestController;/*** @author rtxtitanv* @version 1.0.0* @name com.rtxtitanv.controller.ConfigClientController* @description ConfigClientController* @date 2020/3/8 18:20*/
@RestController
public class ConfigClientController {@Value("${application.name}")private String applicationName;@GetMapping("/getConfig")public String getApplicationName() {return applicationName;}
}
5.从Config配置中心获取配置
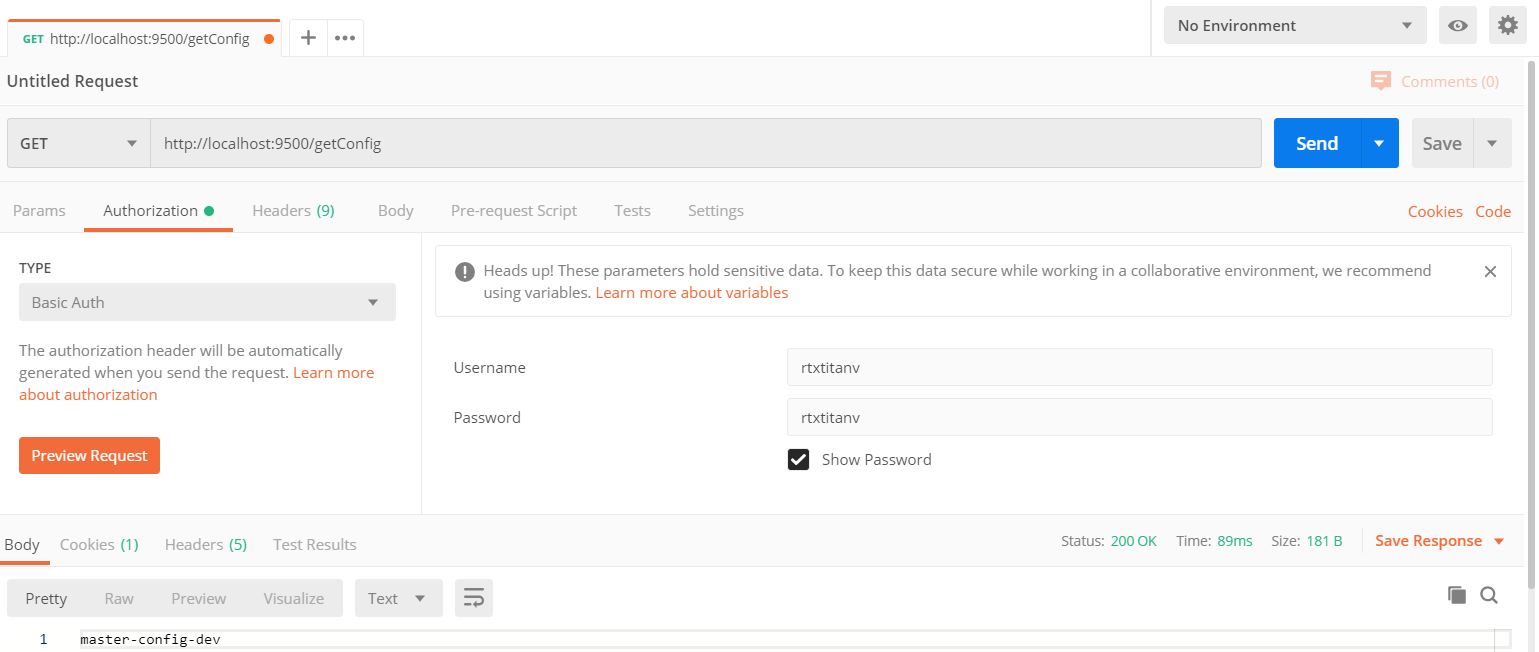
IDEA启动eureka-server集群,config-server和config-client,然后访问http://localhost:9500/getConfig获取master分支application-dev.yml配置文件信息,下图为配置文件信息:
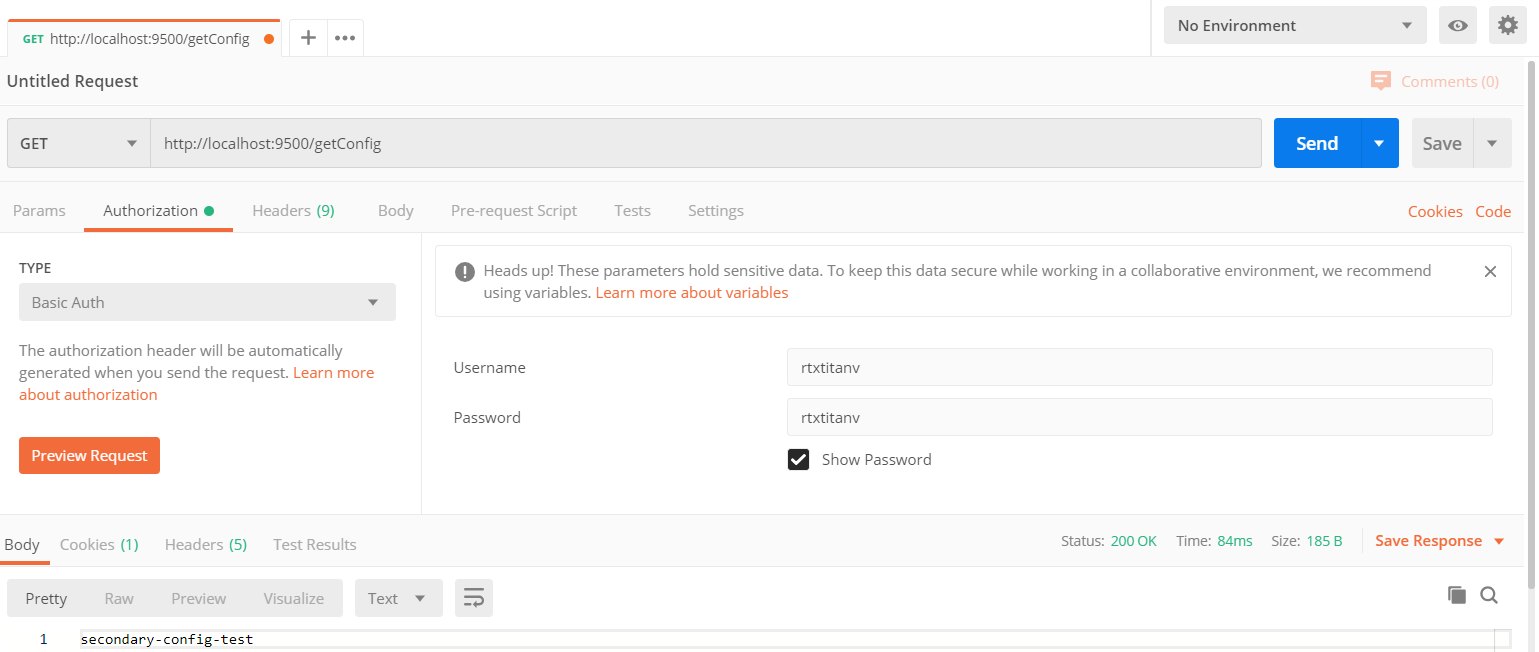
修改spring.cloud.config.label=secondary和spring.cloud.config.profile=test,重启config-client,然后访问http://localhost:9500/getConfig获取secondary分支application-test.yml配置文件信息,下图为配置文件信息:
四、Config配置中心集群搭建
1.服务注册到Eureka注册中心
首先Config服务端和Config客户端都需要引入spring-cloud-starter-netflix-eureka-client启用服务注册与发现,通过eureka.client.serviceUrl.defaultZone指定Eureka注册中心地址进行服务注册并在主启动类添加@EnableEurekaClient,这一步前面已经做过了,这里就不重复了。
2.Config客户端服务发现配置
在bootstrap.yml里进行如下配置:
spring:cloud:config:discovery:# 指定是否启用服务发现访问配置中心服务端,true:启用,false:不启用enabled: true# 指定分布式配置中心服务名称service-id: config-server
3.从Config配置中心获取配置
IDEA启动eureka-server集群,config-server集群和config-client,访问注册中心,下图为服务注册信息:

访问http://localhost:9500/getConfig获取master分支application-dev.yml配置文件信息,下图为配置文件信息:
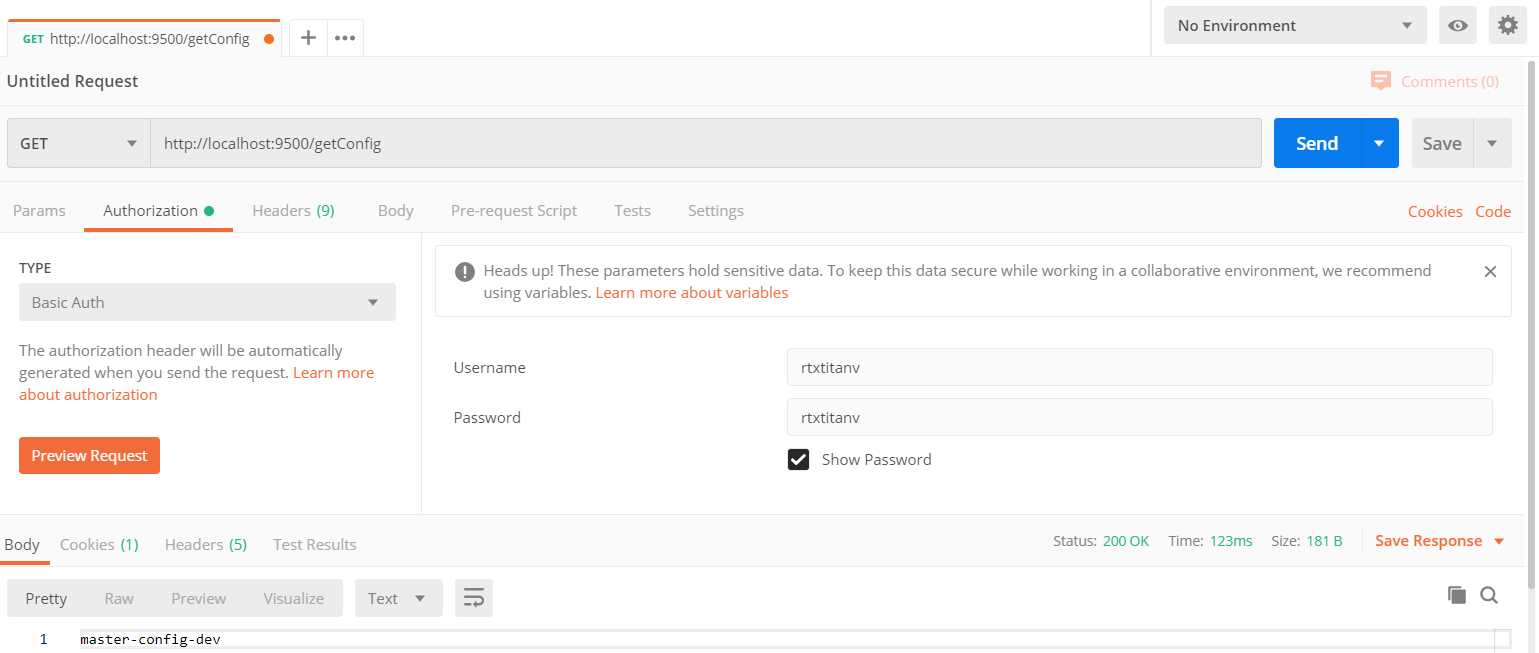
这样一个简单的Config高可用配置中心就搭建完成了。
五、Config服务端常用配置
1.指定Git仓库相对搜索路径
通过spring.cloud.config.server.git.search-paths可以指定仓库下的相对搜索路径,获取这些路径下的配置文件信息。下面在git仓库中新增一个config目录,里面已经准备好了测试用的配置文件,然后在config-server的application.yml中进行如下配置:
spring:cloud:config:server:git:# 指定仓库下的相对搜索路径,可以配置多个search-paths: config
访问http://localhost:9400/master/application-dev.yml,下图是获取的Config目录下的配置文件信息:
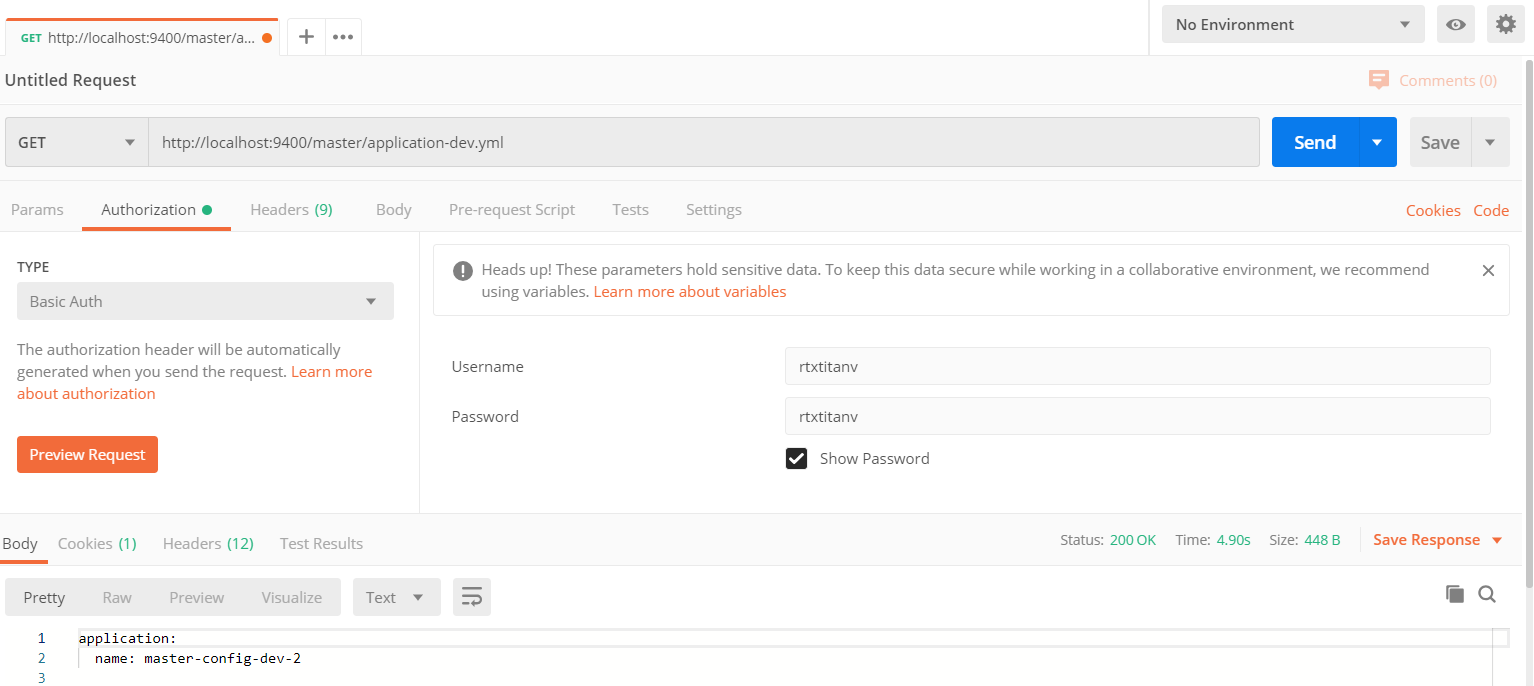
搜索路径中还支持{application}和{profile}以及{label}占位符的搜索路径,例如下面的配置,表示从对应应用名称的子目录中搜索配置,这里就不测试了。
spring:cloud:config:server:git:# 指定仓库下的相对搜索路径,可以配置多个search-paths: '{application}'
2.Git仓库URI中使用占位符
Spring Cloud Config服务器支持git仓库URL中包含{application}和 {profile} 以及{label}占位符,例如下面的配置:
spring:cloud:config:server:git:uri: https://github.com/RtxTitanV/{application}
在客户端发起请求后,{application}默认会用客户端应用名填充,从而实现根据微服务应用的不同动态的获取不同仓库下的配置。还可以使用类似的模式支持每个配置文件一个存储库的策略,但需要使用{profile}。在{application}中使用特殊字符串(_)可以启用对多个组织的支持,例如下面的配置,{application}在请求时以organization(_)application代替。
spring: cloud:config:server:git:uri: https://github.com/{application}
3.模式匹配和多个存储库
Spring Cloud Config还支持更复杂的需求并在应用程序和配置文件名称上进行模式匹配。模式的格式是一组逗号分隔的{application}/{profile},其中的参数可以使用通配符,例如下面的配置:
spring:cloud:config:server:git:uri: https://github.com/spring-cloud-samples/config-reporepos:simple: https://github.com/simple/config-repospecial:pattern: special*/dev*,*special*/dev*uri: https://github.com/special/config-repolocal:pattern: local*uri: file:/home/configsvc/config-repo
如果{application}/{profile}没有匹配到任何模式,它将使用默认的仓库地址spring.cloud.config.server.git.uri。在上面的例子中,simple仓库的模式是simple/*,在所有环境下它只匹配一个名为simple的应用。local仓库在所有环境下匹配所有{application}的名字以local开头的应用。/*前缀自动添加到所有没有设置{profile}的模式中。这里要注意一点,只有要设置的唯一属性是URI时,才能使用simple示例中使用的one-liner快捷方式,如果需要设置诸如证书,模式等其他任何内容,则需要使用完整的格式。
存储库里面的pattern属性实际上是一个数组,因此可以使用YAML数组或属性文件中的[0],[1]等后缀来绑定多个模式。如果要运行具有多环境的应用则可能需要执行此操作,如下例所示:
spring:cloud:config:server:git:uri: https://github.com/spring-cloud-samples/config-reporepos:development:pattern:- '*/development'- '*/staging'uri: https://github.com/development/config-repostaging:pattern:- '*/qa'- '*/production'uri: https://github.com/staging/config-repo
每个存储库都可以将配置文件存储在子目录中,依然可以通过spring.cloud.config.server.git.search-paths指定相对搜索路径。默认情况下Config服务器在首次请求配置时会克隆远程仓库,可以将服务器配置为在启动时克隆远程库,如下例所示:
spring:cloud:config:server:git:uri: https://git/common/config-repo.gitrepos:team-a:pattern: team-a-*cloneOnStart: trueuri: https://git/team-a/config-repo.gitteam-b:pattern: team-b-*cloneOnStart: falseuri: https://git/team-b/config-repo.gitteam-c:pattern: team-c-*uri: https://git/team-a/config-repo.git
4.跳过SSL证书验证
通过spring.cloud.config.server.git.skip-ssl-validation=true(默认false)来禁用Config服务器对Git服务器的SSL证书验证。下面是跳过SSL证书验证的配置:
spring:cloud:config:server:git:# 指定是否跳过SSL证书验证,true:跳过,false:不跳过,默认falseskip-ssl-validation: true
5.设置HTTP连接超时
通过spring.cloud.config.server.git.timeout配置Config服务器获取HTTP连接的超时时间,单位为秒。下面是设置HTTP连接超时的配置:
spring:cloud:config:server:git:# 指定Config服务器获取HTTP连接的超时时间,单位秒timeout: 5
6.Git基于属性的SSH配置
默认情况下Spring Cloud Config服务器使用的JGit库在使用SSH URI连接到Git仓库时使用例如~/.ssh/known_hosts和/etc/ssh/ssh_config的SSH配置文件。在Cloud Foundry等云环境下,本地系统可能是短暂或不容易访问的。对于这些情况可以使用Java属性设置SSH配置。不过必须通过spring.cloud.config.server.git.ignore-local-ssh-settings=true激活基于属性的SSH配置。下面在application.yml中进行如下配置,由于私钥太长,中间省略一部分。至于Git生成SSH密钥和配置,可以参考Git生成SSH密钥及配置。
spring:cloud:config:server:git:# 使用SSH的方式连接git远程仓库uri: git@github.com:RtxTitanV/springcloud-config-repository.git# 指定是否激活基于属性的SSH配置,true:激活,false:不激活,使用基于文件的SSH配置ignore-local-ssh-settings: true# true或false,如果为false则忽略主机密钥错误strict-host-key-checking: false# 指定密钥口令,没有可以不配置passphrase: .*********.# 指定有效的SSH私钥# 如果ignore-local-ssh-settings为true并且使用的Git URI是SSH格式则必须设置private-key: |-----BEGIN OPENSSH PRIVATE KEY-----b3BlbnNzaC1rZXktdjEAAAAACmFlczI1Ni1jdHIAAAAGYmNyeXB0AAAAGAAAABDCT1OmV+i7p1j/HuxmLr3gAAAAEAAAAAEAAAGXAAAAB3NzaC1yc2EAAAADAQABAAABgQC5+mqz+eBrNsIjevJgaSWcXLMefkudot9a6ILKZDfKDVsS+utgrVBtQmclfj2QMOBPPWiuLMxURllMnm.../V999hYR3uFh+An/fk1/XNjnnNFSYsa9v/srN7D1tRfHVCBxYbMSvoR9dGyEFUzDATMDveD8JtayQvOp90XT+Q8iC3xsnweBHMnnOfmMaVBnEmCgWkbxt4yFh6UokV46YDP6zf0b6Sx6OUZeZAb8bjKmcfA1GQUNULeMjBs=-----END OPENSSH PRIVATE KEY-----
启动eureka-server集群和config-server,报下图中的错误,这是因为生成私钥的方式不对,之前使用的ssh-keygen -t rsa -C "your email"生成的私钥以OPENSSH PRIVATE KEY开头和结尾的,而Spring官方提供的私钥方式以RSA PRIVATE KEY开头和结尾的RSA格式,所以这里需要重新生成RSA格式密钥。

在Git Bash控制台输入以下命令生成RSA格式SSH密钥然后在Github配置SSH公钥,Github中设置公钥的过程这里就不写出来了。
ssh-keygen -m PEM -t rsa -C 'your email' -f id01
下面是修改SSH私钥后的配置:
spring:cloud:config:server:git:# 使用SSH的方式连接git远程仓库uri: git@github.com:RtxTitanV/springcloud-config-repository.git# 指定是否激活基于属性的SSH配置,true:激活,false:不激活,使用基于文件的SSH配置ignore-local-ssh-settings: true# true或false,如果为false则忽略主机密钥错误strict-host-key-checking: false# 指定密钥口令,没有可以不配置passphrase: .*********.# 指定有效的SSH私钥# 如果ignore-local-ssh-settings为true并且使用的Git URI是SSH格式则必须设置private-key: |-----BEGIN RSA PRIVATE KEY-----Proc-Type: 4,ENCRYPTEDDEK-Info: AES-128-CBC,1FD185F530C5BA0EDFA104A5DD3D938DMRL/90tmiR7PowyRoezp+sjcGel/afk7NdJuFPWUA5fHFIR3SH0giAQbZcPQ66TX8+ctiJF+Jm/p5s0m0gsWDI8QHlAQAqElR3lmqMIbHy5fNPk8Vd1fFNoTw4H7HtIzwa+Ix4xJz/wZwpT1PowW3DYKmY17CYb4BbKkLRPsh74Qkh0vS3Vr2oOj7tMdKStM...fDSy9j7wARrcga3GEOc9OmkDXayIMMO+ToYfwbAZ17U0YX0AKcJit3SAICiim8E1YxvwSwLLw8z8ZE0qF8rpBAUiZaoSzgQ/xZ2tEFIDPeEohsQcCx7cWTkCyMcxo3VlC6xFmXH95EDnob+SxErBJDt9WmM/PShkBgXP2bJAaXkg3NyfHcpde8ptDWc/+LfN-----END RSA PRIVATE KEY-----
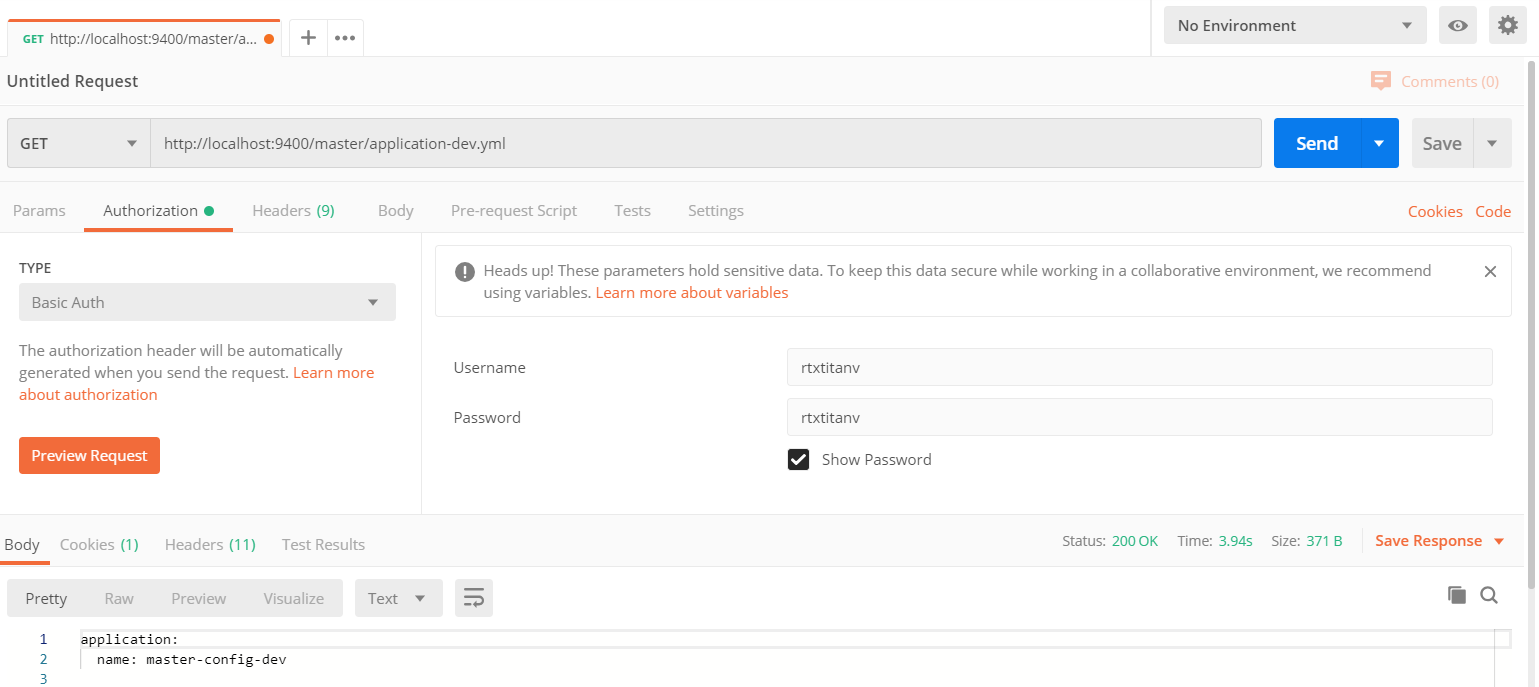
启动eureka-server集群和config-server,访问http://localhost:9400/master/application-dev.yml获取master分支application-dev.yml配置文件信息,配置文件信息如下图所示,说明Git通过基于属性的SSH配置后以SSH的方式连接并获取配置成功。
另外SSH配置还有以下几个属性,这里简单总结一下:
spring:cloud:config:server:git:# 指定有效的主机密钥,如果设置了host-key-algorithm则必须指定host-key: # ssh-dss、ssh-rsa、ecdsa-sha2-nistp256、ecdsa-sha2-nistp384、ecdsa-sha2-nistp521中的一个# 如果设置了host-key则必须设置host-key-algorithm: # 指定自定义.known_hosts文件位置known-hosts-file: # 指定覆盖服务器身份验证方法顺序# 如果服务器在publickey方法之前具有键盘交互式身份验证,则应允许避免登录提示。preferred-authentications:
7.强制从Git仓库拉取
Spring Cloud Config服务器会克隆远程Git仓库以防本地副本变脏,造成Spring Cloud Config服务器无法从远程仓库更新本地副本。通过spring.cloud.config.server.git.force-pull= true可以解决这个问题。下面是强制从Git仓库拉取的配置,如果你有多个仓库配置,你也可以为每个仓库都配置force-pull属性。
spring:cloud:config:server:git:# 指定是否强制从远程仓库拉取,true:是,false:否,默认falseforce-pull: true
8.删除Git仓库中未跟踪分支
由于Spring Cloud Config服务器在剪出分支到本地仓库后具有远程Git仓库的克隆,它将永久保持此分支或直到下个服务重启才创建新的本地仓库。因此可能存在删除远程分支但仍然可以获取其本地副本的情况。如果Spring Cloud Config服务器的客户端服务以--spring.cloud.config.label=deleteRemoteBranch,master启动,它会从deleteRemoteBranch本地分支获取属性而不是从master。为了解决这个问题,可以通过spring.cloud.config.server.git.delete-untracked-branches=true来保持本地仓库分支的清洁并与远程仓库一致,它将使Spring Cloud Config服务器强制删除本地仓库未跟踪的分支。下面是删除本地仓库未跟踪分支的配置:
spring:cloud:config:server:git:# 指定是否删除本地仓库未跟踪的分支,true:删除,false:不删除,默认falsedelete-untracked-branches: true
9.Git刷新率
通过配置spring.cloud.config.server.git.refresh-rate可以控制Config服务器从Git后端获取更新配置数据的频率,单位为秒,默认值为0意味着配置服务器将在每次请求时从Git存储库获取更新的配置。下面是Git刷新率的配置:
spring:cloud:config:server:git:# 指定git刷新率,单位秒,默认0refresh-rate: 0
10.版本控制后端文件系统的使用
使用诸如git,svn这种基于VCS的后端,文件将被剪出或克隆到本地文件系统。默认情况下它们会被放在前缀为config-repo-的系统临时目录中。例如在Linux中可能是/tmp/config-repo-<randomid>。某些操作系统会定期清理临时目录,可能会导致比如缺少属性这种意外情况。通过将spring.cloud.config.server.git.basedir或spring.cloud.config.server.svn.basedir设置为不在系统临时结构中的固定目录可以避免此问题。这里以Git的配置为例,在application.yml中新增以下配置:
spring:cloud:config:server:git:# 指定配置文件被剪出或克隆到本地文件系统的存放目录basedir: E:\software\DevelopmentTool\IntelliJ IDEA Space\my_project\springcloud-config-repository\localrep
重启相关服务之后访问http://localhost:9400/master/application-dev.yml,控制台打印以下日志,发现配置文件被剪出或克隆到本地文件系统的存放目录已经变更为指定目录了。
2020-03-10 17:19:56.474  INFO 25532 --- [nio-9400-exec-3] o.s.c.c.s.e.NativeEnvironmentRepository  : Adding property source: file:/E:/software/DevelopmentTool/IntelliJ%20IDEA%20Space/my_project/springcloud-config-repository/localrep/application-dev.yml
2020-03-10 17:19:56.475  INFO 25532 --- [nio-9400-exec-3] o.s.c.c.s.e.NativeEnvironmentRepository  : Adding property source: file:/E:/software/DevelopmentTool/IntelliJ%20IDEA%20Space/my_project/springcloud-config-repository/localrep/application.yml
11.文件系统后端
Config服务器还有一个不使用Git但从本地类路径或文件系统加载配置文件的native环境。这里的文件系统路径可以通过spring.cloud.config.server.native.search-locations指定,通过spring.profiles.active=native启动Config服务器可以使用native环境。注意使用文件系统需加上file:前缀,没有前缀的默认使用的类路径。和任何Spring Boot应用一样可以嵌入${}环境占位符,但是Windows系统中的绝对路径还需要额外的/。search-locations中依然可以包含{application},{profile}和{label}占位符。如果不在search-locations中使用占位符,在此存储库还是会将HTTP资源的{label}附加到search-locations的后缀,通过spring.cloud.config.server.native.add-label-locations=false可以禁用此行为。下面在application.yml中进行如下配置,其中本地文件系统目录下的配置已经准备了。
spring:profiles:active: nativecloud:config:server:native:# 指定本地文件系统路径search-locations: file:E:\software\DevelopmentTool\IntelliJ IDEA Space\my_project\springcloud-config-repository
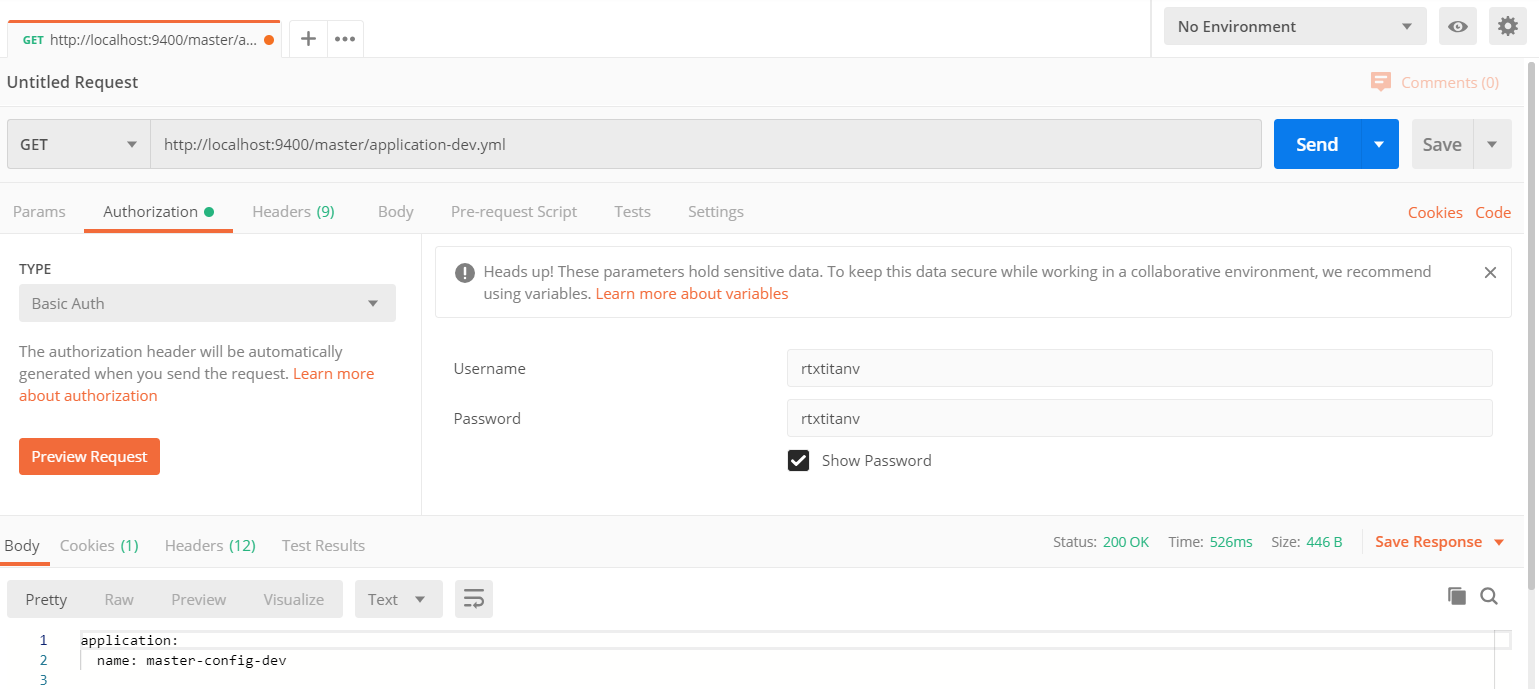
重启相关服务之后访问http://localhost:9400/master/application-dev.yml获取master分支application-dev.yml配置文件信息,下图为配置文件信息:
12.属性覆盖
Config服务器具有“覆盖”的特性,允许开发人员为所有应用提供配置属性。只需要通过spring.cloud.config.server.overrides设置键值对参数,这些参数会以Map的形式加载到客户端的配置中。通过该属性配置的参数不会被Spring Cloud的客户端修改,并且Spring Cloud客户端从Config服务器中获取配置信息时都会取得这些配置信息,可以方便的为Spring Cloud应用配置一些共同属性或者默认属性,并且这些属性非强制的,可以通过改变客户端中更高优先级的配置方式来选择是否使用Config服务器提供的默认值。下面是属性覆盖的配置:
spring:cloud:config:server:overrides:foo: bar
13.健康监测
Config服务器带有一个健康指示器,用于检查配置的EnvironmentRepository是否正常工作。默认情况下它会向EnvironmentRepository请求名为app的应用程序,默认环境以及EnvironmentRepository实现提供的默认分支。通过spring.cloud.config.server.health.repositories可以配置健康指示器以检查更多应用程序以及自定义环境和自定义分支,例如以下配置。通过spring.cloud.config.server.health.enabled=false可以禁用健康指示器。
spring:cloud:config:server:health:repositories:myservice:# 分支名label: mylabelmyservice-dev:# 应用名name: myservice# 环境名profiles: development
六、Config客户端常用配置
1.Config客户端快速失败
在某些情况下如果服务无法连接到Config服务器,可以通过设置bootstrap配置属性spring.cloud.config.fail-fast=true时客户端异常终止。在没有配置客户端快速失败时,不启动Config服务端只启动Config客户端会加载很多内容,等待启动的时间长,不利于初期调试。下面在bootstrap.yml里新增以下配置:
spring:cloud:config:# 指定是否开启快速失败响应,true:开启,false:关闭fail-fast: true
不启动Config服务端只启动Config客户端,这时Config客户端会快速失败,并且在控制台打印以下异常信息:
java.lang.IllegalStateException: Could not locate PropertySource and the fail fast property is set, failing
2.Config客户端重试
如果希望应用启动时遇到Config服务器发生故障后偶尔不可用时继续尝试,就需要配置Config重试。首先引入以下依赖:
<!-- SpringRetry 重试框架依赖 -->
<dependency><groupId>org.springframework.retry</groupId><artifactId>spring-retry</artifactId>
</dependency>
<!-- Aop 起步依赖 -->
<dependency><groupId>org.springframework.boot</groupId><artifactId>spring-boot-starter-aop</artifactId>
</dependency>
由于Config客户端提供了自动重试的功能,此时不做任何配置,启动Config客户端会使用默认的重试功能,在连接Config服务端失败后会继续尝试至第六次失败后才返回错误信息,下面是控制台打印的日志:
2020-03-10 20:28:17.217  INFO 19172 --- [           main] c.c.c.ConfigServicePropertySourceLocator : Fetching config from server at : http://localhost:9400/
2020-03-10 20:28:19.296  INFO 19172 --- [           main] c.c.c.ConfigServicePropertySourceLocator : Connect Timeout Exception on Url - http://localhost:9400/. Will be trying the next url if available
2020-03-10 20:28:20.299  INFO 19172 --- [           main] c.c.c.ConfigServicePropertySourceLocator : Fetching config from server at : http://localhost:9400/
2020-03-10 20:28:22.313  INFO 19172 --- [           main] c.c.c.ConfigServicePropertySourceLocator : Connect Timeout Exception on Url - http://localhost:9400/. Will be trying the next url if available
2020-03-10 20:28:23.414  INFO 19172 --- [           main] c.c.c.ConfigServicePropertySourceLocator : Fetching config from server at : http://localhost:9400/
2020-03-10 20:28:25.431  INFO 19172 --- [           main] c.c.c.ConfigServicePropertySourceLocator : Connect Timeout Exception on Url - http://localhost:9400/. Will be trying the next url if available
2020-03-10 20:28:26.643  INFO 19172 --- [           main] c.c.c.ConfigServicePropertySourceLocator : Fetching config from server at : http://localhost:9400/
2020-03-10 20:28:28.658  INFO 19172 --- [           main] c.c.c.ConfigServicePropertySourceLocator : Connect Timeout Exception on Url - http://localhost:9400/. Will be trying the next url if available
2020-03-10 20:28:29.991  INFO 19172 --- [           main] c.c.c.ConfigServicePropertySourceLocator : Fetching config from server at : http://localhost:9400/
2020-03-10 20:28:32.005  INFO 19172 --- [           main] c.c.c.ConfigServicePropertySourceLocator : Connect Timeout Exception on Url - http://localhost:9400/. Will be trying the next url if available
2020-03-10 20:28:33.471  INFO 19172 --- [           main] c.c.c.ConfigServicePropertySourceLocator : Fetching config from server at : http://localhost:9400/
2020-03-10 20:28:35.475  INFO 19172 --- [           main] c.c.c.ConfigServicePropertySourceLocator : Connect Timeout Exception on Url - http://localhost:9400/. Will be trying the next url if available
2020-03-10 20:28:35.484 ERROR 19172 --- [           main] o.s.boot.SpringApplication               : Application run failedjava.lang.IllegalStateException: Could not locate PropertySource and the fail fast property is set, failing
如果不想使用默认的重试次数和间隔时间,可以通过以下配置调整。下面在bootstrap.yml里新增以下配置:
spring:cloud:# config客户端重试配置retry:# 指定最大重试次数,默认6max-attempts: 8# 指定最大间隔时间,单位ms,默认2000max-interval: 1200# 指定间隔乘数,默认1.1multiplier: 1.2# 指定初始重试间隔时间,单位ms,默认1000initial-interval: 800
启动Config客户端,下面是控制台打印的日志:
2020-03-10 20:35:34.546  INFO 25824 --- [           main] c.c.c.ConfigServicePropertySourceLocator : Fetching config from server at : http://localhost:9400/
2020-03-10 20:35:36.613  INFO 25824 --- [           main] c.c.c.ConfigServicePropertySourceLocator : Connect Timeout Exception on Url - http://localhost:9400/. Will be trying the next url if available
2020-03-10 20:35:37.416  INFO 25824 --- [           main] c.c.c.ConfigServicePropertySourceLocator : Fetching config from server at : http://localhost:9400/
2020-03-10 20:35:39.432  INFO 25824 --- [           main] c.c.c.ConfigServicePropertySourceLocator : Connect Timeout Exception on Url - http://localhost:9400/. Will be trying the next url if available
2020-03-10 20:35:40.393  INFO 25824 --- [           main] c.c.c.ConfigServicePropertySourceLocator : Fetching config from server at : http://localhost:9400/
2020-03-10 20:35:42.409  INFO 25824 --- [           main] c.c.c.ConfigServicePropertySourceLocator : Connect Timeout Exception on Url - http://localhost:9400/. Will be trying the next url if available
2020-03-10 20:35:43.563  INFO 25824 --- [           main] c.c.c.ConfigServicePropertySourceLocator : Fetching config from server at : http://localhost:9400/
2020-03-10 20:35:45.579  INFO 25824 --- [           main] c.c.c.ConfigServicePropertySourceLocator : Connect Timeout Exception on Url - http://localhost:9400/. Will be trying the next url if available
2020-03-10 20:35:46.781  INFO 25824 --- [           main] c.c.c.ConfigServicePropertySourceLocator : Fetching config from server at : http://localhost:9400/
2020-03-10 20:35:48.796  INFO 25824 --- [           main] c.c.c.ConfigServicePropertySourceLocator : Connect Timeout Exception on Url - http://localhost:9400/. Will be trying the next url if available
2020-03-10 20:35:49.998  INFO 25824 --- [           main] c.c.c.ConfigServicePropertySourceLocator : Fetching config from server at : http://localhost:9400/
2020-03-10 20:35:52.014  INFO 25824 --- [           main] c.c.c.ConfigServicePropertySourceLocator : Connect Timeout Exception on Url - http://localhost:9400/. Will be trying the next url if available
2020-03-10 20:35:53.216  INFO 25824 --- [           main] c.c.c.ConfigServicePropertySourceLocator : Fetching config from server at : http://localhost:9400/
2020-03-10 20:35:55.231  INFO 25824 --- [           main] c.c.c.ConfigServicePropertySourceLocator : Connect Timeout Exception on Url - http://localhost:9400/. Will be trying the next url if available
2020-03-10 20:35:56.432  INFO 25824 --- [           main] c.c.c.ConfigServicePropertySourceLocator : Fetching config from server at : http://localhost:9400/
2020-03-10 20:35:58.446  INFO 25824 --- [           main] c.c.c.ConfigServicePropertySourceLocator : Connect Timeout Exception on Url - http://localhost:9400/. Will be trying the next url if available
2020-03-10 20:35:58.455 ERROR 25824 --- [           main] o.s.boot.SpringApplication               : Application run failedjava.lang.IllegalStateException: Could not locate PropertySource and the fail fast property is set, failing
3.定位远程配置资源
Config服务从/{application}/{profile}/{label}提供属性源,客户端应用中的默认绑定见下:
- “name” = ${spring.application.name}
- “profile” = ${spring.profiles.active} (实际上是Environment.getActiveProfiles())
- “label” = “master”
这些都可以通过设置spring.cloud.config.*覆盖,其中*是name、profile或label。label可用于回滚到以前版本的配置,使用默认的Config服务实现,它可以是git标签,分支名称或提交ID。label也可以以逗号分隔的列表形式提供,在这种情况下列表中的项目会逐个尝试直到成功为止。下面是客户端获取远程配置信息的配置:
spring:cloud:config:# 指定要获取的配置文件名,对应配置文件中的{application}name: application# 指定要获取的配置文件的环境名,对应配置文件中{profile}profile: dev# 指定要获取的配置文件的分支名,对应{label},默认为masterlabel: master
4.动态刷新配置
首先引入以下依赖,其中包含了refresh端点的实现:
<!-- Actuator 起步依赖 -->
<dependency><groupId>org.springframework.boot</groupId><artifactId>spring-boot-starter-actuator</artifactId>
</dependency>
在bootstrap.yml里新增以下配置,暴露刷新配置端点:
management:endpoints:web:exposure:# 暴露指定端点,refresh为刷新配置端点include: 'refresh'
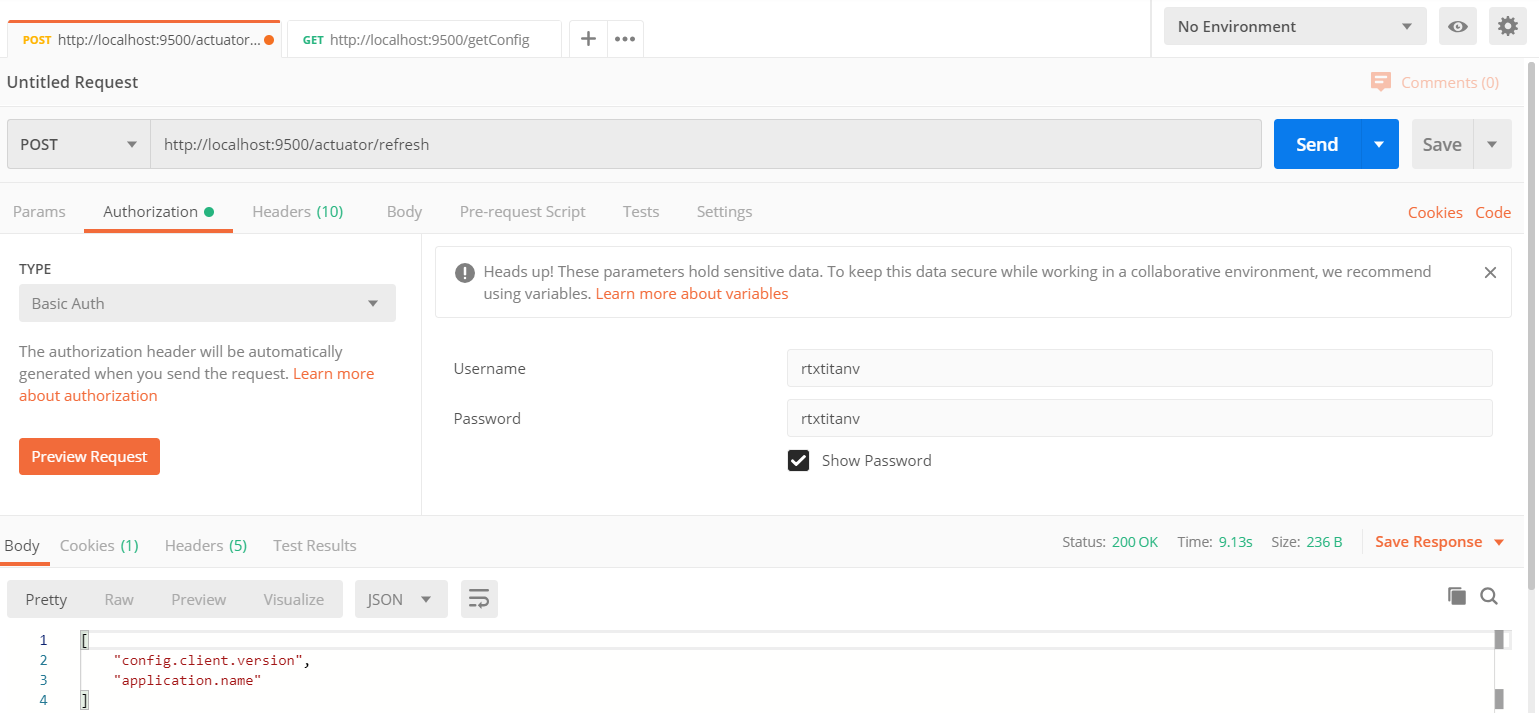
然后在Controller上添加@RefreshScope注解,重启Config客户端,然后访问http://localhost:9500/getConfig,返回的是master分支application-dev.yml的内容master-config-dev,然后修改该配置内容为master-config-dev-refresh保存,然后再次访问http://localhost:9500/getConfig发现返回的配置内容没有改变,然后通过POST请求访问http://localhost:9500/actuator/refresh,下图为访问结果:
再次访问http://localhost:9500/getConfig,下图为访问结果,返回master-config-dev-refresh说明动态刷新配置成功。

关于Config的常用配置就总结到这里,更多的配置和使用可以参考Spring Cloud Config 官方文档。
代码示例
- Github:
https://github.com/RtxTitanV/springcloud-learning/tree/master/springcloud-hoxton-learning/spring-cloud-config-server
https://github.com/RtxTitanV/springcloud-learning/tree/master/springcloud-hoxton-learning/spring-cloud-config-client - Gitee:
https://gitee.com/RtxTitanV/springcloud-learning/tree/master/springcloud-hoxton-learning/spring-cloud-config-server
https://gitee.com/RtxTitanV/springcloud-learning/tree/master/springcloud-hoxton-learning/spring-cloud-config-client
这篇关于SpringCloud 分布式配置中心Config Hoxton版本的文章就介绍到这儿,希望我们推荐的文章对编程师们有所帮助!


