本文主要是介绍使用 Certbot 为 Nginx 自动配置 SSL 证书,希望对大家解决编程问题提供一定的参考价值,需要的开发者们随着小编来一起学习吧!
发布于 2023-07-13 on https://chenhaotian.top/linux/certbot-nginx/
使用 Certbot 为 Nginx 自动配置 SSL 证书
配置步骤
以 Debian 11 为例
1. 安装Certbot和Nginx插件
sudo apt-get update
sudo apt-get install certbot python3-certbot-nginx
2. 获取和安装证书
运行 Certbot 自动安装 SSL 证书。注意替换your_domain:
sudo certbot --nginx -d your_domain
Certbot 将自动与 Let’s Encrypt 的服务器通信,验证域名,请求SSL证书。
3. 测试自动更新
Let’s Encrypt 的证书每 90 天需要更新一次。运行以下命令来测试自动更新是否正常工作:
sudo certbot renew --dry-run
若测试成功,证书将自动更新,无需任何其他操作。
配置过程示例
若是第一次配置,会要求输入一个合法邮箱提供给 Let’s Encrypt。若自动更新失效,Let’s Encrypt 会在证书失效前给你发邮件。
root@VM-PV30VGNA7611:~# sudo certbot --nginx -d storage.opennet.top
Saving debug log to /var/log/letsencrypt/letsencrypt.log
Plugins selected: Authenticator nginx, Installer nginx
Obtaining a new certificate
Performing the following challenges:
http-01 challenge for storage.opennet.top
Waiting for verification...
Cleaning up challenges
Deploying Certificate to VirtualHost /etc/nginx/sites-enabled/defaultPlease choose whether or not to redirect HTTP traffic to HTTPS, removing HTTP access.
- - - - - - - - - - - - - - - - - - - - - - - - - - - - - - - - - - - - - - - -
1: No redirect - Make no further changes to the webserver configuration.
2: Redirect - Make all requests redirect to secure HTTPS access. Choose this for
new sites, or if you're confident your site works on HTTPS. You can undo this
change by editing your web server's configuration.
- - - - - - - - - - - - - - - - - - - - - - - - - - - - - - - - - - - - - - - -
Select the appropriate number [1-2] then [enter] (press 'c' to cancel): 1- - - - - - - - - - - - - - - - - - - - - - - - - - - - - - - - - - - - - - - -
Congratulations! You have successfully enabled https://storage.opennet.topYou should test your configuration at:
https://www.ssllabs.com/ssltest/analyze.html?d=storage.opennet.top
- - - - - - - - - - - - - - - - - - - - - - - - - - - - - - - - - - - - - - - -IMPORTANT NOTES:- Congratulations! Your certificate and chain have been saved at:/etc/letsencrypt/live/storage.opennet.top/fullchain.pemYour key file has been saved at:/etc/letsencrypt/live/storage.opennet.top/privkey.pemYour cert will expire on 2023-10-11. To obtain a new or tweakedversion of this certificate in the future, simply run certbot againwith the "certonly" option. To non-interactively renew *all* ofyour certificates, run "certbot renew"- If you like Certbot, please consider supporting our work by:Donating to ISRG / Let's Encrypt:   https://letsencrypt.org/donateDonating to EFF:                    https://eff.org/donate-le
自动更新测试
root@VM-PV30VGNA7611:~# sudo certbot renew --dry-run
Saving debug log to /var/log/letsencrypt/letsencrypt.log- - - - - - - - - - - - - - - - - - - - - - - - - - - - - - - - - - - - - - - -
Processing /etc/letsencrypt/renewal/storage.opennet.top.conf
- - - - - - - - - - - - - - - - - - - - - - - - - - - - - - - - - - - - - - - -
Cert not due for renewal, but simulating renewal for dry run
Plugins selected: Authenticator nginx, Installer nginx
Renewing an existing certificate
Performing the following challenges:
http-01 challenge for storage.opennet.top
Waiting for verification...
Cleaning up challenges- - - - - - - - - - - - - - - - - - - - - - - - - - - - - - - - - - - - - - - -
new certificate deployed with reload of nginx server; fullchain is
/etc/letsencrypt/live/storage.opennet.top/fullchain.pem
- - - - - - - - - - - - - - - - - - - - - - - - - - - - - - - - - - - - - - - -- - - - - - - - - - - - - - - - - - - - - - - - - - - - - - - - - - - - - - - -
** DRY RUN: simulating 'certbot renew' close to cert expiry
**          (The test certificates below have not been saved.)Congratulations, all renewals succeeded. The following certs have been renewed:/etc/letsencrypt/live/storage.opennet.top/fullchain.pem (success)
** DRY RUN: simulating 'certbot renew' close to cert expiry
**          (The test certificates above have not been saved.)
- - - - - - - - - - - - - - - - - - - - - - - - - - - - - - - - - - - - - - - -
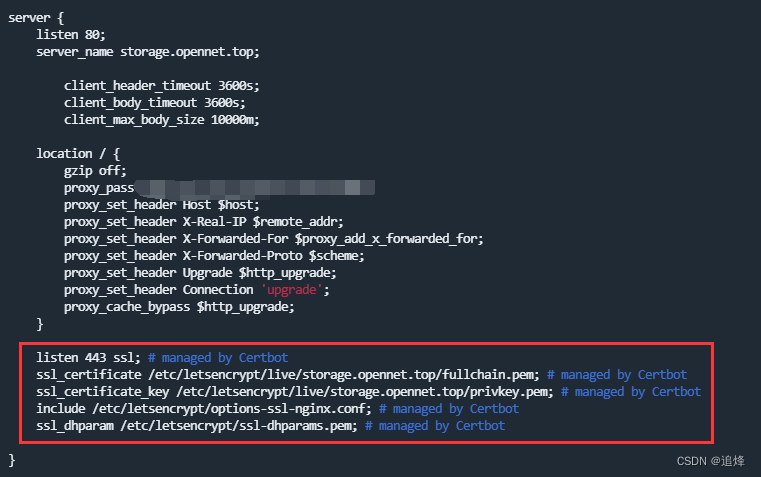
Nginx 配置文件示例
在写配置文件时只需写 80 端口,Certbot 会自动添加 443 端口的监听以及 SSL 证书的配置
server {listen 80;server_name storage.opennet.top;location / {gzip off;proxy_pass http://localhost:8080;proxy_set_header Host $host;proxy_set_header X-Real-IP $remote_addr;proxy_set_header X-Forwarded-For $proxy_add_x_forwarded_for;proxy_set_header X-Forwarded-Proto $scheme;proxy_set_header Upgrade $http_upgrade;proxy_set_header Connection 'upgrade';proxy_cache_bypass $http_upgrade;}listen 443 ssl; # managed by Certbotssl_certificate /etc/letsencrypt/live/storage.opennet.top/fullchain.pem; # managed by Certbotssl_certificate_key /etc/letsencrypt/live/storage.opennet.top/privkey.pem; # managed by Certbotinclude /etc/letsencrypt/options-ssl-nginx.conf; # managed by Certbotssl_dhparam /etc/letsencrypt/ssl-dhparams.pem; # managed by Certbot
}
取消 Certbot 对网站的管理
1. 删除证书:
列出 Certbot 管理的所有证书
sudo certbot certificates
删除证书,将 name_of_certificate 替换为证书名称,此时会自动取消续期
sudo certbot delete --cert-name name_of_certificate
2. 删除 Nginx 的 SSL 配置:
在 Nginx 配置中删除关于该证书的引用。编辑 Nginx 配置文件(通常位于 /etc/nginx/sites-available/),删除或注释掉所有 # managed by Certbot 的代码
重新加载 Nginx
sudo systemctl reload nginx
这篇关于使用 Certbot 为 Nginx 自动配置 SSL 证书的文章就介绍到这儿,希望我们推荐的文章对编程师们有所帮助!


