本文主要是介绍RecyclerView自定义StaggeredGridLayoutManager实现EPG布局,希望对大家解决编程问题提供一定的参考价值,需要的开发者们随着小编来一起学习吧!
实现布局:
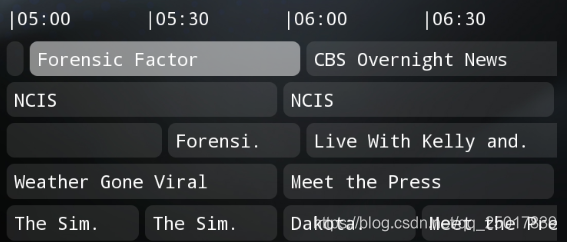
最近在做EPG功能,要求能够展示每个节目对应时间轴的预览节目信息,这种布局可以采用RecyclerView的瀑布流布局实现,但是测试的时候发现Item的position是没有规律的,这样就不能够很好的根据positoin去区分是哪个节目的EPG信息从而显示到不同行数上,所以需要从StaggeredGridLayoutManager源码改起
修改getNextSpan函数
/*** Finds the span for the next view.*/
private StaggeredGridLayoutManager.Span getNextSpan(LayoutState layoutState) {final boolean preferLastSpan = preferLastSpan(layoutState.mLayoutDirection);final int startIndex, endIndex, diff;if (preferLastSpan) {startIndex = mSpanCount - 1;endIndex = -1;diff = -1;} else {startIndex = 0;endIndex = mSpanCount;diff = 1;}//布局排列方向,表示从起始排到末尾if (layoutState.mLayoutDirection == LayoutState.LAYOUT_END) {Span min = null;int minLine = Integer.MAX_VALUE;final int defaultLine = mPrimaryOrientation.getStartAfterPadding();//for循环是找到布局中哪个列的最后一个Item的末尾处坐标最小for (int i = startIndex; i != endIndex; i += diff) {final Span other = mSpans[i];int otherLine = other.getEndLine(defaultLine);if (otherLine < minLine) {min = other;minLine = otherLine;}}return min;} else { //布局排列方向,表示从末尾排到起始Span max = null;int maxLine = Integer.MIN_VALUE;final int defaultLine = mPrimaryOrientation.getEndAfterPadding();//for循环是找到布局中哪个列的第一个Item的起始处坐标值最大for (int i = startIndex; i != endIndex; i += diff) {final Span other = mSpans[i];int otherLine = other.getStartLine(defaultLine);if (otherLine > maxLine) {max = other;maxLine = otherLine;}}return max;}
}
该函数是获取下一个Span,每次获取都会先计算当前哪个Span的末尾处最小,最小则返回该Span,以便下一个View添加到这个Span上,我们可以增加一个int变量,每次调用+1,循环去Span数组获取,修改layoutState.mLayoutDirection == LayoutState.LAYOUT_END条件代码为
if (layoutState.mLayoutDirection == LayoutState.LAYOUT_END) {return mSpans[(index++) % mSpanCount];
}
这样我们就可以在adapter里面根据position去区分是哪一行了
虽然上面代码能够有规律的显示数据了,但是当我们回滚时,会发现行数据会概率发现交换,通过打印代码发现,行数据发生交换的时候会调用getNextSpan函数我们修改的代码块,index++了,所以行数据会发生交换,既然知道了原因,那么我们来看看为什么会调用到这个函数吧
在fill(EPGRecyclerView.Recycler recycler, LayoutState layoutState,EPGRecyclerView.State state)这个函数里,有这样一段代码
final int spanIndex = mLazySpanLookup.getSpan(position);
StaggeredGridLayoutManager.Span currentSpan;
final boolean assignSpan = spanIndex == StaggeredGridLayoutManager.LayoutParams.INVALID_SPAN_ID;
if (assignSpan) {currentSpan = lp.mFullSpan ? mSpans[0] : getNextSpan(layoutState);mLazySpanLookup.setSpan(position, currentSpan);if (DEBUG) {Log.d(TAG, "assigned " + currentSpan.mIndex + " for " + position);}
}
当我们回滚时,按道理assignSpan应该是false的,spanIndex应该是有确切值的,而且spanIndex设置只有一处,这说明滚动时候在某个地方spanIndex被重置了
通过对代码的debug调试,原来是onLayoutChildren函数中有一个判断2个相邻的子View位置是否合理的逻辑,如果不合理的话会进行变量的重置,也就是上面的spanIndex
onLayoutChildren函数中有这样一段代码
boolean hasGaps = false;
if (shouldCheckForGaps && !state.isPreLayout() ) {//LogUtil.e("StaggeredGridLayoutManager", "onLayoutChildren", "state.isPreLayout() = false");final boolean needToCheckForGaps = mGapStrategy != GAP_HANDLING_NONE&& getChildCount() > 0&& (mLaidOutInvalidFullSpan || hasGapsToFix() != null);if (needToCheckForGaps) {removeCallbacks(mCheckForGapsRunnable);//LogUtil.e("StaggeredGridLayoutManager", "onLayoutChildren", "checkForGaps()3");if (checkForGaps()) {hasGaps = true;}}
}
if (state.isPreLayout()) {mAnchorInfo.reset();
}
mLastLayoutFromEnd = anchorInfo.mLayoutFromEnd;
mLastLayoutRTL = isLayoutRTL();
if (hasGaps) {//进行重置mAnchorInfo.reset();onLayoutChildren(recycler, state, false);
}
接下来我们来看看hasGapsToFix里面的一段代码
if (mShouldReverseLayout) {// ensure child's end is below nextChild's endint myEnd = mPrimaryOrientation.getDecoratedEnd(child);int nextEnd = mPrimaryOrientation.getDecoratedEnd(nextChild);if (myEnd < nextEnd) {return child; //i should have a better position} else if (myEnd == nextEnd) {compareSpans = true;}
} else {int myStart = mPrimaryOrientation.getDecoratedStart(child);int nextStart = mPrimaryOrientation.getDecoratedStart(nextChild);//如果当前View的起始处大于下一个View的起始处,会返回当前Viewif (myStart > nextStart) {return child; //i should have a better position} else if (myStart == nextStart) {compareSpans = true;}
}
if (compareSpans) {// equal, check span indices.StaggeredGridLayoutManager.LayoutParams nextLp = (StaggeredGridLayoutManager.LayoutParams) nextChild.getLayoutParams();if (lp.mSpan.mIndex - nextLp.mSpan.mIndex < 0 != preferredSpanDir < 0) {//preferredSpanDir < 0 为truereturn child;}
}
既然知道了原因,那么我们可以修改为不检测间隙,这样就避免了行数据交换的问题
①增加一个needCheckGap的标志位,置为false
//增加一个是否需要检测间隙的标志
private boolean needCheckGap = false;
②在hasGapsToFix函数起始处直接返回
View hasGapsToFix() {//不需要检测间隙 -zbjif (!needCheckGap) {return null;}...
}
③onLayoutChild函数去除检测间隙
boolean hasGaps = false;
//不检测间隙
if (shouldCheckForGaps && !state.isPreLayout() && hasGaps) {//LogUtil.e("StaggeredGridLayoutManager", "onLayoutChildren", "state.isPreLayout() = false");final boolean needToCheckForGaps = mGapStrategy != GAP_HANDLING_NONE&& getChildCount() > 0&& (mLaidOutInvalidFullSpan || hasGapsToFix() != null);if (needToCheckForGaps) {removeCallbacks(mCheckForGapsRunnable);//LogUtil.e("StaggeredGridLayoutManager", "onLayoutChildren", "checkForGaps()3");if (checkForGaps()) {hasGaps = true;}}
}
到这里,EPG功能布局已经差不多了,可以正常在手机上显示了,但是在安卓TV上,用遥控器左右键来进行选择时,会出现焦点不在同一行的问题,经过对安卓焦点规律的研究,发现是当滚动到屏幕后面的时候,后面已经没有实际的View了,这时候安卓系统会就近选择View,也就会出现左右切换焦点不在同一行的问题,解决这个问题也挺简单的,就是让RecyclerView额外多加载一层View,onLayoutChildren函数主要是进行子View的添加的,所以我们要从这里开始研究,该函数中有这样的代码块
// Layout end.
setLayoutStateDirection(LayoutState.LAYOUT_END);
testNum = 3;
fill(recycler, mLayoutState, state);
// Layout start.
setLayoutStateDirection(LayoutState.LAYOUT_START);
mLayoutState.mCurrentPosition = anchorInfo.mPosition + mLayoutState.mItemDirection;
fill(recycler, mLayoutState, state);
这里有2个fill函数,其实都是填充布局的,只不过第1个是为了做一些边缘检测处理,第二个才是真正的进行填充布局,接下来看看fill函数,StaggeredGridLayoutManager有一个判断某列或行是否还需要进行填充布局的标志mRemainingSpans,fiil函数填充布局的时候就会去对这个标志位做判断和赋值,以便用来加载子View
fill函数起始处会对mRemainingSpans做一个复位,也就是所有的列或行都需要进行添加子View
mRemainingSpans.set(0, mSpanCount, true);接着在while循环中有这样一段代码,主要是用于检测该列或行末尾是否已经达到需要展示的位置,如果达到的话就将该列的标志位置为false,也就不再需要进行添加子View了
if (lp.mFullSpan) {updateAllRemainingSpans(mLayoutState.mLayoutDirection, targetLine);
} else {updateSpanNum = 1;updateRemainingSpans(currentSpan, mLayoutState.mLayoutDirection, targetLine);
}
private void updateRemainingSpans(StaggeredGridLayoutManager.Span span, int layoutDir, int targetLine) {final int deletedSize = span.getDeletedSize();final int line;if (layoutDir == LayoutState.LAYOUT_START) {line = span.getStartLine();if (line + deletedSize <= targetLine) {mRemainingSpans.set(span.mIndex, false);}} else {line = span.getEndLine();if (line - deletedSize >= targetLine) {mRemainingSpans.set(span.mIndex, false);}}
}知道了填充布局的原理,那么我们就添加多一个BitSet标志位来使mRemainingSpans延迟置位,以达到多填充一层子View的目的
定义一个全局BitSet
/*** 增加一个延迟置位的标志,使其每列/行能添加多一个View */
private BitSet mDelayFlagSpans;
在setSpanCount(int spanCount)函数进行初始化
public void setSpanCount(int spanCount) {...mRemainingSpans = new BitSet(mSpanCount);mDelayFlagSpans = new BitSet(mSpanCount);...
}
接着在fill函数起始处添加置位标志
mRemainingSpans.set(0, mSpanCount, true);
mDelayFlagSpans.set(0, mSpanCount, true);
在updateRemainingSpans函数中对mRemainingSpans做延迟操作
private void updateRemainingSpans(StaggeredGridLayoutManager.Span span, int layoutDir, int targetLine) {final int deletedSize = span.getDeletedSize();final int line;if (layoutDir == LayoutState.LAYOUT_START) {line = span.getStartLine();if (line + deletedSize <= targetLine) {if (mDelayFlagSpans.get(span.mIndex)) {mDelayFlagSpans.set(span.mIndex, false);} else {mRemainingSpans.set(span.mIndex, false);}}} else {line = span.getEndLine();if (line - deletedSize >= targetLine) {if (mDelayFlagSpans.get(span.mIndex)) {mDelayFlagSpans.set(span.mIndex, false);} else {mRemainingSpans.set(span.mIndex, false);}}}
}
到这里差不多了,我们可以运行了,但是通过打印发现当一滚动的时候position会一下子多加载了几十个,这样的结果我们是不能接受的,既然一滚动就会多加载,那么肯定是在滚动的时候会调用到fill函数,果不其然,在scrollBy函数中调用到了fill函数
int scrollBy(int dt, EPGRecyclerView.Recycler recycler, EPGRecyclerView.State state) {...int consumed = fill(recycler, mLayoutState, state);...
}
由于scrollBy函数会调用很多次,所以会额外加载了更多的子View,所以我们不能在fill函数里面对mDelayFlagSpans做复位操作,通过对代码的研究,我发现在3处地方加入mDelayFlagSpans的复位操作比较好,第1,2处是在onLayoutChild函数
// Layout end.
setLayoutStateDirection(LayoutState.LAYOUT_END);
mDelayFlagSpans.set(0, mSpanCount, true);
fill(recycler, mLayoutState, state);
// Layout start.
setLayoutStateDirection(LayoutState.LAYOUT_START);
mLayoutState.mCurrentPosition = anchorInfo.mPosition + mLayoutState.mItemDirection;
testNum = 4;
mDelayFlagSpans.set(0, mSpanCount, true);
fill(recycler, mLayoutState, state);
一开始布局的时候我们可以对mDelayFlagSpans进行复位,后面滚动的时候是不会在调用到此段代码,第3处是在RecyclerView的dispatchKeyEvent函数对按键做一下判断,并在StaggeredGridLayoutManager中加个对mDelayFlagSpans的复位函数以便在RecyclerView中调用
@Override
public boolean dispatchKeyEvent(KeyEvent event) {int keyCode = event.getKeyCode();// 这里只考虑水平移动的情况(垂直移动相同的解决方案)if (keyCode == KeyEvent.KEYCODE_DPAD_LEFT || keyCode == KeyEvent.KEYCODE_DPAD_RIGHT) {if (event.getAction() == KeyEvent.ACTION_DOWN) {if(getLayoutManager() instanceof StaggeredGridLayoutManager){StaggeredGridLayoutManager staggeredGridLayoutManager = (StaggeredGridLayoutManager)getLayoutManager();staggeredGridLayoutManager.resetDelayFlagSpans();}}}return super.dispatchKeyEvent(event);
}
StaggeredGridLayoutManager增加函数
public void resetDelayFlagSpans(){mDelayFlagSpans.set(0, mSpanCount, true);
}
到这里,我们已经基本完成了对StaggeredGridLayoutManager的修改,这里的修改只适合屏幕不做横竖屏切换的情况,因为去除了判断间隙,所以横竖屏切换会出现间隙
这篇关于RecyclerView自定义StaggeredGridLayoutManager实现EPG布局的文章就介绍到这儿,希望我们推荐的文章对编程师们有所帮助!


