本文主要是介绍ffmpeg用examples转码mp4视频duration加倍,希望对大家解决编程问题提供一定的参考价值,需要的开发者们随着小编来一起学习吧!
前言
最近在使用ijkplayer开发播放器时,发现部分视频下载到本地后,拖动播放出画面的时间较长,大概1-2s,查明原因是此类mp4文件的视频gop较大,通常gop>=250,帧率25fps的话,即每隔10s才1个IDR帧。
而精准seek需要先seek到最近的IDR帧,然后逐帧解码后再与seek_timestamp做比对,若pts <seek_timestamp,则会丢弃解码后的音视频帧。这个操作在gop>=250时耗时较久,这即是本地mp4视频拖动播放时出现顿了1-2s左右,才出画面的原因。
因此,拟用ffmpeg开发一个转码工具,将mp4文件的gop缩短,输出转码后的mp4文件。
问题
在用ffmpeg开发转码mp4功能时,用ffprobe和mediainfo工具查看,转码后的mp4文件video的duration加倍,而video的fps减半。
转码前的mp4文件:
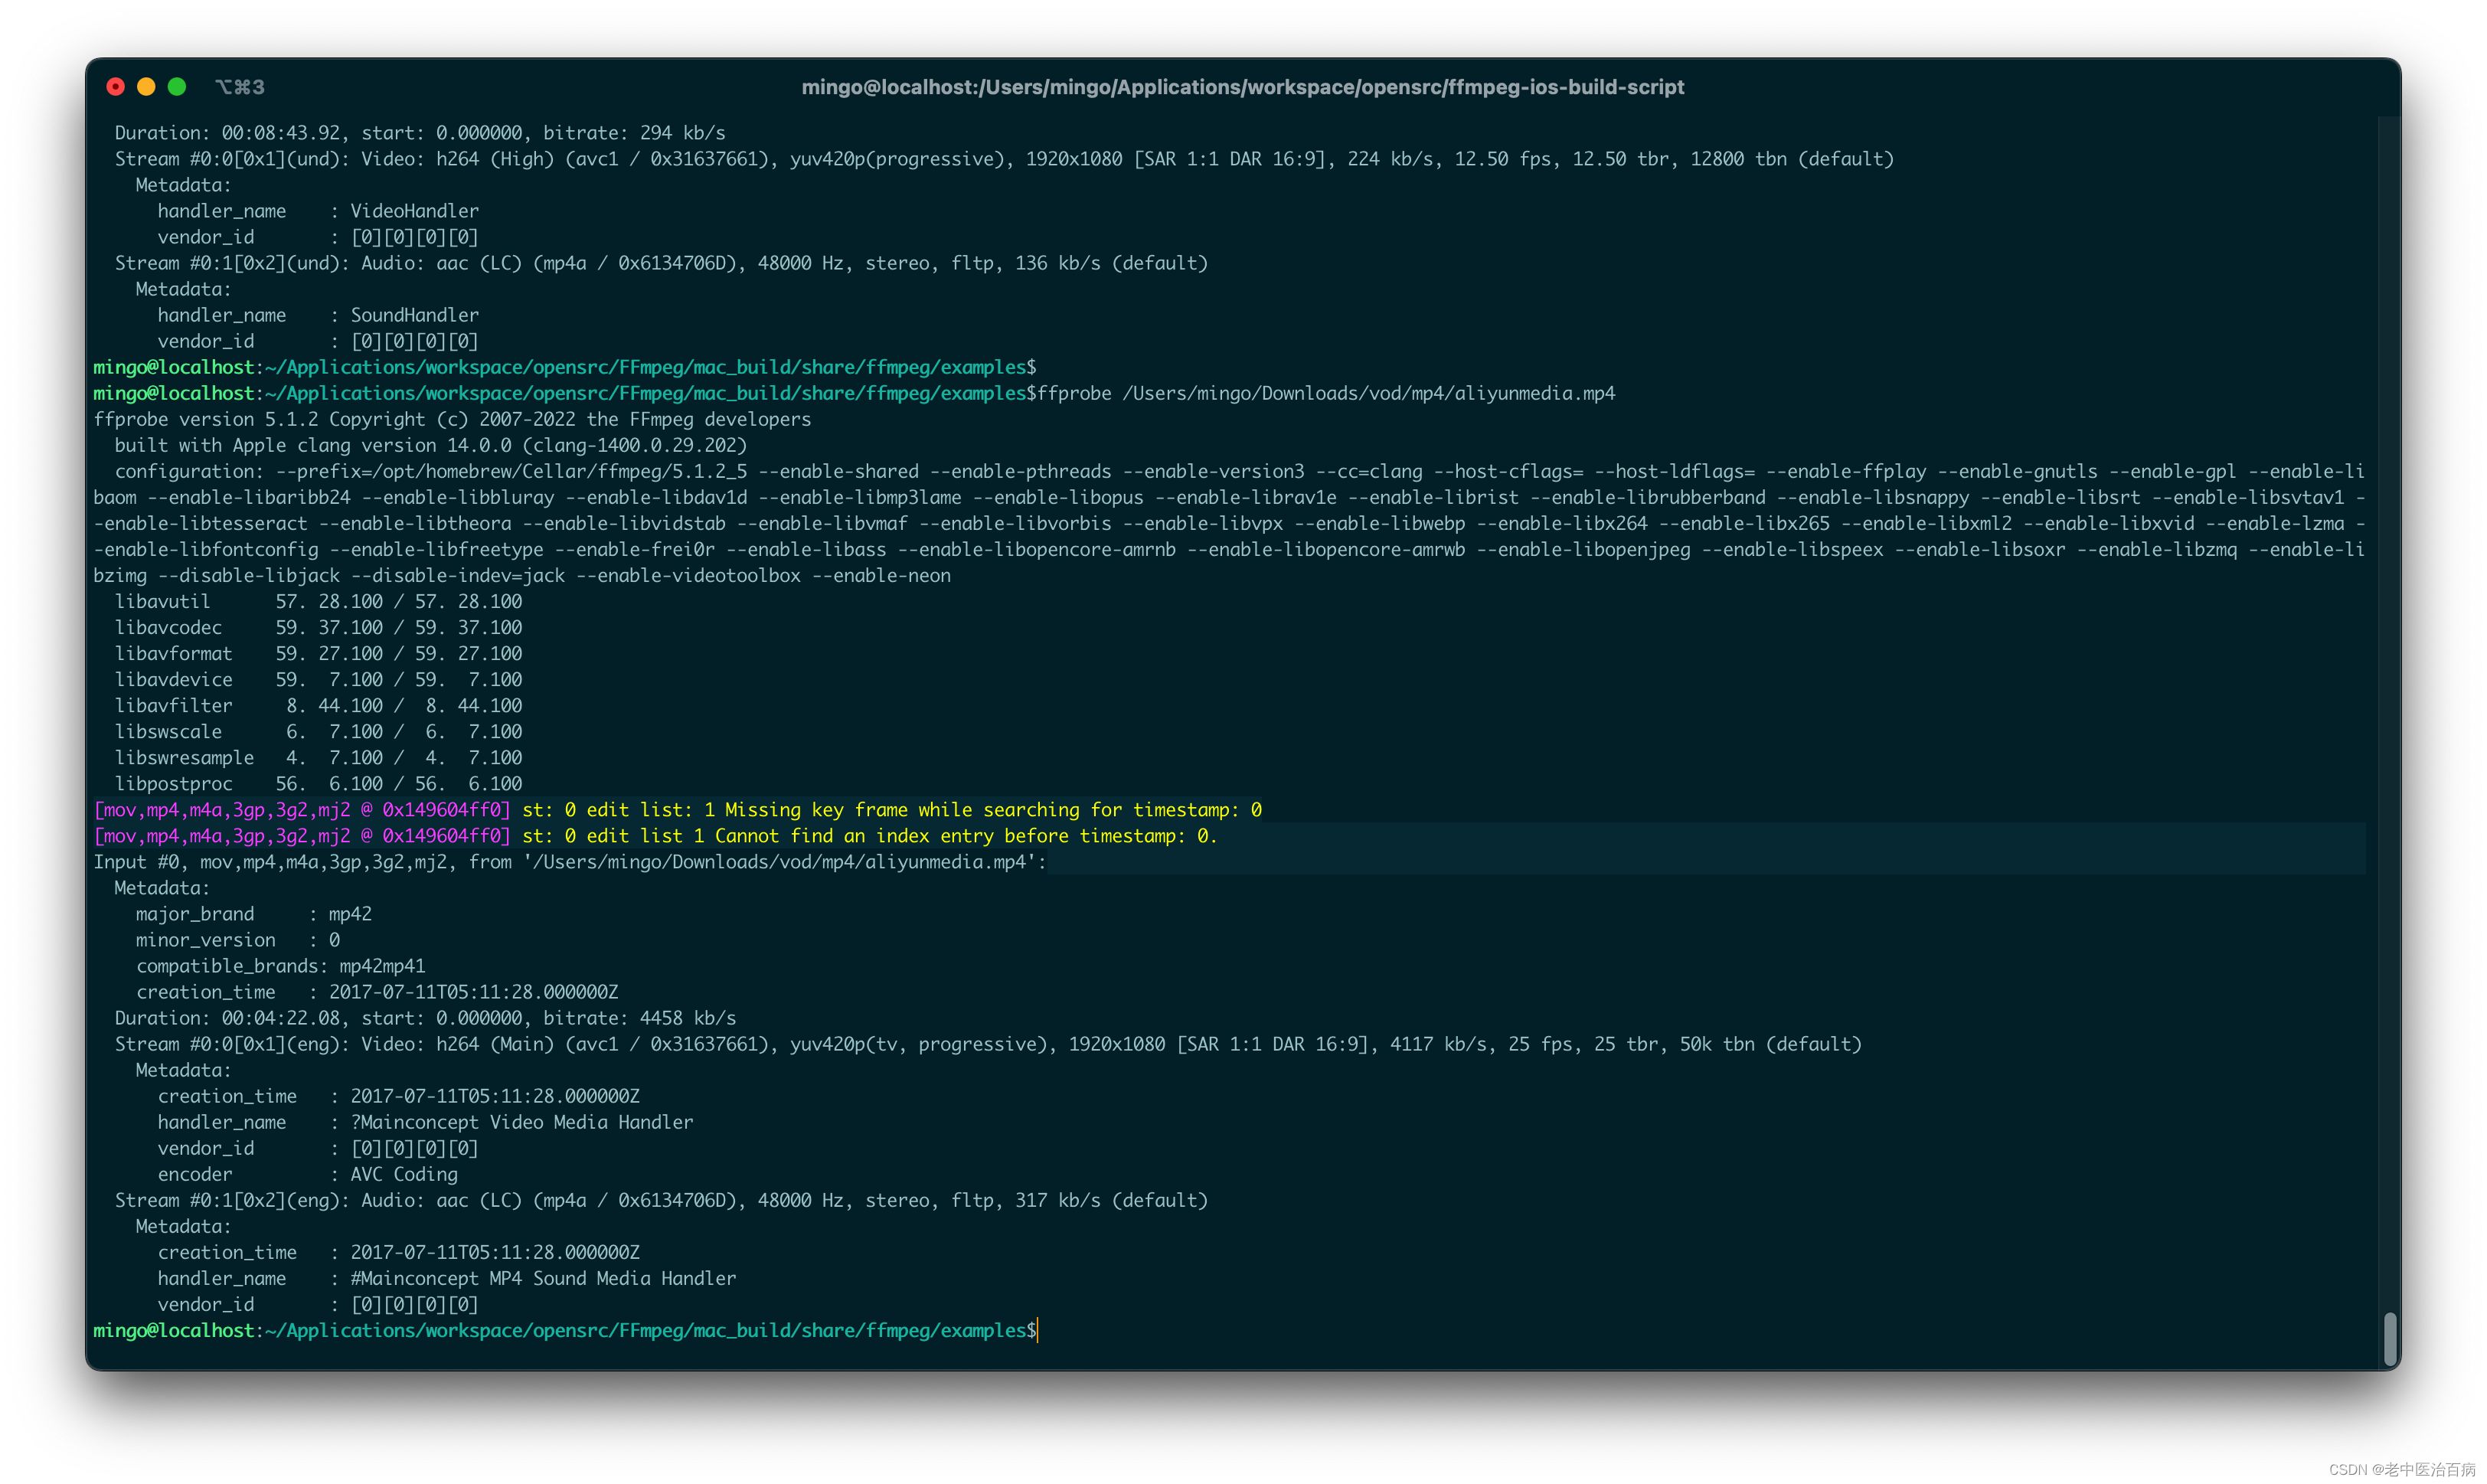
转码后的mp4文件:
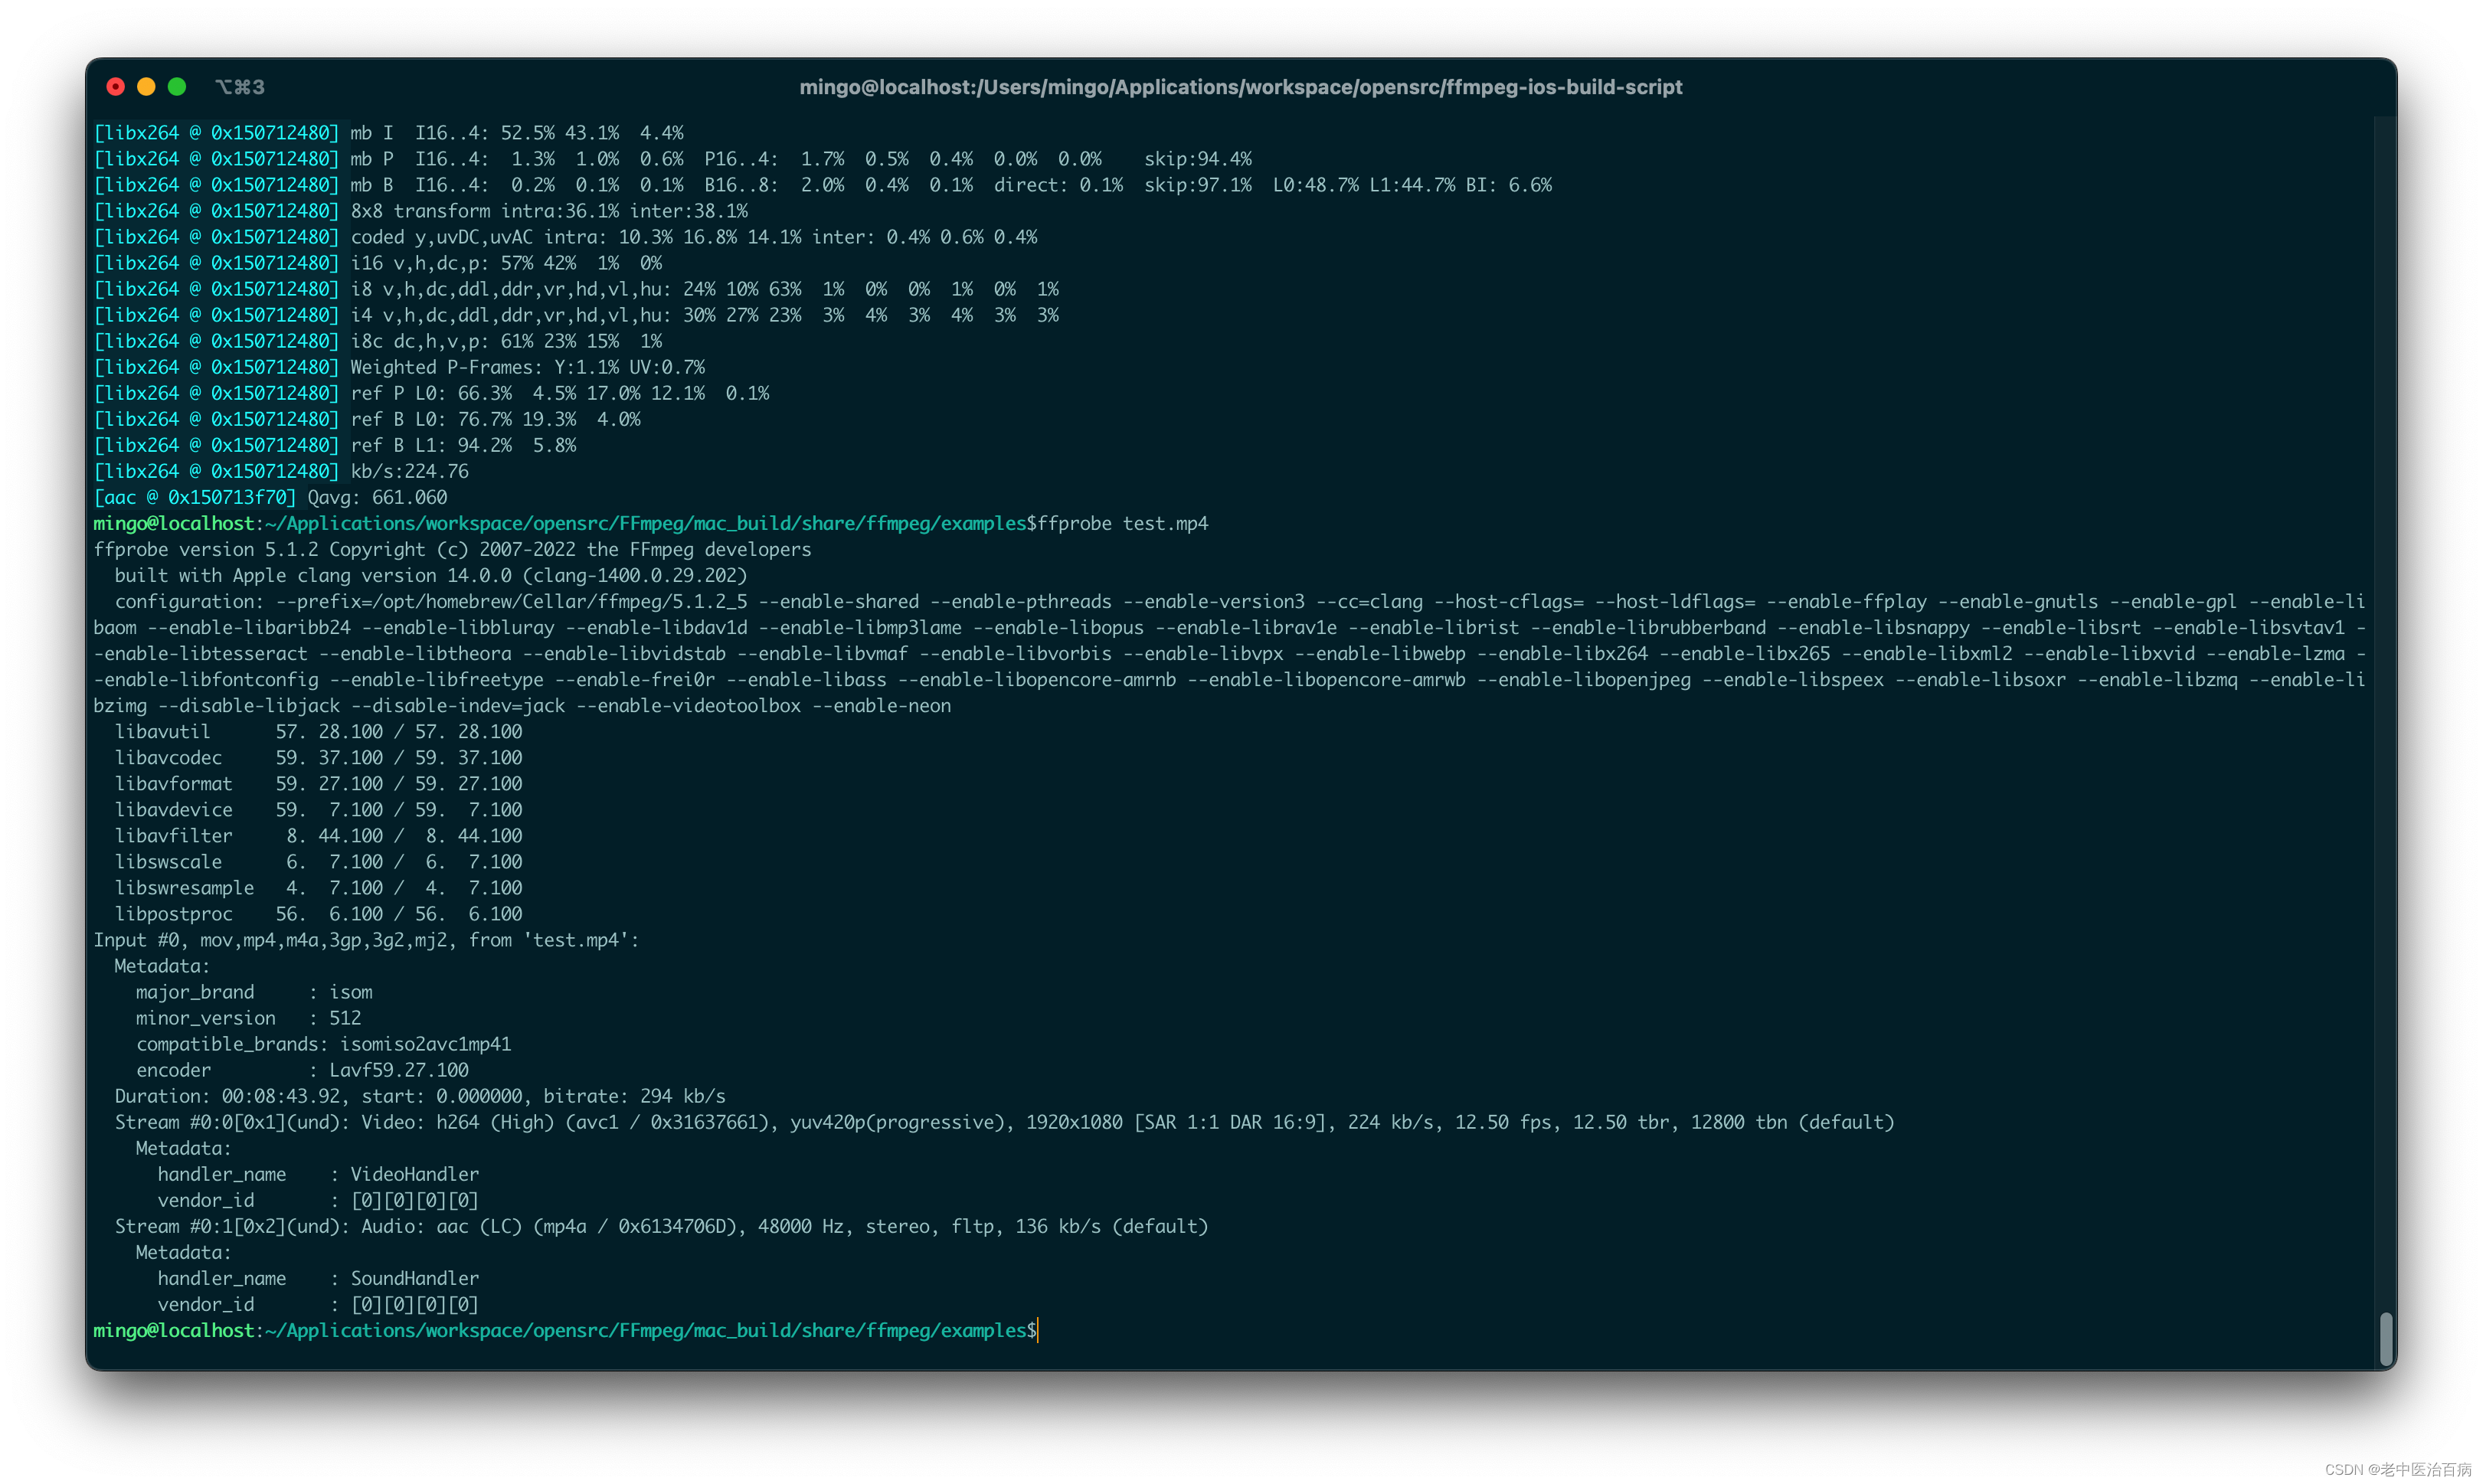
可以看到,转码后mp4文件的duration加倍了。进一步用mediainfo工具查看:
这是转码前的mp4文件媒体参数信息:
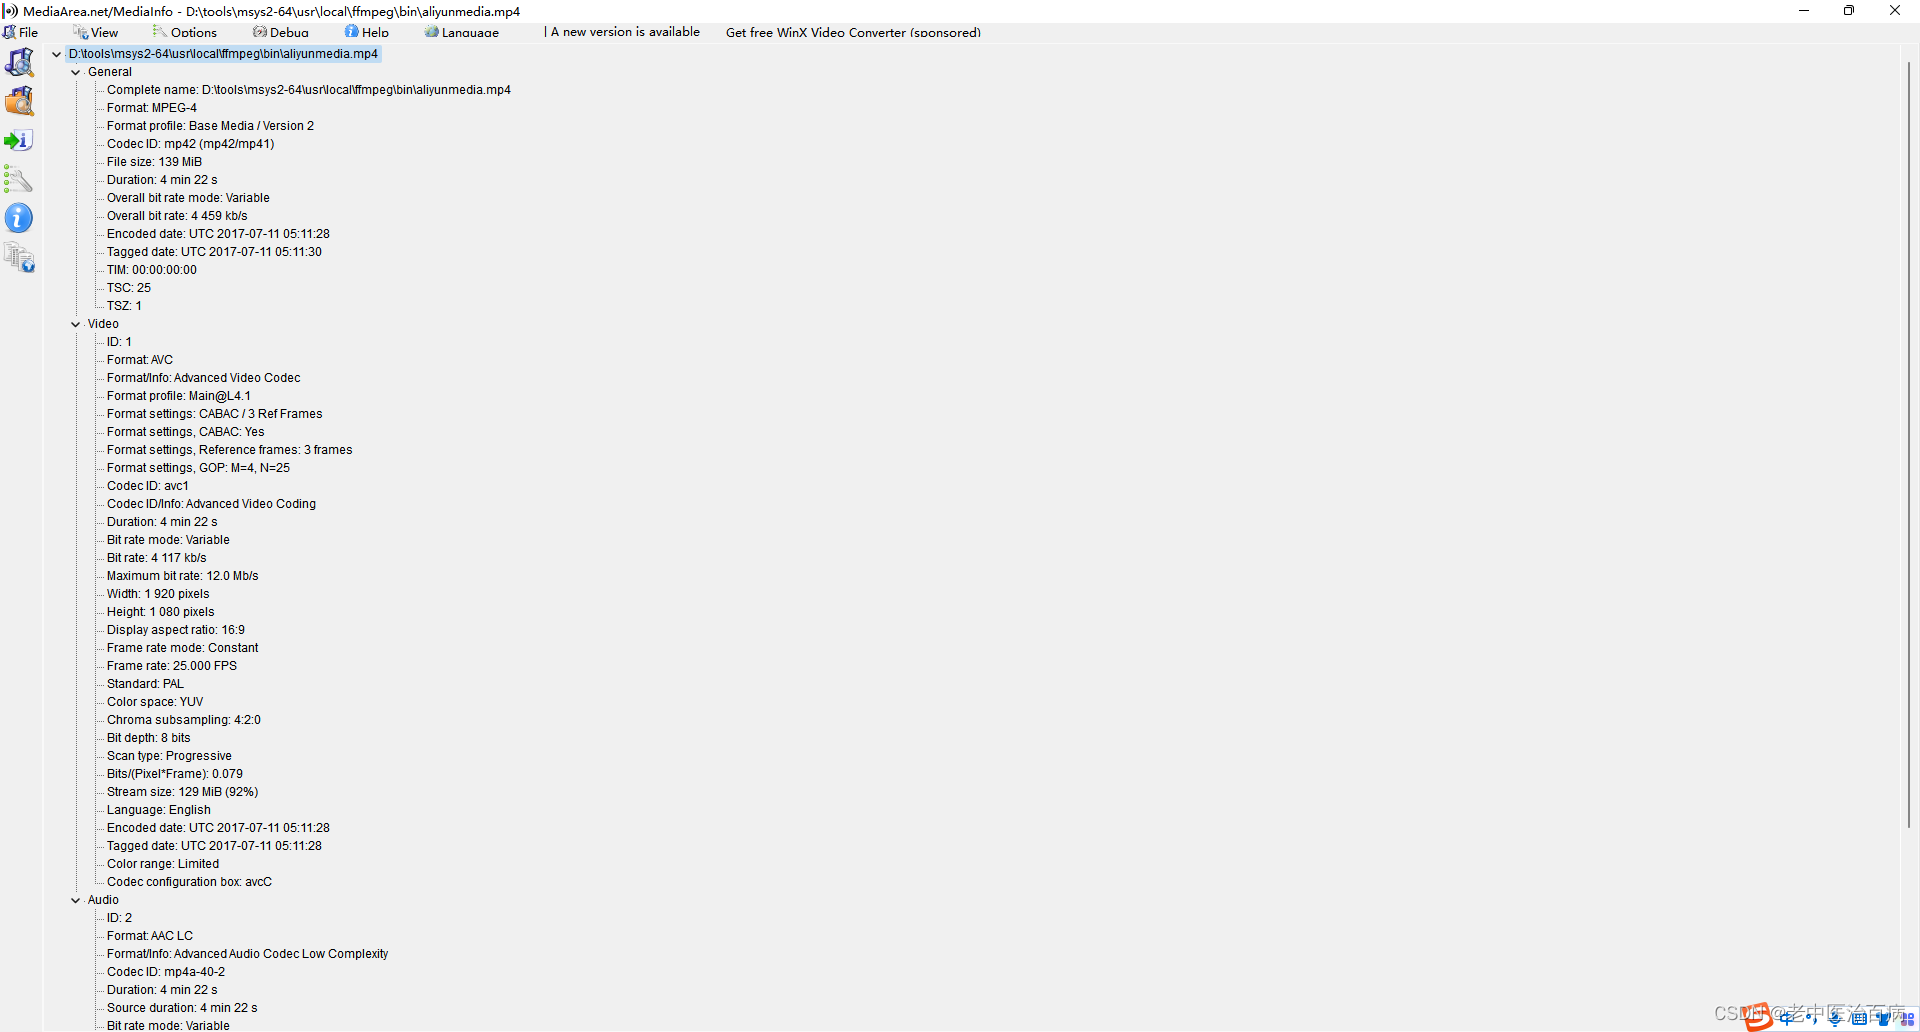
这是转码后的mp4文件媒体参数信息:

进一步分析发现,是由于转码后video的duration加倍,导致转码后mp4文件的duration加倍。
原因
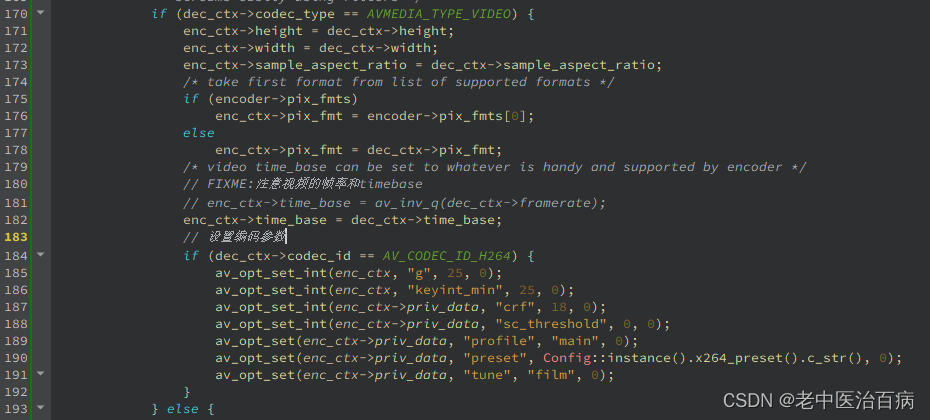
为了查明原因,特意在 encodeWriteFrame 方法里,增加了对encode之后AVPacket的打印,主要是pts/dts/duration,以及帧率,发现这些参数明显不对,怀疑是timebase设置出了问题。果然在排查 openOutputFile 方法里的encode参数设置时,发现是将decode的framerate(1/25,而time_base为1/50,刚好2倍)设置给了encode的timebase。并且也没有设置 video_track_timescale 选项。
解决之法
原因明了之后,解决办法就比较容易了,将video的encode参数timebase设置为decode参数timebase,即enc_ctx->time_base = dec_ctx->time_base:
并设置视频的 video_track_timescale 时间基刻度,通常视频是90000,这里以实际为准,通过变量video_sample_传递:
/* init muxer, write output file header */AVDictionary *format_opts = NULL;// moving the moov atom to the beginning of the fileav_dict_set(&format_opts, "movflags", "+faststart", 0);// 计算video的时间刻度,重要!av_dict_set_int(&format_opts, "video_track_timescale", video_sample_, 0);ret = avformat_write_header(ofmt_ctx_, &format_opts);if (ret < 0) {av_log(NULL, AV_LOG_ERROR, "Error occurred when opening output file\n");return ret;}最后,将编码后的AVPacket的video duration设置一下,即 enc_pkt.duration = video_sample_ / video_fps_:
int SingleSlice::encodeWriteFrame(AVFrame *filt_frame, unsigned int stream_index, int *got_frame)
{int ret;int got_frame_local;AVPacket enc_pkt;int (*enc_func)(AVCodecContext *, AVPacket *, const AVFrame *, int *) =(ifmt_ctx_->streams[stream_index]->codecpar->codec_type ==AVMEDIA_TYPE_VIDEO) ? avcodec_encode_video2 : avcodec_encode_audio2;if (!got_frame)got_frame = &got_frame_local;av_log(NULL, AV_LOG_INFO, "Encoding frame\n");/* encode filtered frame */enc_pkt.data = NULL;enc_pkt.size = 0;av_init_packet(&enc_pkt);ret = enc_func(stream_ctx_[stream_index].enc_ctx, &enc_pkt,filt_frame, got_frame);av_frame_free(&filt_frame);if (ret < 0)return ret;if (!(*got_frame))return 0;/* prepare packet for muxing */enc_pkt.stream_index = stream_index;av_packet_rescale_ts(&enc_pkt,stream_ctx_[stream_index].enc_ctx->time_base,ofmt_ctx_->streams[stream_index]->time_base);if (enc_pkt.stream_index == AVMEDIA_TYPE_VIDEO) {enc_pkt.duration = video_sample_ / video_fps_;av_log(NULL, AV_LOG_INFO, "encode video stream_index=%d,duration=%" PRId64 ",framerate=%d,pts=%" PRId64 ",dts=%" PRId64 "\n",stream_index,enc_pkt.duration, video_fps_,enc_pkt.pts,enc_pkt.dts);}/* mux encoded frame */ret = av_interleaved_write_frame(ofmt_ctx_, &enc_pkt);return ret;
}
这里是较为完整的代码:
int SingleSlice::openOutputFile(const char *filename)
{AVStream *out_stream;AVStream *in_stream;AVCodecContext *dec_ctx, *enc_ctx;AVCodec *encoder;int ret;int i;ofmt_ctx_ = NULL;avformat_alloc_output_context2(&ofmt_ctx_, NULL, NULL, filename);if (!ofmt_ctx_) {av_log(NULL, AV_LOG_ERROR, "Could not create output context\n");return AVERROR_UNKNOWN;}for (i = 0; i < ifmt_ctx_->nb_streams; i++) {dec_ctx = stream_ctx_[i].dec_ctx;if (dec_ctx == NULL) {break;}out_stream = avformat_new_stream(ofmt_ctx_, NULL);if (!out_stream) {av_log(NULL, AV_LOG_ERROR, "Failed allocating output stream\n");return AVERROR_UNKNOWN;}in_stream = ifmt_ctx_->streams[i];//dec_ctx = stream_ctx_[i].dec_ctx;if (dec_ctx->codec_type == AVMEDIA_TYPE_VIDEO|| dec_ctx->codec_type == AVMEDIA_TYPE_AUDIO) {/* in this example, we choose transcoding to same codec */encoder = avcodec_find_encoder(dec_ctx->codec_id);if (!encoder) {av_log(NULL, AV_LOG_FATAL, "Necessary encoder not found\n");return AVERROR_INVALIDDATA;}enc_ctx = avcodec_alloc_context3(encoder);if (!enc_ctx) {av_log(NULL, AV_LOG_FATAL, "Failed to allocate the encoder context\n");return AVERROR(ENOMEM);}/* In this example, we transcode to same properties (picture size,* sample rate etc.). These properties can be changed for output* streams easily using filters */if (dec_ctx->codec_type == AVMEDIA_TYPE_VIDEO) {enc_ctx->height = dec_ctx->height;enc_ctx->width = dec_ctx->width;enc_ctx->sample_aspect_ratio = dec_ctx->sample_aspect_ratio;/* take first format from list of supported formats */if (encoder->pix_fmts)enc_ctx->pix_fmt = encoder->pix_fmts[0];elseenc_ctx->pix_fmt = dec_ctx->pix_fmt;/* video time_base can be set to whatever is handy and supported by encoder */// FIXME:注意视频的帧率和timebase// enc_ctx->time_base = av_inv_q(dec_ctx->framerate);enc_ctx->time_base = dec_ctx->time_base;// 设置编码参数if (dec_ctx->codec_id == AV_CODEC_ID_H264) {av_opt_set_int(enc_ctx, "g", 25, 0);av_opt_set_int(enc_ctx, "keyint_min", 25, 0);av_opt_set_int(enc_ctx->priv_data, "crf", 18, 0);av_opt_set_int(enc_ctx->priv_data, "sc_threshold", 0, 0);av_opt_set(enc_ctx->priv_data, "profile", "main", 0);av_opt_set(enc_ctx->priv_data, "preset", Config::instance().x264_preset().c_str(), 0);av_opt_set(enc_ctx->priv_data, "tune", "film", 0);}} else {enc_ctx->sample_rate = dec_ctx->sample_rate;enc_ctx->channel_layout = dec_ctx->channel_layout;enc_ctx->channels = av_get_channel_layout_nb_channels(enc_ctx->channel_layout);/* take first format from list of supported formats */enc_ctx->sample_fmt = encoder->sample_fmts[0];enc_ctx->time_base = {1, enc_ctx->sample_rate};}if (ofmt_ctx_->oformat->flags & AVFMT_GLOBALHEADER)enc_ctx->flags |= AV_CODEC_FLAG_GLOBAL_HEADER;/* Third parameter can be used to pass settings to encoder */ret = avcodec_open2(enc_ctx, encoder, NULL);if (ret < 0) {av_log(NULL, AV_LOG_ERROR, "Cannot open video encoder for stream #%u\n", i);return ret;}ret = avcodec_parameters_from_context(out_stream->codecpar, enc_ctx);if (ret < 0) {av_log(NULL, AV_LOG_ERROR, "Failed to copy encoder parameters to output stream #%u\n", i);return ret;}out_stream->time_base = enc_ctx->time_base;stream_ctx_[i].enc_ctx = enc_ctx;} else if (dec_ctx->codec_type == AVMEDIA_TYPE_UNKNOWN) {av_log(NULL, AV_LOG_FATAL, "Elementary stream #%d is of unknown type, cannot proceed\n", i);return AVERROR_INVALIDDATA;} else {/* if this stream must be remuxed */ret = avcodec_parameters_copy(out_stream->codecpar, in_stream->codecpar);if (ret < 0) {av_log(NULL, AV_LOG_ERROR, "Copying parameters for stream #%u failed\n", i);return ret;}out_stream->time_base = in_stream->time_base;}}av_dump_format(ofmt_ctx_, 0, filename, 1);if (!(ofmt_ctx_->oformat->flags & AVFMT_NOFILE)) {ret = avio_open(&ofmt_ctx_->pb, filename, AVIO_FLAG_WRITE);if (ret < 0) {av_log(NULL, AV_LOG_ERROR, "Could not open output file '%s'", filename);return ret;}}/* init muxer, write output file header */AVDictionary *format_opts = NULL;// moving the moov atom to the beginning of the fileav_dict_set(&format_opts, "movflags", "+faststart", 0);// 计算video的时间刻度,重要!av_dict_set_int(&format_opts, "video_track_timescale", video_sample_, 0);ret = avformat_write_header(ofmt_ctx_, &format_opts);if (ret < 0) {av_log(NULL, AV_LOG_ERROR, "Error occurred when opening output file\n");return ret;}return 0;
}
结果
通过以上方法改了代码之后,编译运行,发现转码后的mp4文件duration与转码前一致:

事情到此,问题算是解决了。
这篇关于ffmpeg用examples转码mp4视频duration加倍的文章就介绍到这儿,希望我们推荐的文章对编程师们有所帮助!


