本文主要是介绍Brian2学习笔记三 Introduction to Brian part 3 :Simulations,希望对大家解决编程问题提供一定的参考价值,需要的开发者们随着小编来一起学习吧!
Brian2学习笔记三 Introduction to Brian part 3 :Simulations
- 1. 前言
- 2、正文
- 1、多次运行(Multiple runs)
- 2、在运行期间改变一些内容(Changing things during a run)
- 3、添加输入(Adding input)
- 3、总结
1. 前言
推荐几个CSDN上不错的类似教程:
1、链接: https://blog.csdn.net/u013751642/article/details/80947005.
2、链接: https://blog.csdn.net/lemonade_117/article/details/81156087.
3、链接: https://blog.csdn.net/xiaoqu001/article/details/80422546#_Tutorial_84.
本文是根据Brian2官网提供的英文教程进行翻译整理总结的。
Brian2的官方安装教程链接:
链接: https://brian2.readthedocs.io/en/stable/introduction/install.html.
官方文档链接及Jupyter notebook学习资料:
链接: https://brian2.readthedocs.io/en/stable/resources/tutorials/3-intro-to-brian-simulations.html.
(注意:本文所有代码运行环境为Anaconda 的 Spyder(python 3.7), 注意运行代码首先要通过如下代码来导入 Brian2的包)

因为前段时间一直在改论文,还有中间各种事情,导致这篇学习笔记一直推到了现在,还是要尽快学完的,话不多说,接下来就进入正文部分。
2、正文
如果你还没有读过第一部分神经元和第二部分突触那就先去读吧,然后再来看这篇学习内容。
这一部分的教程是关于在研究问题中出现的稍微复杂的任务,而不是我们目前看到的简单的示例。所以这里包含了输入传感器数据, 模拟实验环境等等。
1、多次运行(Multiple runs)
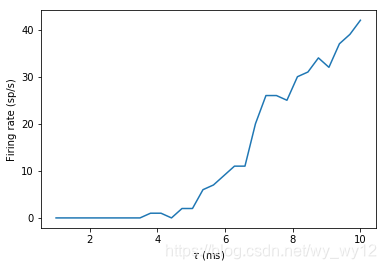
首先,从一个非常常见的任务开始 : 使用某个参数的变化来进行多次模拟运行。让我们从一些非常简单的任务开始,一个由泊松脉冲神经元驱动的IF神经元的放电速率如何随着神经元膜的时间常数的变化而变化?
from brian2 import*
# remember, this is here for running separate simulations in the same notebook
start_scope()
# Parameters
num_inputs = 100
input_rate = 10*Hz
weight = 0.1
# Range of time constants
tau_range = linspace(1, 10, 30)*ms
# Use this list to store output rates
output_rates = []
# Iterate over range of time constants
for tau in tau_range:# Construct the network each timeP = PoissonGroup(num_inputs, rates=input_rate)eqs = '''dv/dt = -v/tau : 1'''G = NeuronGroup(1, eqs, threshold='v>1', reset='v=0', method='exact')S = Synapses(P, G, on_pre='v += weight')S.connect()M = SpikeMonitor(G)# Run it and store the output firing rate in the listrun(1*second)output_rates.append(M.num_spikes/second)
# And plot it
plot(tau_range/ms, output_rates)
xlabel(r'$\tau$ (ms)')
ylabel('Firing rate (sp/s)')

如果你在运行上述代码,你会发现运行速度有点慢。这是因为对于每个循环,都需要重新创建对象。我们可以通过只建立一次网络来改善这一点。我们在循环之前先存储网络状态的副本,并在每次迭代开始时恢复它。
from brian2 import*
start_scope()
# Parameters
num_inputs = 100
input_rate = 10*Hz
weight = 0.1
# Range of time constants
tau_range = linspace(1, 10, 30)*ms  #  30 points between 1 and 10
# Use this list to store output rates
output_rates = []
# Construct the network just once
P = PoissonGroup(num_inputs, rates=input_rate)
eqs = '''
dv/dt = -v/tau : 1
'''
G = NeuronGroup(1, eqs, threshold='v>1', reset='v=0', method='exact')
S = Synapses(P, G, on_pre='v += weight')
S.connect()
M = SpikeMonitor(G)
# Store the current state of the network
store()
for tau in tau_range:# Restore the original state of the networkrestore()# Run it with the new value of taurun(1*second)output_rates.append(M.num_spikes/second)
# And plot it
plot(tau_range/ms, output_rates)
xlabel(r'$\tau$ (ms)')
ylabel('Firing rate (sp/s)')

这是一个非常简单的使用存储(store)和恢复(restore)的例子,但是可以在更复杂的情况下使用它。比如,您可能希望运行一个长时间的训练,然后进行多次的测试运行。最简单的方法就是只需在长时间的训练结束之后放置一个存储,并在每次测试运行之前进行恢复。
可以看出输出曲线非常的嘈杂,并不像我们期望的那样单调递增。实际上,这些噪声来自于我们每次重新运行泊松神经元组。如果我们只想看到时间常数的影响,我们可以确保神经元的每次峰值都是相同的(尽管请注意,实际上您应该多次运行并取平均值)。为了方便,我们只运行一次泊松神经元组,然后记录它的峰值,最后再创建一个新的SpikeGeneratorGroup,来记录每次输出的峰值。
from brian2 import *
start_scope()
num_inputs = 100
input_rate = 10*Hz
weight = 0.1
tau_range = linspace(1, 10, 30)*ms
output_rates = []
# Construct the Poisson spikes just once
P = PoissonGroup(num_inputs, rates=input_rate)
MP = SpikeMonitor(P)
# We use a Network object because later on we don't
# want to include these objects
net = Network(P, MP)
net.run(1*second)
# And keep a copy of those spikes
spikes_i = MP.i
spikes_t = MP.t
# Now construct the network that we run each time
# SpikeGeneratorGroup gets the spikes that we created before
SGG = SpikeGeneratorGroup(num_inputs, spikes_i, spikes_t)
eqs = '''
dv/dt = -v/tau : 1
'''
G = NeuronGroup(1, eqs, threshold='v>1', reset='v=0', method='exact')
S = Synapses(SGG, G, on_pre='v += weight')
S.connect()
M = SpikeMonitor(G)
# Store the current state of the network
net = Network(SGG, G, S, M)
net.store()
for tau in tau_range:# Restore the original state of the networknet.restore()# Run it with the new value of taunet.run(1*second)output_rates.append(M.num_spikes/second)
plot(tau_range/ms, output_rates)
xlabel(r'$\tau$ (ms)')
ylabel('Firing rate (sp/s)')

从上面的结果中可以看出,现在的噪声比之更小,是单并且单调递增的。因为每次输入的脉冲都是一样的,这意味着我们看到的是时间常数的作用,而不是随机的脉冲。
请注意,在上面的代码中,我们创建了Network对象。因为在循环中,如果我们只是调用run,它会尝试模拟所有的对象,包括泊松神经元P,但是我们只想运行一次。所以我们使用Network来明确指定我们想要包含的对象。
到目前为止,我们用到的技术只是概念上最简单的多次进行的方法,但它们并不总是最有效的。由于上面的模型中只有一个输出神经元,所以我们可以简单的复制输出神经元并将时间常数设为这个神经元组的一个参数
from brian2 import *
start_scope()
num_inputs = 100
input_rate = 10*Hz
weight = 0.1
tau_range = linspace(1, 10, 30)*ms
num_tau = len(tau_range)
P = PoissonGroup(num_inputs, rates=input_rate)
# We make tau a parameter of the group
eqs = '''
dv/dt = -v/tau : 1
tau : second
'''
# And we have num_tau output neurons, each with a different tau
G = NeuronGroup(num_tau, eqs, threshold='v>1', reset='v=0', method='exact')
G.tau = tau_range
S = Synapses(P, G, on_pre='v += weight')
S.connect()
M = SpikeMonitor(G)
# Now we can just run once with no loop
run(1*second)
output_rates = M.count/second # firing rate is count/duration
plot(tau_range/ms, output_rates)
xlabel(r'$\tau$ (ms)')
ylabel('Firing rate (sp/s)')

可以看出,这次程序运行的速度快了很多。虽然在概念上更加复杂了,但是如果可以实现的话,它会更加高效。
接下来,我们看一下interspike之间的间隔时间的均值和标准差与时间常数之间的关系。
from brian2 import *
start_scope()
num_inputs = 100
input_rate = 10*Hz
weight = 0.1
tau_range = linspace(1, 10, 30)*ms
num_tau = len(tau_range)
P = PoissonGroup(num_inputs, rates=input_rate)
# We make tau a parameter of the group
eqs = '''
dv/dt = -v/tau : 1
tau
这篇关于Brian2学习笔记三 Introduction to Brian part 3 :Simulations的文章就介绍到这儿,希望我们推荐的文章对编程师们有所帮助!


