本文主要是介绍Spring注解扫描:ComponentScan使用及原理详解,希望对大家解决编程问题提供一定的参考价值,需要的开发者们随着小编来一起学习吧!
1.概述
当下Spring Boot之所以能成为主流首选开发框架,得益于其核心思想:约定大于配置和Spring提供的基于注解配置式开发,解决了繁琐的XML文件配置问题,大大提高了开发效率。基于Spring MVC三层架构框架开发的项目中大量用到@Controller, @Service...等注解,即使这些类在不同包路径下,都能被注入到Spring容器中,然后可以相互之间进行依赖注入、使用。这时候就有一个问题了:Spring是如何将声明了@Component注解的Bean注入到Spring容器当中的呢?怎么做到bean的类定义可以随意写在不同包路径下?答案就是今天的主角@ComponentScan,该注解告诉Spring扫描那些包路径下的类,然后判断如果类使用了@Component,@Controller, @Service...等注解,就注入到Spring容器中。
之前我们讲过一个注解@Component,它就是声明当前类是一个bean组件,那@ComponentScan注解顾名思义就是扫描声明了@Component注解的类,然后注入到Spring容器中的。这时候你可能会问@Controller, @Service...等注解为什么也会被扫描、注入到Spring容器中。
接下来我们就看看这些注解@Controller, @Service, @Repository和@Component的关系,从这些注解的定义上来看都声明了@Component,所以都是@Component衍生注解,其作用及属性和@Component是一样,只不过是提供了更加明确的语义化,是spring框架为我们提供明确的三层使用的注解,使我们的三层对象更加清晰
- @Controller:一般用于表现层的注解。
- @Service:一般用于业务层的注解。
- @Repository:一般用于持久层的注解。
- @RestController:是@Controller的衍生注解,主要用于前后端分离,接口返回JSON格式数据的表现层注解
项目推荐:基于SpringBoot2.x、SpringCloud和SpringCloudAlibaba企业级系统架构底层框架封装,解决业务开发时常见的非功能性需求,防止重复造轮子,方便业务快速开发和企业技术栈框架统一管理。引入组件化的思想实现高内聚低耦合并且高度可配置化,做到可插拔。严格控制包依赖和统一版本管理,做到最少化依赖。注重代码规范和注释,非常适合个人学习和企业使用
Github地址:https://github.com/plasticene/plasticene-boot-starter-parent
Gitee地址:https://gitee.com/plasticene3/plasticene-boot-starter-parent
微信公众号:Shepherd进阶笔记
接下来我们就来讲讲@ComponentScan的使用和底层实现。
2.@ComponentScan的使用
在讲述@ComponentScan使用之前先来看看定义:
@Retention(RetentionPolicy.RUNTIME)
@Target(ElementType.TYPE)
@Documented
@Repeatable(ComponentScans.class)//可重复注解
public @interface ComponentScan {@AliasFor("basePackages")String[] value() default {};//基础包名,等同于basePackages@AliasFor("value")String[] basePackages() default {};//基础包名,valueClass<?>[] basePackageClasses() default {};//扫描的类,会扫描该类所在包及其子包的组件。Class<? extends BeanNameGenerator> nameGenerator() default BeanNameGenerator.class;//注册为BeanName生成策略 默认BeanNameGenerator,用于给扫描到的Bean生成BeanNameClass<? extends ScopeMetadataResolver> scopeResolver() default AnnotationScopeMetadataResolver.class;//用于解析bean的scope的属性的解析器,默认是AnnotationScopeMetadataResolverScopedProxyMode scopedProxy() default ScopedProxyMode.DEFAULT;//scoped-proxy 用来配置代理方式 // no(默认值):如果有接口就使用JDK代理,如果没有接口就使用CGLib代理 interfaces: 接口代理(JDK代理) targetClass:类代理(CGLib代理)String resourcePattern() default ClassPathScanningCandidateComponentProvider.DEFAULT_RESOURCE_PATTERN;//配置要扫描的资源的正则表达式的,默认是"**/*.class",即配置类包下的所有class文件。boolean useDefaultFilters() default true;//useDefaultFilters默认是true,扫描带有@Component ro @Repository ro @Service ro @Controller 的组件Filter[] includeFilters() default {};//包含过滤器Filter[] excludeFilters() default {};//排除过滤器boolean lazyInit() default false;//是否是懒加载@Retention(RetentionPolicy.RUNTIME)@Target({})@interface Filter {//过滤器注解FilterType type() default FilterType.ANNOTATION;//过滤判断类型@AliasFor("classes")Class<?>[] value() default {};//要过滤的类,等同于classes@AliasFor("value")Class<?>[] classes() default {};//要过滤的类,等同于valueString[] pattern() default {};// 正则化匹配过滤}}从定义来看,比起之前讲的@Import注解相对有点复杂,但是不用过于担心,其大部分属性使用默认即可,我们一般只需要配置一下basePackages属性指定包扫描路径即可。
下面我们来看看如何使用,我在包路径下com.shepherd.common.bean下定义如下类:
@Component
public class Coo {
}@Repository
public class Doo {
}@Service
public class Eoo {
}@RestController
public class Foo {
}
然后在另一个包路径com.shepherd.common.bean1下再定义一个类:
@Component
public class Goo {
}
最后声明一个类,使用ComponentScan注解进行包扫描:
@ComponentScan("com.shepherd.common.bean")
public class MyConfig {public static void main(String[] args) {AnnotationConfigApplicationContext applicationContext = new AnnotationConfigApplicationContext(MyConfig.class);String[] beanDefinitionNames = applicationContext.getBeanDefinitionNames();// 遍历Spring容器中的beanNamefor (String beanDefinitionName : beanDefinitionNames) {System.out.println(beanDefinitionName);}}}
执行结果如下:
myConfig
coo
doo
eoo
foo
我们发现Goo没有注入到Spring容器中,因为我们扫描的包路径是com.shepherd.common.bean,但是它在com.shepherd.common.bean1
下,所以没有被扫描到,要想被扫描到只需要指定扫描包添加路径com.shepherd.common.bean1即可
@ComponentScan(basePackages = {"com.shepherd.common.bean", "com.shepherd.common.bean1"})
public class MyConfig {public static void main(String[] args) {AnnotationConfigApplicationContext applicationContext = new AnnotationConfigApplicationContext(MyConfig.class);String[] beanDefinitionNames = applicationContext.getBeanDefinitionNames();// 遍历Spring容器中的beanNamefor (String beanDefinitionName : beanDefinitionNames) {System.out.println(beanDefinitionName);}}
}
执行结果如下:
myConfig
coo
doo
eoo
foo
goo
可以看到Goo被成功扫描、注入到Spring容器中了。
从上面@ComponentScan定义看到声明了@Repeatable(ComponentScans.class),意味着该注解可以在同一个类中多次使用,这时候我想着使用两次分别指定不同的包扫描路径,解决前面Goo没有被扫描到的问题,下面的@ComponentScan多次使用等价于 @ComponentScans({@ComponentScan("com.shepherd.common.bean"), @ComponentScan("com.shepherd.common.bean1")}),代码如下:
@ComponentScan("com.shepherd.common.bean")
@ComponentScan("com.shepherd.common.bean1")
public class MyConfig {public static void main(String[] args) {AnnotationConfigApplicationContext applicationContext = new AnnotationConfigApplicationContext(MyConfig.class);String[] beanDefinitionNames = applicationContext.getBeanDefinitionNames();// 遍历Spring容器中的beanNamefor (String beanDefinitionName : beanDefinitionNames) {System.out.println(beanDefinitionName);}}
}
执行结果如下:
myConfig
这时候惊奇发现指定的包路径下类都没有被扫描注入,很是纳闷不知道问题出在哪里,只能debug调试了,你会发现又来到配置后置处理器ConfigurationClassPostProcessor的#processConfigBeanDefinitions()方法,这个方法会先判断有没有配置类,没有的话不再做后续的注解解析。
public void processConfigBeanDefinitions(BeanDefinitionRegistry registry) {List<BeanDefinitionHolder> configCandidates = new ArrayList<>();String[] candidateNames = registry.getBeanDefinitionNames();for (String beanName : candidateNames) {BeanDefinition beanDef = registry.getBeanDefinition(beanName);if (beanDef.getAttribute(ConfigurationClassUtils.CONFIGURATION_CLASS_ATTRIBUTE) != null) {if (logger.isDebugEnabled()) {logger.debug("Bean definition has already been processed as a configuration class: " + beanDef);}}// 判断当前bean(这里就是上面的定义的MyConfig类)是不是配置类,是的话加入配置类候选集合else if (ConfigurationClassUtils.checkConfigurationClassCandidate(beanDef, this.metadataReaderFactory)) {configCandidates.add(new BeanDefinitionHolder(beanDef, beanName));}}// Return immediately if no @Configuration classes were found// 配置类集合为空,直接返回,不在做后续的相关注解解析if (configCandidates.isEmpty()) {return;}......}
进入到ConfigurationClassUtils.checkConfigurationClassCandidate(beanDef, this.metadataReaderFactory)方法,核心逻辑如下:
Map<String, Object> config = metadata.getAnnotationAttributes(Configuration.class.getName());if (config != null && !Boolean.FALSE.equals(config.get("proxyBeanMethods"))) {beanDef.setAttribute(CONFIGURATION_CLASS_ATTRIBUTE, CONFIGURATION_CLASS_FULL);}else if (config != null || isConfigurationCandidate(metadata)) {beanDef.setAttribute(CONFIGURATION_CLASS_ATTRIBUTE, CONFIGURATION_CLASS_LITE);}else {return false;}这里判断当前是不是配置类,是配置类还分是FULL模式或LITE模式,两种模式的区别之前我们总结过,请查看 @Configuration 和 @Component区别于实现原理,上面定义的MyConfig没有用@Configuration注解,所以config是null,所以接下来会进入到方法isConfigurationCandidate(metadata)
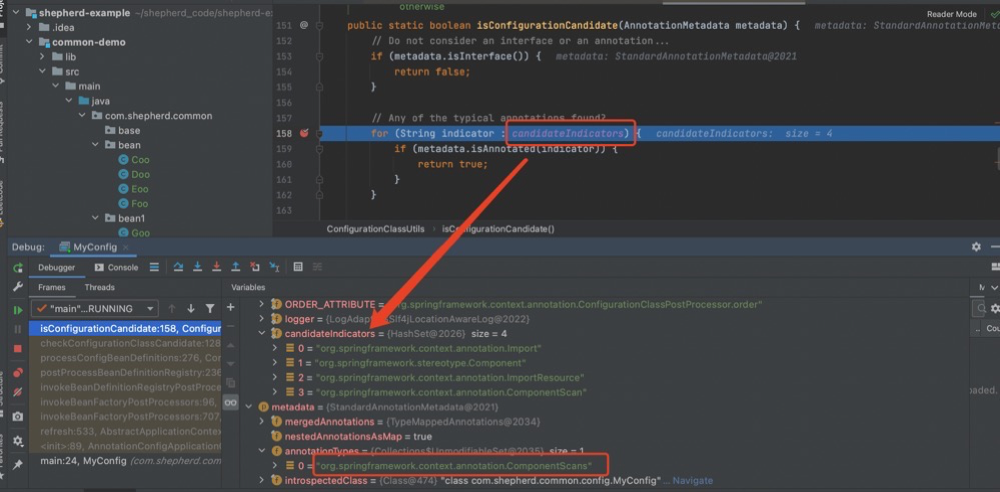
发现配置类LITE模式匹配规则里面并没有包含@ComponentScans注解,所以判断当前类不是配置类,自然不会再进行后面的相关注解解析了,这也就是上面多次使用@ComponentScan扫描注入不成功的问题。
上面的案例都是只简单配置@ComponentScan的basePackages()属性,当然我们也可以基于@Filter进行过滤啥的,如下面Spring Boot的启动类注解:
@Target(ElementType.TYPE)
@Retention(RetentionPolicy.RUNTIME)
@Documented
@Inherited
@SpringBootConfiguration
@EnableAutoConfiguration
@ComponentScan(excludeFilters = { @Filter(type = FilterType.CUSTOM, classes = TypeExcludeFilter.class),@Filter(type = FilterType.CUSTOM, classes = AutoConfigurationExcludeFilter.class) })
public @interface SpringBootApplication {}
3.@ComponentScan的实现原理
@ComponentScan的底层实现流程和之前我们分析 @Import实现原理基本一致的,都是依靠配置类后置处理器ConfigurationClassPostProcessor进行处理、解析的,核心流程图如下所示:
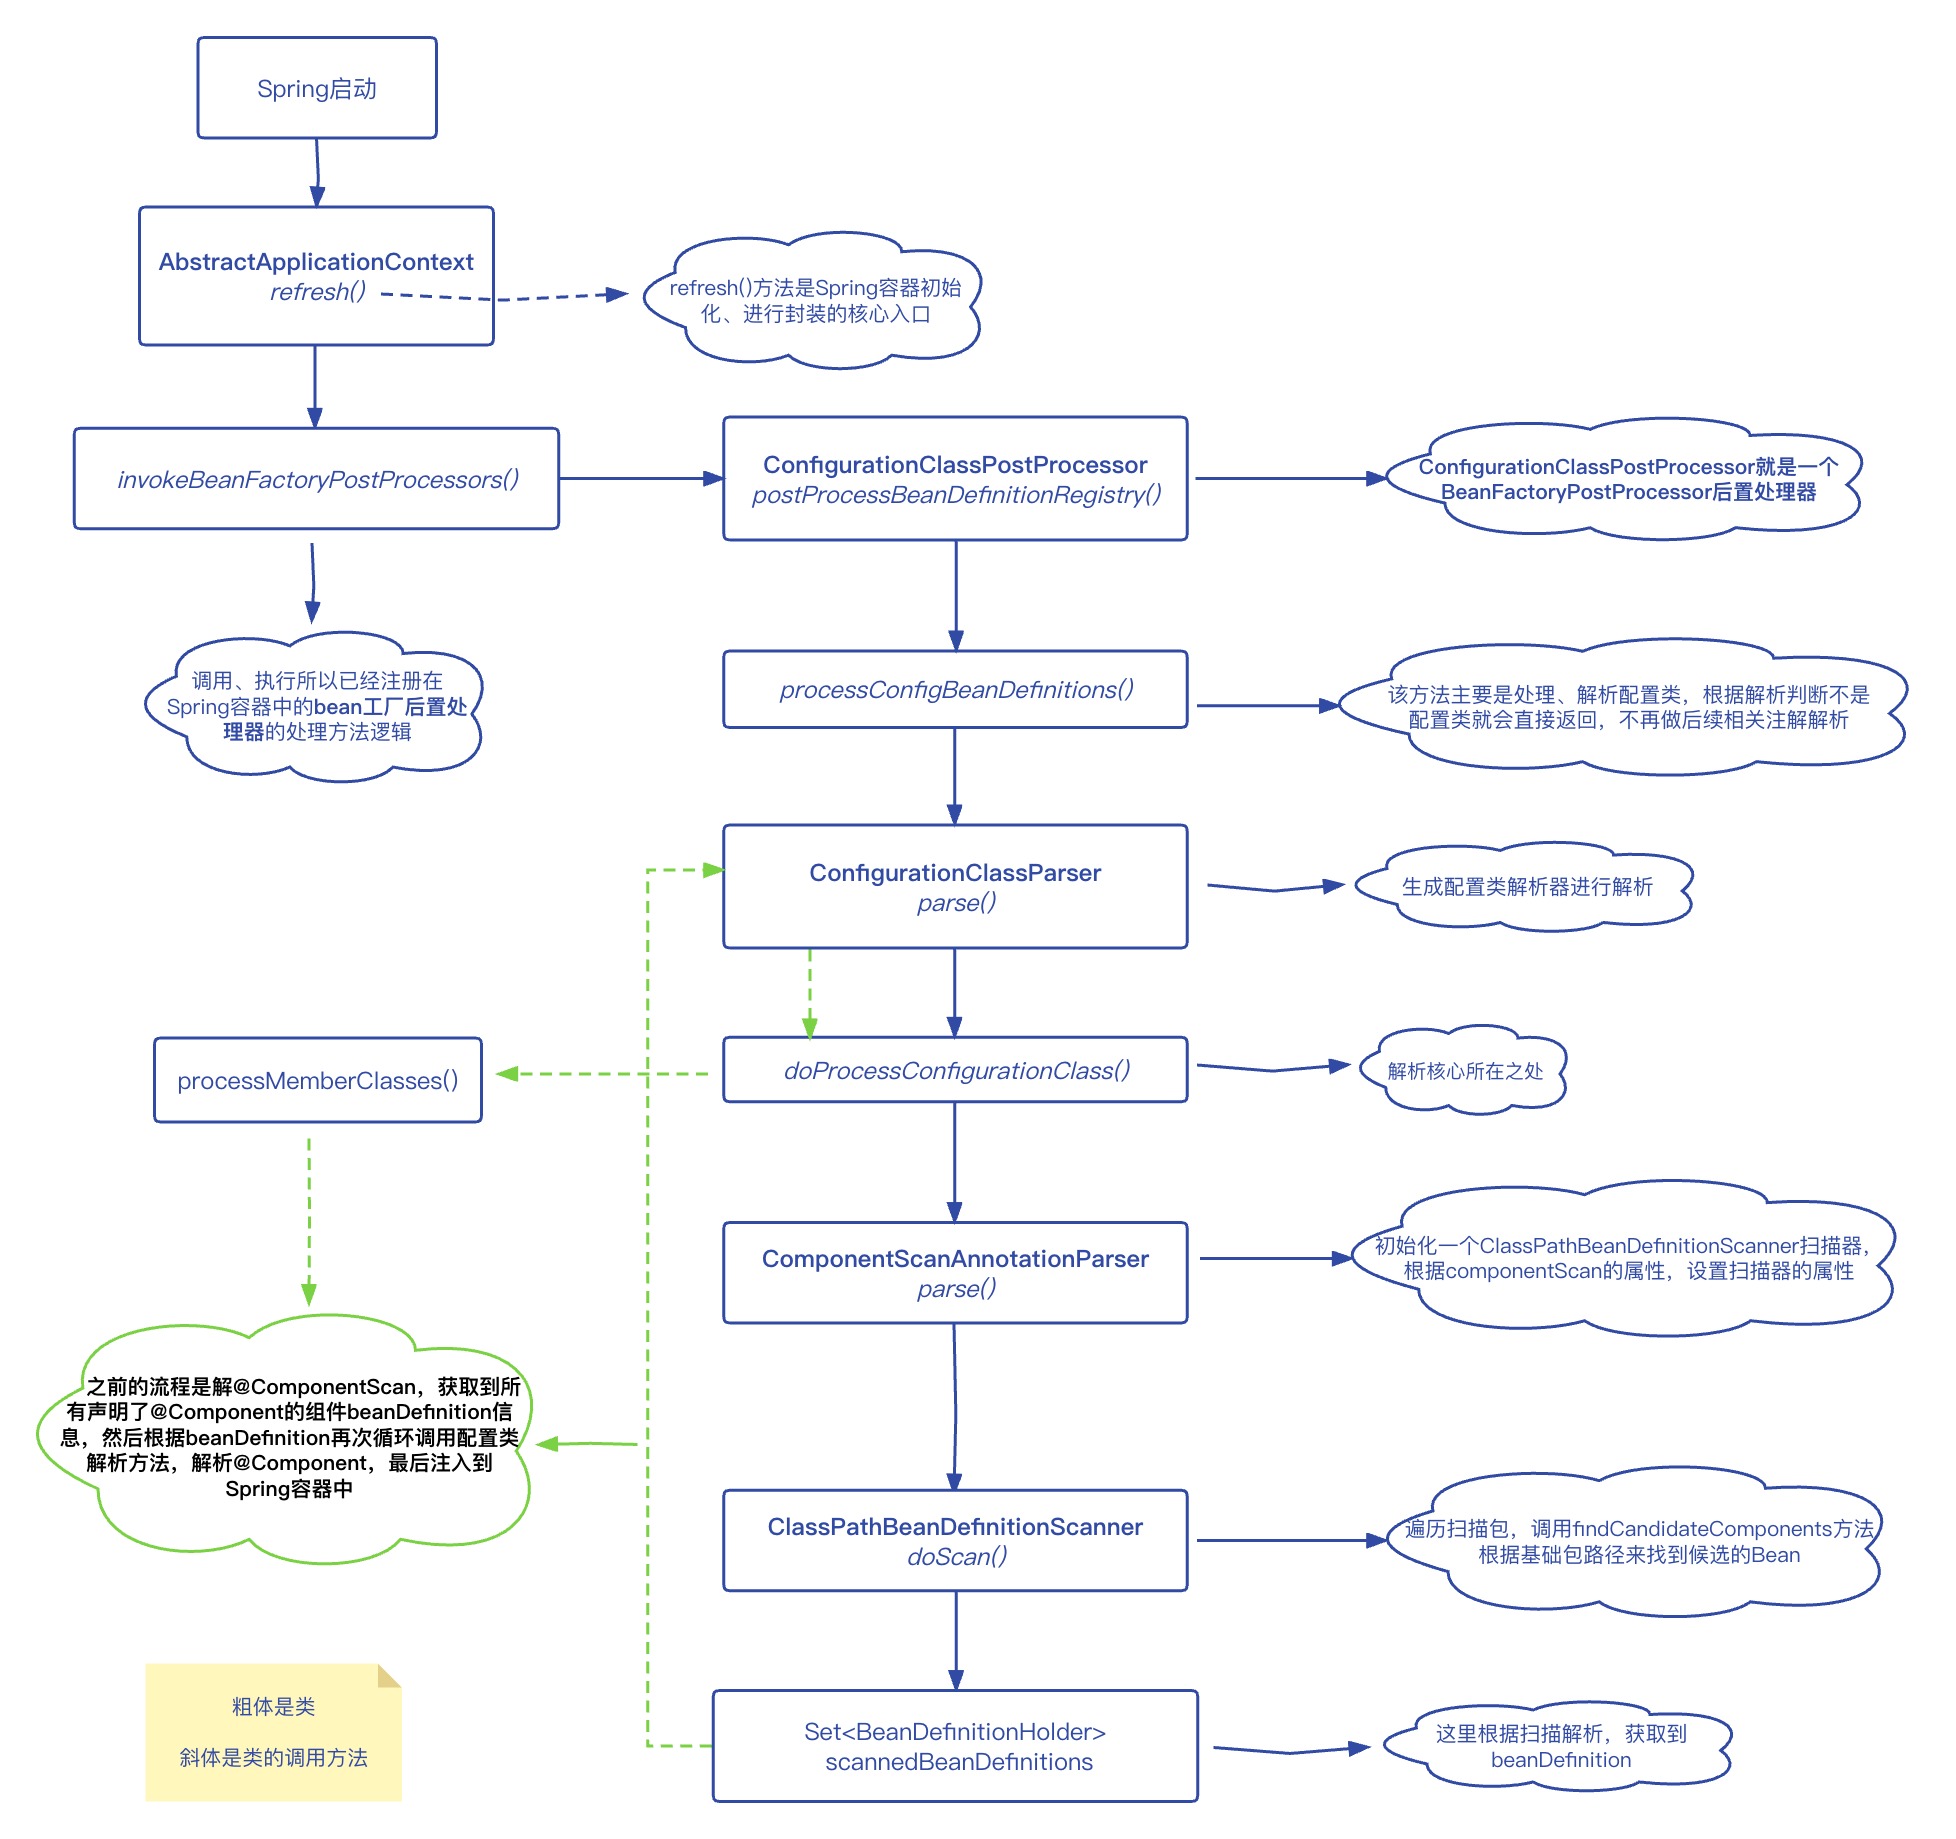
所以我们这里直接看配置类解析器ConfigurationClassParser的解析方法doProcessConfigurationClass()
protected final SourceClass doProcessConfigurationClass(ConfigurationClass configClass, SourceClass sourceClass, Predicate<String> filter)throws IOException {// 对@Component的解析处理,对@ComponentScan注解解析在下面,意味着会先跳过这里对@ComponentScan解析进行包扫描拿到生了@Component的beanDefinition,然后递归调用会再次来到这里解析@Componentif (configClass.getMetadata().isAnnotated(Component.class.getName())) {// Recursively process any member (nested) classes firstprocessMemberClasses(configClass, sourceClass, filter);}// Process any @PropertySource annotationsfor (AnnotationAttributes propertySource : AnnotationConfigUtils.attributesForRepeatable(sourceClass.getMetadata(), PropertySources.class,org.springframework.context.annotation.PropertySource.class)) {if (this.environment instanceof ConfigurableEnvironment) {processPropertySource(propertySource);}else {logger.info("Ignoring @PropertySource annotation on [" + sourceClass.getMetadata().getClassName() +"]. Reason: Environment must implement ConfigurableEnvironment");}}// Process any @ComponentScan annotations 解析@ComponentScan核心所在// 这里是调用AnnotationConfigUtils的静态方法attributesForRepeatable,获取@ComponentScan注解的属性Set<AnnotationAttributes> componentScans = AnnotationConfigUtils.attributesForRepeatable(sourceClass.getMetadata(), ComponentScans.class, ComponentScan.class);if (!componentScans.isEmpty() &&!this.conditionEvaluator.shouldSkip(sourceClass.getMetadata(), ConfigurationPhase.REGISTER_BEAN)) {// for循环,遍历componentScans,此时仅有一个componentScan,使用componentScanParser解析器来解析componentScan这个对象for (AnnotationAttributes componentScan : componentScans) {// The config class is annotated with @ComponentScan -> perform the scan immediatelySet<BeanDefinitionHolder> scannedBeanDefinitions =// componentScanParser解析器进行解析this.componentScanParser.parse(componentScan, sourceClass.getMetadata().getClassName());// Check the set of scanned definitions for any further config classes and parse recursively if needed// for循环扫描到的beanDefinition信息for (BeanDefinitionHolder holder : scannedBeanDefinitions) {BeanDefinition bdCand = holder.getBeanDefinition().getOriginatingBeanDefinition();if (bdCand == null) {bdCand = holder.getBeanDefinition();}// 这里递归调用前面的配置类解析器的解析方法,也就是会再次来到doProcessConfigurationClass()这个方法,会匹配到方法一开始的对@Component解析逻辑if (ConfigurationClassUtils.checkConfigurationClassCandidate(bdCand, this.metadataReaderFactory)) {parse(bdCand.getBeanClassName(), holder.getBeanName());}}}}// Process any @Import annotations// 处理注解@import的入口方法processImports(configClass, sourceClass, getImports(sourceClass), filter, true);// Process any @ImportResource annotationsAnnotationAttributes importResource =AnnotationConfigUtils.attributesFor(sourceClass.getMetadata(), ImportResource.class);if (importResource != null) {String[] resources = importResource.getStringArray("locations");Class<? extends BeanDefinitionReader> readerClass = importResource.getClass("reader");for (String resource : resources) {String resolvedResource = this.environment.resolveRequiredPlaceholders(resource);configClass.addImportedResource(resolvedResource, readerClass);}}// Process individual @Bean methodsSet<MethodMetadata> beanMethods = retrieveBeanMethodMetadata(sourceClass);for (MethodMetadata methodMetadata : beanMethods) {configClass.addBeanMethod(new BeanMethod(methodMetadata, configClass));}// Process default methods on interfacesprocessInterfaces(configClass, sourceClass);// Process superclass, if anyif (sourceClass.getMetadata().hasSuperClass()) {String superclass = sourceClass.getMetadata().getSuperClassName();if (superclass != null && !superclass.startsWith("java") &&!this.knownSuperclasses.containsKey(superclass)) {this.knownSuperclasses.put(superclass, configClass);// Superclass found, return its annotation metadata and recursereturn sourceClass.getSuperClass();}}// No superclass -> processing is completereturn null;}
ComponentScanAnnotationParser的parse()
public Set<BeanDefinitionHolder> parse(AnnotationAttributes componentScan, final String declaringClass) {ClassPathBeanDefinitionScanner scanner = new ClassPathBeanDefinitionScanner(this.registry,componentScan.getBoolean("useDefaultFilters"), this.environment, this.resourceLoader);Class<? extends BeanNameGenerator> generatorClass = componentScan.getClass("nameGenerator");boolean useInheritedGenerator = (BeanNameGenerator.class == generatorClass);scanner.setBeanNameGenerator(useInheritedGenerator ? this.beanNameGenerator :BeanUtils.instantiateClass(generatorClass));ScopedProxyMode scopedProxyMode = componentScan.getEnum("scopedProxy");if (scopedProxyMode != ScopedProxyMode.DEFAULT) {scanner.setScopedProxyMode(scopedProxyMode);}else {Class<? extends ScopeMetadataResolver> resolverClass = componentScan.getClass("scopeResolver");scanner.setScopeMetadataResolver(BeanUtils.instantiateClass(resolverClass));}scanner.setResourcePattern(componentScan.getString("resourcePattern"));for (AnnotationAttributes filter : componentScan.getAnnotationArray("includeFilters")) {for (TypeFilter typeFilter : typeFiltersFor(filter)) {scanner.addIncludeFilter(typeFilter);}}for (AnnotationAttributes filter : componentScan.getAnnotationArray("excludeFilters")) {for (TypeFilter typeFilter : typeFiltersFor(filter)) {scanner.addExcludeFilter(typeFilter);}}boolean lazyInit = componentScan.getBoolean("lazyInit");if (lazyInit) {scanner.getBeanDefinitionDefaults().setLazyInit(true);}Set<String> basePackages = new LinkedHashSet<>();String[] basePackagesArray = componentScan.getStringArray("basePackages");for (String pkg : basePackagesArray) {String[] tokenized = StringUtils.tokenizeToStringArray(this.environment.resolvePlaceholders(pkg),ConfigurableApplicationContext.CONFIG_LOCATION_DELIMITERS);Collections.addAll(basePackages, tokenized);}for (Class<?> clazz : componentScan.getClassArray("basePackageClasses")) {basePackages.add(ClassUtils.getPackageName(clazz));}if (basePackages.isEmpty()) {basePackages.add(ClassUtils.getPackageName(declaringClass));}scanner.addExcludeFilter(new AbstractTypeHierarchyTraversingFilter(false, false) {@Overrideprotected boolean matchClassName(String className) {return declaringClass.equals(className);}});return scanner.doScan(StringUtils.toStringArray(basePackages));}初始化ClassPathBeanDefinitionScanner扫描器,根据·@ComponentScan的属性,设置扫描器的属性,最后调用扫描器的doScan()方法执行真正的扫描工作。遍历扫描包,调用findCandidateComponents()方法根据基础包路径来找到候选的Bean。
之后就是遍历扫描到的候选Bean,给他们设置作用域,生成BeanName等一系列的操作。然后检查BeanName是否冲突,添加到beanDefinitions集合当中,调用registerBeanDefinition注册Bean,将Bean的定义beanDefinition注册到Spring容器当中,方便后续注入bean。
4.总结
以上全部就是对@ComponentScan注解实现流程的解析,也是对使用了@Component的组件怎么注入到Spring容器的梳理,Spring Boot项目会默认扫描启动类包下面的所有组件,其自动配置原理实现中使用到了@ComponentScan注解,所以我们需要关注该注解啦。
这篇关于Spring注解扫描:ComponentScan使用及原理详解的文章就介绍到这儿,希望我们推荐的文章对编程师们有所帮助!


