本文主要是介绍dom-to-image库是如何将html转换成图片的,希望对大家解决编程问题提供一定的参考价值,需要的开发者们随着小编来一起学习吧!
dom-to-image库可以帮你把dom节点转换为图片,它的核心原理很简单,就是利用svg的foreignObject标签能嵌入html的特性,然后通过img标签加载svg,最后再通过canvas绘制img实现导出,好了,本文到此结束。
另一个知名的html2canvas库其实也支持这种方式。
虽然原理很简单,但是dom-to-image毕竟也有1000多行代码,所以我很好奇它具体都做了哪些事情,本文就来详细剖析一下,需要说明的是dom-to-image库已经六七年前没有更新了,可能有点过时,所以我们要看的是基于它修改的dom-to-image-more库,这个库修复了一些bug,以及增加了一些特性,接下来我们就来详细了解一下。
将节点转换成图片
我们用的最多的api应该就是toPng(node),所以以这个方法为入口:
function toPng(node, options) {return draw(node, options).then(function (canvas) {return canvas.toDataURL();});
}
toPng方法会调用draw方法,然后返回一个canvas,最后通过canvas的toDataURL方法获取到图片的base64格式的data:URL,我们就可以直接下载为图片。
看一下draw方法:
function draw(domNode, options) {options = options || {};return toSvg(domNode, options)// 转换成svg.then(util.makeImage)// 转换成图片.then(function (image) {// 通过canvas绘制图片// ...});
}
一共分为了三个步骤,一一来看。
将节点转换成svg
toSvg方法如下:
function toSvg(node, options) {const ownerWindow = domtoimage.impl.util.getWindow(node);options = options || {};copyOptions(options);let restorations = [];return Promise.resolve(node).then(ensureElement)// 检查和包装元素.then(function (clonee) {// 深度克隆节点return cloneNode(clonee, options, null, ownerWindow);}).then(embedFonts)// 嵌入字体.then(inlineImages)// 内联图片.then(makeSvgDataUri)// svg转data:URL.then(restoreWrappers)// 恢复包装元素
}
node就是我们要转换成图片的DOM节点,首先调用了getWindow方法获取window对象:
function getWindow(node) {const ownerDocument = node ? node.ownerDocument : undefined;return ((ownerDocument ? ownerDocument.defaultView : undefined) ||global ||window);
}
说实话前端写了这么多年,但是ownerDocument和defaultView两个属性我完全没用过,ownerDocument属性会返回当前节点的顶层的 document对象,而在浏览器中,defaultView属性会返回当前 document 对象所关联的 window 对象,如果没有,会返回 null。
所以这里优先通过我们传入的DOM节点获取window对象,可能是为了处理iframe嵌入之类的情况把。
接下来合并了选项后,就通过Promise实例的then方法链式的调用一系列的方法,一一来看。
检查和包装元素
ensureElement方法如下:
function ensureElement(node) {// ELEMENT_NODE:1if (node.nodeType === ELEMENT_NODE) return node;const originalChild = node;const originalParent = node.parentNode;const wrappingSpan = document.createElement('span');originalParent.replaceChild(wrappingSpan, originalChild);wrappingSpan.append(node);restorations.push({parent: originalParent,child: originalChild,wrapper: wrappingSpan,});return wrappingSpan;
}
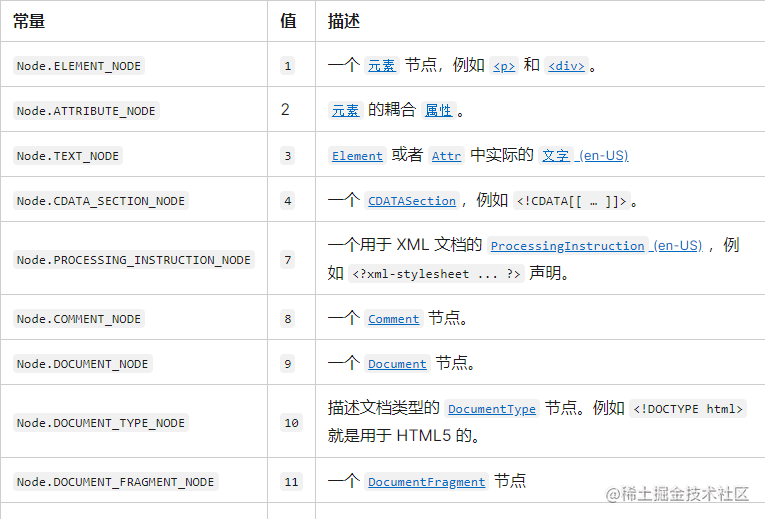
html节点的nodeType有如下类型:

值为1也就是我们普通的html标签,其他的比如文本节点、注释节点、document节点也是比较常用的,如果我们传入的节点的类型为1,ensureElement方法什么也不做直接返回该节点,否则会创建一个span标签替换掉原节点,并把原节点添加到该span标签里,可以猜测这个主要是处理文本节点,毕竟应该没有人会传其他类型的节点进行转换了。
同时它还把原节点,原节点的父节点,span标签都收集到restorations数组里,很明显,这是为了后面进行还原。
克隆节点
接下来执行了cloneNode方法:
cloneNode(clonee, options, null, ownerWindow)
// 参数:需要克隆的节点、选项、父节点的样式、所属window对象
function cloneNode(node, options, parentComputedStyles, ownerWindow) {const filter = options.filter;if (node === sandbox ||util.isHTMLScriptElement(node) ||util.isHTMLStyleElement(node) ||util.isHTMLLinkElement(node) ||(parentComputedStyles !== null && filter && !filter(node))) {return Promise.resolve();}return Promise.resolve(node).then(makeNodeCopy)// 处理canvas元素.then(function (clone) {// 克隆子节点return cloneChildren(clone, getParentOfChildren(node));}).then(function (clone) {// 处理克隆的节点return processClone(clone, node);});
}
先做了一堆判断,如果是script、style、link标签,或者需要过滤掉的节点,那么会直接返回。
sandbox、parentComputedStyles后面会看到。
接下来又调用了几个方法,没办法,跟着它一起入栈把。
处理canvas元素的克隆
function makeNodeCopy(original) {if (util.isHTMLCanvasElement(original)) {return util.makeImage(original.toDataURL());}return original.cloneNode(false);
}
如果元素是canvas,那么会通过makeImage方法将其转换成img标签:
function makeImage(uri) {if (uri === 'data:,') {return Promise.resolve();}return new Promise(function (resolve, reject) {const image = new Image();if (domtoimage.impl.options.useCredentials) {image.crossOrigin = 'use-credentials';}image.onload = function () {if (window && window.requestAnimationFrame) {// 解决 Firefox 的一个bug (webcompat/web-bugs#119834) // 需要等待一帧window.requestAnimationFrame(function () {resolve(image);});} else {// 如果没有window对象或者requestAnimationFrame方法,那么立即返回resolve(image);}};image.onerror = reject;image.src = uri;});
}
crossOrigin属性用于定义一些元素如何处理跨域请求,主要有两个取值:
anonymous:元素的跨域资源请求不需要凭证标志设置。
use-credentials:元素的跨域资源请求需要凭证标志设置,意味着该请求需要提供凭证。
除了use-credentials,给crossOrigin设置其他任何值都会解析成anonymous,为了解决跨域问题,我们一般都会设置成anonymous,这个就相当于告诉服务器,你不需要返回任何非匿名信息过来,例如cookie,所以肯定是安全的。不过在使用这两个值时都需要服务端返回Access-Control-Allow-Credentials响应头,否则肯定无法跨域使用的。
非canvas元素的其他元素,会直接调用它们的cloneNode方法进行克隆,参数传了false,代表只克隆自身,不克隆子节点。
克隆子节点
接下来调用了cloneChildren方法:
cloneChildren(clone, getParentOfChildren(node));
getParentOfChildren方法如下:
function getParentOfChildren(original) {// 如果该节点是Shadow DOM的附加节点,那么返回附加的Shadow DOM的根节点if (util.isElementHostForOpenShadowRoot(original)) {return original.shadowRoot; }return original;
}
function isElementHostForOpenShadowRoot(value) {return isElement(value) && value.shadowRoot !== null;
}
这里涉及到了shadow DOM,有必要先简单了解一下。
shadow DOM是一种封装技术,可以将标记结构、样式和行为隐藏起来,比如我们熟悉的video标签,我们看到的只是一个video标签,但实际上它里面有很多我们看不到的元素,这个特性一般会和Web components结合使用,也就是可以创建自定义元素,就和Vue和React组件一样。
先了解一些术语:
- Shadow host:一个常规 DOM 节点,Shadow DOM 会被附加到这个节点上。
- Shadow tree:Shadow DOM 内部的 DOM 树。
- Shadow boundary:Shadow DOM 结束的地方,也是常规 DOM 开始的地方。
- Shadow root: Shadow tree 的根节点。
一个普通的DOM元素可以使用attachShadow方法来添加shadow DOM:
let shadow = div.attachShadow({ mode: "open" });
这样就可以给div元素附加一个shadow DOM,然后我们可以和创建普通元素一样创建任何元素添加到shadow下:
let para = document.createElement('p');
shadow.appendChild(para);
当mode设为open,我们就可以通过div.shadowRoot获取到 Shadow DOM,如果设置的是closed,那么外部就获取不到。
所以前面的getParentOfChildren方法会判断当前节点是不是一个Shadow host节点,是的话就返回它内部的Shadow root节点,否则返回自身。
回到cloneChildren方法,它接收两个参数:克隆的节点、原节点。
function cloneChildren(clone, original) {// 获取子节点,如果原节点是slot节点,那么会返回slot内的节点,const originalChildren = getRenderedChildren(original);let done = Promise.resolve();if (originalChildren.length !== 0) {// 获取原节点的计算样式,如果原节点是shadow root节点,那么会获取它所附加到的普通元素的样式const originalComputedStyles = getComputedStyle(getRenderedParent(original));// 遍历子节点util.asArray(originalChildren).forEach(function (originalChild) {done = done.then(function () {// 递归调用cloneNode方法return cloneNode(originalChild,options,originalComputedStyles,ownerWindow).then(function (clonedChild) {// 克隆完后的子节点添加到该节点if (clonedChild) {clone.appendChild(clonedChild);}});});});}return done.then(function () {return clone;});
}
首先通过getRenderedChildren方法获取子节点:
function getRenderedChildren(original) {// 如果是slot元素,那么通过assignedNodes方法返回该插槽中的节点if (util.isShadowSlotElement(original)) {return original.assignedNodes();}// 普通元素直接通过childNodes获取子节点return original.childNodes;
}
// 判断是否是html slot元素
function isShadowSlotElement(value) {return (isInShadowRoot(value) && value instanceof getWindow(value).HTMLSlotElement);
}
// 判断一个节点是否处于shadow DOM树中
function isInShadowRoot(value) {// 如果是普通节点,getRootNode方法会返回document对象,如果是Shadow DOM,那么会返回shadow rootreturn (value !== null &&Object.prototype.hasOwnProperty.call(value, 'getRootNode') &&isShadowRoot(value.getRootNode()));
}
// 判断是否是shadow DOM的根节点
function isShadowRoot(value) {return value instanceof getWindow(value).ShadowRoot;
}
这一连串的判断,如果对于shadow DOM不熟悉的话大概率很难看懂,不过没关系,跳过这部分也可以,反正就是获取子节点。
获取到子节点后又调用了如下方法:
const originalComputedStyles = getComputedStyle(getRenderedParent(original)
);
function getRenderedParent(original) {// 如果该节点是shadow root,那么返回它附加到的普通的DOM节点if (util.isShadowRoot(original)) {return original.host;}return original;
}
调用getComputedStyle获取原节点的样式,这个方法其实就是window.getComputedStyle方法,会返回节点的所有样式和值。
接下来就是遍历子节点,然后对每个子节点再次调用cloneNode方法,只不过会把原节点的样式也传进去。对于子元素又会递归处理它们的子节点,这样就能深度克隆完整棵DOM树。
处理克隆的节点
对于每个克隆节点,又调用了processClone(clone, node)方法:
function processClone(clone, original) {// 如果不是普通节点,或者是slot节点,那么直接返回if (!util.isElement(clone) || util.isShadowSlotElement(original)) {return Promise.resolve(clone);}return Promise.resolve().then(cloneStyle)// 克隆样式.then(clonePseudoElements)// 克隆伪元素.then(copyUserInput)// 克隆输入框.then(fixSvg)// 修复svg.then(function () {return clone;});
}
又是一系列的操作,稳住,我们继续。
克隆样式
function cloneStyle() {copyStyle(original, clone);
}
调用了copyStyle方法,传入原节点和克隆节点:
function copyStyle(sourceElement, targetElement) {const sourceComputedStyles = getComputedStyle(sourceElement);if (sourceComputedStyles.cssText) {// ...} else {// ...}
}
window.getComputedStyle方法返回的是一个CSSStyleDeclaration对象,和我们使用div.style获取到的对象类型是一样的,但是div.style对象只能获取到元素的内联样式,使用div.style.color = '#fff'设置的也能获取到,因为这种方式设置的也是内联样式,其他样式是获取不到的,但是window.getComputedStyle能获取到所有css样式。
div.style.cssText属性我们都用过,可以获取和批量设置内联样式,如果要设置多个样式,比单个调用div.style.xxx方便一点,但是cssText会覆盖整个内联样式,比如下面的方式设置的字号是会丢失的,内联样式最终只有color:
div.style.fontSize = '23px'
div.style.cssText = 'color: rgb(102, 102, 102)'
但是window.getComputedStyle方法返回的对象的cssText和div.style.cssText不是同一个东西,即使有内联样式,window.getComputedStyle方法返回对象的cssText值也是空,并且它无法修改,所以不清楚什么情况下它才会有值。
假设有值的话,接下来的代码我也不是很能理解:
if (sourceComputedStyles.cssText) {targetElement.style.cssText = sourceComputedStyles.cssText;copyFont(sourceComputedStyles, targetElement.style);
}function copyFont(source, target) {target.font = source.font;target.fontFamily = source.fontFamily;// ...
}
为什么不直接把原节点的style.cssText复制给克隆节点的style.cssText呢,另外为啥文本相关的样式又要单独设置一遍呢,无法理解。
我们看看另外一个分支:
else {copyUserComputedStyleFast(options,sourceElement,sourceComputedStyles,parentComputedStyles,targetElement);// ...
}
先调用了copyUserComputedStyleFast方法,这个方法内部非常复杂,就不把具体代码放出来了,大致介绍一下它都做了什么:
1.首先会获取原节点的所谓的默认样式,这个步骤也比较复杂:
1.1.先获取原节点及祖先节点的元素标签列表,其实就是一个向上递归的过程,不过存在终止条件,就是当遇到块级元素的祖先节点。比如原节点是一个span标签,它的父节点也是一个span,再上一个父节点是一个div,那么获取到的标签列表就是[span, span, div]。
1.2.接下来会创建一个沙箱,也就是一个iframe,这个iframe的DOCTYPE和charset会设置成和当前页面的一样。
1.3.再接下来会根据前面获取到的标签列表,在iframe中创建对应结构的DOM节点,也就是会创建这样一棵DOM树:div -> span -> span。并且会给最后一个节点添加一个零宽字符的文本,并返回这个节点。
1.4.使用iframe的window.getComputedStyle方法获取上一步返回节点的样式,对于width和height会设置成auto。
1.5.删除iframe里前面创建的节点。
16.返回1.4步获取到的样式对象。
2.遍历原节点的样式,也就是sourceComputedStyles对象,对于每一个样式属性,都会获取到三个值:sourceValue、defaultValue、parentValue,分别来自原节点的样式对象sourceComputedStyles、第一步获取到的默认样式对象、父节点的样式对象parentComputedStyles,然后会做如下判断:
if (sourceValue !== defaultValue ||(parentComputedStyles && sourceValue !== parentValue)
) {// 样式优先级,比如importantconst priority = sourceComputedStyles.getPropertyPriority(name);// 将样式设置到克隆节点的style对象上setStyleProperty(targetStyle, name, sourceValue, priority);
}
如果原节点的某个样式值和默认的样式值不一样,并且和父节点的也不一样,那么就需要给克隆的节点手动设置成内联样式,否则其实就是继承样式或者默认样式,就不用管了,不得不说,还是挺巧妙的。
copyUserComputedStyleFast方法执行完后还做了如下操作:
if (parentComputedStyles === null) {['inset-block','inset-block-start','inset-block-end',].forEach((prop) => targetElement.style.removeProperty(prop));['left', 'right', 'top', 'bottom'].forEach((prop) => {if (targetElement.style.getPropertyValue(prop)) {targetElement.style.setProperty(prop, '0px');}});
}
对于我们传入的节点,parentComputedStyles是null,本质相当于根节点,所以直接移除它的位置信息,防止发生偏移。
克隆伪元素
克隆完样式,接下来就是处理伪元素了:
function clonePseudoElements() {const cloneClassName = util.uid();[':before', ':after'].forEach(function (element) {clonePseudoElement(element);});
}
分别调用clonePseudoElement方法处理两种伪元素:
function clonePseudoElement(element) {// 获取原节点伪元素的样式const style = getComputedStyle(original, element);// 获取伪元素的contentconst content = style.getPropertyValue('content');// 如果伪元素的内容为空就直接返回if (content === '' || content === 'none') {return;}// 获取克隆节点的类名const currentClass = clone.getAttribute('class') || '';// 给克隆元素增加一个唯一的类名clone.setAttribute('class', `${currentClass} ${cloneClassName}`);// 创建一个style标签const styleElement = document.createElement('style');// 插入伪元素的样式styleElement.appendChild(formatPseudoElementStyle());// 将样式标签添加到克隆节点内clone.appendChild(styleElement);
}
window.getComputedStyle方法是可以获取元素的伪元素的样式的,通过第二个参数指定要获取的伪元素即可。
如果伪元素的content为空就不管了,总感觉有点不妥,毕竟我经常会用伪元素渲染一些三角形,content都是设置成空的。
如果不为空,那么会给克隆的节点新增一个唯一的类名,并且创建一个style标签添加到克隆节点内,这个style标签里会插入伪元素的样式,通过formatPseudoElementStyle方法获取伪元素的样式字符串:
function formatPseudoElementStyle() {const selector = `.${cloneClassName}:${element}`;// style为原节点伪元素的样式对象const cssText = style.cssText? formatCssText(): formatCssProperties();return document.createTextNode(`${selector}{${cssText}}`);
}
如果样式对象的cssText有值,那么调用formatCssText方法:
function formatCssText() {return `${style.cssText} content: ${content};`;
}
但是前面说了,这个属性一般都是没值的,所以会走formatCssProperties方法:
function formatCssProperties() {const styleText = util.asArray(style).map(formatProperty).join('; ');return `${styleText};`;function formatProperty(name) {const propertyValue = style.getPropertyValue(name);const propertyPriority = style.getPropertyPriority(name)? ' !important': '';return `${name}: ${propertyValue}${propertyPriority}`;}
}
很简单,遍历样式对象,然后拼接成css的样式字符串。
克隆输入框
对于输入框的处理很简单:
function copyUserInput() {if (util.isHTMLTextAreaElement(original)) {clone.innerHTML = original.value;}if (util.isHTMLInputElement(original)) {clone.setAttribute('value', original.value);}
}
如果是textarea或者input元素,直接将原节点的值设置到克隆后的元素上即可。但是我测试发现克隆输入框也会把它的值给克隆过去,所以这一步可能没有必要。
修复svg
最后就是处理svg节点:
function fixSvg() {if (util.isSVGElement(clone)) {clone.setAttribute('xmlns', 'http://www.w3.org/2000/svg');if (util.isSVGRectElement(clone)) {['width', 'height'].forEach(function (attribute) {const value = clone.getAttribute(attribute);if (value) {clone.style.setProperty(attribute, value);}});}}
}
给svg节点添加命名空间,另外对于rect节点,还把宽高的属性设置成对应的样式,这个是何原因,我们也不得而知。
到这里,节点的克隆部分就结束了,不得不说,还是有点复杂的,很多操作其实我们也没有看懂为什么要这么做,开发一个库就是这样,要处理很多边界和异常情况,这个只有遇到了才知道为什么。
嵌入字体
节点克隆完后接下来会处理字体:
function embedFonts(node) {return fontFaces.resolveAll().then(function (cssText) {if (cssText !== '') {const styleNode = document.createElement('style');node.appendChild(styleNode);styleNode.appendChild(document.createTextNode(cssText));}return node;});
}
调用resolveAll方法,会返回一段css字符串,然后创建一个style标签添加到克隆的节点内,接下来看看resolveAll方法都做了什么:
function resolveAll() {return readAll()// ...
}
又调用了readAll方法:
function readAll() {return Promise.resolve(util.asArray(document.styleSheets)).then(getCssRules).then(selectWebFontRules).then(function (rules) {return rules.map(newWebFont);});
}
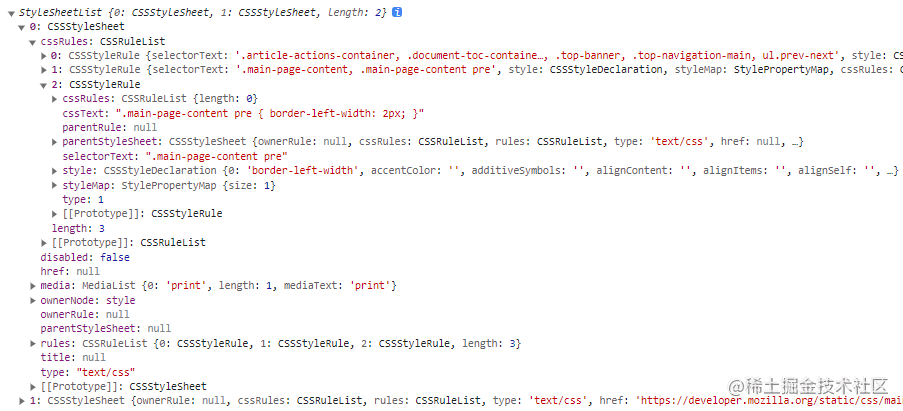
document.styleSheets属性可以获取到文档中所有的style标签和通过link标签引入的样式,结果是一个类数组,数组的每一项是一个CSSStyleSheet对象。
function getCssRules(styleSheets) {const cssRules = [];styleSheets.forEach(function (sheet) {if (Object.prototype.hasOwnProperty.call(Object.getPrototypeOf(sheet),'cssRules')) {util.asArray(sheet.cssRules || []).forEach(cssRules.push.bind(cssRules));}});return cssRules;
}
通过CSSStyleSheet对象的cssRules属性可以获取到具体的css规则,cssRules的每一项也就是我们写的一条css语句:

function selectWebFontRules(cssRules) {return cssRules.filter(function (rule) {return rule.type === CSSRule.FONT_FACE_RULE;}).filter(function (rule) {return inliner.shouldProcess(rule.style.getPropertyValue('src'));});
}
遍历所有的css语句,找出其中的@font-face语句,shouldProcess方法会判断@font-face语句的src属性是否存在url()值,找出了所有存在的字体规则后会遍历它们调用newWebFont方法:
function newWebFont(webFontRule) {return {resolve: function resolve() {const baseUrl = (webFontRule.parentStyleSheet || {}).href;return inliner.inlineAll(webFontRule.cssText, baseUrl);},src: function () {return webFontRule.style.getPropertyValue('src');},};
}
inlineAll方法会找出@font-face语句中定义的所有字体的url,然后通过XMLHttpRequest发起请求,将字体文件转换成data:URL形式,然后替换css语句中的url,核心就是使用下面这个正则匹配和替换。
const URL_REGEX = /url\(['"]?([^'"]+?)['"]?\)/g;
继续resolveAll方法:
function resolveAll() {return readAll().then(function (webFonts) {return Promise.all(webFonts.map(function (webFont) {return webFont.resolve();}));}).then(function (cssStrings) {return cssStrings.join('\n');});
}
将所有@font-face语句的远程字体url都转换成data:URL形式后再将它们拼接成css字符串即可完成嵌入字体的操作。
说实话,Promise链太长,看着容易晕。
内联图片
内联完了字体后接下来就是内联图片:
function inlineImages(node) {return images.inlineAll(node).then(function () {return node;});
}
处理图片的inlineAll方法如下:
function inlineAll(node) {if (!util.isElement(node)) {return Promise.resolve(node);}return inlineCSSProperty(node).then(function () {// ...});
}
inlineCSSProperty方法会判断节点background和 background-image属性是否设置了图片,是的话也会和嵌入字体一样将远程图片转换成data:URL嵌入:
function inlineCSSProperty(node) {const properties = ['background', 'background-image'];const inliningTasks = properties.map(function (propertyName) {const value = node.style.getPropertyValue(propertyName);const priority = node.style.getPropertyPriority(propertyName);if (!value) {return Promise.resolve();}// 如果设置了背景图片,那么也会调用inliner.inlineAll方法将远程url的形式转换成data:URL形式return inliner.inlineAll(value).then(function (inlinedValue) {// 将样式设置成转换后的值node.style.setProperty(propertyName, inlinedValue, priority);});});return Promise.all(inliningTasks).then(function () {return node;});
}
处理完节点的背景图片后:
function inlineAll(node) {return inlineCSSProperty(node).then(function () {if (util.isHTMLImageElement(node)) {return newImage(node).inline();} else {return Promise.all(util.asArray(node.childNodes).map(function (child) {return inlineAll(child);}));}});
}
会检查节点是否是图片节点,是的话会调用newImage方法处理,这个方法也很简单,也是发个请求获取图片数据,然后将它转换成data:URL设置回图片的src。
如果是其他节点,那么就递归处理子节点。
将svg转换成data:URL
图片也处理完了接下来就可以将svg转换成data:URL了:
function makeSvgDataUri(node) {let width = options.width || util.width(node);let height = options.height || util.height(node);return Promise.resolve(node).then(function (svg) {svg.setAttribute('xmlns', 'http://www.w3.org/1999/xhtml');return new XMLSerializer().serializeToString(svg);}).then(util.escapeXhtml).then(function (xhtml) {const foreignObjectSizing =(util.isDimensionMissing(width)? ' width="100%"': ` width="${width}"`) +(util.isDimensionMissing(height)? ' height="100%"': ` height="${height}"`);const svgSizing =(util.isDimensionMissing(width) ? '' : ` width="${width}"`) +(util.isDimensionMissing(height) ? '' : ` height="${height}"`);return `<svg xmlns="http://www.w3.org/2000/svg"${svgSizing}>	<foreignObject${foreignObjectSizing}>${xhtml}</foreignObject></svg>`;}).then(function (svg) {return `data:image/svg+xml;charset=utf-8,${svg}`;});
}
其中的isDimensionMissing方法就是判断是否是不合法的数字。
主要做了四件事。
一是给节点添加命名空间,并使用XMLSerializer对象来将DOM节点序列化成字符串。
二是转换DOM字符串中的一些字符:
function escapeXhtml(string) {return string.replace(/%/g, '%25').replace(/#/g, '%23').replace(/\n/g, '%0A');
}
第三步就是拼接svg字符串了,将序列化后的字符串使用foreignObject标签包裹,同时会计算一下DOM节点的宽高设置到svg上。
最后一步是拼接成data:URL的形式。
恢复包装元素
在最开始的【检查和包装元素】步骤会替换掉节点类型不为1的节点,这一步就是用来恢复这个操作:
function restoreWrappers(result) {while (restorations.length > 0) {const restoration = restorations.pop();restoration.parent.replaceChild(restoration.child, restoration.wrapper);}return result;
}
这一步结束后将节点转换成svg的操作就结束了。
将svg转换成图片
现在我们可以回到draw方法:
function draw(domNode, options) {options = options || {};return toSvg(domNode, options).then(util.makeImage).then(function (image) {// ...});
}
获取到了svg的data:URL后会调用makeImage方法将它转换成图片,这个方法前面我们已经看过了,这里就不重复说了。
将图片通过canvas导出
继续draw方法:
function draw(domNode, options) {options = options || {};return toSvg(domNode, options).then(util.makeImage).then(function (image) {const scale = typeof options.scale !== 'number' ? 1 : options.scale;const canvas = newCanvas(domNode, scale);const ctx = canvas.getContext('2d');ctx.msImageSmoothingEnabled = false;// 禁用图像平滑ctx.imageSmoothingEnabled = false;// 禁用图像平滑if (image) {ctx.scale(scale, scale);ctx.drawImage(image, 0, 0);}return canvas;});
}
先调用newCanvas方法创建一个canvas:
function newCanvas(node, scale) {let width = options.width || util.width(node);let height = options.height || util.height(node);// 如果宽度高度都没有,那么默认设置成300if (util.isDimensionMissing(width)) {width = util.isDimensionMissing(height) ? 300 : height * 2.0;}// 如果高度没有,那么默认设置成宽度的一半if (util.isDimensionMissing(height)) {height = width / 2.0;}// 创建canvasconst canvas = document.createElement('canvas');canvas.width = width * scale;canvas.height = height * scale;// 设置背景颜色if (options.bgcolor) {const ctx = canvas.getContext('2d');ctx.fillStyle = options.bgcolor;ctx.fillRect(0, 0, canvas.width, canvas.height);}return canvas;
}
把svg图片绘制到canvas上后,就可以通过canvas.toDataURL()方法转换成图片的data:URL,你可以渲染到页面,也可以直接进行下载。
总结
本文通过源码详细介绍了dom-to-image-more的原理,核心就是克隆节点和节点样式,内联字体、背景图片、图片,然后通过svg的foreignObject标签嵌入克隆后的节点,最后将svg转换成图片,图片绘制到canvas上进行导出。
可以看到源码中大量的Promise,很多不是异步的逻辑也会通过then方法来进行管道式调用,大部分情况会让代码很清晰,一眼就知道大概做了什么事情,但是部分地方串联了太长,反倒不太容易理解。
限于篇幅,源码中其实还要很多有意思的细节没有介绍,比如为了修改iframe的DOCTYPE和charset,居然写了三种方式,虽然我觉得第一种就够了,又比如获取节点默认样式的方式,通过iframe创建同样标签同样层级的元素,说实话我是从来没见过,再比如解析css中的字体的url时用的是如下方法:
function resolveUrl(url, baseUrl) {const doc = document.implementation.createHTMLDocument();const base = doc.createElement('base');doc.head.appendChild(base);const a = doc.createElement('a');doc.body.appendChild(a);base.href = baseUrl;a.href = url;return a.href;
}
base标签我也是从来没有见过。等等。
所以看源码还是挺有意思的一件事,毕竟平时写业务代码局限性太大了,很多东西都了解不到,强烈推荐各位去阅读一下。
这篇关于dom-to-image库是如何将html转换成图片的的文章就介绍到这儿,希望我们推荐的文章对编程师们有所帮助!


