在此分享下本人最近搭建的一个springcloud微服务项目,包括注册中心、配置中心、熔断器、turbine熔断器集中监控中心、fegin、前后端负载均衡、swagger2、网关bus动态修改配置等等。项目只是初步搭建,之后还会加入各种好玩的技术,会不定期更新,感兴趣的可下载进行研究交流,微服务的明天会更好。
github
arthur https://github.com/ArthurFamily/arthur.git
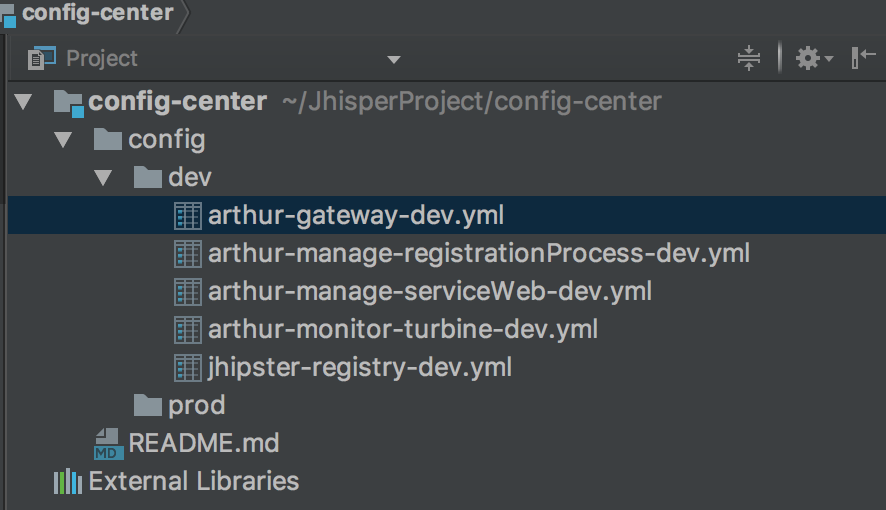
config https://github.com/ArthurFamily/config-center.git
码云
https://git.oschina.net/ArthurFamily/arthur.git
https://git.oschina.net/ArthurFamily/config-center.git
(注:配置文件通过git项目读取,放到一个项目中读取超过5分钟才会有响应,经测试不是网络原因,配置文件单独放置一个项目没有问题。)
<modules><!-- 注册中心与配置中心使用jhipster2.6.0 --><module>arthur-eureka</module><!-- 配置中心 --><module>arthur-config-center</module><!-- 集中监控断路器仪表盘 --><module>arthur-monitor-turbine</module><!-- zuul网关 --><module>arthur-gateway</module><!-- 后台管理之服务网管理 --><module>arthur-manage-serviceWeb</module><!-- 注册流程 --><module>arthur-manage-registrationProcess</module>
</modules>
最后两个模块主要做模块间通讯测试,没有页面,只是简单的连接了数据库,页面之后会增加。
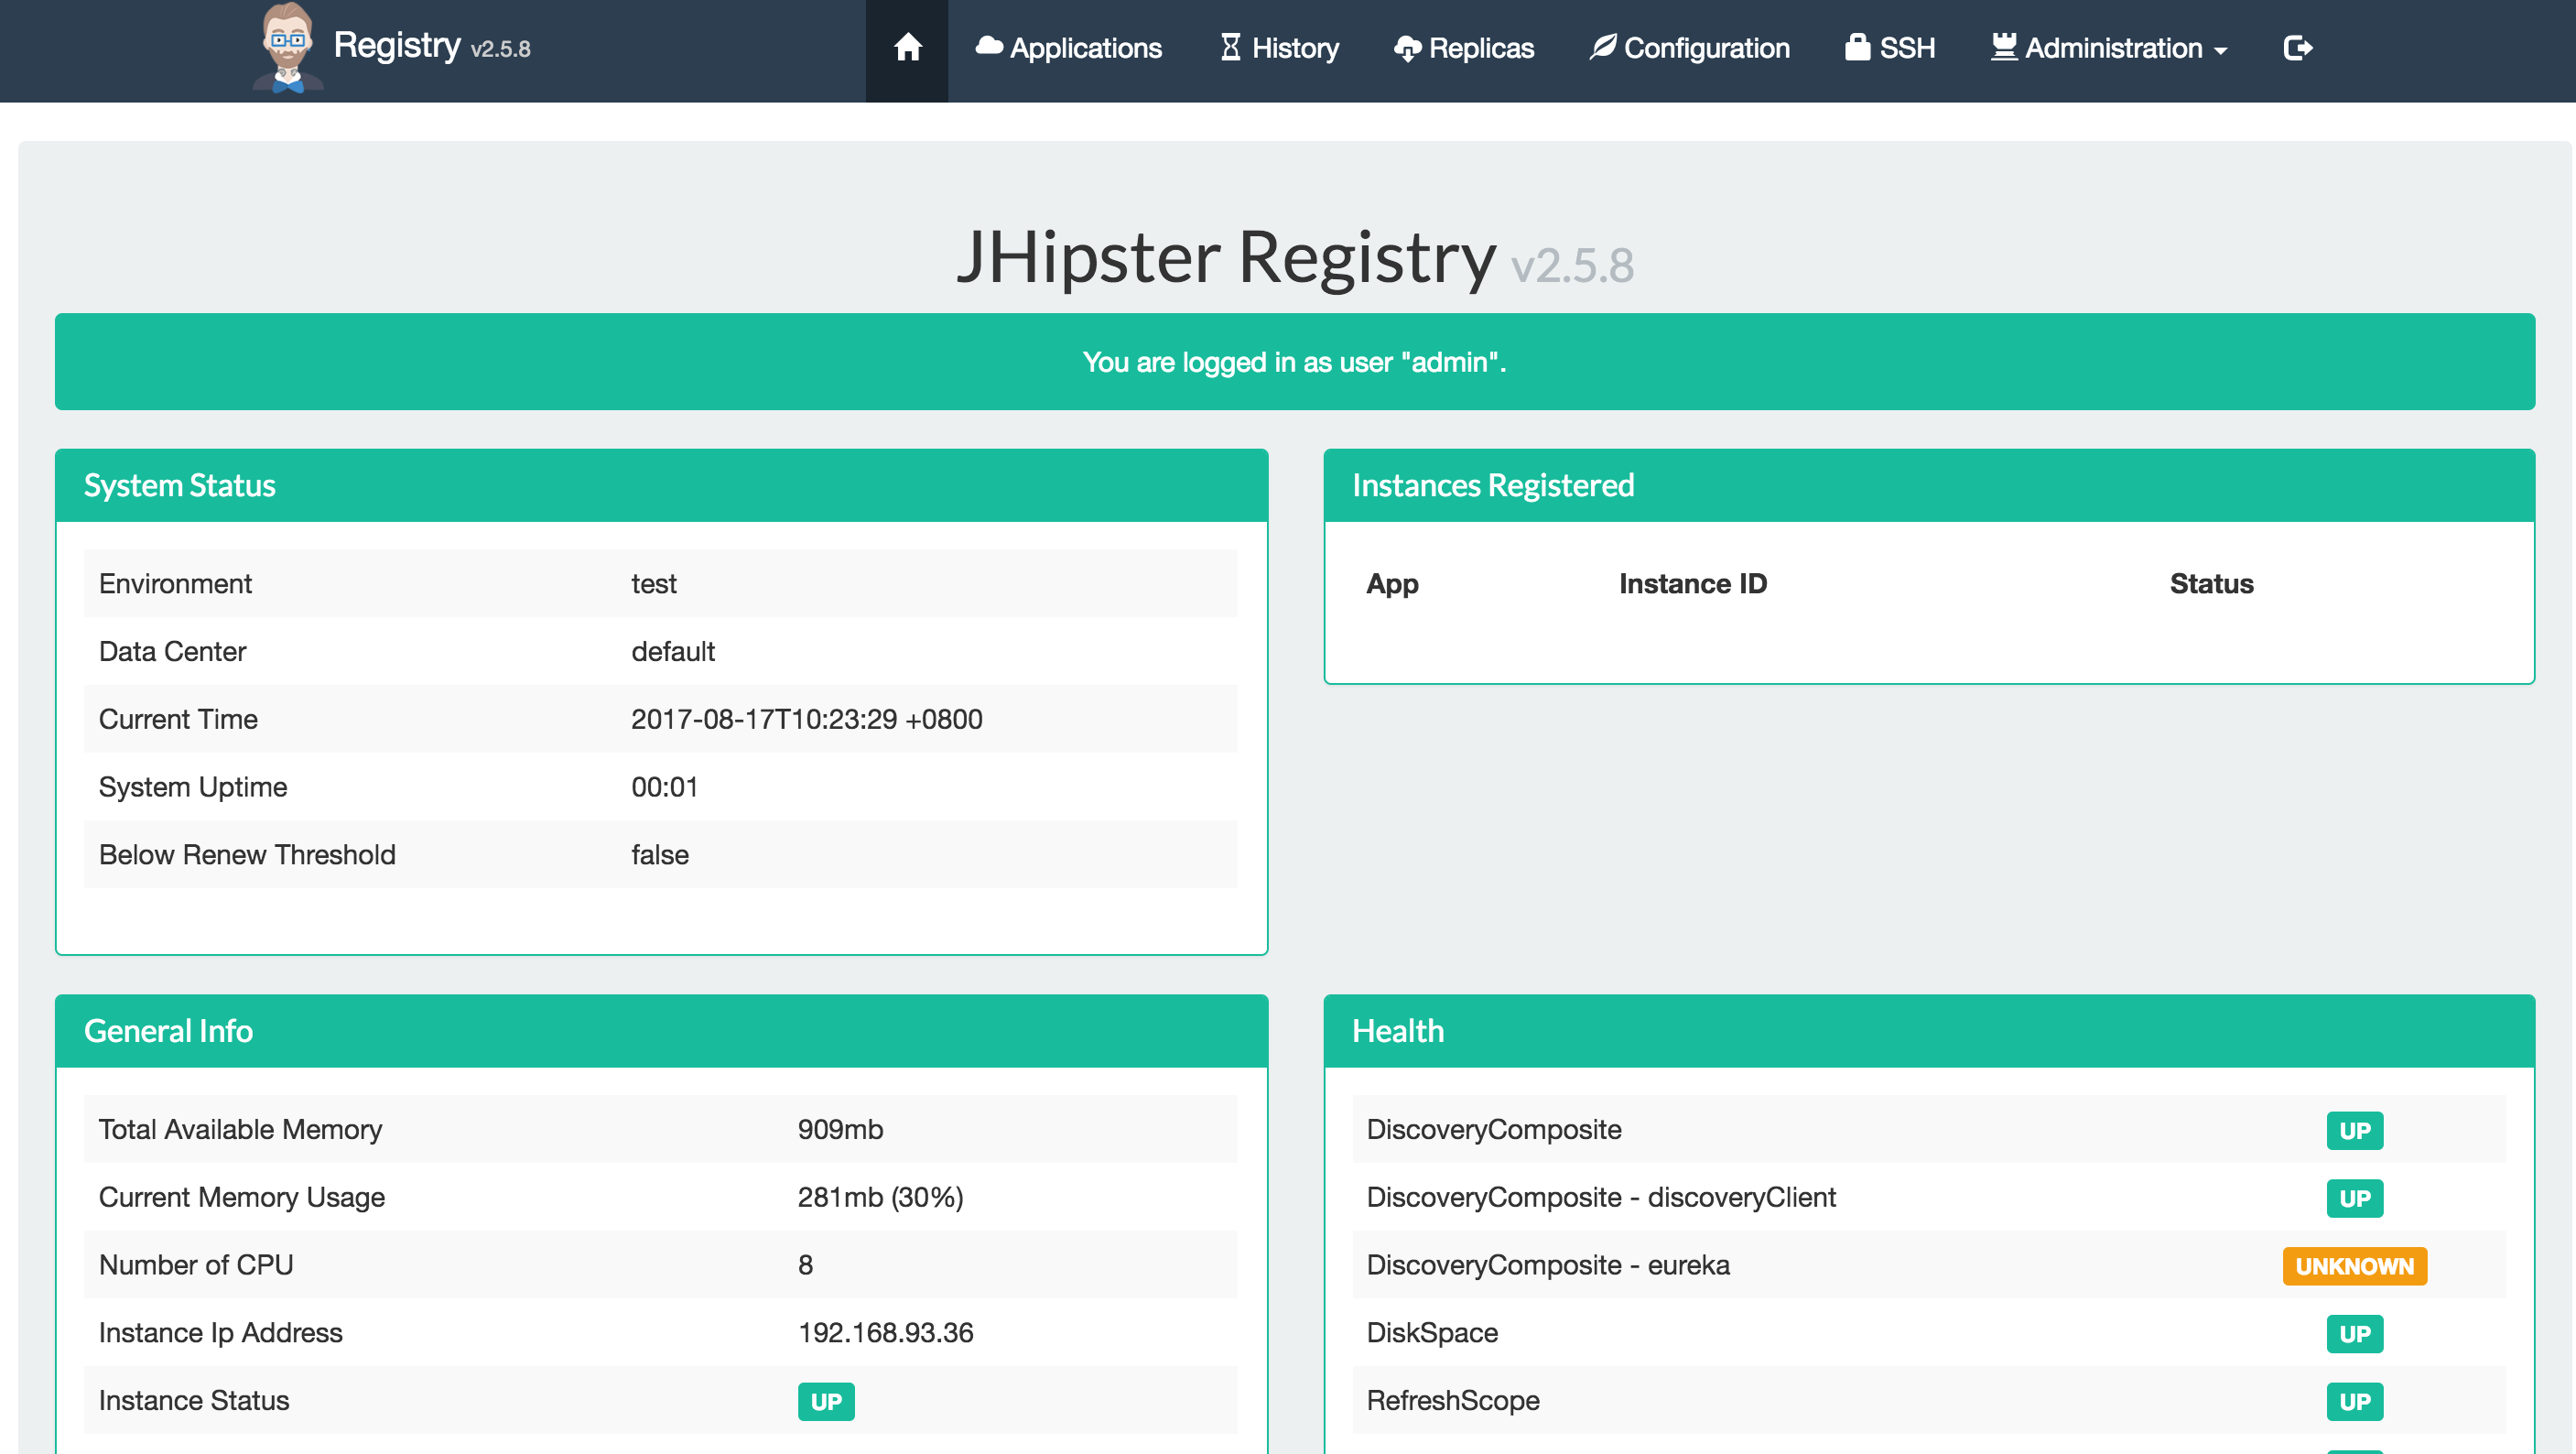
注册中心eureka主要使用的Jhipster的jhipster-registry-2.6.0版本,最新的版本3.1.0启动异常,貌似是zuul的问题,故采用稳定版,页面比原生的eureka页面要美观一些Jhipster抽空还会介绍,可以生成微服务项目,但是前端采用的angularjs,还在入门,故想集成bootstrap框架,所以子项目自己搭建,只用它的注册中心。如果需要搭建高可用集群注册中心,可部署多台eureka进行以来注册,也就是通常说的服务端的负载均衡。
1.首先介绍下配置中心 arthur-config-center,需要引入spring-cloud-config-server
<dependencies><dependency><groupId>org.springframework.cloud</groupId><artifactId>spring-cloud-config-server</artifactId><version>${springcloudconfig-version}</version><exclusions><exclusion><artifactId>slf4j-api</artifactId><groupId>org.slf4j</groupId></exclusion></exclusions></dependency><dependency><groupId>org.springframework.boot</groupId><artifactId>spring-boot-starter-logging</artifactId></dependency>
</dependencies>
加入EnableConfigServer注解
@SpringBootApplication
@EnableConfigServer
@EnableDiscoveryClient
public class ConfigCenter {private static final Logger LOG = LoggerFactory.getLogger(ConfigCenter.class.getName());public static void main(String[] args) throws UnknownHostException {SpringApplication app = new SpringApplication(ConfigCenter.class);//DefaultProfileUtil.addDefaultProfile(app);Environment env = app.run(args).getEnvironment();LOG.info("\n----------------------------------------------------------\n\t" +"Application '{}' is running! Access URLs:\n\t" +"Local: \t\thttp://127.0.0.1:{} \n\t" +"External: \thttp://{}:{} \n\t" +"Profile(s): \t{}\n----------------------------------------------------------",env.getProperty("spring.application.name")+"("+env.getProperty("version")+")",env.getProperty("server.port"),InetAddress.getLocalHost().getHostAddress(),env.getProperty("server.port"),env.getProperty("spring.profiles.active"));}
}
进行注册,这里采用的高可用配置中心,可部署多台应用,然后依赖的项目跟进注册中心的服务名去读取各自的配置文件
# 注册中心
eureka:client:enabled: true#注册中心开启健康检查会刷新上下文healthcheck:enabled: falsefetch-registry: trueregister-with-eureka: trueinstance-info-replication-interval-seconds: 10registry-fetch-interval-seconds: 10serviceUrl:defaultZone: http://${eurekaCenter.username}:${eurekaCenter.pasword}@localhost:8761/eureka/
配置Git
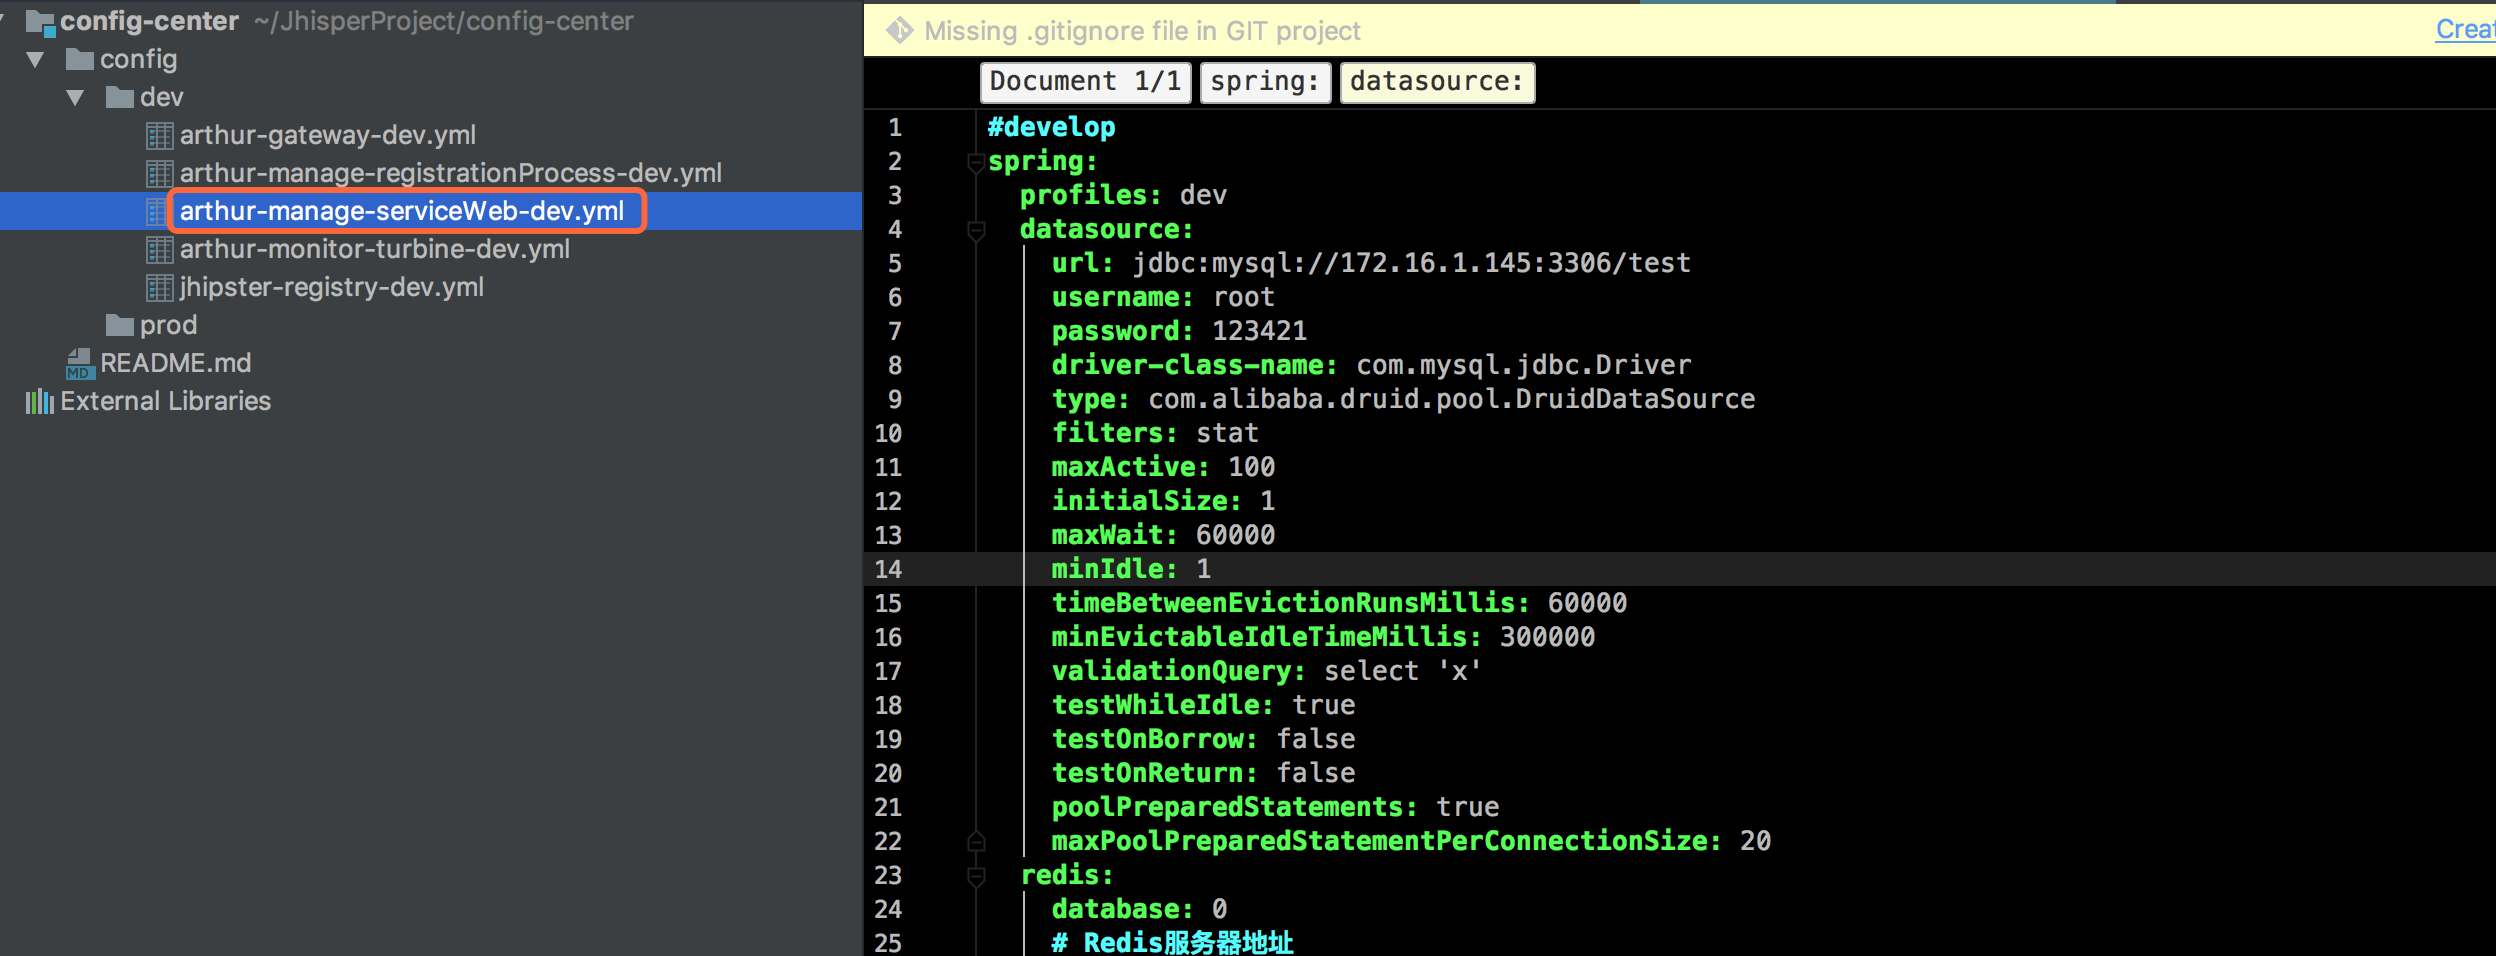
#配置中心 GitHub配置
cloud:config:server:git:uri: https://github.com/ArthurFamily/config-center.gitsearch-paths: /config/devstrict-host-key-checking: false
启动后访问http://127.0.0.1:10002/arthur-manage-serviceWeb/dev,返回配置文件json, 这里有一个对应规则,对应配置文件中的{服务名-dev(profiles->active的名)},配置文件中放置数据库、redis等配置
2.微服务项目 arthur-manage-serviceWeb 包括mybatis分页插件,自动配置数据源,与arthur-manage-registration 通过fegin进行接口调用,swagger2,ribbon的使用等。
<dependencies><!-- 自动配置,引入后,配置文件里必须配置,用到再引入故不在父级放置 --><dependency><groupId>org.mybatis.spring.boot</groupId><artifactId>mybatis-spring-boot-starter</artifactId><version>${springboot-mybatis}</version><exclusions><exclusion><artifactId>spring-boot</artifactId><groupId>org.springframework.boot</groupId></exclusion></exclusions></dependency><dependency><groupId>org.springframework.boot</groupId><artifactId>spring-boot-starter-data-redis</artifactId></dependency><!-- 数据库分页插件 --><dependency><groupId>com.github.pagehelper</groupId><artifactId>pagehelper-spring-boot-starter</artifactId><version>LATEST</version></dependency>
</dependencies>
公用的都在父级pom,部分如下fegin、hystrix、服务注册发现的、读取config的等
<!-- fegin 自带断路器-->
<dependency><groupId>org.springframework.cloud</groupId><artifactId>spring-cloud-starter-feign</artifactId>
</dependency>
<!-- 断路器 -->
<dependency><groupId>org.springframework.cloud</groupId><artifactId>spring-cloud-starter-hystrix</artifactId>
</dependency><dependency><groupId>org.springframework.cloud</groupId><artifactId>spring-cloud-starter-eureka</artifactId><version>${eureka-version}</version>
</dependency>
<dependency><groupId>org.springframework.cloud</groupId><artifactId>spring-cloud-starter-config</artifactId><version>${springcloudconfig-version}</version><exclusions><exclusion><artifactId>spring-boot</artifactId><groupId>org.springframework.boot</groupId></exclusion></exclusions>
</dependency>
mybatis-spring-boot-starter会自动读取配置文件中的数据源配置,无需我们自己去实现创建datasource、sqlsessionfactory等
spring:application:name: arthur-manage-serviceWebprofiles:active: devoutput:ansi:enabled: ALWAYSjackson:default-property-inclusion: non_nullcloud:config:discovery:enabled: trueservice-id: arthur-config-center
注意@MapperScan扫描mapper接口,原生的baseMapper不能被扫描到,故自己创建,扫描mapper配置文件在application.yml中
# mybatis mapper 文件
mybatis:mapper-locations: classpath:mapper/**/*.xml
@EnableDiscoveryClient启用注册发现,@EnableFeignClients启用fegin调用
@SpringBootApplication
@Import({WebMvcConfig.class})
@EnableScheduling
@ServletComponentScan
@RestController
@MapperScan(value = "**.mapper", markerInterface = BaseMapper.class)
@EnableDiscoveryClient
@EnableFeignClients // 调用服务
@EnableHystrix
public class ManageServiceWeb {private static final Logger LOG = LoggerFactory.getLogger(ManageServiceWeb.class.getName());public static void main(String[] args) throws UnknownHostException {SpringApplication app = new SpringApplication(ManageServiceWeb.class);//DefaultProfileUtil.addDefaultProfile(app);Environment env = app.run(args).getEnvironment();LOG.info("\n----------------------------------------------------------\n\t" +"Application '{}' is running! Access URLs:\n\t" +"Local: \t\thttp://127.0.0.1:{} \n\t" +"External: \thttp://{}:{} \n\t" +"Profile(s): \t{}\n----------------------------------------------------------",env.getProperty("spring.application.name")+"("+env.getProperty("version")+")",env.getProperty("server.port"),InetAddress.getLocalHost().getHostAddress(),env.getProperty("server.port"),env.getProperty("spring.profiles.active"));}
分页插件的使用
引入pom后在application.yml中增加配置
#分页插件使用
pagehelper:helperDialect: mysqlreasonable: truesupportMethodsArguments: trueparams: count=countSql
在调用数据库查询之前增加
public List<Users> getUserList(int page, int pageSize) {PageHelper.startPage(page, pageSize);return usersMapper.getUserList();
}
只对跟随在PageHelper之后的一条查询有效,PageInfo中有自己需要的page,limit等
@ApiOperation("获取用户分页列表")
@ApiImplicitParam(name = "offset", value = "当前页数", required = true, dataType = "int", paramType = "query")
@RequestMapping(value = "/getUserList", method = RequestMethod.GET)
public Object getUserList(int offset) {// 分页通过request传入参数// PageHelper.offsetPage(offset, 1);return new PageInfo(usersService.getUserList(offset,2));
}
下面再说一下fegin,自带ribbon前端负载均衡,其实就是封装了一下http请求,包括请求头一些数据,自己也可以通过实现接口类去自定义,首先使用@EnableFeignClients启用,然后创建接口,自己项目中就可以通过@Autowired直接注入使用了
@FeignClient(value = "arthur-manage-registrationProcess")
public interface RegistrationProcessFeignService {@RequestMapping(value = "/test/{name}", method = RequestMethod.GET)public String getServiceName(@PathVariable(value = "name") String name);
}
就会调用 arthur-manage-registrationProcess中的test方法,返回想要的信息
@RequestMapping(value = "/test/{name}", method = RequestMethod.GET)
public String getServiceName(@PathVariable(value = "name") String name) {return "请求者:" + name + "请求arthur-manage-registrationProcess的test方法";
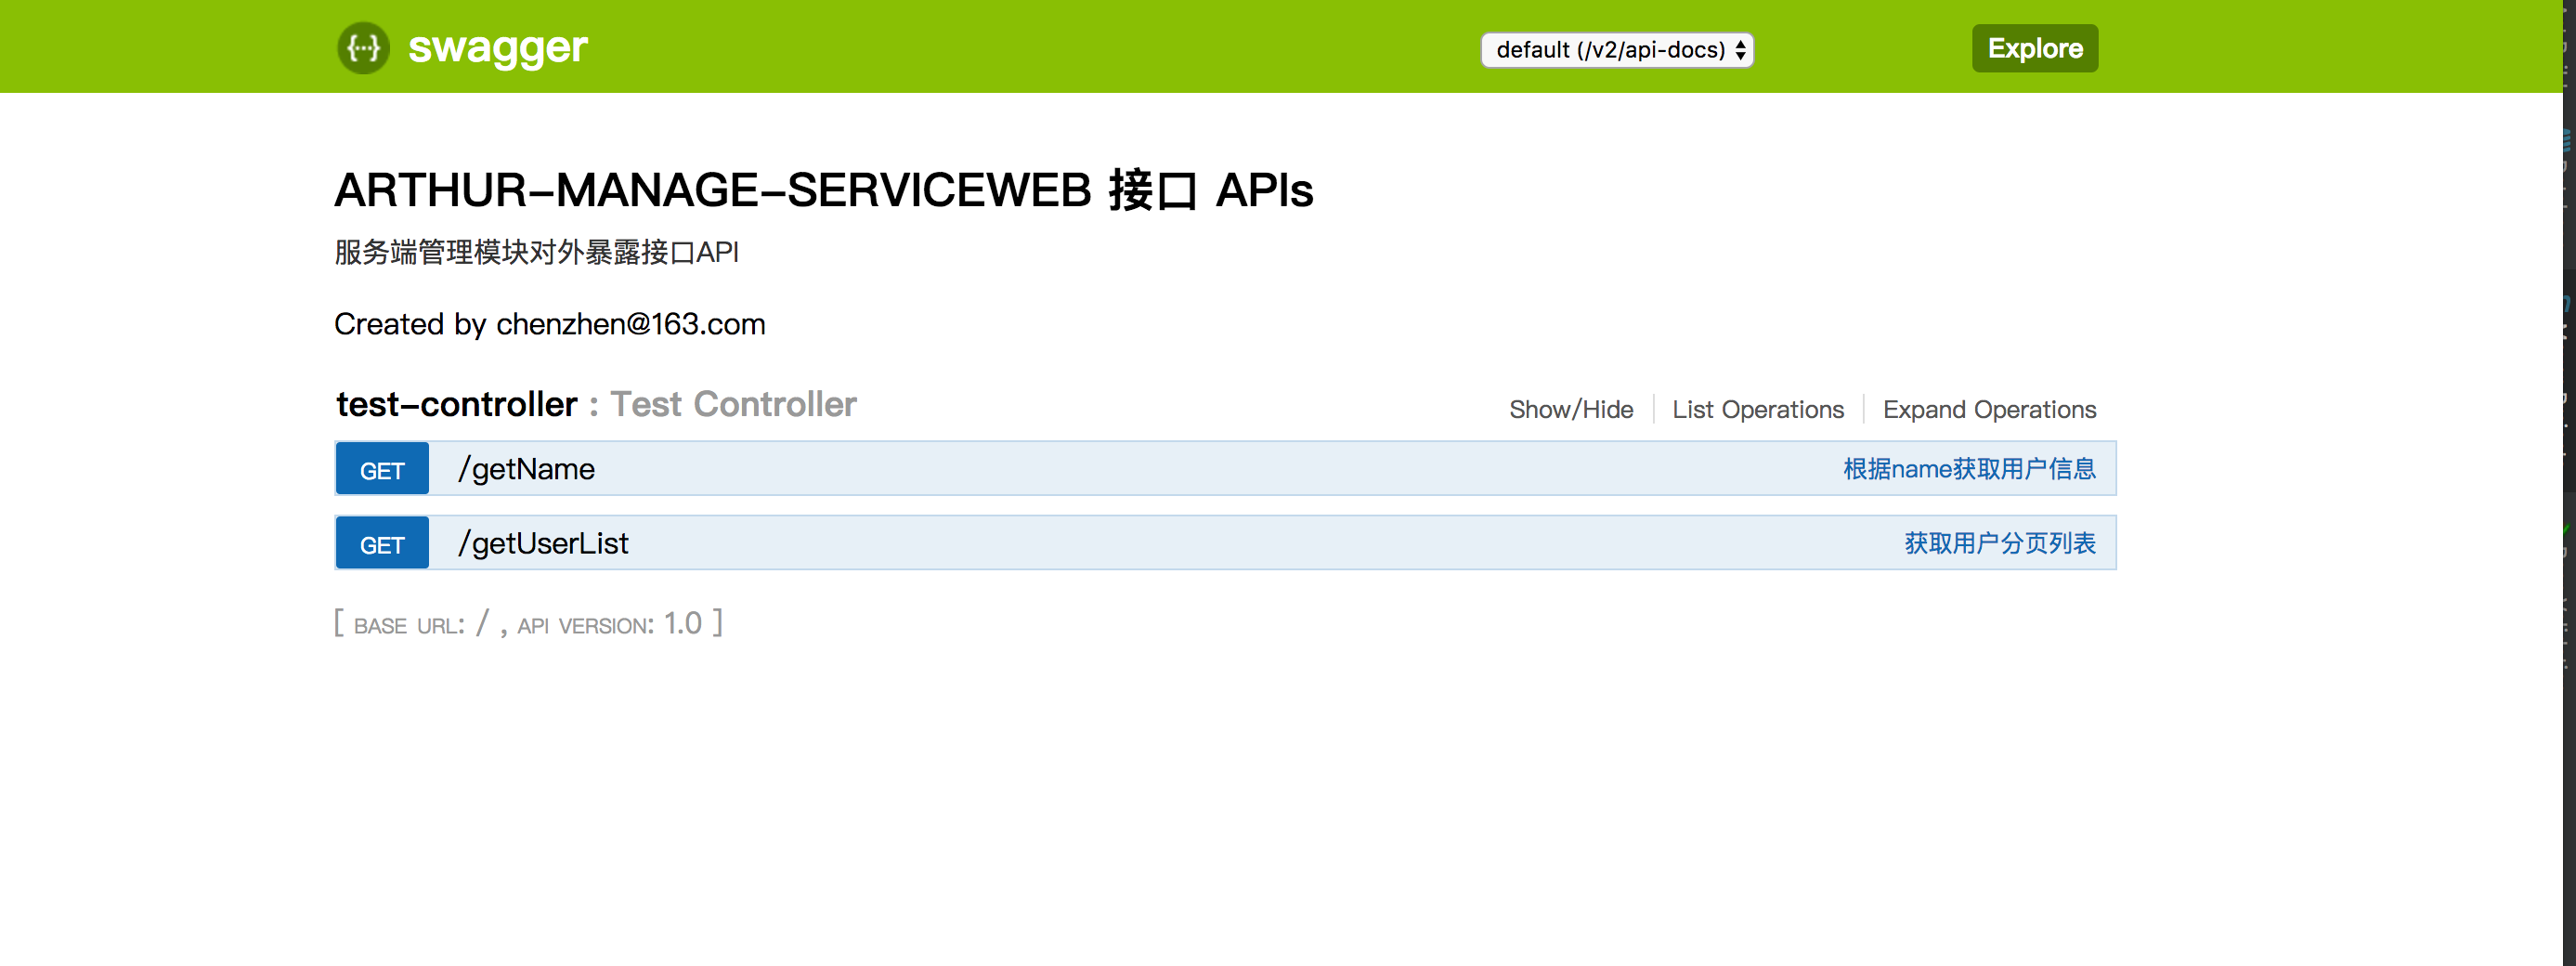
} 然后就是swagger2,可以帮助我们进行接口测试同时帮助我们维护API
公用的在父级
<!-- swagger支持 每个项目通过注册中心的实例点击进入swagger页面 -->
<dependency><groupId>io.springfox</groupId><artifactId>springfox-swagger2</artifactId><version>2.7.0</version>
</dependency>
<dependency><groupId>io.springfox</groupId><artifactId>springfox-swagger-ui</artifactId><version>2.7.0</version>
</dependency>
然后通过spring帮我们配置swagger,通过@EnableSwagger2启用
/*** 提供接口的服务需要引入此配置.* eureka中home-page-url配置http://localhost:${server.port}/swagger-ui.html地址,通过注册中心直接点击进入页面* Created by chenzhen on 2017/8/4.*/
@Configuration
@EnableSwagger2 // 启用Swagger2
public class SwaggerConfig {@Beanpublic Docket createRestApi() {// 创建API基本信息return new Docket(DocumentationType.SWAGGER_2).apiInfo(apiInfo()).select().apis(RequestHandlerSelectors.basePackage("com.cloud.arthur.controller"))// 扫描该包下的所有需要在Swagger中展示的API,@ApiIgnore注解标注的除外.paths(PathSelectors.any()).build();}private ApiInfo apiInfo() {// 创建API的基本信息,这些信息会在Swagger UI中进行显示return new ApiInfoBuilder().title("ARTHUR-MANAGE-SERVICEWEB 接口 APIs")// API 标题.description("服务端管理模块对外暴露接口API")// API描述.contact("chenzhen@163.com")// 联系人.version("1.0")// 版本号.build();}
}
然后要在自己的controller中对方法进行注释,一定要指定method类型,否则所有种类的http方法都会创建一遍,也可用@GetMapping@postMapping@PutMapping等注解,无需指定,这里类型还要对应API注解中的paramType,如get方法对应query
@ApiIgnore
@RequestMapping("/hello")
public String hello(String name) {return registrationProcessFeginService.getServiceName(name);
}@ApiOperation("根据name获取用户信息")
@ApiImplicitParam(name = "name", value = "用户名称", required = true, dataType = "String", paramType = "query")
@RequestMapping(value = "/getName", method = RequestMethod.GET)
public Users getName(String name) {return usersService.getUserByName(name);
}@ApiOperation("获取用户分页列表")
@ApiImplicitParam(name = "offset", value = "当前页数", required = true, dataType = "int", paramType = "query")
@RequestMapping(value = "/getUserList", method = RequestMethod.GET)
public Object getUserList(int offset) {// 分页通过request传入参数// PageHelper.offsetPage(offset, 1);return new PageInfo(usersService.getUserList(offset,2));
}
通过http://localhost:${server.port}/swagger-ui.html访问页面,这里可以通过配置注册中心的home-page-url,直接从注册中心点击进入swagger页面,项目多了维护起来也方便
# 注册中心
eureka:client:enabled: true#此处开启健康检查与高可用配置中心冲突,不可并存healthcheck:enabled: falsefetch-registry: trueregister-with-eureka: trueinstance-info-replication-interval-seconds: 10registry-fetch-interval-seconds: 10serviceUrl:defaultZone: http://${eurekaCenter.username}:${eurekaCenter.pasword}@localhost:8761/eureka/instance:appname: ${spring.application.name}instanceId: ${spring.application.name}:${spring.application.instance-id:${random.value}:${server.port}}lease-renewal-interval-in-seconds: 5lease-expiration-duration-in-seconds: 10metadata-map:zone: primaryprofile: ${spring.profiles.active}version: ${info.project.version}#配置swagger地址通过注册重点点击进入home-page-url: http://localhost:${server.port}/swagger-ui.html 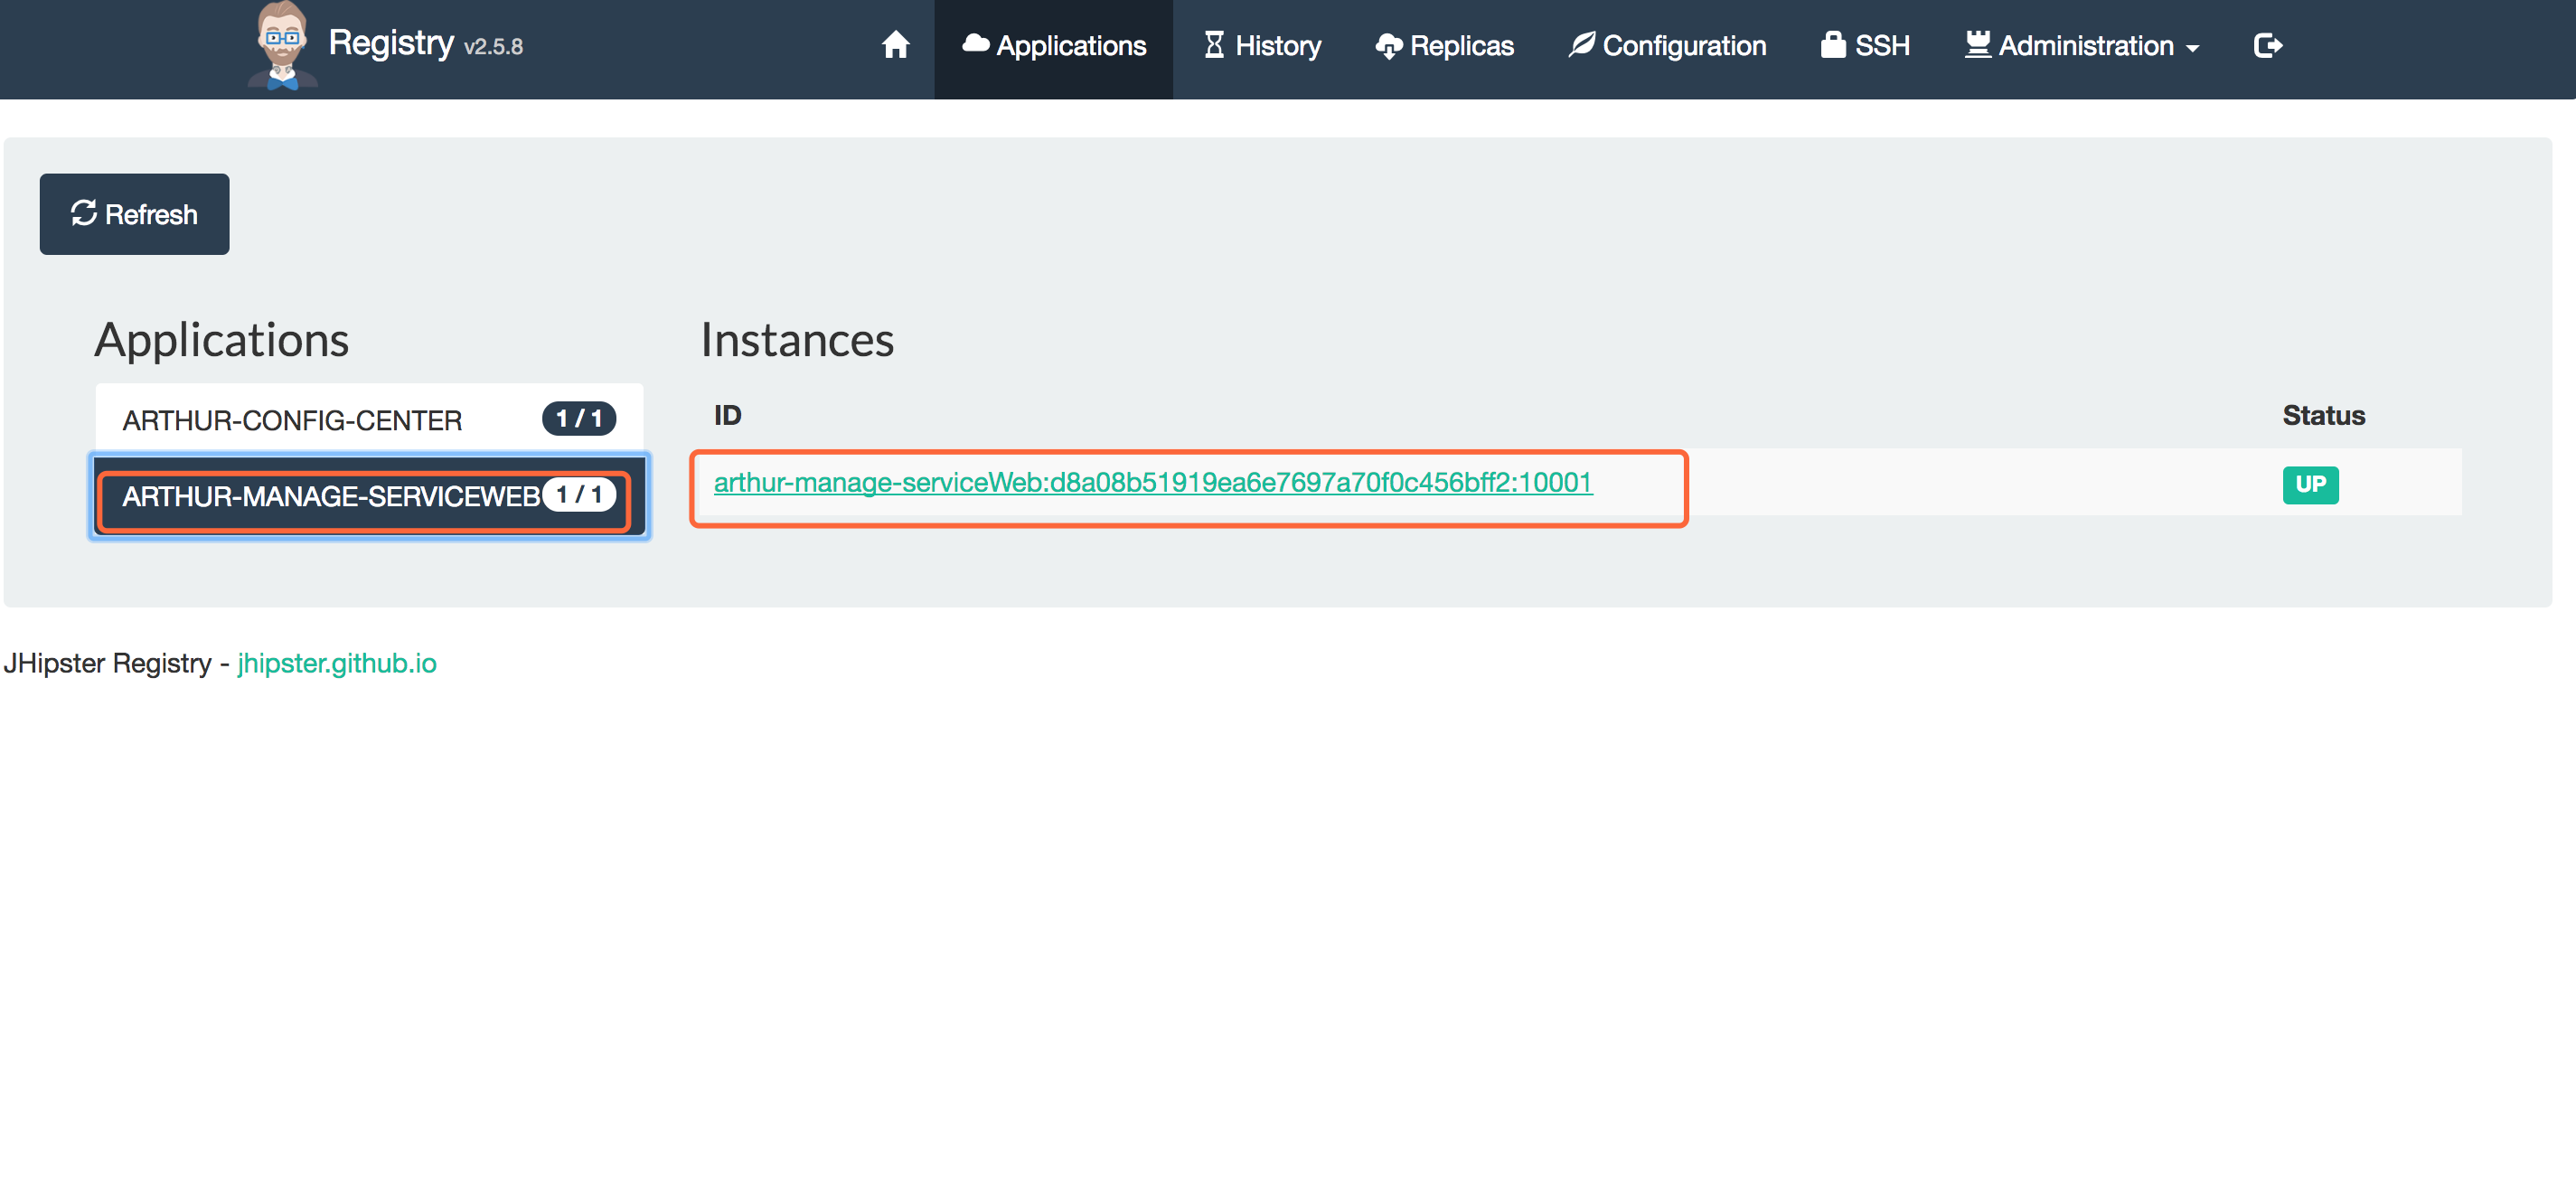
3.断路器使用
<!-- 断路器 -->
<dependency><groupId>org.springframework.cloud</groupId><artifactId>spring-cloud-starter-hystrix</artifactId>
</dependency>
通过@EnableHystrix启用熔断器
然后需要熔断的方法中自己实现一个方法,feign中直接实现自己的fegin接口就可以了,然后进行异常处理,fallback指向实现类。
@RequestMapping("/tests")
@HystrixCommand(fallbackMethod = "getNameFail")
public String getName() {String a = null;a.length();return "success";
}public String getNameFail() {return "fail";
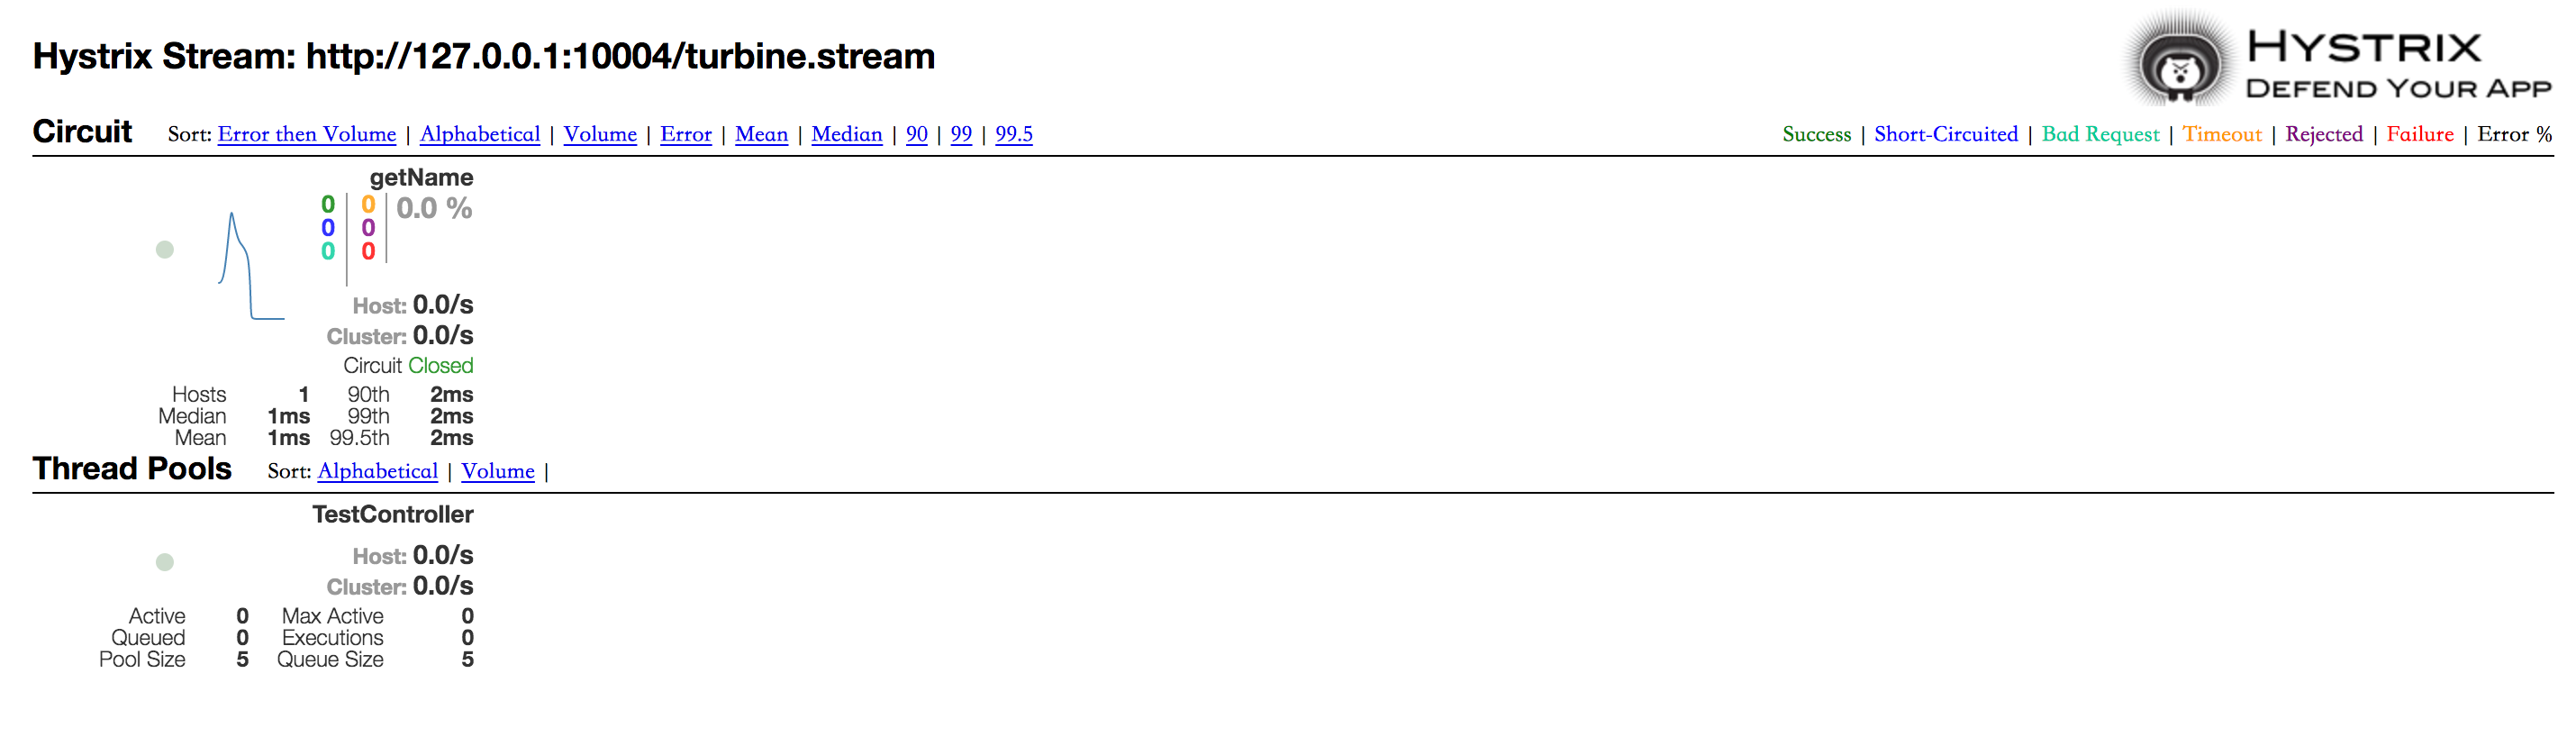
} 其实现在再加入@EnableHystrixDashboard,通过http://127.0.0.1:10004/hystrix访问页面添加/hystrix/hystrix.stream就可以监控了,但是只能监控自己,所以我们需要一个集群监控,故此采用turbine
下面看一下arthur-monitor-turbine项目
<dependencies><!-- 监控断路器总大盘 --><dependency><groupId>org.springframework.cloud</groupId><artifactId>spring-cloud-starter-turbine</artifactId></dependency><dependency><groupId>org.springframework.cloud</groupId><artifactId>spring-cloud-netflix-turbine</artifactId></dependency><dependency><groupId>org.springframework.cloud</groupId><artifactId>spring-cloud-starter-hystrix-dashboard</artifactId></dependency>
</dependencies>
通过@EnableTurbine启用turbine@EnableHystrixDashboard启用页面大盘
@SpringBootApplication
@EnableDiscoveryClient
@EnableTurbine
@EnableHystrixDashboard
public class MonitorTurbine {private static final Logger LOG = LoggerFactory.getLogger(MonitorTurbine.class.getName());public static void main(String[] args) throws UnknownHostException {SpringApplication app = new SpringApplication(MonitorTurbine.class);//DefaultProfileUtil.addDefaultProfile(app);Environment env = app.run(args).getEnvironment();LOG.info("\n----------------------------------------------------------\n\t" +"Application '{}' is running! Access URLs:\n\t" +"Local: \t\thttp://127.0.0.1:{} \n\t" +"External: \thttp://{}:{} \n\t" +"Profile(s): \t{}\n----------------------------------------------------------",env.getProperty("spring.application.name")+"("+env.getProperty("version")+")",env.getProperty("server.port"),InetAddress.getLocalHost().getHostAddress(),env.getProperty("server.port"),env.getProperty("spring.profiles.active"));}
}
集中配置文件中配置需要监控的服务的名称,这些服务都得启用@EnableHystrix并配置fallback
turbine:aggregator:clusterConfig: default   # 指定聚合哪些集群,多个使用","分割,默认为default。可使用http://.../turbine.stream?cluster={clusterConfig之一}访问appConfig: arthur-manage-registrationProcess,arthur-manage-serviceWeb  # 配置Eureka中的serviceId列表,表明监控哪些服务clusterNameExpression: new String("default")# 1. clusterNameExpression指定集群名称,默认表达式appName;此时:turbine.aggregator.clusterConfig需要配置想要监控的应用名称# 2. 当clusterNameExpression: default时,turbine.aggregator.clusterConfig可以不写,因为默认就是default# 3. 当clusterNameExpression: metadata['cluster']时,假设想要监控的应用配置了eureka.instance.metadata-map.cluster: ABC,则需要配置,同时turbine.aggregator.clusterConfig: ABC
#前端负载配置
启动后可看到监控的stream

访问http://127.0.0.1:10004/hystrix,并写入turbine的stream http://127.0.0.1:10004/turbine.stream
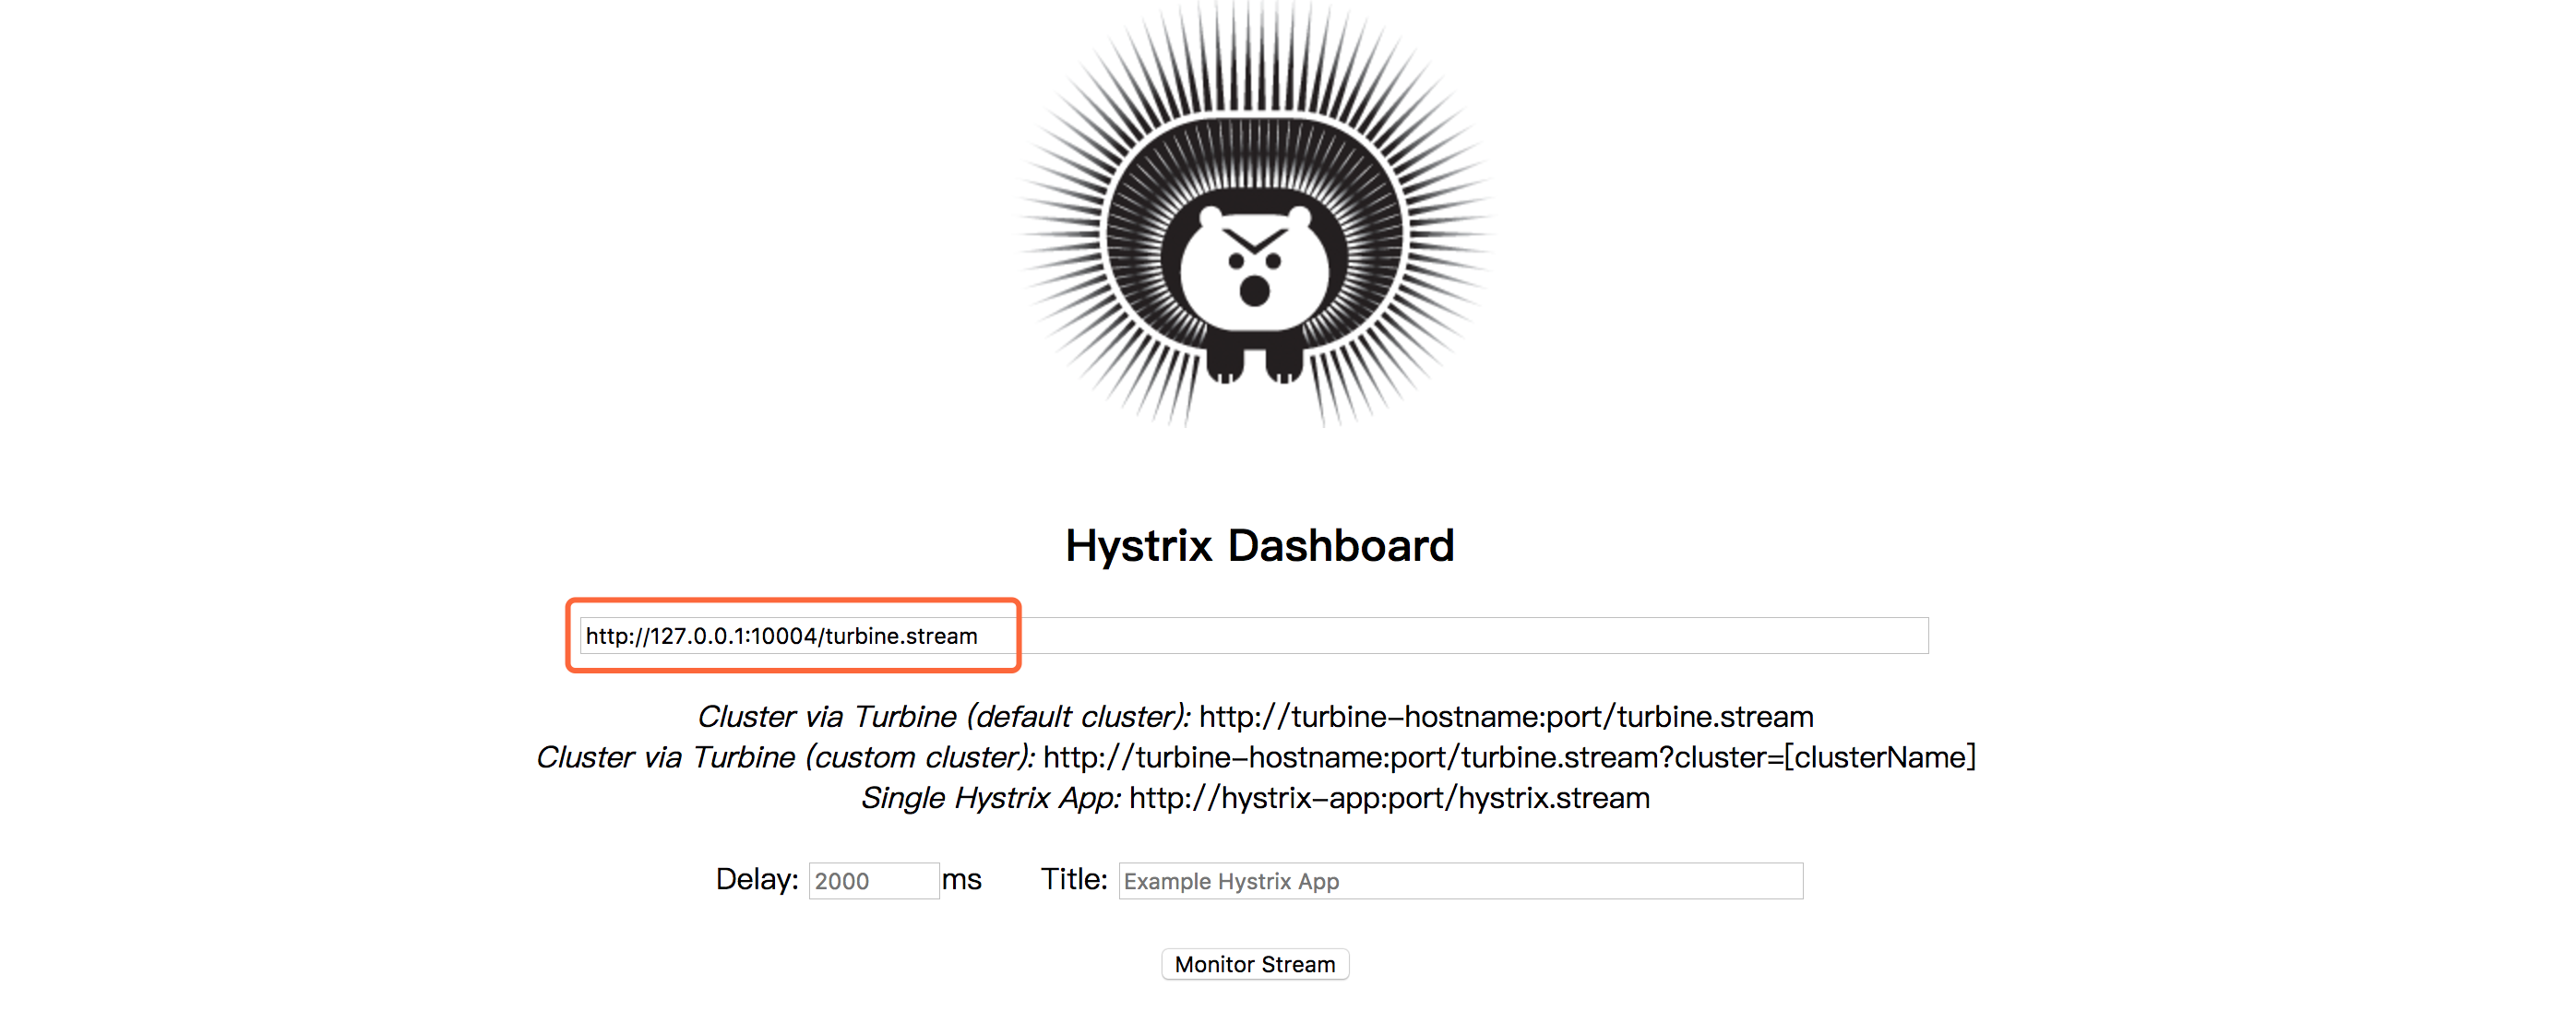
访问熔断器方法http://127.0.0.1:10003/tests,就可以看到大盘了
4.网关zuul的使用 arthur-gateway
<dependencies><dependency><groupId>org.springframework.cloud</groupId><artifactId>spring-cloud-starter-zuul</artifactId></dependency>
</dependencies>
@EnableZuulProxy启用网关代理@SpringCloudApplication包含@SpringBootApplication、@EnableDiscoveryClient、@EnableCircuitBreaker这仨注解
@SpringCloudApplication
@EnableZuulProxy
public class GateWay {private static final Logger LOG = LoggerFactory.getLogger(GateWay.class.getName());public static void main(String[] args) throws UnknownHostException {SpringApplication app = new SpringApplication(GateWay.class);//DefaultProfileUtil.addDefaultProfile(app);Environment env = app.run(args).getEnvironment();LOG.info("\n----------------------------------------------------------\n\t" +"Application '{}' is running! Access URLs:\n\t" +"Local: \t\thttp://127.0.0.1:{} \n\t" +"External: \thttp://{}:{} \n\t" +"Profile(s): \t{}\n----------------------------------------------------------",env.getProperty("spring.application.name")+"("+env.getProperty("version")+")",env.getProperty("server.port"),InetAddress.getLocalHost().getHostAddress(),env.getProperty("server.port"),env.getProperty("spring.profiles.active"));}@Beanpublic GatewayFilter gatewayFilter() {return new GatewayFilter();}
创建一个zuulfilter,接收请求的时候首先去校验参数中是否包含我们配置的tocken,包含才继续请求,加强安全认证
public class GatewayFilter extends ZuulFilter{@Value("${spring.accessToken}")private String accessToken;@Overridepublic boolean shouldFilter() {return true;}/*filterType:返回一个字符串代表过滤器的类型,在zuul中定义了四种不同生命周期的过滤器类型,具体如下:pre:可以在请求被路由之前调用routing:在路由请求时候被调用post:在routing和error过滤器之后被调用error:处理请求时发生错误时被调用filterOrder:通过int值来定义过滤器的执行顺序shouldFilter:返回一个boolean类型来判断该过滤器是否要执行,所以通过此函数可实现过滤器的开关。在上例中,我们直接返回true,所以该过滤器总是生效。run:过滤器的具体逻辑。需要注意,这里我们通过ctx.setSendZuulResponse(false)令zuul过滤该请求,不对其进行路由,然后通过ctx.setResponseStatusCode(401)设置了其返回的错误码,当然我们也可以进一步优化我们的返回,比如,通过ctx.setResponseBody(body)对返回body内容进行编辑等。*/@Overridepublic Object run() {RequestContext ctx = RequestContext.getCurrentContext();HttpServletRequest request = ctx.getRequest();Object accessToken = request.getParameter("accessToken"); //定义规则:访问url中必须带有accessToken参数if(accessToken == null || !accessToken.equals(accessToken)) {ctx.setSendZuulResponse(false);ctx.setResponseStatusCode(401);return null;}return null;}@Overridepublic String filterType() {return "pre";}@Overridepublic int filterOrder() {return 0;} 然后配置网关代理
#develop
# zuul配置
zuul:host:max-total-connections: 1000max-per-route-connections: 100semaphore:max-semaphores: 500routes:api-a:path: /services/**# 提供服务的名称,对外接口,需提供tokenserviceId: arthur-manage-serviceWeb
spring:accessToken: 1000010121385750333
最后通过网关服务器就可以访问注册服务提供的方法了
之前访问http://127.0.0.1:10001/getUserList?offset=1
现在访问http://127.0.0.1:9999/services/getUserList?offset=1&accessToken=1000010121385750333 同样的效果
最后就可以同步进行开发了。


