本文主要是介绍【Freeradius】使用Freeradius、LDAP和Google Authenticator实现双因素身份验证,希望对大家解决编程问题提供一定的参考价值,需要的开发者们随着小编来一起学习吧!
随着网络安全威胁的增加,传统的用户名和密码已经变得不再安全。为了加强网络访问的安全性,双因素身份验证成为了一种流行且有效的解决方案。在本文中,我们将介绍如何在已有的Windows AD环境下,在Ubuntu 22.04上安装和配置Freeradius和Google Authenticator来实现双因素身份验证,来提供网络访问服务器认证、授权和帐户信息。。
- Freeradius 是一个功能强大的开源 AAA (认证、授权、会计) 服务器,用于实现网络访问控制和用户认证。
- Google Authenticator是谷歌提供的双因素身份验证服务,提供额外的安全层,确保用户登录和访问在线服务时的身份确认。
- Windows AD 提供的LDAP服务是基于轻量目录访问协议,用于管理和访问Windows活动目录中的用户、组织结构和资源等信息。
实验环境:
Windows AD(已有):提供LDAP服务,作为用户信息的存储库。
Ubuntu 22.04:将用于安装和配置Freeradius和Google Authenticator。
以下是实施步骤:
第一步:在Ubuntu 22.04上安装Freeradius和Google Authenticator以及相关软件。
apt update && apt upgrade -y
apt-get install freeradius freeradius-common freeradius-utils freeradius-ldap libpam-google-authenticator -yroot@ud-Virtual-Machine:/home/ud# freeradius -v
radiusd: FreeRADIUS Version 3.0.26, for host x86_64-pc-linux-gnu, built on Jan  4 2023 at 03:23:09
FreeRADIUS Version 3.0.26
Copyright (C) 1999-2021 The FreeRADIUS server project and contributors
There is NO warranty; not even for MERCHANTABILITY or FITNESS FOR A
PARTICULAR PURPOSE
You may redistribute copies of FreeRADIUS under the terms of the
GNU General Public License
For more information about these matters, see the file named COPYRIGHTroot@ud-Virtual-Machine:/home/ud# google-authenticator -h
google-authenticator [<options>]-h, --help                     Print this message-c, --counter-based            Set up counter-based (HOTP) verification-C, --no-confirm               Don't confirm code. For non-interactive setups-t, --time-based               Set up time-based (TOTP) verification-d, --disallow-reuse           Disallow reuse of previously used TOTP tokens-D, --allow-reuse              Allow reuse of previously used TOTP tokens-f, --force                    Write file without first confirming with user-l, --label=<label>            Override the default label in "otpauth://" URL-i, --issuer=<issuer>          Override the default issuer in "otpauth://" URL-q, --quiet                    Quiet mode-Q, --qr-mode={NONE,ANSI,UTF8} QRCode output mode-r, --rate-limit=N             Limit logins to N per every M seconds-R, --rate-time=M              Limit logins to N per every M seconds-u, --no-rate-limit            Disable rate-limiting-s, --secret=<file>            Specify a non-standard file location-S, --step-size=S              Set interval between token refreshes-w, --window-size=W            Set window of concurrently valid codes-W, --minimal-window           Disable window of concurrently valid codes-e, --emergency-codes=N        Number of emergency codes to generate
第二步:配置Freeradius和Google Authenticator。
1. 编辑的第一个配置文件是 /etc/freeradius/3.0/radiusd.conf 文件
# SECURITY CONFIGURATION
security {# user/group: The name (or #number) of the user/group to run radiusd as.user = rootgroup = root
}
2. 需要编辑 FreeRadius 配置文件是 /etc/freeradius/3.0/sites-enabled/default。这个文件告诉 FreeRADIUS 如何使用 PAM 进行授权和认证。
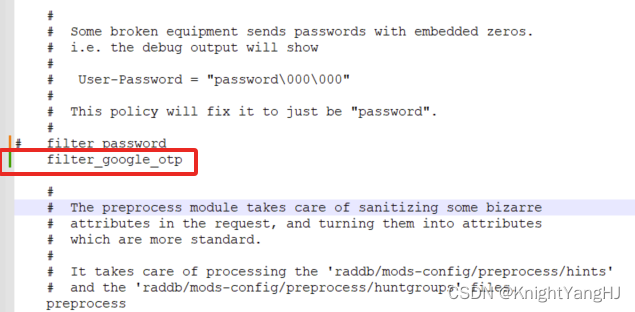
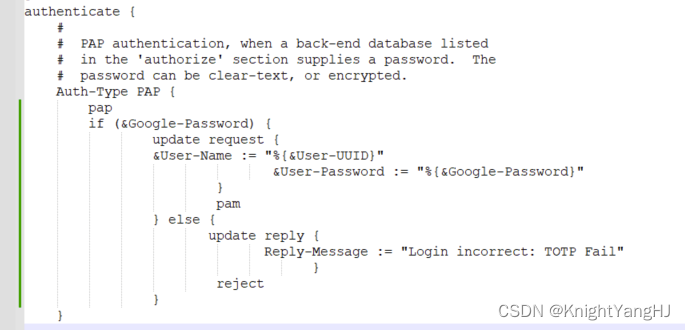
3. 上面的配置片段使用了一个在 /etc/freeradius/3.0/policy.d/filter 中定义的新过滤器( “filter_google_otp”),它有助于从密码中提取6位数的TOTP。
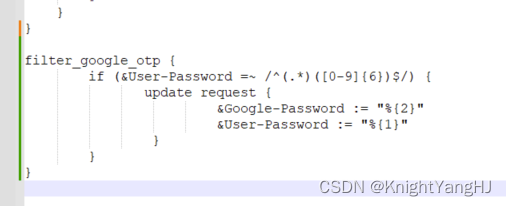
4. 由于我们正在使用新的属性( “Google-Password”)在协议中名称没有意义。因此,将新的属性添加到 /etc/freeradius/3.0/dictionary 文件中,如下所示。

5. 设置 FreeRadius 客户端,在这里/etc/freeradius/3.0/clients.conf,我们可以设置客户端(例如:网络设备或服务器)用于连接到 RADIUS 服务器的密钥。请确保将默认密钥更改为不同的密钥,以提高安全性,以下配置仅供测试使用。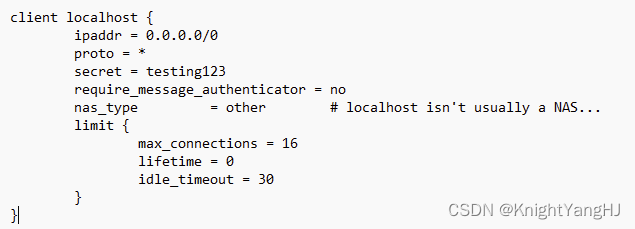
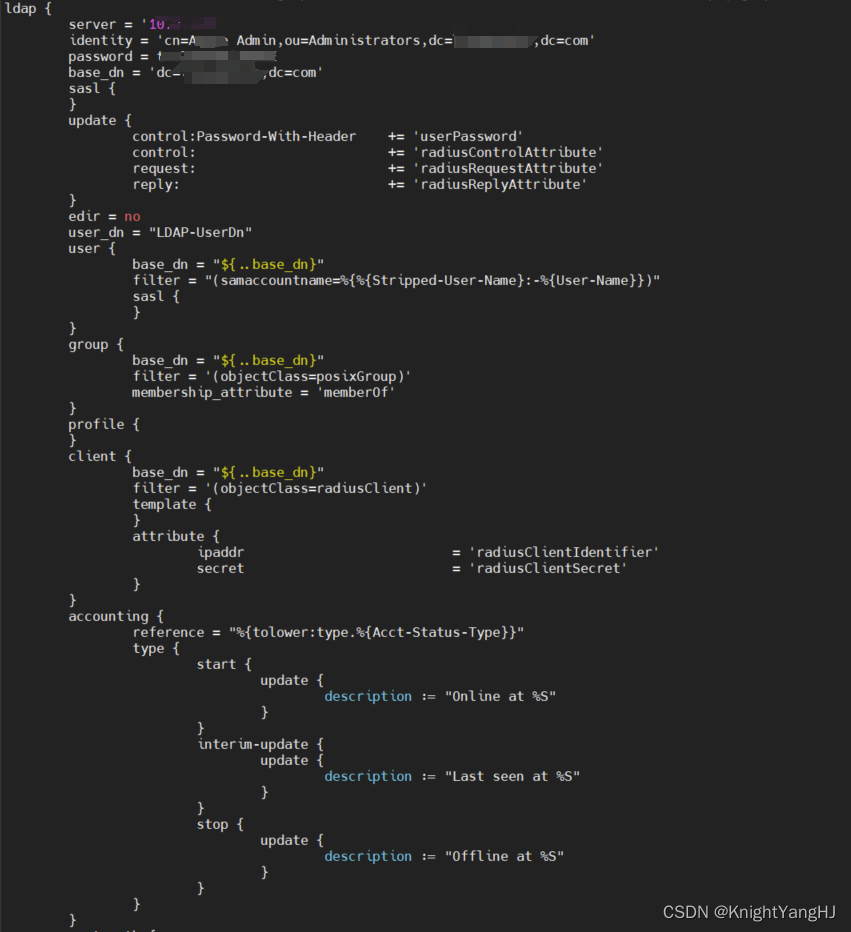
6. 开始配置 freeradius LDAP 模块以连接到 LDAP 服务器。编辑文件 /etc/freeradius/3.0/mods-available/ldap,内容如下所示。
7. 由于我们配置了 FreeRADIUS 使用 PAM + LDAP 对用户进行身份验证,我们需要配置 /etc/pam.d/radiusd 文件,并指示它集成 Google Authenticator PAM。请按照以下配置并将其余行注释掉。
8. 在配置完后,通过执行以下命令启用LDAP 模块和PAM 模块。
ln -s /etc/freeradius/3.0/mods-available/ldap /etc/freeradius/3.0/mods-enabled/
ln -s /etc/freeradius/3.0/mods-available/pam /etc/freeradius/3.0/mods-enabled/
9. 修改FreeRADIUS 服务的 systemd 服务单元文件/lib/systemd/system/freeradius.service
# Ensure the daemon can still write its pidfile after it drops
# privileges. Combination of options that work on a variety of
# systems. Test very carefully if you alter these lines.
RuntimeDirectory=freeradius
RuntimeDirectoryMode=0775
User=root
Group=root
10. 当所有配置文件都已更改时,需要重新启动服务才能使更改生效,可以执行以下命令重新启动 FreeRadius 服务。
systemctl daemon-reload
systemctl restart freeradius.service
第三步:测试
在开始测试之前,您需要创建 LDAP 用户 Google Authenticator,并保存在/google_auth文件夹下。
a. 创建vim add-otp-user
#!/bin/bash
if [ -z $1 ]; thenecho "Usage: add_otp_user USERNAME"exit 1
fi
# Ensure the otp folder is present
[ -d /google_auth ] || mkdir -p /google_authgoogle-authenticator \--time-based \--disallow-reuse \--force \--rate-limit=3 \--rate-time=30 \--window-size=3 \-s /google_auth/${1}.google_authenticator
b. 赋权
chmod -v +x add-otp-user
c. 运行脚本添加用户Google Auth密钥
#添加OTP 【where username matches the LDAP username】
bash ./add-otp-user <username>
d. 测试所有配置是否成功
#Command Syntax
radtest <username> <password+google authenticator TOTP> localhost 1812 <RADIUS secret key>#Example:
radtest use01 ldapuserpassword123456 localhost 1812 testing123#

通过实施以上步骤,您可以为您的Radius服务添加一层额外的安全性。双因素身份验证不仅提供了更强的身份认证,还可以减少身份盗窃和未授权访问的风险。然而,需要注意的是,双因素身份验证并不能保证100%的安全性。使用强密码、定期更换密码、定期更新系统和进行安全审计等其他安全措施同样重要。综合采取多种安全策略,才能有效保护系统和用户的数据安全。
通过结合Freeradius、Google Authenticator和LDAP的强大功能,您可以轻松实现双因素身份验证,并提升系统的安全性。不断关注并采取最新的安全技术,保护您的网络免受恶意入侵和数据泄露的威胁。为了您的系统和用户的安全,投入一些时间和精力来实施双因素身份验证是值得的!
这篇关于【Freeradius】使用Freeradius、LDAP和Google Authenticator实现双因素身份验证的文章就介绍到这儿,希望我们推荐的文章对编程师们有所帮助!


