本文主要是介绍10行代码让Nodejs处理请求的能力提升5x倍,希望对大家解决编程问题提供一定的参考价值,需要的开发者们随着小编来一起学习吧!
Node.js以单线程、非阻塞性能工作,在CPU中作为单个进程工作。无论使用多么强大的服务器和资源,单线程进程所能做的都是有限的。
Node.js被设计用于构建具有多个节点的分布式应用程序,因此得名Node.js。
工作负载是我们开始扩展应用程序的主要原因之一,包括可用性和容错性。我们可通过多种方式进行扩展,其中最简单的解决方案之一是克隆。我们可以使用Node.js提供的Cluster Module进行克隆。
在开始使用资源利用率Node.Js服务器处理请求之前,让我们了解一下Cluster模块的基本工作原理。
Cluster模块如何工作?
集群模块有两种类型的进程,Master和Worker。所有传入的请求都由主进程处理,主进程决定由哪个Worker处理传入的请求。Worker进程可以被认为是普通的Node.Js单实例服务器,它服务于请求。
主进程如何分配请求的连接?
- 第一种方法(除了Windows以外的所有平台上的默认方法)是轮询方法,其中主进程在一个端口上监听,接受新连接,并以轮询方式将它们分发给各个工作进程,并使用一些内置的负载判断来避免工作进程超载。

- 第二种方法是主进程创建侦听套接字并将其发送给感兴趣的工作程序。然后,工作进程直接接受传入的连接请求。
从理论上讲,第二种方法性能最好。然而,在实践中,由于操作系统调度程序的变幻莫测,分布往往非常不平衡。我们观察到超过70%的连接只在两个进程中结束,而这两个进程总共有8个。
创建一个简单的Node.js服务器
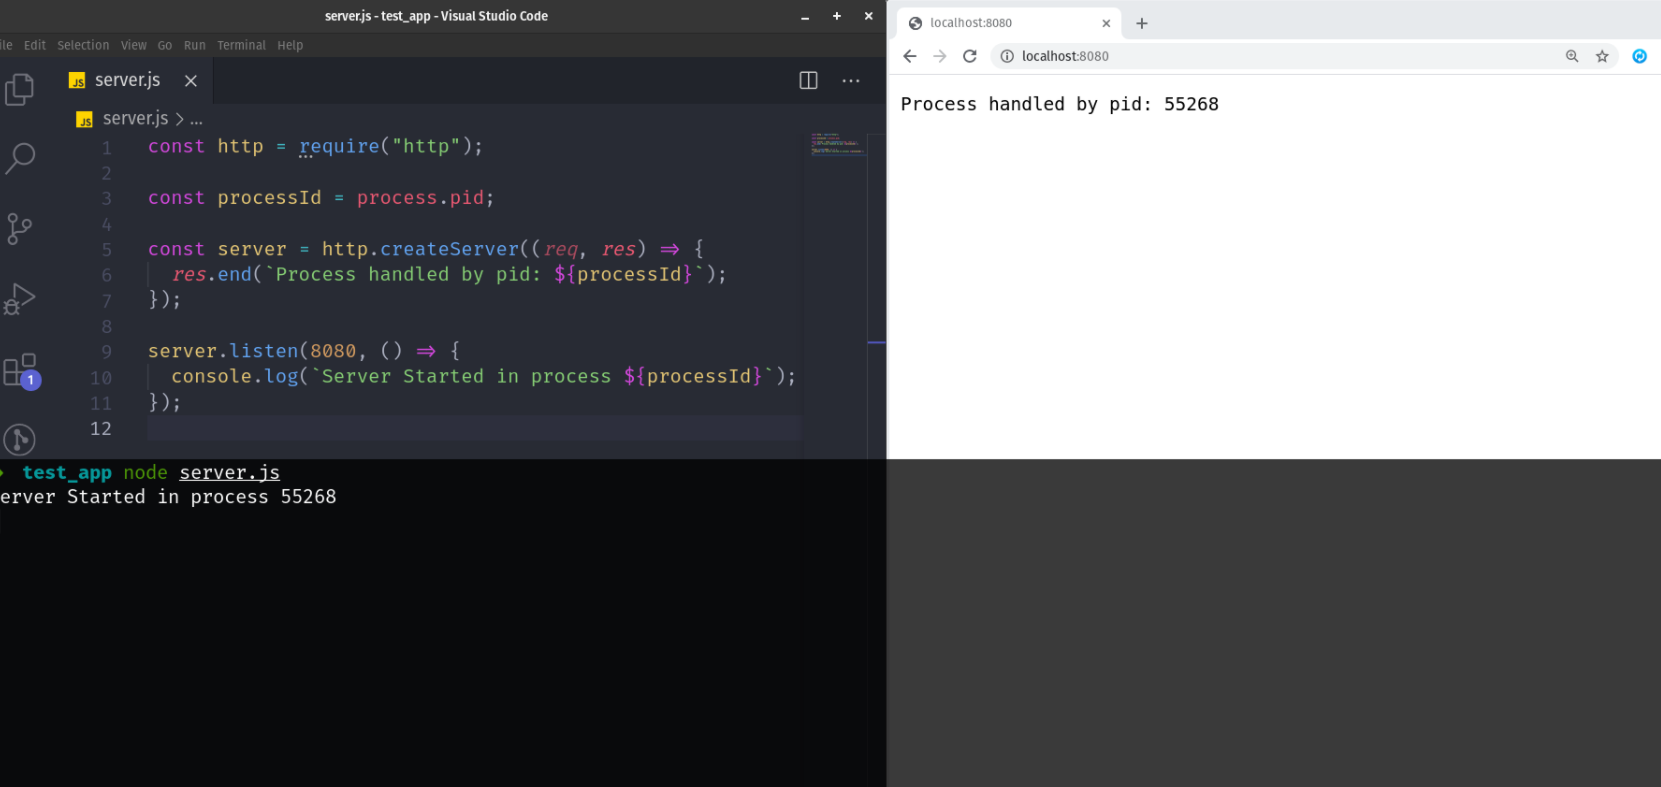
让我们创建最简单的Node.js服务器:
/*** server.js ***/
const http = require(“http”);
// get the process ID of Node Server
const processId = process.pid;
// Creating server and handling request
const server = http.createServer((req, res) => {// Simulate CPU Workfor (let index = 0; index < 1e7; index++);res.end(`Process handled by pid: ${processId}`);
});
// start server and listen the request
server.listen(8080, () => {console.log(`Server Started in process ${processId}`);
});
服务器反馈出以下响应结果:
对改服务器进行负载测试,这里我们使用ApacheBench Tool
我们将在10秒内用500个并发请求访问Node.js服务器。
➜ test_app ab -c 500 -t 10 http://localhost:8080/
This is ApacheBench, Version 2.3 <$Revision: 1843412 $>
Copyright 1996 Adam Twiss, Zeus Technology Ltd, http://www.zeustech.net/
Licensed to The Apache Software Foundation, http://www.apache.org/Benchmarking localhost (be patient)
Finished 3502 requestsServer Software:
Server Hostname: localhost
Server Port: 8080Document Path: /
Document Length: 29 bytesConcurrency Level: 500
Time taken for tests: 11.342 seconds
Complete requests: 3502
Failed requests: 0
Total transferred: 416104 bytes
HTML transferred: 116029 bytes
Requests per second: 308.76 [#/sec] (mean)
Time per request: 1619.385 [ms] (mean)
Time per request: 3.239 [ms] (mean, across all concurrent requests)
Transfer rate: 35.83 [Kbytes/sec] receivedConnection Times (ms)
min mean[+/-sd] median max
Connect: 0 6 3.7 5 17
Processing: 21 1411 193.9 1412 2750
Waiting: 4 742 395.9 746 1424
Total: 21 1417 192.9 1420 2750Percentage of the requests served within a certain time (ms)
50% 1420
66% 1422
75% 1438
80% 1438
90% 1624
95% 1624
98% 1624
99% 1625
100% 2750 (longest request)
这个简单服务器,在500个并发请求的水平上,总共服务了3502个请求。每秒308个请求,每次请求的时间为1619毫秒。
处理的请求数量很好,它应该适用于大多数中小型应用程序。但是我们没有充分利用资源,而且大多数可用资源都处于闲置状态。
使用 Cluster 模块
现在我们来尝试一下
/** cluster.js **/
const os = require(“os”);
const cluster = require(“cluster”);
if (cluster.isMaster) {const number_of_cpus = os.cpus().length;console.log(`Master ${process.pid} is running`);console.log(`Forking Server for ${number_of_cpus} CPUs\n`);// Create a Worker Process for each Available CPUfor (let index = 0; index < number_of_cpus; index++) {cluster.fork();}// When Worker process has died, Log the workercluster.on(“exit”, (worker, code, signal) => {console.log(`\nWorker ${worker.process.pid} died\n`);});
} else {// if Worker process, master is false, cluster.isWorker is true// worker starts server for individual cpus// the worker created above is starting server require(“./server”);
}
我的个人电脑是i7第8代有8个处理器核。考虑到现在大多数可用的cp最低配置也是双核,因此剩下的7个核的资源都处于空闲状态*。
现在,让我们运行创建的cluster.js文件,服务器给我们的响应如下:
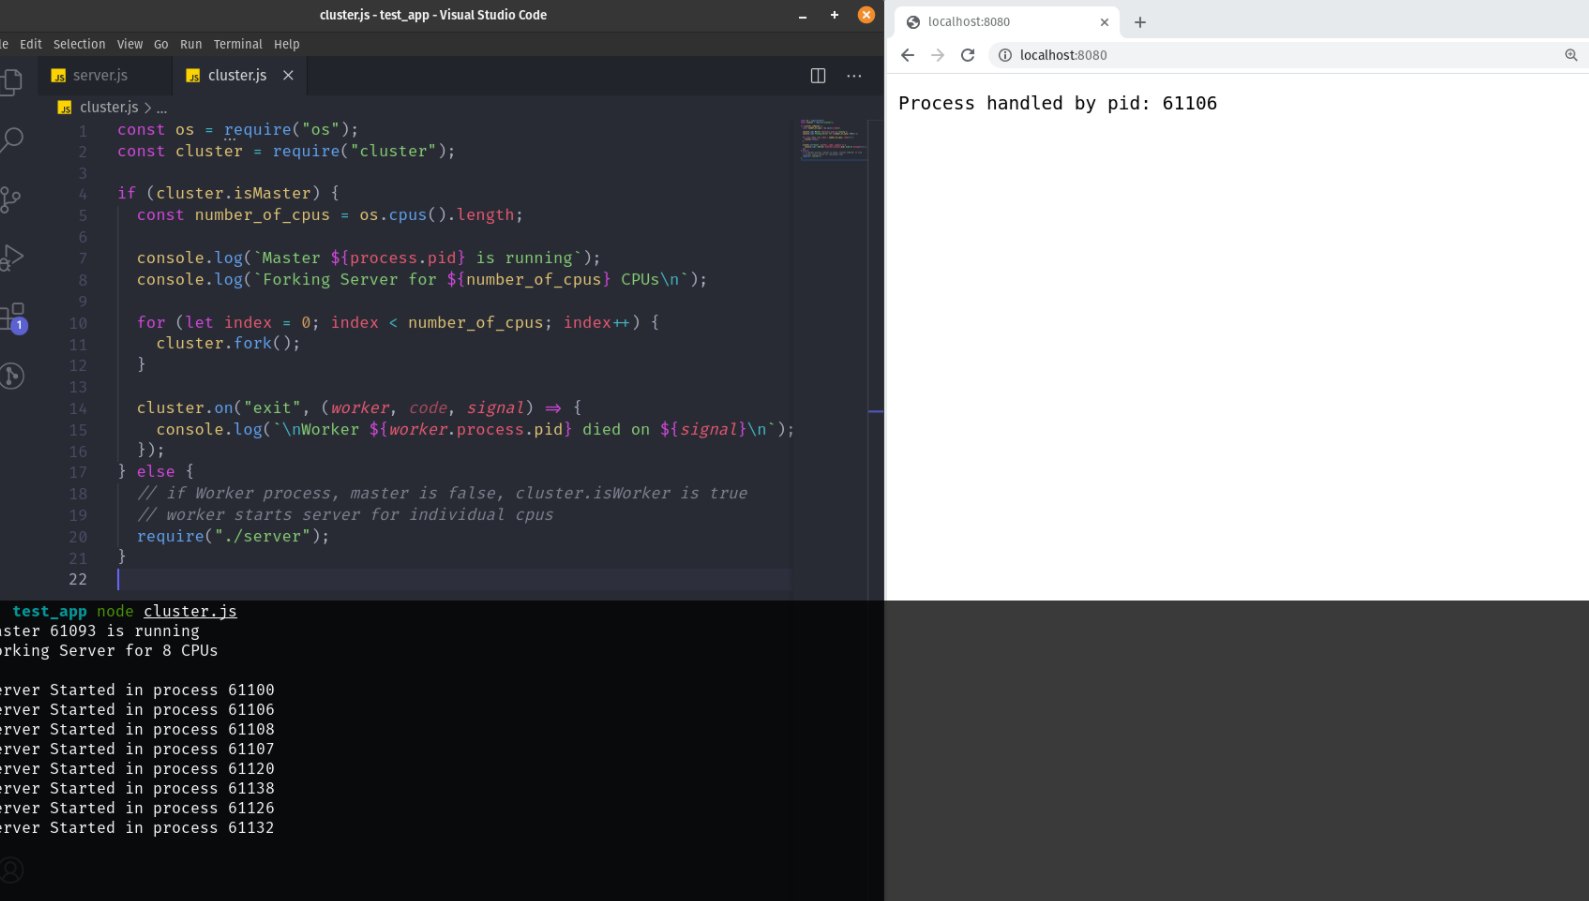
如果您实现了上述集群,那么您将充分利用您的CPU/服务器性能。请求由同一个主进程接收,但是会根据操作系统的调度分配给任一的工作进程处理。
对集群进行负载测试
➜  test_app ab -c 500 -t 10  http://localhost:8080/
This is ApacheBench, Version 2.3 <$Revision: 1843412 $>
Copyright 1996 Adam Twiss, Zeus Technology Ltd, http://www.zeustech.net/
Licensed to The Apache Software Foundation, http://www.apache.org/Benchmarking localhost (be patient)
Completed 5000 requests
Completed 10000 requests
Completed 15000 requests
Completed 20000 requests
Finished 20374 requestsServer Software:
Server Hostname:        localhost
Server Port:            8080Document Path:          /
Document Length:        29 bytesConcurrency Level:      500
Time taken for tests:   10.000 seconds
Complete requests:      20374
Failed requests:        0
Total transferred:      2118896 bytes
HTML transferred:       590846 bytes
Requests per second:    2037.39 [#/sec] (mean)
Time per request:       245.412 [ms] (mean)
Time per request:       0.491 [ms] (mean, across all concurrent requests)
Transfer rate:          206.92 [Kbytes/sec] receivedConnection Times (ms)
min  mean[+/-sd] median   max
Connect:        0    0   1.3      0      12
Processing:     6  242  15.6    241     369
Waiting:        6  242  15.5    241     368
Total:         18  242  15.5    241     371Percentage of the requests served within a certain time (ms)
50%    241
66%    244
75%    246
80%    247
90%    251
95%    259
98%    283
99%    290
100%    371 (longest request)
上面简单的Node.js服务器在我们的负载测试中每秒处理308个请求,现在这个数字已经增加到2037个,处理的请求数量增加了6倍。此外,以前的每请求时间是1619毫秒,现在已经减少到245ms。我们之前总共提供3502个请求,现在已经增加到20374个请求(增加了5.8倍)。如果你看看上面的实现,这个巨大的改进是由10行代码引起的。我们也不需要重构现有的服务器代码,是不是很香。
可用性和零停机时间
_
对我们目前所取得的进展感到兴奋,现在它变得更好了。
但是当我们有一个服务器实例,而该服务器崩溃时。服务器必须重新启动,这样会有停机时间。即使流程是自动化的,也会有延迟,在此期间不能服务任何请求。
模拟服务器崩溃:
*** server.js ***/
const http = require(“http”);
// get the process ID of Node Server
const processId = process.pid;
// Creating server and handling request
const server = http.createServer((req, res) => {// Simulate CPU Workfor (let index = 0; index < 1e7; index++);res.end(`Process handled by pid: ${processId}`);
});
// start server and listen the request
server.listen(8080, () => {console.log(`Server Started in process ${processId}`);
});
// Warning: Only For Testing and Visualization Purpose
// Don't add the code below in production
// Let's simulate Server Randomly Crashing using process.exit()
setTimeout(() => {process.exit(1);
}, Math.random() * 10000);
现在,出于模拟目的,如果我们将上面高亮显示的代码添加到服务器代码中。然后启动我们的服务器,我们可以看到一个接一个的所有服务器都崩溃了。由于没有可用的Worker,主进程也可能崩溃。这种崩溃在现实情况很常见。
现在,请记住,这是由Cluster Module创建的8个服务器的情况。当我们有一个服务器实例并且在它崩溃时,在此期间没有请求可以被服务。
➜  test_app node cluster.js
Master 63104 is running
Forking Server for 8 CPUs
Server Started in process 63111
Server Started in process 63118
Server Started in process 63112
Server Started in process 63130
Server Started in process 63119
Server Started in process 63137
Server Started in process 63142
Server Started in process 63146
Worker 63142 died
Worker 63112 died
Worker 63111 died
Worker 63146 died
Worker 63119 died
Worker 63130 died
Worker 63118 died
Worker 63137 died
➜  test_app
处理零停机时间
当我们有一个服务器的多个实例时,服务器的可用性可以很容易地提高。
让我们打开cluster.js文件,并将突出显示的代码添加到cluster.js:
/** cluster.js **/
const os = require(“os”);
const cluster = require(“cluster”);
if (cluster.isMaster) {const number_of_cpus = os.cpus().length;console.log(`Master ${process.pid} is running`);console.log(`Forking Server for ${number_of_cpus} CPUs\n`);// Create a Worker Process for each Available CPUfor (let index = 0; index < number_of_cpus; index++) {cluster.fork();}// When Worker process has died, Log the workercluster.on(“exit”, (worker, code, signal) => {/*** The condition checks if worker actually crashed and* wasn't manually disconnected or killed by master process.** The condition can be changed by desired error code,* and condition.*/if (code !== 0 && !worker.exitedAfterDisconnect) {console.log(`Worker ${worker.process.pid} died`);cluster.fork();}});
} else {// if Worker process, master is false, cluster.isWorker is true// worker starts server for individual cpus// the worker created above is starting serverrequire(“./server”);
}
实现服务器重启的负载测试:
运行实现了集群切换的服务器(运行:node cluster.js)。现在,让我们打开基准测试工具,开始对服务器进行基准测试。
➜  test_app ab -c 500 -t 10 -r http://localhost:8080/
This is ApacheBench, Version 2.3 <$Revision: 1843412 $>
Copyright 1996 Adam Twiss, Zeus Technology Ltd, http://www.zeustech.net/
Licensed to The Apache Software Foundation, http://www.apache.org/
Benchmarking localhost (be patient)
Completed 5000 requests
Completed 10000 requests
Completed 15000 requests
Completed 20000 requests
Finished 20200 requests
Server Software:
Server Hostname:        localhost
Server Port:            8080
Document Path:          /
Document Length:        29 bytes
Concurrency Level:      500
Time taken for tests:   10.000 seconds
Complete requests:      20200
Failed requests:        12(Connect: 0, Receive: 4, Length: 4, Exceptions: 4)
Total transferred:      2100488 bytes
HTML transferred:       585713 bytes
Requests per second:    2019.91 [#/sec] (mean)
Time per request:       247.536 [ms] (mean)
Time per request:       0.495 [ms] (mean, across all concurrent requests)
Transfer rate:          205.12 [Kbytes/sec] received
Connection Times (ms)min  mean[+/-sd] median   max
Connect:        0    0   1.5      0      13
Processing:    13  243  15.7    241     364
Waiting:        0  243  16.0    241     363
Total:         22  243  15.5    241     370
Percentage of the requests served within a certain time (ms)50%    24166%    24575%    24880%    25090%    25895%    26598%    27399%    287100%    370 (longest request)
➜  test_app
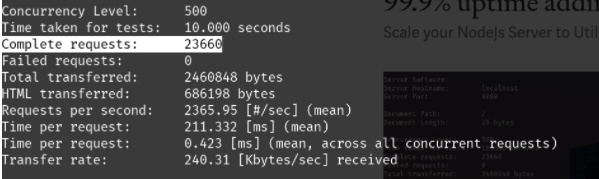
在上面的负载测试中,在500并发请求和2019请求每秒的水平上。总共有20200个请求,只有12个请求失败,这意味着我们的服务器有99.941%的正常运行时间,即使服务器一个接一个地崩溃并重新启动。
考虑到我们只增加了3行额外的代码,这真是太棒了!
更多精彩关注公众号【程序员石磊】
这篇关于10行代码让Nodejs处理请求的能力提升5x倍的文章就介绍到这儿,希望我们推荐的文章对编程师们有所帮助!


