本文主要是介绍vue3+vite+vant4手机端项目实录,希望对大家解决编程问题提供一定的参考价值,需要的开发者们随着小编来一起学习吧!
目录
一、项目介绍
二、项目的搭建
1.vite的安装
2.启动vite项目
3.vant4的引入与使用
3.1安装指令
npm i vant
3.2引入vant4
4.路由router的引入
4.1安装指令
4.2路由配置
5.路径别名设置
6.json-server
6.1json-server安装
6.2json-server启动项配置
6.3启动命令:npm run mock
7.axios请求数据
7.1安装axios依赖
7.2简单封装axios
7.3项目使用axios
三、登录注册模块
1.登录页面
2.注册页面
3.修改密码
4.开始页面
四、用户端模块
1.职位模块
1.1职位详情页面
2.求职申请页面
2.1求职申请详情页
3.我的页面
3.1我的页面信息修改
3.2我的在线简历页面
3.3我的意见反馈模块
四、总结
一、项目介绍
一款在线招聘App,有四个模块分别为登录注册模块、用户端模块、企业端模块、管理员模块
二、项目的搭建
1.vite的安装

2.启动vite项目
指令:npm run dev
3.vant4的引入与使用
vant4是轻量、可定制的移动端 Vue 组件库
3.1安装指令
npm i vant
3.2引入vant4
main.js
import { createApp } from 'vue'
import './style.css'
import App from './App.vue'
import vant from 'vant';
import { Icon } from 'vant';
import 'vant/lib/index.css';
// 导入router配置文件
import router from "./router"
// 导入阿里图标
import './assets/font/iconfont.css'
// 导入vuex
import store from './store'
createApp(App).use(router).use(vant).use(Icon).use(store).mount('#app')
4.路由router的引入
4.1安装指令
4.2路由配置
//1. 导入vue-router相关函数
import { createRouter, createWebHashHistory } from "vue-router"
// 2.路由规则
const routes = [{path:"路由地址",name:"路由名称",component:组件名称}
]
// 3.路由对象实例化
const router = createRouter({history: createWebHashHistory(),routes
})
// 暴露导出
export default routerimport { createApp } from 'vue'
import './style.css'
import App from './App.vue'
import vant from 'vant';
import { Icon } from 'vant';
import 'vant/lib/index.css';
// 导入router配置文件
import router from "./router"
// 导入阿里图标
import './assets/font/iconfont.css'
// 导入vuex
import store from './store'
createApp(App).use(router).use(vant).use(Icon).use(store).mount('#app')5.路径别名设置
import vue from '@vitejs/plugin-vue'
import { defineConfig } from 'vite'
import WindiCSS from 'vite-plugin-windicss'
// 1.导入node的path路径模块
import path from "path"
// https://vitejs.dev/config/
export default defineConfig({resolve: {alias: {// 配置别名"~": path.resolve(__dirname, "src")}}
})
6.json-server
6.1json-server安装
npm install json-server
6.2json-server启动项配置
在src的同级目录先创建文件夹mock,并创建mock/db.json文件,添加数据
{"infomation": [{"id": 1,"title": "json-server 的第1条数据","desc": "奥特曼不想打小怪兽,明明可以做好朋友的","author": "被奥特曼打了很久的怪兽"},{"id": 2,"title": "json-server 的第2条数据","desc": "葫芦娃不想去救爷爷,一个一个的去送不好","author": "种出七个葫芦的爷爷"},{"id": 1,"title": "json-server 的第一条数据","desc": "王者荣耀其实不是很好玩,这并不是我内心的真话","author": "想玩游戏的我"}],"infomation2": [{"id": 11,"title": "json-server 的第11条数据","desc": "奥特曼不想打小怪兽,明明可以做好朋友的","author": "被奥特曼打了很久的怪兽"},{"id": 12,"title": "json-server 的第12条数据","desc": "葫芦娃不想去救爷爷,一个一个的去送不好","author": "种出七个葫芦的爷爷"},{"id": 12,"title": "json-server 的第13条数据","desc": "王者荣耀其实不是很好玩,这并不是我内心的真话","author": "想玩游戏的我"}]
}
(举例数据)
6.3启动命令:npm run mock
7.axios请求数据
7.1安装axios依赖
npm install axios
7.2简单封装axios
在src文件在下创建utils文件夹,在utils里创建 http.js文件
//引入安装好的axios插件
import axios from "axios";
// 查询数据
const get = (url) => {return axios.get(url);
};
// 添加数据
const post = (url, data) => {return axios.post(url, data);
};
// 修改数据
const put = (url, data) => {return axios.put(url, data);
};// 局部修改
const patch = (url, data) => {return axios.patch(url, data);
};// 删除数据
const del = (url) => {return axios.delete(url);
};//将二次封装好的axios导出
export { get, post, put, del, patch };
7.3项目使用axios
项目的端口为8080,然后json文件的端口为3000,这样就会涉及到跨域,解决跨域的方式很多种,此处讲解一下配置proxy代理 在根目录下创建文件vue.config.js,覆盖webpack的一些内容。
vite.config.js
server: {proxy: {'/api': {target: 'http://localhost:3000',changeOrigin: true,rewrite: (path) => path.replace(/^\/api/, '')}}}三、登录注册模块
1.登录页面
代码:
<template><van-nav-bartitle="登录"left-text="返回"left-arrow@click-left="onClickLeft"/><div class="login"><img :src="img" alt="" /><van-form @submit="onSubmit"><van-cell-group inset><van-fieldv-model="username"left-icon="phone-o"name="username"placeholder="手机号码":rules="[{ required: true, message: '请填写用户名' }]"/><van-fieldv-model="password"left-icon="manager-o"type="password"name="password"placeholder="密码":rules="[{ required: true, message: '请填写密码' }]"/></van-cell-group><div style="margin: 16px"><van-button round block type="primary" native-type="submit">提交</van-button></div></van-form></div><div class="find"><router-link to="/enroll"><span>注册新用户</span></router-link><router-link to="/verify"><span>找回密码</span></router-link></div><div class="ways"><span>其他登录方式</span><div><span class="iconfont"></span><span class="iconfont"></span><span class="iconfont"></span></div></div>
</template>
<!-- 逻辑层 -->
<script setup>
import { reactive, ref } from "vue";
import { get, post, put, del } from "~/axios/http";
import { showDialog } from "vant";
// 本地图片引入
import img from "../../assets/images/avatar.svg";
// 导入useRouter方法
import { useRouter } from "vue-router";
const router = useRouter();
// 返回上一页
const onClickLeft = () => {router.go(-1);
};
// 表单
const username = ref("");
const password = ref("");
//点击登录按钮事件
async function onSubmit(values) {console.log(values);
//axios调用json-server数据let res = await get("/api/infomation");
//foreach循环判断填入的手机号和密码是否正确res.data.forEach((element) => {if (element.iphone == values.username &&element.password == values.password) {//本地存储数据的id值localStorage.setItem("key", JSON.stringify(element.id));router.push("/start");throw new Error();} else {username.value = "";password.value = "";}});
}
</script>
<!-- 样式层 -->
<style scoped>
.login {width: 100%;margin-top: 22.6667vw;
}.login img {margin-left: 50vw;transform: translate(-50%, 0);
}.find {display: flex;width: 70%;margin: 0 auto;justify-content: space-between;
}.find span {color: #0079fe;
}
.ways {width: 80%;margin: 7.6667vw auto;text-align: center;
}.ways > span {display: block;margin-bottom: 5.3333vw;color: #999999;
}
.ways div {display: flex;width: 80%;margin: 0 auto;justify-content: space-around;
}
.ways div span {font-size: 8.3333vw;
}
</style>效果图:
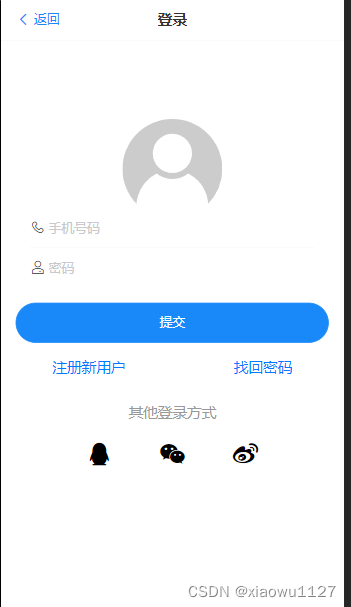
登录模块静态页面主要使用vant4组件库中的组件,主要实现了通过vant表单的数据提交和axios方法获取本地数据来判断手机号与密码是否正确。同时成功就通过路由跳转
2.注册页面
代码:
<!--* @Author: wu07 1732042133@qq.com* @Date: 2023-01-12 10:03:12* @LastEditors: wu07 1732042133@qq.com* @LastEditTime: 2023-02-03 14:08:54* @FilePath: \recruitAPP\recruitApp\recruitApp\src\pages\login\Login.vue* @Description: 这是默认设置,请设置`customMade`, 打开koroFileHeader查看配置 进行设置: https://github.com/OBKoro1/koro1FileHeader/wiki/%E9%85%8D%E7%BD%AE
-->
<!-- 视图层 -->
<template><van-nav-bartitle="注册"left-text="返回"left-arrow@click-left="onClickLeft"/><div class="login"><img :src="img" alt="" /><van-form @submit="onSubmit"><van-cell-group inset><van-fieldv-model="username"left-icon="phone-o"name="username"placeholder="请输入手机号码":rules="[{ required: true, message: '请填写手机号码' }]"/><van-fieldv-model="captcha"centerleft-icon="sign"name="captcha"placeholder="请输入验证码":rules="[{ required: true, message: '请填写验证码' }]"><template #button><van-button size="small" type="primary">发送验证码</van-button></template></van-field><van-fieldv-model="password"left-icon="manager-o"type="password"name="password"placeholder="请设计6-20位登录密码":rules="[{ required: true, message: '请填写密码' }]"/><van-fieldv-model="passwordT"left-icon="manager-o"type="password"name="passwordT"placeholder="请再次确认密码":rules="[{ required: true, message: '请填写密码' }]"/><van-field name="checkbox"><template #input><van-checkbox v-model="checked" shape="round">同意《<router-link to="protocol"><a>用户服务协议</a></router-link>》</van-checkbox></template></van-field></van-cell-group><div style="margin: 16px"><van-button round block type="primary" native-type="submit">注册</van-button></div></van-form></div><div class="find"><router-link to="/login"><span>已有账号,立即登录</span></router-link></div>
</template>
<!-- 逻辑层 -->
<script setup>
import { reactive, ref } from "vue";
import { get, post, put, del } from "~/axios/http";
import { showDialog } from "vant";
// 本地图片引入
import img from "../../assets/images/avatar.svg";
// 导入useRouter方法
import { useRouter } from "vue-router";
const router = useRouter();
// 返回上一页
const onClickLeft = () => {router.go(-1);
};
// 表单
const username = ref("");
const captcha = ref("");
const password = ref("");
const passwordT = ref("");
const checked = ref(true);
async function onSubmit(values) {//两次输入密码一致if (values.password == values.passwordT) {let res = await get("/api/infomation");console.log(res);res.data.some((element) => {if (element.iphone == values.username) {showDialog({title: "提示",message: "手机号已被注册",});} else if (values.password.length < 6 && values.passwordT.length < 6) {showDialog({title: "提示",message: "密码不低于六位",});} else {//增加数据let res3 = post("/api/infomation", {iphone: values.username,password: values.password,name: "",gender: "",state: "",degree: "",num1: [],num2: [],num3: [],num4: [],num5:[],num6:[],num7:[],img:""});router.push("/login");throw new Error();}});} else {showDialog({title: "提示",message: "确定密码跟密码不一致",});}
}
</script>
<!-- 样式层 -->
<style  scoped>
.login {width: 100%;margin-top: 12.6667vw;
}.login img {margin-left: 50vw;transform: translate(-50%, 0);
}.find {width: 70%;margin: 0 auto;
}.find span {display: block;width: 100%;color: #0079fe;text-align: center;
}
.ways {width: 80%;margin: 7.6667vw auto;text-align: center;
}.ways > span {display: block;margin-bottom: 5.3333vw;color: #999999;
}
.ways div {display: flex;width: 80%;margin: 0 auto;justify-content: space-around;
}
.ways div span {font-size: 8.3333vw;
}
a {color: #0079fe;
}
</style>
效果图:
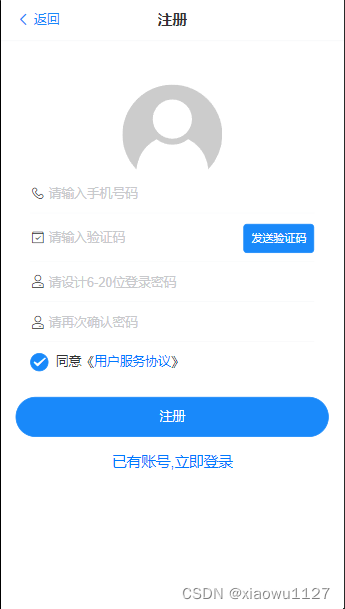
注册模块静态页面主要使用vant4组件库中的组件,主要实现了通过vant表单的数据提交和axios方法获取本地数据来判断两次密码是否一致,一致就通过axios增加本地数据。验证码功能未实现
3.修改密码
代码:
<!--* @Author: wu07 1732042133@qq.com* @Date: 2023-01-14 15:25:58* @LastEditors: wu07 1732042133@qq.com* @LastEditTime: 2023-02-05 22:52:02* @FilePath: \recruitAPP\recruitApp\recruitApp\src\pages\login\Verify.vue* @Description: 这是默认设置,请设置`customMade`, 打开koroFileHeader查看配置 进行设置: https://github.com/OBKoro1/koro1FileHeader/wiki/%E9%85%8D%E7%BD%AE
-->
<!-- 视图层 -->
<template><van-nav-bartitle="验证"left-text="返回"left-arrow@click-left="onClickLeft"/><van-tabs v-model:active="active" title-active-color="#0079FE" color="#fff"><van-tab title="1.验证手机号码"><van-form @submit="onSubmit"><van-cell-group inset><van-fieldv-model="username"left-icon="phone-o"name="username"placeholder="请输入注册手机号码":rules="[{ required: true, message: '请填写手机号码' }]"/><van-fieldv-model="password"centerleft-icon="sign"name="password"placeholder="请输入验证码":rules="[{ required: true, message: '请填写验证码' }]"><template #button><van-button size="small" type="primary">发送验证码</van-button></template></van-field></van-cell-group><div style="margin: 16px"><van-button round block type="primary" native-type="submit">下一步</van-button></div></van-form></van-tab><van-tab title="2.设置新密码" disabled></van-tab></van-tabs>
</template>
<!-- 逻辑层 -->
<script setup>
import { get, post, put, del } from "~/axios/http";
import { showDialog } from "vant";
import { ref } from "vue";
// 导入useRouter方法
import { useRouter } from "vue-router";
const router = useRouter();
// 返回上一页
const onClickLeft = () => {router.go(-1);
};
// 表单
const username = ref("");
const password = ref("");
async function onSubmit(values) {let res = await get("/api/infomation");res.data.forEach((element) => {if (element.iphone == values.username) {//传出id值router.push({path: "/revise",query: {id: element.id,},});throw new Error();} else {username.value = "";password.value = "";}});
}
</script>
<!-- 样式层 -->
<style  scoped>
</style>
<!--* @Author: wu07 1732042133@qq.com* @Date: 2023-01-14 15:25:58* @LastEditors: wu07 1732042133@qq.com* @LastEditTime: 2023-02-02 10:43:38* @FilePath: \recruitAPP\recruitApp\recruitApp\src\pages\login\Verify.vue* @Description: 这是默认设置,请设置`customMade`, 打开koroFileHeader查看配置 进行设置: https://github.com/OBKoro1/koro1FileHeader/wiki/%E9%85%8D%E7%BD%AE
-->
<!-- 视图层 -->
<template><van-nav-bartitle="设置密码"left-text="返回"left-arrow@click-left="onClickLeft"/><van-tabs v-model:active="active" title-active-color="#0079FE" color="#fff"><van-tab title="1.验证手机号码" disabled> </van-tab><van-tab title="2.设置新密码"><van-form @submit="onSubmit"><van-cell-group inset><van-fieldv-model="password"left-icon="manager-o"name="password"type="password"placeholder="请设置6-20位新的登录密码":rules="[{ required: true, message: '请填写新密码' }]"/><van-fieldv-model="passwordT"type="password"left-icon="manager-o"name="passwordT"placeholder="请再次输入新的登录密码":rules="[{ required: true, message: '请填写新密码' }]"></van-field></van-cell-group><div style="margin: 16px"><van-button round block type="primary" native-type="submit">提交</van-button></div></van-form></van-tab></van-tabs>
</template>
<!-- 逻辑层 -->
<script setup>
import { get, post, put, del,patch } from "~/axios/http";
import { showDialog } from "vant";
import { ref, reactive } from "vue";
// 导入useRouter方法
import { useRouter, useRoute } from "vue-router";
const router = useRouter();
const route = useRoute();
// 返回上一页
const onClickLeft = () => {router.go(-1);
};
// 表单const password = ref("");
const passwordT = ref("");
async function onSubmit(values) {//route方法传入id值let data = reactive({id: route.query.id,});if (values.password.length < 6 && values.passwordT.length < 6) {showDialog({title: "提示",message: "密码不低于六位",});} else if (values.password == values.passwordT) {let res2 = await get(`/api/infomation/${data.id}`);let res = await patch(`/api/infomation/${data.id}`, {password: values.password,});showDialog({title: "提示",message: "修改成功",});router.push("/login");} else {showDialog({title: "提示",message: "两次密码不一致",});}
}
</script>
<!-- 样式层 -->
<style scoped>
</style>效果图:

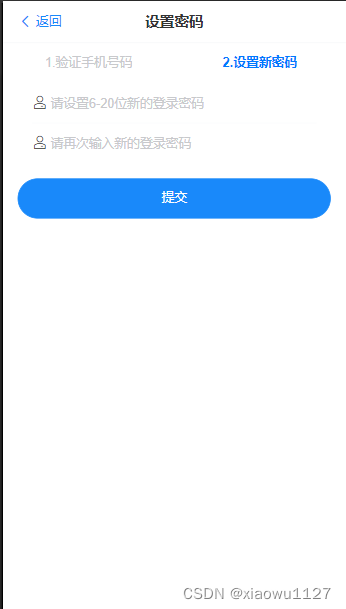
修改密码由两个页面组成,通过输入手机号用axios得到本地数据才能进入修改密码页面,同时通过router方法传进一个id值同时用route方法接受id值,修改指定账号的密码
4.开始页面
代码:
<!--* @Author: wu07 1732042133@qq.com* @Date: 2023-01-14 18:55:58* @LastEditors: wu07 1732042133@qq.com* @LastEditTime: 2023-02-01 09:59:13* @FilePath: \recruitAPP\recruitApp\recruitApp\src\pages\login\Start.vue* @Description: 这是默认设置,请设置`customMade`, 打开koroFileHeader查看配置 进行设置: https://github.com/OBKoro1/koro1FileHeader/wiki/%E9%85%8D%E7%BD%AE
-->
<!-- 视图层 -->
<template><van-nav-bartitle="注册"left-text="返回"left-arrow@click-left="onClickLeft"/><div class="user" @click="runUser">我是求职者</div><div class="enterprise" @click="runEnterprise">我是招聘者</div><div class="admin">我是管理员</div><div></div>
</template>
<!-- 逻辑层 -->
<script setup>
// 导入useRouter方法
import { useRouter } from "vue-router";
const router = useRouter();
// 返回上一页
const onClickLeft = () => {router.go(-1);
};
// 跳转用户端
const runUser = () => {router.push("/user");
};
//跳转企业端
const runEnterprise = () => {router.push("/tabber");
};
</script>
<!-- 样式层 -->
<style scoped>
.user {background-color: rgba(0, 121, 254, 1);width: 80%;height: 18.6667vw;border-radius: 1.3333vw;color: #fff;text-align: center;line-height: 18.6667vw;margin: 10.3333vw auto;margin-top: 23.3333vw;
}
.enterprise {background-color: rgba(75, 216, 99, 1);width: 80%;height: 18.6667vw;border-radius: 1.3333vw;color: #fff;text-align: center;line-height: 18.6667vw;margin: 10.3333vw auto;
}
.admin {background-color: rgba(254, 148, 0, 1);width: 80%;height: 18.6667vw;border-radius: 1.3333vw;color: #fff;text-align: center;line-height: 18.6667vw;margin: 10.3333vw auto;
}
</style>
效果图:

该页面主要进行三个端口的跳转,通过router路由的push方法进行路由跳转
四、用户端模块
分为职位、求职申请、我的三个主页面
1.职位模块
代码:
<!--* @Author: wu07 1732042133@qq.com* @Date: 2023-01-14 19:31:55* @LastEditors: wu07 1732042133@qq.com* @LastEditTime: 2023-02-02 15:58:50* @FilePath: \recruitAPP\recruitApp\recruitApp\src\pages\user\Posts.vue* @Description: 这是默认设置,请设置`customMade`, 打开koroFileHeader查看配置 进行设置: https://github.com/OBKoro1/koro1FileHeader/wiki/%E9%85%8D%E7%BD%AE
-->
<!-- 视图层 -->
<template><div class="body"><van-nav-bartitle="岗位"left-text="返回"left-arrow@click-left="onClickLeft"/><van-searchv-model="value"placeholder="请输入搜索关键词"@search="onSearch"/><div class="classify"><div><spanv-for="(item, index) in arr":key="index"@click="change(index)":class="{ active: index == nowIndex }">{{ item }}</span></div><van-button type="default">筛选</van-button></div><div class="mainstay"><divclass="main"v-for="(item, index) in arr1":key="index"v-if="nowIndex == 0"@click="runDetail(item.id)"v-show="item.fell == 'recommend'"><div><span>{{ item.name }}</span><span>{{ item.money }}</span></div><div>{{ item.city }}<span>|</span>{{ item.time }}<span>|</span>{{ item.degree }}</div><div><span>{{ item.company }}</span><span>{{ item.people }}</span></div></div><divclass="main"v-for="(item, index) in arr1":key="index"v-if="nowIndex == 1"v-show="item.fell == 'hot'"@click="runDetail(item.id)"><div><span>{{ item.name }}</span><span>{{ item.money }}</span></div><div>{{ item.city }}<span>|</span>{{ item.time }}<span>|</span>{{ item.degree }}</div><div><span>{{ item.company }}</span><span>{{ item.people }}</span></div></div></div></div>
</template>
<!-- 逻辑层 -->
<script setup>
import { get, post, put, del } from "~/axios/http";
import { reactive, ref, computed } from "vue";
import { useRouter, useRoute } from "vue-router";
const router = useRouter();
const route = useRoute();
const value = ref("");
const arr = ref(["推荐", "热门职位"]);
const nowIndex = ref(0);
const change = (index) => {nowIndex.value = index;
};
const arr1 = ref([]);
async function sendRequest() {let res = await get("/api/infomation2");arr1.value = res.data;
}
sendRequest();
async function onSearch(val) {console.log(val);//模糊搜索let res2 = await get(`/api/infomation2?name_like=${val}`);console.log(res2.data);arr1.value = res2.data;
}
const runDetail = (value) => {router.push({path: "/postsDetail",query: {id: value,},});
};
</script>
<!-- 样式层 -->
<style  scoped>
.body {background-color: #f2f2f2;
}
.classify {display: flex;width: 100%;align-items: center;margin: 0 auto;justify-content: space-around;background-color: #fff;
}.classify div {width: 70%;
}.classify div span:nth-child(1) {margin-right: 5.3333vw;
}.active {color: #0079fe;
}
.mainstay {padding-bottom: 13.3333vw;
}
.main {background-color: #fff;overflow: hidden;margin-bottom: 2.6667vw;
}
.main div:nth-child(1) {display: flex;width: 90%;margin: 0 auto;justify-content: space-between;margin-top: 2.6667vw;
}
.main div:nth-child(1) span:nth-child(2) {font-size: 5.3333vw;color: #0079fe;
}.main div:nth-child(2) {margin: 1.6667vw 0;margin-left: 4.8333vw;
}.main div:nth-child(2) span {margin: 0 0.8vw;color: #e4e4e4;
}
.main div:nth-child(3) {margin-left: 4.8333vw;margin-top: 1.6667vw;margin-bottom: 4vw;
}
.main div:nth-child(3) span:nth-child(1) {margin-right: 5.3333vw;
}
</style>
效果图:
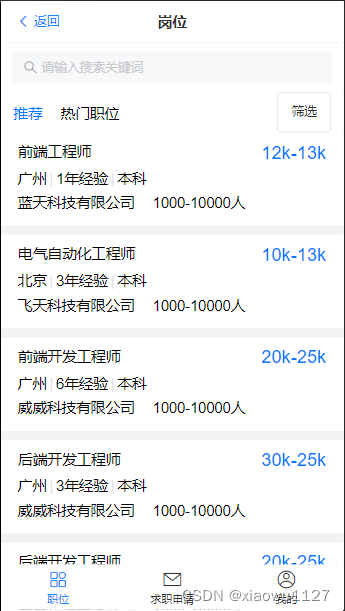
该页面主要通过v-for进行数据遍历,axios.get方法进行数据引用、搜索栏静态效果主要用vant4组件,模糊搜索用了await get(`/api/infomation2?name_like=${val}`)的方法。
1.1职位详情页面
代码:
<!--* @Author: wu07 1732042133@qq.com* @Date: 2023-01-15 18:07:48* @LastEditors: wu07 1732042133@qq.com* @LastEditTime: 2023-02-03 11:29:04* @FilePath: \recruitAPP\recruitApp\recruitApp\src\pages\user\PostsDetail.vue* @Description: 这是默认设置,请设置`customMade`, 打开koroFileHeader查看配置 进行设置: https://github.com/OBKoro1/koro1FileHeader/wiki/%E9%85%8D%E7%BD%AE
-->
<!-- 视图层 -->
<template><van-nav-bartitle="职位详情"left-text="返回"left-arrow@click-left="onClickLeft"/><div class="name"><span>{{ arr.name }}</span><span>{{ arr.money }}</span><div><span>{{ arr.city }}</span><span>|</span><span>{{ arr.time }}</span><span>|</span><span>{{ arr.degree }}</span></div></div><div class="introduce"><span>职位描述</span><p>{{ arr.introduce }}</p></div><div class="company"><span>公司简介</span><div><span>{{ arr.company }}</span><span>{{ arr.people }}</span><p>{{ arr.description }}</p></div></div><div class="bt"><van-button square type="default" @click="change">{{ a }}</van-button><van-button square type="primary" @click="td">投递简历</van-button></div>
</template>
<!-- 逻辑层 -->
<script setup>
import { get, post, put, del, patch } from "~/axios/http";
import { showDialog } from "vant";
import { ref, reactive } from "vue";
// 导入useRouter方法
import { useRouter, useRoute } from "vue-router";
const router = useRouter();
const route = useRoute();
// 返回上一页
const onClickLeft = () => {router.go(-1);
};
const arr = ref({});
const a = ref("");
async function find() {let data = reactive({id: route.query.id,});let res2 = await get(`/api/infomation2/${data.id}`);arr.value = res2.data;a.value = res2.data.interest;
}
find();
const flag = ref(true);
async function change() {flag.value = !flag.value;if (flag.value == true) {a.value = "感兴趣";let data = reactive({id: route.query.id,});let res7 = await patch(`/api/infomation2/${data.id}`, {like: "0",interest: "感兴趣",});let id = ref(localStorage.getItem("key"));let res10 = await get(`/api/infomation/${id.value}`);res10.data.num3.pop(Number(data.id));let res11 = await patch(`/api/infomation/${id.value}`, {num3: res10.data.num3,});} else {a.value = "取消感兴趣";let data = reactive({id: route.query.id,});let res5 = await patch(`/api/infomation2/${data.id}`, {like: "1",interest: "取消感兴趣",});let id = ref(localStorage.getItem("key"));let res12 = await get(`/api/infomation/${id.value}`);res12.data.num3.push(Number(data.id));let res13 = await patch(`/api/infomation/${id.value}`, {num3: res12.data.num3,});}
}
async function td() {let data = reactive({id: route.query.id,});let res3 = await patch(`/api/infomation2/${data.id}`, {state: "投递成功",});let id = ref(localStorage.getItem("key"));let res8 = await get(`/api/infomation/${id.value}`);res8.data.num1.push(Number(data.id));let res9 = await patch(`/api/infomation/${id.value}`, {num1: res8.data.num1,});
}
</script>
<!-- 样式层 -->
<style  scoped>
.name {width: 90%;margin: 0 auto;display: flex;flex-direction: column;border-bottom: 2px solid #e4e4e4;border-top: 2px solid #e4e4e4;padding-bottom: 2.6667vw;
}
.name > span:nth-child(1) {font-weight: bold;margin: 2.6667vw 0;
}
.name > span:nth-child(2) {font-size: 5.3333vw;color: #09ba72;margin-bottom: 2.6667vw;
}
.name > div span {margin-right: 1.3333vw;
}
.introduce {width: 90%;margin: 0 auto;padding-top: 2.6667vw;border-bottom: 2px solid #e4e4e4;
}
.introduce span {font-weight: bold;
}
.company {width: 90%;margin: 0 auto;padding-top: 2.6667vw;border-bottom: 2px solid #e4e4e4;display: flex;flex-direction: column;margin-bottom: 10.3333vw;
}
.company > span:nth-child(1) {font-weight: bold;margin: 2.6667vw 0;
}
.company div span:nth-child(1) {margin-right: 5.3333vw;
}
.bt {width: 80%;display: flex;margin: 0 auto;justify-content: space-between;
}
.bt .van-button {width: 35vw !important;
}
</style>
效果图:
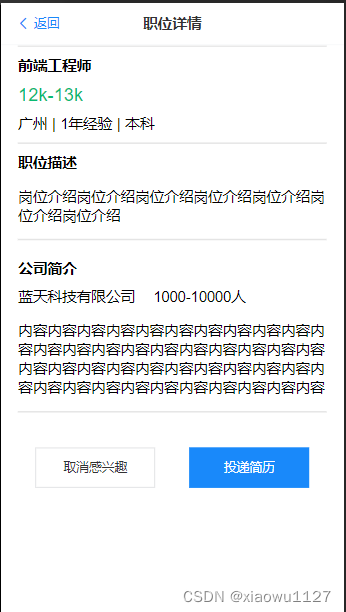
该页面通过职位页面router路由query传值方法接收不同id值,再通过axios方法获取json-server不同id值的数据从而实现数据动态交互。同时页面数据同样通过axios.get方式获取数据渲染页面。按钮感兴趣与投递简历都能实现数据的传递
2.求职申请页面
代码:
<!--* @Author: wu07 1732042133@qq.com* @Date: 2023-01-14 19:32:47* @LastEditors: wu07 1732042133@qq.com* @LastEditTime: 2023-02-03 10:47:57* @FilePath: \recruitAPP\recruitApp\recruitApp\src\pages\user\Request.vue* @Description: 这是默认设置,请设置`customMade`, 打开koroFileHeader查看配置 进行设置: https://github.com/OBKoro1/koro1FileHeader/wiki/%E9%85%8D%E7%BD%AE
-->
<!-- 视图层 -->
<template><div class="all"><van-nav-bartitle="求职反馈"left-text="返回"left-arrow@click-left="onClickLeft"/><van-tabs v-model:active="active"><van-tab v-for="(value, index) in nav" :title="value"><divv-for="(item, i) in arr"v-show="value == item.state"@click="runDetail(item.id)"><div class="body"><div class="name"><span> {{ item.name }}</span><span> {{ item.state }}</span></div><div class="money">{{ item.money }}</div><div class="introduce">{{ item.introduce }}</div></div></div></van-tab></van-tabs></div>
</template>
<!-- 逻辑层 -->
<script setup>
import { get, post, put, del, patch } from "~/axios/http";
import { ref, reactive } from "vue";
import { useRouter, useRoute } from "vue-router";
const router = useRouter();
const route = useRoute();
const nav = ref(["投递成功","被查看","面试待确认","已约面试","不合适","有意向","已录用",
]);
const arr = ref([]);
const arr1 = ref([]);
async function sendRequest() {let id = ref(localStorage.getItem("key"));let res1 = await get(`/api/infomation?id=${id.value}`);res1.data[0].num1.forEach(async function (element) {let res3 = patch(`/api/infomation2/${element}`, {state: "投递成功",});});res1.data[0].num2.forEach(async function (element) {let res3 = patch(`/api/infomation2/${element}`, {state: "已约面试",});});let res = await get("/api/infomation2");arr.value = res.data;
}
sendRequest();
const runDetail = (value) => {router.push({path: "/requestDetail",query: {id: value,},});
};
</script>
<!-- 样式层 -->
<style  scoped>
.all {background-color: #f2f2f2;margin-bottom: 12vw;
}
.body {width: 100%;margin-bottom: 2.6667vw;background-color: #fff;overflow: hidden;
}
.name {display: flex;justify-content: space-between;width: 90%;margin: 1.6vw auto;
}
.name span:nth-child(2) {color: #ff9933;
}
.money {width: 90%;margin: 0 auto;
}
.introduce {width: 90%;margin: 1.6vw auto;
}
</style>
效果图

该页面通过json-server数据对岗位状态进行分别展示,通过v-show进行不同状态的不同岗位展示
同时不同用户显示自己的参与的岗位状态实现数据的动态显示。
2.1求职申请详情页
<!--* @Author: wu07 1732042133@qq.com* @Date: 2023-01-15 18:07:48* @LastEditors: wu07 1732042133@qq.com* @LastEditTime: 2023-02-02 16:04:00* @FilePath: \recruitAPP\recruitApp\recruitApp\src\pages\user\PostsDetail.vue* @Description: 这是默认设置,请设置`customMade`, 打开koroFileHeader查看配置 进行设置: https://github.com/OBKoro1/koro1FileHeader/wiki/%E9%85%8D%E7%BD%AE
-->
<!-- 视图层 -->
<template><van-nav-bartitle="职位详情"left-text="返回"left-arrow@click-left="onClickLeft"/><div class="name"><span>{{ arr.name }}</span><span>{{ arr.money }}</span><div><span>{{ arr.city }}</span><span>|</span><span>{{ arr.time }}</span><span>|</span><span>{{ arr.degree }}</span></div></div><div class="introduce"><span>职位描述</span><p>{{ arr.introduce }}</p></div><div class="company"><span>公司简介</span><div><span>{{ arr.company }}</span><span>{{ arr.people }}</span><p>{{ arr.description }}</p></div></div>
</template>
<!-- 逻辑层 -->
<script setup>
import { get, post, put, del } from "~/axios/http";
import { showDialog } from "vant";
import { ref, reactive } from "vue";
// 导入useRouter方法
import { useRouter, useRoute } from "vue-router";
const router = useRouter();
const route = useRoute();
// 返回上一页
const onClickLeft = () => {router.go(-1);
};
const arr = ref({});
async function find() {let data = reactive({id: route.query.id,});let res2 = await get(`/api/infomation2/${data.id}`);arr.value = res2.data;console.log(arr.value);
}
find();
</script>
<!-- 样式层 -->
<style  scoped>
.name {width: 90%;margin: 0 auto;display: flex;flex-direction: column;border-bottom: 2px solid #e4e4e4;border-top: 2px solid #e4e4e4;padding-bottom: 2.6667vw;
}
.name > span:nth-child(1) {font-weight: bold;margin: 2.6667vw 0;
}
.name > span:nth-child(2) {font-size: 5.3333vw;color: #09ba72;margin-bottom: 2.6667vw;
}
.name > div span {margin-right: 1.3333vw;
}
.introduce {width: 90%;margin: 0 auto;padding-top: 2.6667vw;border-bottom: 2px solid #e4e4e4;
}
.introduce span {font-weight: bold;
}
.company {width: 90%;margin: 0 auto;padding-top: 2.6667vw;border-bottom: 2px solid #e4e4e4;display: flex;flex-direction: column;margin-bottom: 10.3333vw;
}
.company > span:nth-child(1) {font-weight: bold;margin: 2.6667vw 0;
}
.company div span:nth-child(1) {margin-right: 5.3333vw;
}
</style>
效果图:
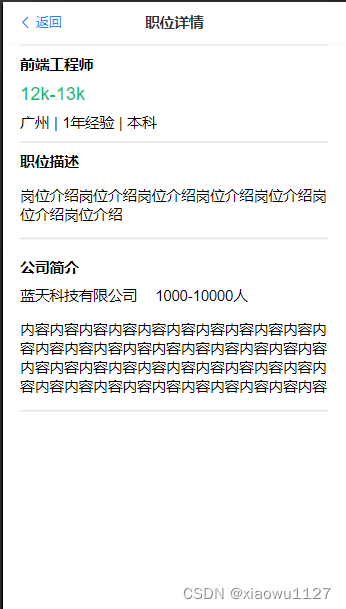
该页面通过职位页面router路由query传值方法接收不同id值,再通过axios方法获取json-server不同id值的数据从而实现数据动态交互。同时页面数据同样通过axios.get方式获取数据渲染页面。
3.我的页面
代码:
<!--* @Author: wu07 1732042133@qq.com* @Date: 2023-01-14 19:33:31* @LastEditors: wu07 1732042133@qq.com* @LastEditTime: 2023-02-03 17:41:18* @FilePath: \recruitAPP\recruitApp\recruitApp\src\pages\user\Me.vue* @Description: 这是默认设置,请设置`customMade`, 打开koroFileHeader查看配置 进行设置: https://github.com/OBKoro1/koro1FileHeader/wiki/%E9%85%8D%E7%BD%AE
-->
<!-- 视图层 -->
<template><div class="body"><van-nav-bartitle="我的"left-text="返回"left-arrow@click-left="onClickLeft"/><div class="before" v-show="num4 == 0" @click="write"><span>请填写个人信息</span></div><divclass="name"v-show="num4 == 1"v-for="(item, idex) in me":key="index"><div class="message"><span>{{ item.name }} <van-icon name="edit" @click="revise" /></span><img :src="item.url" /></div><div class="number"><div v-for="(item, idex) in number" :key="index"><span>{{ item.name }}</span><span>{{ item.number }}</span></div></div></div><div class="function"><div v-for="(item, index) in fc" :key="index" @click="run(item.path)"><span>{{ item.name }}</span><div><van-badge:content="item.num"position="center-right"v-show="item.num >= 1"/><van-icon name="arrow" /></div></div></div><van-button type="primary" block @click="exit">退出登录</van-button></div>
</template>
<!-- 逻辑层 -->
<script setup>
// 本地图片引入
import img from "../../../assets/images/u616.png";
import { get, post, put, del, patch } from "~/axios/http";
import { ref } from "vue";
// 导入useRouter方法
import { useRouter } from "vue-router";
const router = useRouter();
// 返回上一页
const onClickLeft = () => {router.go(-1);
};
// 跳转个人信息修改
const revise = () => {router.push("/information");
};
// 跳转详情页
const run = (val) => {router.push(val);
};
const me = ref([{name: "",url: img,},
]);
const num1 = ref();
const num2 = ref();
const num3 = ref([]);
const num4 = ref();
async function num() {let res1 = await get("/api/infomation2?state=投递成功");let res2 = await get("/api/infomation2?state=已约面试");let res3 = await get("/api/infomation2?like=1");let id = ref(localStorage.getItem("key"));let res4 = await get(`/api/infomation/${id.value}`);console.log(res4.data.iphone);if (res4.data.name == "") {num4.value = 0;} else {num4.value = 1;}me.value[0].name = res4.data.name;me.value[0].url = res4.data.img;console.log(num4);num1.value = res1.data.length;num2.value = res2.data.length;num3.value = res3.data.length;
}
num();
const number = ref([{ name: "已投递", number: num1 },{ name: "已面试", number: num2 },{ name: "感兴趣", number: num3 },
]);
const fc = ref([{ name: "在线简历", num: "0", path: "/resume" },{ name: "修改密码", num: "0", path: "/verify" },{ name: "意见反馈", num: "2", path: "/opinion" },{ name: "消息", num: "10" },
]);
const write = () => {router.push("/information");
};async function exit() {let res5 = await get("/api/infomation2");res5.data.forEach(async function (element) {if (element.state == "投递成功") {let res6 = await patch(`/api/infomation2/${element.id}`, {state: "",});} else if (element.state == "已约面试") {let res7 = await patch(`/api/infomation2/${element.id}`, {state: "",});} else if (element.like == "1") {let res8 = await patch(`/api/infomation2/${element.id}`, {like: "0",});}router.push("/login");});
}
</script>
<!-- 样式层 -->
<style  scoped>
.body {background-color: #f2f2f2;height: 100vh;
}
.name {background-color: #f59a23;width: 100%;
}
.before {width: 100%;height: 26.6667vw;background-color: cornflowerblue;text-align: center;font-size: 4.3333vw;line-height: 26.6667vw;color: #775a34;
}
.message {display: flex;justify-content: space-between;align-content: center;width: 90%;margin: 0 auto;padding-top: 2.6667vw;
}
.message img {height: 18.6667vw;
}
.message span {line-height: 21.3333vw;color: #fce6c8;font-size: 4.2667vw;
}
.number {display: flex;width: 90%;margin: 5.3333vw auto;justify-content: space-around;
}
.number div {display: flex;flex-direction: column;align-items: center;color: #fce6c8;margin-bottom: 5.3333vw;
}
.number div span:nth-child(1) {margin-bottom: 2.6667vw;
}
.function {width: 100%;
}
.function > div {width: 100%;display: flex;justify-content: space-between;height: 13.3333vw;background-color: #fff;margin-bottom: 2.6667vw;align-items: center;
}
.function > div span {margin-left: 2.6667vw;
}
.function > div div {margin-right: 2.6667vw;
}
img {border-radius: 50%;width: 18.3333vw;
}
</style>
效果图:
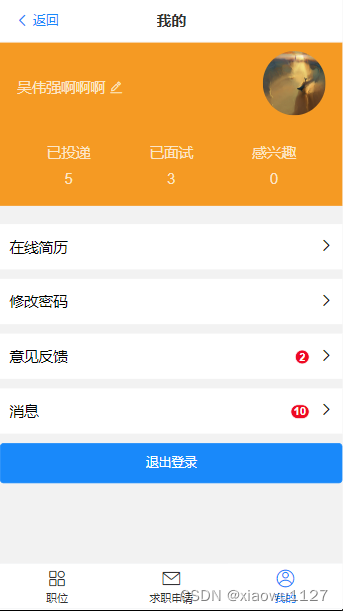
该页面名字头像实现动态改变同时已投递、已面试、感兴趣都能通过职位的状态改变发生改变,功能模块通过router.push跳转。
3.1我的页面信息修改
代码:
<!--* @Author: wu07 1732042133@qq.com* @Date: 2023-01-31 14:54:13* @LastEditors: wu07 1732042133@qq.com* @LastEditTime: 2023-02-03 17:39:47* @FilePath: \recruitApp\recruitApp\src\pages\user\Me\Information.vue* @Description: 这是默认设置,请设置`customMade`, 打开koroFileHeader查看配置 进行设置: https://github.com/OBKoro1/koro1FileHeader/wiki/%E9%85%8D%E7%BD%AE
-->
<!-- 视图层 -->
<template><div><van-nav-bartitle="个人信息"left-text="返回"left-arrow@click-left="onClickLeft"/><van-form @submit="onSubmit"><van-cell-group inset><van-field name="uploader" label="头像上传"><template #input><van-uploaderv-model="imgUrl"multiple:max-count="1":after-read="afterRead"/></template></van-field><van-fieldv-model="name"label="姓名"name="name"placeholder="请输入姓名":rules="[{ required: true, message: '请填写姓名' }]"/><van-fieldv-model="fieldValue"is-linkreadonlyname="fieldValue"label="性别"placeholder="选择性别"@click="showPicker = true"/><van-popup v-model:show="showPicker" round position="bottom"><van-picker:columns="columns"@cancel="showPicker = false"@confirm="onConfirm"/></van-popup><van-fieldv-model="fieldValueTwo"name="fieldValueTwo"is-linkreadonlylabel="求职状态"placeholder="求职状态"@click="showPickerTwo = true"/><van-popup v-model:show="showPickerTwo" round position="bottom"><van-picker:columns="columnsTwo"@cancel="showPickerTwo = false"@confirm="onConfirmTwo"/></van-popup><van-fieldv-model="fieldValueThree"name="fieldValueThree"is-linkreadonlylabel="学历"placeholder="选择学历"@click="showPickerThree = true"/><van-popup v-model:show="showPickerThree" round position="bottom"><van-picker:columns="columnsThree"@cancel="showPickerThree = false"@confirm="onConfirmThree"/></van-popup><van-fieldv-model="emile"name="emile"label="邮箱"placeholder="请输入邮箱":rules="[{ required: true, message: '请填写邮箱' }]"/></van-cell-group><div style="margin: 16px"><van-button round block type="primary" native-type="submit">提交</van-button></div></van-form></div>
</template>
<!-- 逻辑层 -->
<script setup>
// 导入useRouter方法
import { useRouter } from "vue-router";
const router = useRouter();
// 返回上一页
const onClickLeft = () => {router.go(-1);
};
import { ref } from "vue";
import { get, post, put, del, patch } from "~/axios/http";
const imgUrl = ref([{ url: "" }]);
const emile = ref("");
const name = ref("");
async function onSubmit(values) {console.log("submit", values);console.log(values.uploader[0].content);let id = ref(localStorage.getItem("key"));let res = await patch(`/api/infomation/${id.value}`, {img: values.uploader[0].content,name: values.name,gender: values.fieldValue,state: values.fieldValueTwo,degree: values.fieldValueThree,});router.push("/Me/me");
}
const afterRead = (file) => {// 此时可以自行将文件上传至服务器console.log(file);
};
const columns = [{ text: "男", value: "Boy" },{ text: "女", value: "Girl" },
];
const fieldValue = ref("");
const showPicker = ref(false);
const onConfirm = ({ selectedOptions }) => {showPicker.value = false;fieldValue.value = selectedOptions[0].text;
};const columnsTwo = [{ text: "在职", value: "in" },{ text: "离职", value: "out" },
];
const fieldValueTwo = ref("");
const showPickerTwo = ref(false);
const onConfirmTwo = ({ selectedOptions }) => {showPickerTwo.value = false;fieldValueTwo.value = selectedOptions[0].text;
};const columnsThree = [{ text: "初中", value: "secondary" },{ text: "高中", value: "high" },{ text: "中专", value: "technical" },{ text: "大专", value: "junior" },{ text: "本科", value: "undergraduate" },{ text: "硕士", value: "msc" },{ text: "博士", value: "dr" },
];
const fieldValueThree = ref("");
const showPickerThree = ref(false);
const onConfirmThree = ({ selectedOptions }) => {showPickerThree.value = false;fieldValueThree.value = selectedOptions[0].text;
};
</script>
<!-- 样式层 -->
<style  scoped>
</style>
效果图:

该页面通过vant4组件获取表单值,通过axios.patch修改数据
3.2我的在线简历页面
代码:
<!--* @Author: wu07 1732042133@qq.com* @Date: 2023-01-31 16:35:52* @LastEditors: wu07 1732042133@qq.com* @LastEditTime: 2023-02-03 15:59:07* @FilePath: \recruitApp\recruitApp\src\pages\user\Me\Resume.vue* @Description: 这是默认设置,请设置`customMade`, 打开koroFileHeader查看配置 进行设置: https://github.com/OBKoro1/koro1FileHeader/wiki/%E9%85%8D%E7%BD%Az
-->
<!-- 视图层 -->
<template><div class="body"><van-nav-bartitle="在线简历"left-text="返回"left-arrow@click-left="onClickLeft"/><div class="message"><span>基础信息</span><div><span>{{ arr.name }}</span><div><img :src="img" /><van-icon name="arrow" /></div></div><div><span>{{ arr.gender }}</span><span>|</span><span>{{ arr.degree }}</span><span>|</span><span>{{ arr.iphone }}</span></div></div><div class="job"><div class="intention"><span>求职意向</span><van-icon name="add-o" @click="addIntention" /></div><div v-for="(value, index) in arr1" :key="index" class="functions"><div class="left"><div><span>职能:{{ value.name }}</span><span>{{ value.money }}</span></div><span>工作地点:{{ value.place }}</span></div><van-icon name="arrow" @click="runTwo(index)" /></div></div><div class="experience"><div class="history"><span>工作经验(实习经验)</span><van-icon name="add-o" @click="addExperience" /></div><div class="content" v-for="(item, index) in arr2" :key="index"><div class="firm"><span>{{ item.firm }}</span> <van-icon name="arrow" /></div><span>{{ item.posts }}</span><span>{{ item.time }}</span><div class="part"><p>内容:{{ item.content }}</p></div></div></div><div class="educated"><div class="qualifications"><span>教育经历</span><van-icon name="add-o" @click="addEducated" /></div><div class="content" v-for="(item, index) in arr3" :key="index"><div class="school"><span>{{ item.school }}</span> <van-icon name="arrow" /></div><span>{{ item.time }}</span><div class="degree"><span>{{ item.subject }}</span><span>{{ item.degree }}</span></div></div></div></div>
</template>
<!-- 逻辑层 -->
<script setup>
import { get, post, put, del, patch } from "~/axios/http";
import { ref } from "vue";
import img from "../../../assets/images/u616.png";
// 导入useRouter方法
import { useRouter, useRoute } from "vue-router";
const router = useRouter();
// 返回上一页
const onClickLeft = () => {router.go(-1);
};
const arr = ref([]);
const arr1 = ref([]);
const arr2 = ref([]);
const arr3 = ref([]);
async function message() {let id = ref(localStorage.getItem("key"));let res = await get(`/api/infomation/${id.value}`);arr.value = res.data;arr1.value = res.data.num4;console.log(res.data.num5);arr2.value = res.data.num5;arr3.value = res.data.num6;
}
message();
const addIntention = () => {router.push("/intent");
};
const addExperience = () => {router.push("/experience");
};
const addEducated = () => {router.push("/degree");
};
const runTwo = (val) => {console.log(val);router.push({path: "/intentTwo",query: {index: val,},});
};
</script>
<!-- 样式层 -->
<style  scoped>
.body {background-color: #f2f2f2;
}
.message {width: 100%;padding-top: 2.6667vw;background-color: #fff;margin-bottom: 4vw;padding-bottom: 2.6667vw;
}
.message > span {margin-left: 5.3333vw;font-weight: bold;
}
.message > div:nth-child(2) {display: flex;align-items: center;justify-content: space-between;width: 90%;margin: 0 auto;
}.message > div:nth-child(2) div {display: flex;align-items: center;
}
.message div:nth-child(2) img {width: 13.3333vw;
}.message > div:nth-child(3) {width: 90%;margin: 0 auto;
}
.job {width: 100%;background-color: #fff;overflow: hidden;margin-bottom: 4vw;
}
.intention {display: flex;justify-content: space-between;align-items: center;width: 90%;margin: 0 auto;padding-top: 2.6667vw;
}
.intention span {font-weight: bold;
}.intention .van-icon {font-size: 5.3333vw;
}.functions {display: flex;align-items: center;justify-content: space-between;width: 90%;margin: 0 auto;padding: 4vw 0;border-bottom: 2px solid #e4e4e4;
}
.left {width: 60%;
}
.left div {display: flex;justify-content: space-between;margin-bottom: 2.6667vw;
}
.experience {width: 100%;background-color: #fff;overflow: hidden;margin-bottom: 4vw;
}
.history {display: flex;justify-content: space-between;align-items: center;width: 90%;margin: 0 auto;padding-top: 2.6667vw;
}
.history span {font-weight: bold;
}.history .van-icon {font-size: 5.3333vw;
}.experience .content {width: 90%;margin: 0 auto;display: flex;flex-direction: column;padding-bottom: 4.6667vw;border-bottom: 1px solid #e4e4e4;
}.content .firm {display: flex;justify-content: space-between;margin: 2.6667vw 0;
}
.content span:nth-child(3) {margin: 2.6667vw 0;
}
.part {background-color: #f2f2f2;color: #999999;
}
.part p {padding: 2.6667vw 1.6vw;
}.educated {width: 100%;background-color: #fff;overflow: hidden;margin-bottom: 4vw;
}
.qualifications {display: flex;justify-content: space-between;align-items: center;width: 90%;margin: 0 auto;padding-top: 2.6667vw;
}
.qualifications span {font-weight: bold;
}.qualifications .van-icon {font-size: 5.3333vw;
}.educated .content {width: 90%;margin: 0 auto;display: flex;flex-direction: column;padding-bottom: 4.6667vw;border-bottom: 1px solid #e4e4e4;
}
.educated .content .school {display: flex;justify-content: space-between;margin: 2.6667vw 0;
}
.educated .content .degree {margin-top: 2.6667vw;
}
.educated .content .degree span:nth-child(1) {margin-right: 5.3333vw;
}
.certificate {width: 100%;background-color: #fff;overflow: hidden;margin-bottom: 4vw;
}
.certificate .cert {display: flex;justify-content: space-between;align-items: center;width: 90%;margin: 0 auto;padding-top: 2.6667vw;
}
.cert span {font-weight: bold;
}.cert .van-icon {font-size: 5.3333vw;
}
.certificate .content {display: flex;width: 100%;flex-wrap: wrap;justify-content: space-around;
}
.certificate .content .credentials {width: 30%;background-color: #e4e4e4;padding: 1.3333vw 0.5333vw;text-align: center;margin-top: 5.3333vw;
}
</style>
效果图

该页面通过axios.get获取数据再通过v-for进行循环渲染页面
3.2.1求职意向修改页面
代码:
<!--* @Author: wu07 1732042133@qq.com* @Date: 2023-02-01 11:20:29* @LastEditors: wu07 1732042133@qq.com* @LastEditTime: 2023-02-03 16:20:35* @FilePath: \recruitApp\recruitApp\src\pages\user\Me\Intent.vue* @Description: 这是默认设置,请设置`customMade`, 打开koroFileHeader查看配置 进行设置: https://github.com/OBKoro1/koro1FileHeader/wiki/%E9%85%8D%E7%BD%AE
-->
<!-- 视图层 -->
<template><van-nav-bartitle="求职意向"left-text="返回"left-arrow@click-left="onClickLeft"/><van-form @submit="onSubmit"><van-cell-group inset><van-fieldv-model="result"is-linkreadonlyname="picker"label="求职类型"placeholder="点击选择职位"@click="showPicker = true"/><van-popup v-model:show="showPicker" position="bottom"><van-picker:columns="columns"@confirm="onConfirm"@cancel="showPicker = false"/></van-popup><van-fieldv-model="resultTwo"is-linkreadonlyname="area"label="地区选择"placeholder="点击选择省市区"@click="showArea = true"/><van-popup v-model:show="showArea" position="bottom"><van-area:area-list="areaList"@confirm="onConfirmTwo"@cancel="showArea = false"/></van-popup><div class="a">薪资要求</div><div class="money"><van-field v-model="value" placeholder="请输入" name="money" /><span>-</span><van-field v-model="valueOne" placeholder="请输入" name="moneyOne" /><span>k</span></div></van-cell-group><div style="margin: 16px"><van-button round block type="primary" native-type="submit">提交</van-button></div></van-form>
</template>
<!-- 逻辑层 -->
<script setup>
// 导入useRouter方法
import { useRouter } from "vue-router";
import { ref } from "vue";
import { areaList } from "@vant/area-data";
import { get, post, put, del, patch } from "~/axios/http";
const router = useRouter();
// 返回上一页
const onClickLeft = () => {router.go(-1);
};
const result = ref("");
const showPicker = ref(false);
const columns = [{ text: "会计", value: "Hangzhou" },{ text: "老师", value: "Ningbo" },{ text: "IT", value: "Wenzhou" },{ text: "税务", value: "Shaoxing" },{ text: "管理", value: "Huzhou" },
];
const onConfirm = ({ selectedOptions }) => {result.value = selectedOptions[0]?.text;showPicker.value = false;
};const resultTwo = ref("");
const showArea = ref(false);
const onConfirmTwo = ({ selectedOptions }) => {showArea.value = false;resultTwo.value = selectedOptions.map((item) => item.text).join("/");
};
const value = ref("");
const valueOne = ref("");
async function onSubmit(values) {console.log("submit", values);let id = ref(localStorage.getItem("key"));let arr1 = ref(`${values.money}-${values.moneyOne}k`);let arr = ref({ name: values.picker, money: arr1.value, place: values.area });console.log(arr.value);let res1 = await get(`/api/infomation/${id.value}`);res1.data.num4.push(arr.value);let res2 = await patch(`/api/infomation/${id.value}`, {num4: res1.data.num4,});router.push("/resume");
}
</script>
<!-- 样式层 -->
<style  scoped>
.money {display: flex;align-items: center;
}
.a {margin-left: 4vw;margin-top: 8vw;
}
</style>
效果图:
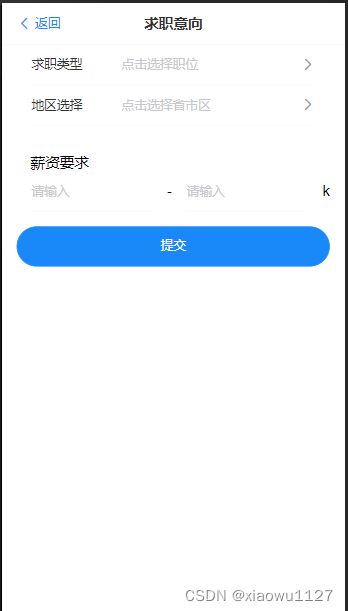
该页面通过vant4组件获取表单值,通过axios.patch修改数据
3.3我的意见反馈模块
代码:
<!--* @Author: wu07 1732042133@qq.com* @Date: 2023-02-01 16:58:23* @LastEditors: wu07 1732042133@qq.com* @LastEditTime: 2023-02-03 16:43:22* @FilePath: \recruitAPP\recruitApp\recruitApp\src\pages\user\Me\Opinion.vue* @Description: 这是默认设置,请设置`customMade`, 打开koroFileHeader查看配置 进行设置: https://github.com/OBKoro1/koro1FileHeader/wiki/%E9%85%8D%E7%BD%AE
-->
<!-- 视图层 -->
<template><van-nav-bartitle="意见反馈"left-text="返回"left-arrow@click-left="onClickLeft"/><div class="body"><div class="content" v-for="(value, index) in arr" :key="inex"><div class="one"><span>反馈类型:{{ value.type }}</span><van-button plain :type="value.color" class="bt">{{value.state}}</van-button></div><div class="two"><span>内容:{{ value.content }}</span></div></div></div><van-button type="primary" block @click="runAdd">添加反馈</van-button>
</template>
<!-- 逻辑层 -->
<script setup>
import { ref } from "vue";
import { get, post, put, del, patch } from "~/axios/http";
// 导入useRouter方法
import { useRouter } from "vue-router";
const router = useRouter();
// 返回上一页
const onClickLeft = () => {router.go(-1);
};
const runAdd = () => {router.push("/add");
};
const value = ref("");
const arr = ref([]);
async function message() {let id = ref(localStorage.getItem("key"));let res1 = await get(`/api/infomation/${id.value}`);console.log(res1.data.num7);arr.value = res1.data.num7;
}
message();
</script>
<!-- 样式层 -->
<style  scoped>
.content {width: 100%;padding: 4vw 0;border: 0.2667vw solid #e6e6e6;
}
.content div {width: 90%;margin: 0 auto;
}
.one {display: flex;justify-content: space-between;align-content: center;
}
.two {overflow: hidden;text-overflow: ellipsis;white-space: nowrap;
}
.body {margin-bottom: 5.3333vw;
}
.bt {width: 14.3333vw !important;padding: 0.2667vw !important;height: 8.6667vw;
}
</style>
效果图:
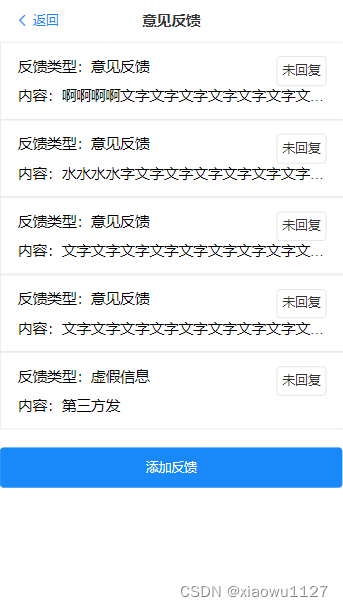
页面通过axioas.get获取数据
四、总结
这次项目有了招聘app的基础功能,但是还有许多细节需要完善。
这篇关于vue3+vite+vant4手机端项目实录的文章就介绍到这儿,希望我们推荐的文章对编程师们有所帮助!


